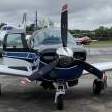
MooneyTunes Posted December 22, 2017 Report Posted December 22, 2017 The folks at Aero Confort have done it again! My 1983 glareshield has been in need of a face lift for some time. I finally sent it to the folks at Aero Comfort for a makeover. What came back from their shop is nothing short of a masterpiece! See for yourselves. 8
Kale McManus Posted December 22, 2017 Report Posted December 22, 2017 44 minutes ago, MooneyTunes said: The folks at Aero Confort have done it again! My 1983 glareshield has been in need of a face lift for some time. I finally sent it to the folks at Aero Comfort for a makeover. What came back from their shop is nothing short of a masterpiece! See for yourselves. That is nice how much did they charge for the work I have they same glaresheild @ what was the time line getting it back
Bartman Posted December 22, 2017 Report Posted December 22, 2017 That looks great ! I'm about to send off my Yokes for leather wrap and if they can make the glare shield look that good at the same time I might just do that too.
DonMuncy Posted December 22, 2017 Report Posted December 22, 2017 They really do that good a job. They did mine. I don't remember the cost or the turn-around time, but I remember the cost was reasonable and the turn-around quick.
markejackson02 Posted December 22, 2017 Report Posted December 22, 2017 Does that have the lights installed?
DonMuncy Posted December 22, 2017 Report Posted December 22, 2017 Just now, markejackson02 said: Does that have the lights installed? Mine did.
MooneyTunes Posted December 23, 2017 Author Report Posted December 23, 2017 (edited) turnaround time was 7business days. And the weight gane is negligible. Ounces. This one does have the brow lights. Edited December 23, 2017 by MooneyTunes
MooneyTunes Posted December 23, 2017 Author Report Posted December 23, 2017 Total cost was $575. This includes $75 to remove, clean and prep for covering. Mine had been poorly covered with cloth. If you have a plain Mooney glareshield the cost is $500.
aviatoreb Posted December 23, 2017 Report Posted December 23, 2017 WOW - that looks great. I wish I had done that when I sent my yokes in to aerocomfort earlier this year - I would have if I had known they do this. I will do this my next annual.
milotron Posted December 23, 2017 Report Posted December 23, 2017 3 hours ago, MooneyTunes said: Total cost was $575. This includes $75 to remove, clean and prep for covering. Mine had been poorly covered with cloth. If you have a plain Mooney glareshield the cost is $500. I spoke with Hector to schedule mine for next year. They have raised the cost to $550 for 2018. Evidently the glareshields that get sent in are getting worse and worse... iain
nels Posted December 24, 2017 Report Posted December 24, 2017 (edited) Is a 201 glareshield difficult to remove?? I looked at removing mine in order to get to the A pillar trim for redying but wasn't sure how to proceed. Nice work on yours. Like the white stitching. Edited December 24, 2017 by nels 1
PTK Posted December 24, 2017 Report Posted December 24, 2017 16 minutes ago, nels said: Is a 201 glareshield difficult to remove?? I looked at removing mine in order to get to the A pillar trim for redying but wasn't sure how to proceed. Nice work on yours. Like the white stitching. Two screws, one on each side on top and one in the middle that holds the cover piece for the down tube slot. A short tip 90° phillips screw driver helps. Space is tight there under the windshield especially the middle one. The glareshield lifts out with a little encouragement. Also need to disconnect the plug of glare shield lights. You'll see it as you lift the windshield a little. I removed mine and refinished it when I did my interior plastics. Cleaned up nicely. Painted it with a nice flat SEM colorcoat black. Looks like brand new.
nels Posted December 24, 2017 Report Posted December 24, 2017 Just now, PTK said: Two screws, one on each side on top and one in the middle that holds the cover piece for the down tube slot. Need a 90° phillips screw driver. Space is tight there under the windshield especially the middle one. The glareshield lifts out with a little encouragement. Also need to disconnect the plug of glare shield lights. You'll see it as you lift the windshield a little. Thanks!
bradp Posted December 25, 2017 Report Posted December 25, 2017 I did my glareshield in leather with a french seam - it fits so snugly that those annoying side screws can be neglected and the glareshield is secure with just the middle. @MooneyTunes did hector use a layer of foam scrim under the leather? He probably used headliner glue as the temperatures under that glareshield are impressive. Standard stuff doesn’t work well.
jetdriven Posted December 26, 2017 Report Posted December 26, 2017 SO will these. http://m.sears.com/craftsman-3-pc-screwdriver-set-finger-bit/p-00941390000P
kris_adams Posted December 28, 2017 Report Posted December 28, 2017 I've had those sitting in my toolbox looking for an excuse to use them! @MooneyTunes Have you reinstalled permanently? I don't see the 2 screws in your picture. Just wondering if it was hard to re-align the holes as it looks like they are covered over. Looks amazing btw!
MooneyTunes Posted December 29, 2017 Author Report Posted December 29, 2017 I also left out the screws. I used industrial strength velcro on the attachment point. The glare shield is snug and well anchored. 1
Recommended Posts