

Marc_B
-
Posts
594 -
Joined
-
Last visited
-
Days Won
1
2 Followers


Recent Profile Visitors
2,626 profile views


Marc_B's Achievements
")


-

Garmin updates - anyone besides me having trouble?
Marc_B replied to hubcap's topic in Miscellaneous Aviation Talk
Interesting. I guess I never waited that long and just updated the cards right after which resulted in databases "downloading" followed by "installing". -
Garmin updates - anyone besides me having trouble?
Marc_B replied to hubcap's topic in Miscellaneous Aviation Talk
@dkkim73 if you clear the downloads, they will re-download when you are trying to update your cards, not automatically. I don't find the calendar view as helpful except to see when my current subscription runs out. And I typically just update one card at a time (not database sync). I find less quirks that way. -
Garmin updates - anyone besides me having trouble?
Marc_B replied to hubcap's topic in Miscellaneous Aviation Talk
It appears there was a new update to the Garmin Database Manager. It often seems like there is quirks every time it updates. But when that happens the two things I try first are restarting the computer and clearing downloads and download a fresh copy (see screen shot). That seems to work 9/10. I have had an issue with FliteCharts that I had to delete that folder from my SD card and reload. However, when I go down that path I usually call Garmin Aviation Support as there's been time that they have me copy files to the re-save back to the card. Same thing with re-formating.
-
I was thinking the same thing...and on their prices this doesn't include initial onboarding/scanning of documents. Even Adobe Acrobat Pro is only $19.99/month.
-
But in all seriousness, I'd suggest scanning all the documents and using something with OCR (optical character recognition) so that it's all searchable. If you have that much stuff, this would make it WAY easier to find what you're looking for. Regarding the paperwork order, so many ways to separate out: maintenance, STCs/FAA, oil analysis/engine monitor data, registrations, financial paperwork... lots of overlap in some papers.
-
I prefer autobiographical! ha ha. Sorry, couldn't resist. (plus High Fidelity is a classic)
-
Flying with oxygen : recommended also for 20.000 plus feet?
Marc_B replied to Raffi's topic in General Mooney Talk
Moral of the story: with any equipment you should know failure modes and have a backup...backup battery, oxygen/tubing backup, backup plan. And realize that none of the pulse demand systems are mandatory use if you have a backup mask/cannula. But the benefit of oxygen conservation is real. One other point worth mentioning...for me, I like the pulse of oxygen. It's noticeable, but not annoying for me. If it disappeared, I would notice. (certainly you can spin reasons that I might not, but in general) Without oxygen flow, pulses would disappear. I also like the pulse because it doesn't dry out my nose and sinuses near as much as continuous delivery. I always have my boom cannula, tubing for the o2d2, and a back up cannula in a bag in the seat back pocket of my pilot seat. Easy to grab if issues. Also worth discussing is where you most frequently fly...for me it's high teens with occasional flight in FL. But mostly around 16-20K. This is the sweet spot for me for glide ring, safety options, oxygen conservation.... YMMV. -
Flying with oxygen : recommended also for 20.000 plus feet?
Marc_B replied to Raffi's topic in General Mooney Talk
I think the big take home point is that everyone responds differently to various oxygen equipment, different flight levels, and even from day to day (hydration, caffeine, poor sleep, overall health etc.) High flight and oxygen use is a risk that can be mitigated and minimized with proper planning. But it will never be zero like pretty much everything flying. I consider pulse oximeters and hypoxia training to be minimum price of entry. How can you know that you’re becoming hypoxic if you don’t understand what that looks like. How can you verify minor changes if you aren’t routinely monitoring your flow, pulse ox and equipment? Regarding cannulas above 18,000 or when to start using oxygen the FARs are a starting point but you should verify this yourself with the equipment you intend to use. From what I understand, the FARs were originally designed to allow the GA pilot to navigate mountain passes effectively without oxygen in most GA aircraft. But 12,500 feet or 14,000 feet is not a minimum physiological standard. Some people are fine WELL above that and some are not so good WELL below it. Best thing is take a buddy and a pulse ox up and verify how it affects you. With a nasal cannula I start to need increasing flow rates above 16-17k and its really ineffective above 18k…even it if was “legal” for me it’s a no go. The higher you go the lower partial pressure of oxygen is, without a nose and mouth covering you entrain more low oxygen content air with each breath. At a certain point it’s like adding only a spoonful of mix to a gallon of water and thinking you’re making lemonade. For me the MH O2D2 works well with a boom cannula on D10 (delayed turn on at 10k) up to 16k. At 16k I turn to F1 (lowest face mask setting) up to 18k. I use the MH mask above that and had to tweak the mic to get it passable and it’s still not as good as boom mic. But for me the MH mask on F1 is excellent for oxygen sat and keeps me at 98% at FL250. Get a CO detector and get a pulse ox (I keep one in my flight bag and a second hung always on the prop knob). And get good ones (or two!). As a doc I feel that anyone flying above 10k should have a pulse ox, for them and their pax use. But KNOW how to use it, how it works for you and what the limitations are. And get in a habit of using it regularly both for habit and for forming your baseline. It will make recognizing deviations a little easier. -
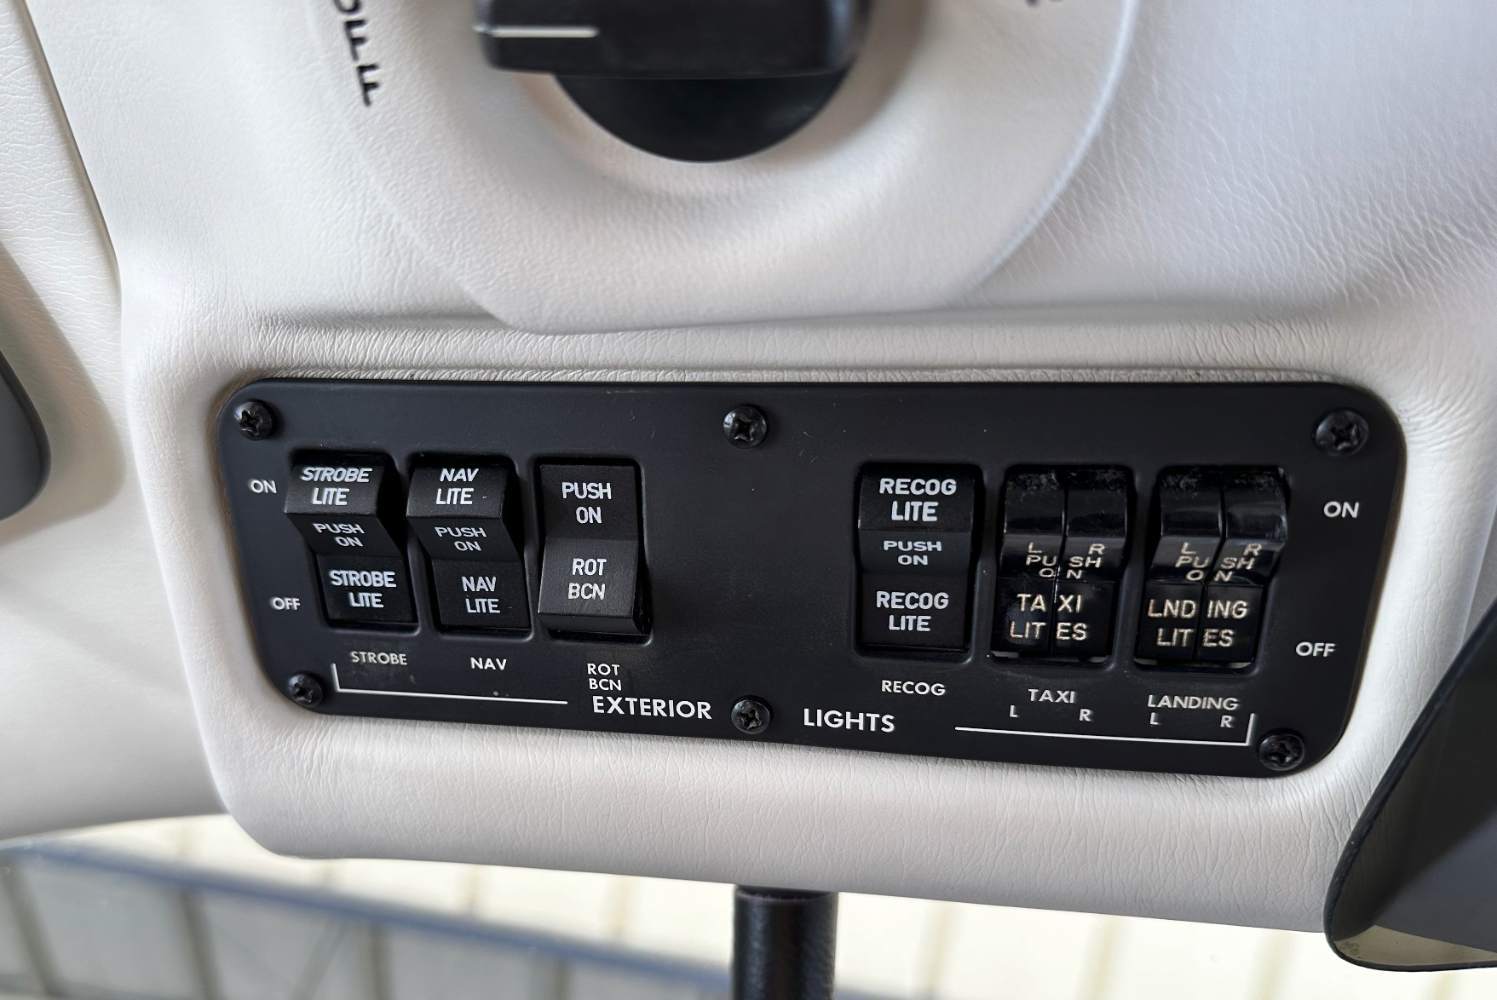
Agreed with light switches in two banks of 3...in flight vs airport environment...even if not in the overhead, I think it makes a lot of sense. strobe/nav/beacon recog/taxi/landing
-
@N201MKTurbo interesting...of course now it seems natural for Mooney...my windscreen is even high octane!
-
I sent my unit back into EI for the upgrade. Certainly looks more fitting with the Garmin screens. I didn't have mine installed originally so not sure how many options you have and how much is set spec to your aircraft. EI has been easy to work with with probes, screen upgrade and programming with fuel senders, and set up. For experimental you can have WAV files for warnings. I wish we had the option for that with certified!

-
I've got backups, just wondering what the issue is and if this is something that will be fixed, or just going out of business permanently? Like @Greg Ellis, I have an order at Spruce that was placed around the same time. Seems strange to have back-orders for so long. Just curious if anyone had the low down?
-
This has been on backorder for quite some time...not exactly sure why and when it will be restock...anyone have any info??
-
Creating a waypoint at the intersection of two radials on a GTN
Marc_B replied to PT20J's topic in Avionics/Panel Discussion
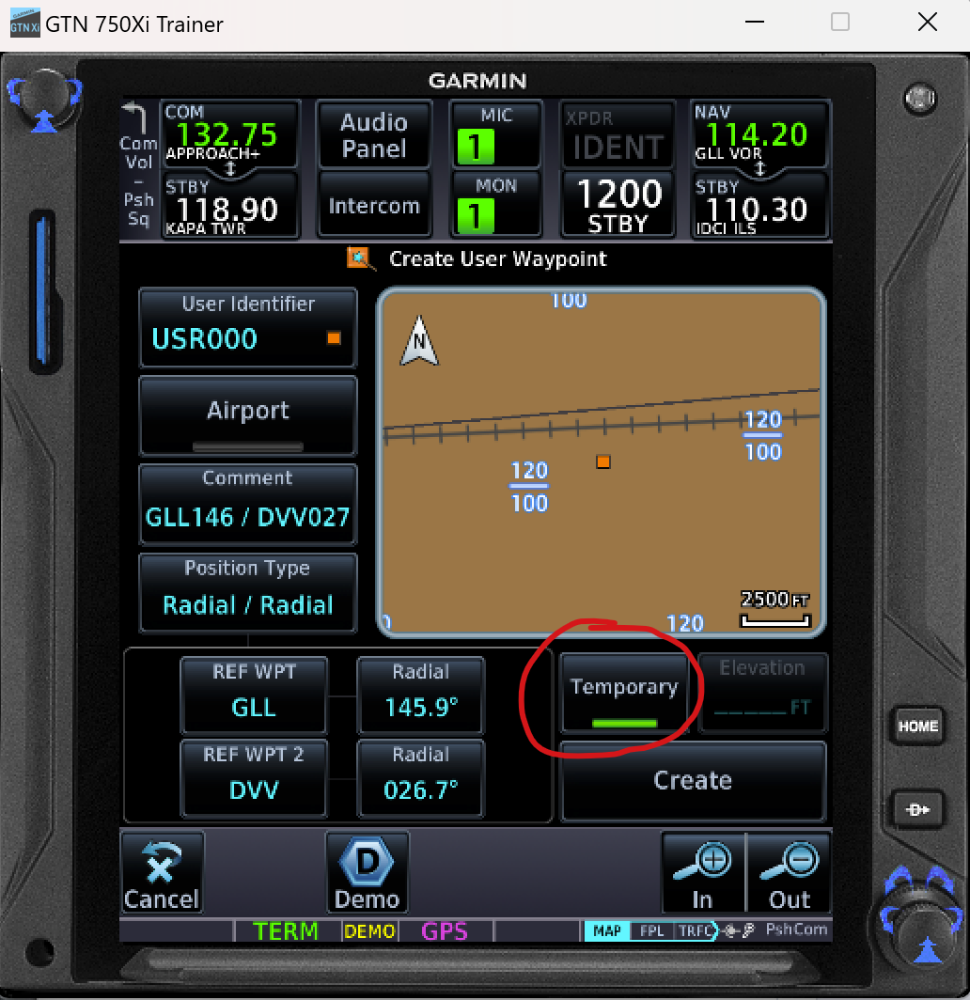
although I guess it does give you the option to create your waypoint there as well... So if you were trying to do this you'd have to then "Create Waypoint" at the map pointer, then you could "Graphically Edit FPL" and rubber band your flight plan track to that waypoint or just add it to the Flight Plan by name. I believe that the GTN only allows 1000 user waypoints to be created so there is a "temporary" button that will scrub the waypoint from the unit at power off. VS if you had a mountain pass you wanted to keep as a waypoint permanently. It doesn't default to temporary, so you have to manually choose it. Interesting that Garmin typically tries to identify map pointers as "Radial/Radial" rather than "Lat/Long"...whereas ForeFlight typically creates lat/long points when you graphically edit and rubber band your flight path. (EDIT: although this could have been because I previously had created a radial/radial waypoint so it defaulted to "last used" to create a waypoint on the map pointer...not sure)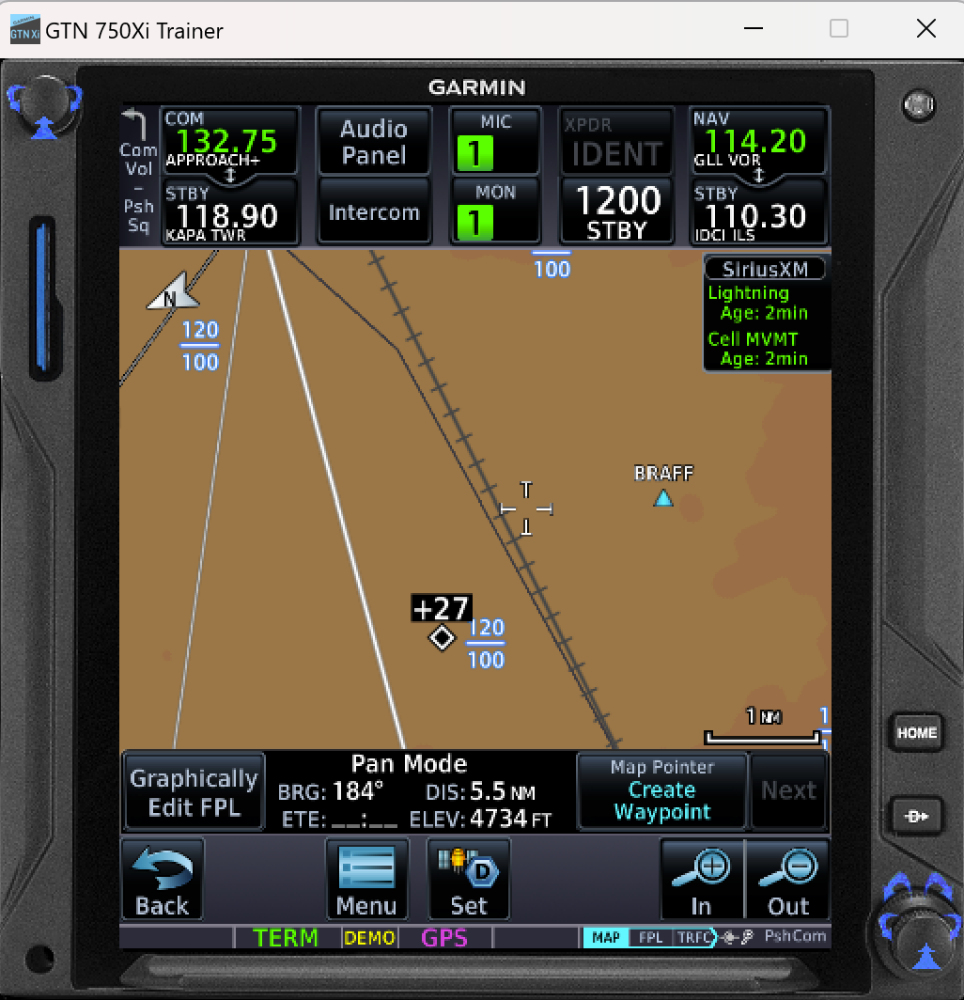
-
Creating a waypoint at the intersection of two radials on a GTN
Marc_B replied to PT20J's topic in Avionics/Panel Discussion
Ya, it's interesting that Foreflight allows you to graphically edit a flight plan and when you drop the rubberband gives you the option to either use the Lat/Long where you dropped it OR choose the nearest waypoint. If you click on the map on the GTN, Garmin does allow you to graphically edit the flight plan as well but only gives you the option to use waypoints in the database (including existing user waypoints you created).

