Leaderboard


Popular Content
Showing content with the highest reputation on 08/31/2023 in all areas
-
I called Anthony tonight , and all is well... He has put down the keyboard and ventured out to smell the roses for a little while.... No problems , or issues , just didnt want to commit the huge amount of time , that he has been for all these years.... He will be back , e v e n t u a l l y ..... Carry on....22 points
-
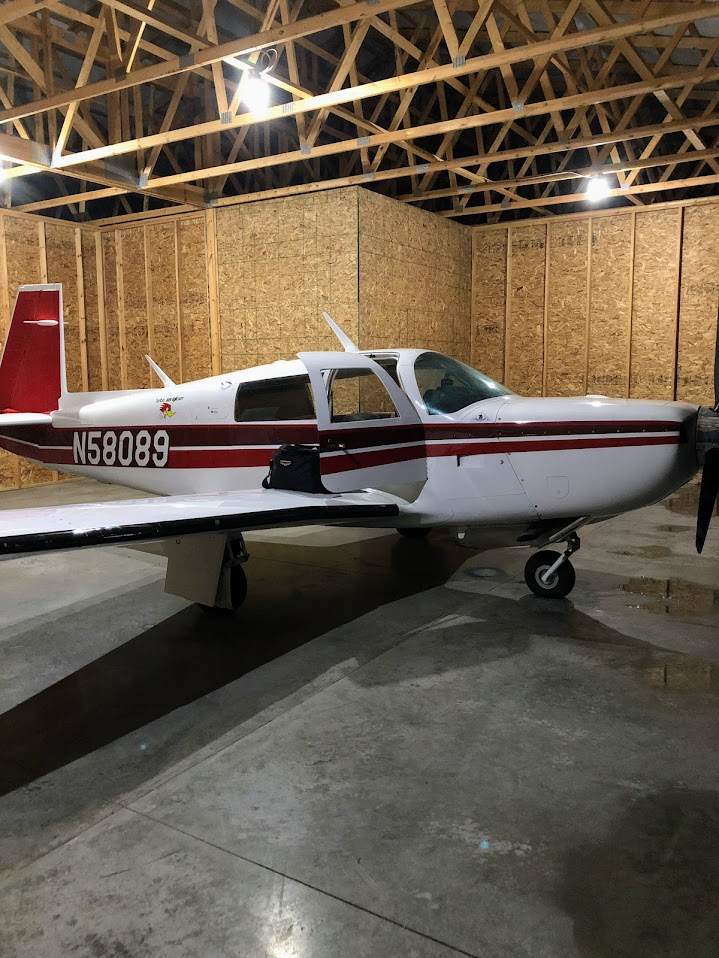
“It’s an old story, one you’ve probably heard before” - Naven Johnson August marks 1 year of ownership of our J. It’s a fantastic plane. During the purchase process the seller was terrific, we completed a thorough pre-buy that we converted to an annual. Flew the plane from Maryland to Oregon trouble-free and we’re able to enjoy the general aviation culture tremendously! We put 27 hours on the clock from checkout through arrive at home. Since arriving home, we have only been able to put 2.3 hours on the clock. Do to a non-movement prop strike (entirely my fault) that caused enough damage to the prop to require a tear down inspection (prop had to be removed for repair, necessitating the tear down) the plane has now been down since October of last year. The delay is primarily due to the scarcity of parts. Prop came back repaired and overhauled without a hitch. Engine was removed and delivered to the engine builder. Due to workload, the disassembly didn’t take place for a 8 weeks. Once disassembled, the case was found to be fretted so it was sent off for repair. Turns out the fretting was beyond spec for repair so a new case is needed. Calendar continues to march forward and we wait for a case. Finally in June a case comes available (A3B6D cases are hard to come by these days). We actually ended up going with a roller case jetdriver Byron had after all the waiting. Once the case issue was handled, the engine shop notified me the cylinders were out of spec due to corrosion, the oil pump had something go through it that scored it up precipitating the need for replacement, one of the oil back lines had been cut by something, the crank is fine but the gear and 1 idler are pitted to the point of replacement, cam has to be replaced (was a part of the decision to go with the roller case), accessory cover has issues needing replacement. Not sure if this is everything yet. Needless to say, this has turned nearly into the worst case scenario for a new owner. With a mid-time engine showing reasonably regular use, we expected to have some time to prepared for additional investment -guess not. Those who know me well, know I always look for the silver lining. I believe in nearly every circumstance there is a silver lining - sometimes you gotta look damn hard, but there is always one to be found. For us, the silver lining is we weren’t in the air when something broke loose. And, once through this, we should have a safer airplane for a while (fingers crossed!). I write this post as an example of what can happen and to, unfortunately, prove what many here say about being prepared to put significantly more money into a plane the first few years of ownership. Sometimes it’s the luck of the draw, you can do everything possible to eliminate the “big” issues via thorough inspections. Sometimes you do all that and still get bit. One thing I want to make sure is clear - no “blame” falls on anyone - it just is, what it is. For everyone looking to get into plane ownership - don’t let this scare you away, rather keep it in the back of your mind that it CAN happen and prepare accordingly. Not sure when we’ll be back in the air but dreaming of it every day. Even with this setback, our passion for general aviation has not waned one bit!6 points
-
^^ This. If you have a weight-and-balance sheet showing this configuration (seat removed) then you're golden. This is the same as removing the rear seat for cargo space, you just need a W&B sheet showing that configuration. They're not hard to do, and it'll cover any potential issues.5 points
-
I have a feeling it is the world at large, not just Mooneyspace….4 points
-
Waxed her tonight. She looks purdy...
 4 points
 -
Well one very expensive solution for paint chipping on leading edges - put a titanium shield there - that's a side benefit of TKS is there is no chipping paint issue.3 points
-
I don’t care where the thermocouple is mounted; if your take off EGTs are 1450, your engine is not rich enough. Have you ever seen an O360 that would generate a peak EGT of 1700? Regardless of thermocouple position, certain things are obvious from raw numbers.3 points
-
Yea, SAL-70 is the guy. Pros: it's worth it. Good power even at idle RPM, so good for prolonged taxis. Cons: it's a very extensive job. Both field and output wiring need to be re-routed. Fishing for the field wire in the cross-firewall bundle on its way to the master switch (it's a double-pole switch) without removing avionics from the panel was not easy. I reused that same wire between the Alt switch circuit breaker and regulator. I had an unused switch next to the avionics switch on the bottom row of switches on the left side of the panel, so used that slot. I recommend installing the alternator indicator lamp, which requires laying down another cross-firewall wire. I didn't use the supplied lamp, because it doesn't match my panel, so I re-used the MS25041 that I had saved from the removal of the vacuum system as it's the same as those for gear up and down. But, the regulator port can only sink 100mA, so I had to get an LED bulb from Aerolights. I installed the 70A circuit breaker, because why not. While I was at it, I re-did the busbar, because previous guys/their mechanics added jumper wires over the years instead of metal across different CBs on the bus bar, which my IA had confirmed that was not unairworthy, but I like a clean, single bar, i.e. one-single piece of metal. I also replaced all of the old style Tyco CBs with new style Klixons. As regards the installation, the generator is slim and deep, whereas alternator is fat and shallow, which requires re-doing the front baffle. You get to see your injector/throttle body from both sides and I think it improves down air flow from the cylinders. Alternator cooling slits make it hard to seal the baffle around the alternator itself. Another thing is the belt. There is only one part number on their STC, which refers to a Piper, and that belt would actually be too long for my installation (I dry-fit the system with a a rope to find the acceptable range of belt lengths while I moved the alternator all the way up and down on the adjustment bar). I called Hartzell about it and they were pretty cool about it. They said to follow AC43.13. I managed to re-use the existing alternator belt but another guy with a C model here had to get a longer belt. That means prop off&on... Good luck. PS: if you can wait, wait till one of those unflyable months. It really takes a lot of time...2 points
-
@FlyingDude just changed his generator for that alternator. (I recommended he keep the generator.) Hopefully he will give a report?2 points
-
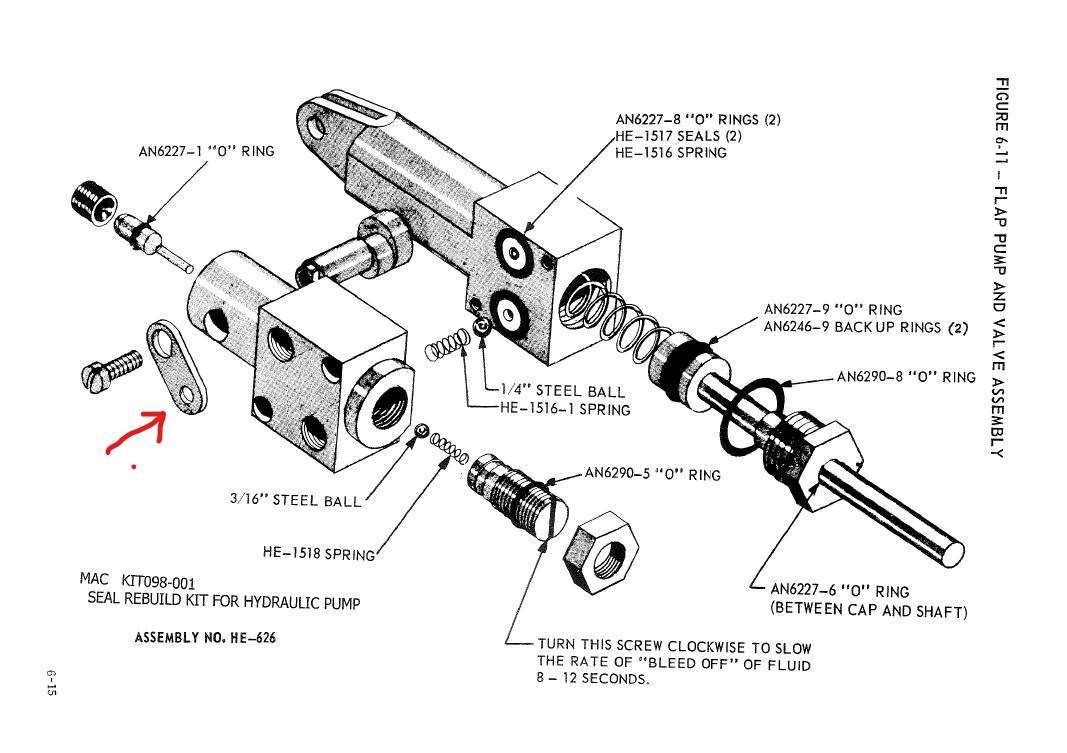
First step is to check that the flap release cable (#67 in diagram below) is correctly adjusted and properly secured at the pump (red arrow under #51). The release cable is attached to an arm (red arrow) that rotates a cam shaft that unseats the check valve for the return circuit. You and your mx need to ensure that the valve is off the cam with the cable in the down position. If this does not solve your problem, then you likely have a valve leaking back to the reservoir.
.jpg.7ca0b5dfa161acccf6a2539c961a480e.jpg) 2 points
2 points -
You might be a red neck pilot if you have flown a plane sitting on a Home Depot bucket….2 points
-
The leading edge of the wings are painted black and I've had more than one person ask me why. It *looks* like deice boots, but it's just painted on. Maybe the reason is now becoming self-evident- only the leading edge need be repainted vs the entire wing. Thanks for all the tips!
 2 points
 -
Swave and deboner. From the book ChickenHawk which is a pretty good read, mostly for Army helicopter pilots, but it is an aviation novel. https://www.amazon.com/Chickenhawk-Robert-Mason/dp/0143035711 I’ve probably been called Redneck, Cracker, Whitey and a few others, but think of my self as “Southern Gentleman”2 points
-
1967 M20F....using Aspen 2500 ProMax.....No Vac pump. Installed STC electric step kit actuator also.
 2 points
 -
These are old aircraft, with anything of this age you take your chances. It’s just part of the game. If we were buying 40 yr old cars probably similar results, difference being cost of the parts. I bought a 19 yr old house, I’ve had to replace the pool heat pump, had to have the house replumbed this year and the roof isn’t going to last much longer. Roof 40K, pool heat pump 4K, replumbing, 10K. Flip side to that is I’d guess average Mooney sells for 100 -200K, new similar airplane 1Mil. As a mechanic my guess is that likely the majority of flying engines if torn down will require parts as there will be some out of limits, now they continue to operate fine, but once a Certified mechanic disassemblies anything and finds non airworthy items they can’t put those parts back into an engine or airframe. I’ve had arguments with a few on this forum saying there is no requirement to inspect, they expect me to put beer googles on and not look at anything, but there is no way that I or any other competent mechanic would do that. If I were you I would have a talk to the engine builder of how much more would it cost to call it an overhaul, and reset the overhaul clock. But this is the exact scenario I try to get people to listen to that have to borrow money to purchase a 40 yr old airplane.2 points
-
I flew without the copilot seat a couple of times while I was working on the interior of my plane, and once mentioned this to the main pilot at our field, an old weathered guy who always does everything by the book. He said that if I wanted to continue this way, I should calculate a new Weight and Balance for the situation without the seat, and keep that document in the plane. He said that would look very well to an inspector, show that I thought about the issue and was careful about it.2 points
-
Yeah, they're pretty bad! War Eagle!!2 points
-
I'm firmly in the camp of if it ain't broke, don't mess with it. I've looked into this a lot. Eaton never had a recommendation about maintenance on these as far as I can tell until they had a failure of a no-back spring that was probably due to a bad manufacturing lot of springs. That was many years ago. The 1000 hours seems to have come from Mooney and was due to the failure of two springs in Plessey actuators (different design) at a little under 1000 hours each. The 1000 hours is really meaningless. It's cycles that are important. Don Maxwell told me that the Eaton actuator is rated for 20,000 cycles. If you cycled the gear once per hour of flight time, that would be 20,000 hours. So, figuring that any bad springs have worked their way out of the installed base by now, I see no value in messing with it. I think about it this way: The only reason to mess with it is fear of failure. After I had it serviced, I would have to worry about a maintenance induced failure. Same difference -- I'd still have something to worry about and there is no objective means to tell which is better. By the way, when I asked Don about it he said not to mess with it unless it was making an unusual noise. Skip2 points
-
I've got around 900 hours in my Rocket over 5 years. A couple operational things really stand out with those numbers. Firstly, I don't fly with gear down and less than prop full forward. If my gear's down, it means I'm on approach to landing, which means I need to be ready for a go around so my prop will be full forward. I also fly my instrument approaches at around 120kts. If it's a GPS approach, MDAs are generally a bit higher and if it's an ILS, I'll have at least a couple thousand feet of runway as airports with ILS approaches tend to have at least 5000ft of runway and I can get rid of that airspeed once I've got the runway in sight. My approach power configuration is prop full forward and 15" of mp. I usually land with the speed brakes extended. Home airport is 2800ft runway with high DA and I have single piston brake calipers and she likes to roll a few hundred feet after touching down. I often will use a little rudder before the touch so I can set one wheel down first to cushion the landing and if it feels like I'm about to plop down, I'll take the rudder out and/or add a touch of power for a smooth touch. When coming in to land with four people and bags from a short flight, when she gets below around 100kts, it sometimes requires full power to arrest a descent with the gear down in a banked turn. Don't be afraid to add as much power as it takes. I climb at 100% power until I reach altitude, even if it's FL240; it needs low boost at around FL180 and I need to climb at over 120kias around that altitude for cooling. The book for the TSIO520-NB variant has the performance shown as rated at 100% power continuous; other variants of the engine are limited to 5 minutes or so. https://www.n57825.com/docs/TCM_TSIO520NB.pdf . I do have an EDM900 that shows all CHTs and I climb to keep them under 400 and I keep TIT under 1600. Here in Florida, I cannot comfortably fly at 105kts in cruise. It feels like slow flight, efficiency drops and temps go up. I'm running a SureFly emag and fine wires, but no gamijectors yet, and it's tough to run LOP smoothly at higher power settings. The SureFly gives what amounts to an effective timing advance by not having the condenser delay and running at lower RPM helps to facility LOP ops, but I don't really have the discipline to go slow. I typically cruise at 2400/32" except in cases where it can mean avoiding a fuel stop, and I'll go 2300/29" or 2200/26" if I absolutely have to. Down low, I get around 16gph at 2300/29 and that goes closer to 19/20gph up high because of the additional work the turbo has to do, which means higher IAT, which translates to higher EGT/TIT.2 points
-
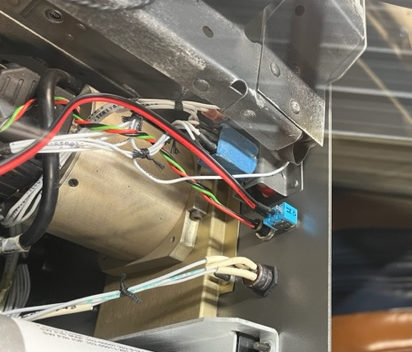
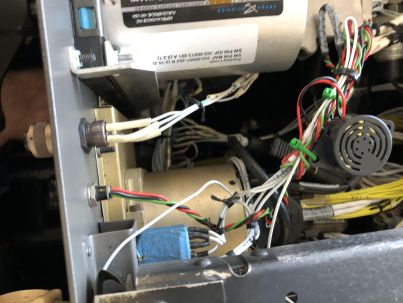
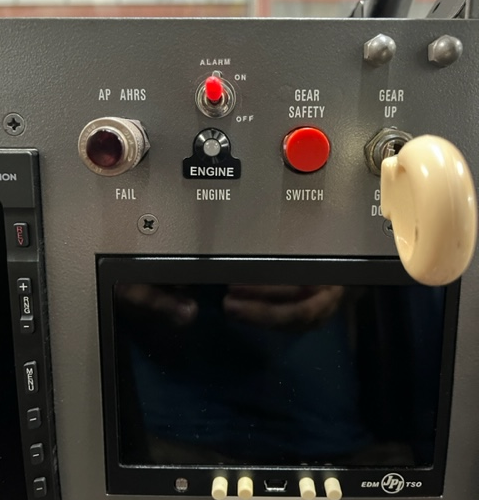
I do a lot of Cross Country flying which includes a fair amount of Auto Pilot. My trip from Florida (KINF) to DC (KVKX) takes approximately 4 hours, if the wind is right. I love my EDM 900 and it gives me a level of comfort I didn't have in my previous aircraft without an Engine Monitor. It has saved my on at least 2 occasions where engine trouble caused me to declare an emergency. On a recent flight I was reading a magazine and when I put it down to change frequencies, I noticed the yellow warning light was blinking. A quick scan of the EDM 900 indicated "Low Fuel" which was not a big deal as the alarm is set for 10 gallons (almost an hour of gas) and I still had 20 in the other tank. Although this situation was not a big deal, I started to think about how long the light could've been flashing without me knowing. I'm sure I was reading for over 5 minutes... I contacted JPI to see if they had a terminal connection for an audible output. NOPE. Just the LED light alarm output. I asked about adding an audible alarm and he agreed that it wouldn't make any difference if I wired it into the light circuit. The EDM 900 has a 3 wire alarm circuit where the Black wire provides power and the Red (Red Light) and Green (Yellow Light) wires provide ground to complete the appropriate circuit. So if I wired a small speaker with the hot side from the circuit breaker and the ground tied into the red or green wire, I would get an audible alarm when the light was lit. That became my plan, so I wanted to share how I did it. First, I installed the audible alarm by connecting it to the Red Alarm Light. Unfortunately I chose a beeper that was the same sound as my gear alarm, but at least the gear alarm is intermittent and the EDM alarm is continuous, so I know the difference. Second, I added a second alarm for the Warning (Yellow) circuit. I could have used the same but found a "buzzer" rather than a "beeper" that I liked and it would give me an audible difference for Red (Beeper) and Yellow (Buzzer) alarms. Third, I considered my last Emergency situation where I lost a cylinder at 15,500' and had a 20 minute descent to the closest airport. I think the continuous audible alarm for 20 minutes might ADD to my STRESS rather than help the situation. After all, I am mainly concerned about not noticing an alarm on a long cross country, when I might be reading or watching a movie and only glancing at the panel from time to time. I don't want a "YELLOW" to go unnoticed until it becomes a "RED" or worse. The audible alert solves this issue, but creates another one with extended situations where it may add to the stress. I realize I can "clear" warnings but they do come back after a few minutes and it's one more thing to worry about. For this I decided to simply install a switch that I can use to silence the audible alarm, but will have no effect on the visual LED alarm. This was an easy add-on and took me longer to label the panel than it did to install the switch. Ultimately, it works like a charm and as I designed it so I'm super happy with the results. I feel I have added an additional layer of safety that makes me feel more comfortable on long XC trips. Piezo Beeper Buzzer 12V-85dB VONVOFF Toggle Switch 12V I will go over the simple steps I used to complete the task and try to reference the photos. Step 1: Remove the Glare Shield Step 2: Locate the Circuit Breaker for the Engine Monitor and Disconnect Step 3 Connect a wire to the "cold" side of the circuit breaker Step 4: Run the wire to the center of the console, behind the Remote Engine Alarm Light Step 5: From the Beeper, Connect the Red Wire to the wire coming from the Circuit Breaker and connect the Black Wire to the Red Wire on the Remote Engine Alarm Light. (The circuit is completed by the EDM 900 connecting the light to ground, therefore, the wire from the circuit breaker represents a "hot" lead and is connected to the Red Wire on the Audible Alarm Beeper. The Black Wire from the Beeper is connected to the Red Wire from the EDM 900 (which drives the Red Warning Light). This is done with an in-line connection, so when the EDM 900 completes the circuit to illuminate the Red Light on the Remote Engine Alarm Light, it also completes the circuit for the Audible Alarm Beeper.) Step 6: Repeat Step 5 for the Buzzer on the Green Wire (Yellow Light Circuit) Step 7: Wire the switch between the circuit breaker and the hot wire used for both speakers. In this case I used a white wire from the Circuit Breaker and it connected to the Red Wire for each speaker. Opening the switch will disconnect the power to each speaker, so it will not sound when the LED light circuit is grounded. Step 8: Drill a 1/4" hole in the panel to mount the switch and label properly. Step 9: Install the Switch into the panel. Step 10: Make sure all connections are soldered and protected with shrink wrap tubing. Step 11: Zip Tie all loose wires and the Buzzers to the wire loom to avoid entanglement in the controls. Step 12: Turn on the Circuit Breaker and Test Step 13: Replace the Circuit Breaker in the Panel Step 14: Replace the Glare Shield ***Alarms sound during the initial boot up for the EDM 900, along with the warning lights. Well that's it! It took less than an hour to complete. Of course, everything was overseen and inspected by my A&P IA. Ultimately, it works like a charm and as I designed it so I'm super happy with the results. I feel I have added an additional layer of safety that makes me feel more comfortable on long XC trips. I'll include a couple of images for you to see. Let me know your thoughts and if you would do anything different. Thanks, Chris N231JY


 1 point
 -
I’ve often heard of the advice regarding multiple weight and balances but I really don’t understand the need. If I put in a negative number representing the weight of the front seat in my normal weight and balance then I have an accurate weight and balance. Seems like people are really overthinking this issue. Not saying the FAA won’t make your life difficult. I’m just saying the math is pretty obvious.1 point
-
I think your attitude is what makes the difference. preparing by having the right expectations makes all the difference. This may make you feel better…. I bought an Aerostar in august of 2022 and flew it directly to the shop for for avionic upgrades. It still is not complete and insurance has become a real problem for this plane and me. An entire year… and they told me it would be four months. Here is the best part, no real surprises or problems, just people not caring about how it affects the customer. I prepared myself for this mentally, and know I will enjoy it when it finally makes it home..1 point
-
As mentioned @AH-1 Cobra Pilot is producing switch caps for both Klixon (he has been doing this for years) and now ETA Switches. I had a friend do the ETA print file, and AH-1 Cobra Pilot fine tuned it. He prints them, sands them, painted them white, then laser etches the logo, then clear coats them.1 point
-
It also means you can see if you start getting ice. And if you can get to sunlight, it will melt the ice quicker.1 point
-
Usually their face when they face plant on the wing. The only thing holding them up is a spring and they will go down when stepped on. Mark1 point
-
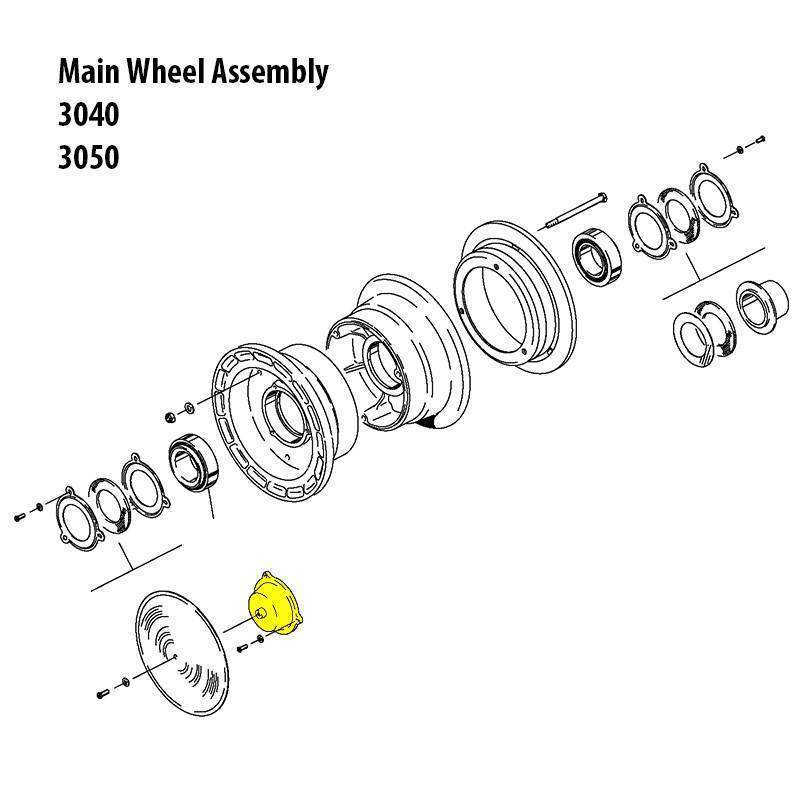
Your wheels shouldn't be throwing a lot of grease. First, there is a felt seal that is supposed to keep the grease in, and water and dirt out of, the bearing. They are not the best seals. Parker now makes rubber ones that are better but expensive. The felt ones, can easily be replaced if they are worn out. Second, some people use way too much grease. The grease only goes in the bearing itself, and just enough to pack it. BTW, the recommended grease is now Mobil SHC 100. If you do put on hubcaps, take note of the screw size in the IPC. They are pretty short. If too long a screw is used, it will poke through the soft magnesium wheel rim into the tire. Skip1 point
-
There seems to be a lot of this going on in the federal justice system these days. If they want to get you, they will get you.1 point
-
@av8or99 Just had the Plane Power SAL12-70 put in last week. Nice unit and it's 2 &1/2 pounds lighter.1 point
-
@Bobaran I'd think p/n 158-01000 is your best bet. I had mine replaced at annual in April due the cotter pin scoring the inside of them. I bought a pair of salvaged ones for $170 from Wentworthaircraft.com Brand new price was $500 for just one from a source I can't remember anymore. Fifteen dollars is way better than $170 but metal is way better than plastic. Just my .02 cents.
 1 point
 -
this is why I say engines are a crapshoot. and pulling cylinders on a pre buy is silly. It does not sound as if anything was found that would have made it come apart in the air. The good news is that you will have a mostly new engine to fly behind for a good while.1 point
-
@good2eat thank you for your honest writeup. Aviation is not for the faint of heart, both in the air and sometimes even on the ground. I had a similar experience with case fretting discovered in January 2020, and I paid dearly for a used case. If you remove a cylinder or split the case on a Lycoming IO-360 that has been in service for a long time, be prepared to find more than you bargained for. If I ever do this again, it will be a Lycoming exchange.1 point
-
I have never flown a Rocket or a big engine long tail, so I have no idea. Just sharing my experience in a M20K 231 with a TSIO-360-MB installed via STC. I would probably experiment with different power settings and use the ones that result in lowest temperatures using modern engine instrumentation. As far as I know, most now agree that high heat is bad for engines, and the cooler you can keep things, the better. I believe some of the early recommendations from the 80's to decrease power for the climb were based on the idea of "reducing engine wear," "taking it easy on the engine," and "fuel efficiency", and that many of those ideas have been disproven. Remember these machines left the factory in the 80's with an analog single probe CHT gauge and no fuel flow meter. They were also designed to just replace a cylinder after it gets fried. But it's also airframe dependent. New or worn out baffling could change how your engine responds. I don't know what cowl flaps your Rocket has. My 262 has the infinitely adjustable ones controlled by an electric motor that were installed as part of the STC. 231's with different cowl flaps might do better at different power settings. Some do believe that RPM = wear, and that lowering RPM increases engine life. The idea is that the fewer revolutions the crankshaft makes, the less all the parts inside rub on each other. That makes sense to me. But in my plane, reducing RPM to 2500 for the climb results in significantly higher internal temperatures, so I usually do not do it.1 point
-
Gotta ask. How does one damage a prop in a non movement scenario to require an engine tear down ? And what is case “fretting”? Doesn’t help much but I spent the first couple of years working on my F before I could turn the key and enjoy it.1 point
-
lol… being from the South and kinda a Redneck I’m offended….. just kid’n, I don’t get offended1 point
-
I used https://hangarflying.com/ to help plan my panel out. It's a great tool for playing around with designs. Here is my completed panel. After ~40 hours with it, I love it so far. Everything is easy to reach and visible. I use the tablet to push IFR routings to the GNX 375 which auto fill into the G3X. It's very easy to use. I use the second 7" G3X for a larger map most of the time, and fail-over in case the 10" screen dies. In case of a 10" screen failure I would need a second screen to control my audio panel and radios since everything is remote. GNX 375 is a great deal for what it is. Screen size of the GNX 375 is a non issue for me since I have the 7" G3X, except for flight plan entry. That can be a bit of a pain if you have a lot of points on the GNX 375. Transponder integrates seamlessly with G3X. It also has built-in bluetooth for flight plan transfer and connection with your tablet for ADS-B, AHARS, etc. Autopilot is amazing. I use indicated airspeed mode for climb with altitude select to intercept my altitude. I don't really need the tablet, but it's nice to have to manage the flight plan. I got a 10+ point route from ATC the other day. It would have been a hell of a thing to get into the GNX 375 directly. Only down side. I don't have a nav radio. I haven't missed it so far, though I know many of you would. I don't fly (IFR) with bases under 1k anyway, so I don't currently miss it. Maybe one day there will be a way to add a remote nav/com.
 1 point
 -
Having seen literally thousands of these you’d be amazed just how much they all have in common. Sent from my iPhone using Tapatalk1 point
-
I watched the pros at the BMW factory in Greenville do paint chip repair. They use the very small artist's brush. They typically did not use primer. But the trick is filling the chip without getting ANY paint outside the chip. I haven't seen it done, but was told by a painter he uses a syringe to fill the chip.1 point
-
I don't have direct experience but, when I went to Ada, I think I recall that their Tornado Alley system wouldn't go to 38 inches. Again, not sure, but I suspect that makes a difference. The Rocket book says "balls to the wall" (or something like that) to push the most fuel. Also, Rocket wants that Continental fuel system set at the top end of the spec, or slightly richer. Rocket didn't like the idea of LOP when they created their documentation, but some Rocket people are able to do it. Of course, the issue is always heat. While I don't remember the exact question, I remember asking Deakin some question regarding the 252 at 28,000 and his one-word answer was "heat".1 point
-
Find the top automotive paint store. They can match color from an inspection cover (don't use one from the bottom of the wing or horizontal) and put it in a rattle can for you. No matter how faded your color, it will match. There is a lot more to it, but starting with the correct color helps.1 point
-
Most auto parts stores sell touch-up pens and sticks and similar touch-up gear in wide varieties of colors. I've had reasonable luck getting a close match (using an inspection plate or something), and just touching up with those. They're not expensive and are reasonably easy to use. https://www.oreillyauto.com/detail/c/scratch-fix-all-in-1/paint---body/paint/touch-up-paint/e3a53676b2d3/dupli-color-scratch-fix-all-in-1-0-5-ounce-bright-white-touch-up-paint/dpli/acc0362?q=touch-up+paint&pos=01 point
-
The internal timing sets the breaker cam so the points open at the E-Gap. The E-Gap is where the magnetic field is strongest during the rotation. The cam on the dual mag controls both points and therefore both mags. So both are right or both are wrong. You can adjust it quite a bit with the point gap, but sometimes the point gap gets very small trying to get the e-gap right. If you adjust the cam, you have to buy a new screw. They are only allowed to be torqued once. If the E-Gap is off by more than a few degrees, the mag output drops a lot. The mag output should be tested on a spark gap tester. It should make a spark across a specified gap (3/8 inch or so) at a specified RPM (500 or so), so it should have been functionally tested before it was sent to you.1 point
-
There are two M-22 Mooney Mustangs in North Dakota and both belong to Warren Pietsch. https://registry.faa.gov/aircraftinquiry/Search/MMSResult?Statetxt=ND&Mmstxt=5870402&Countrytxt=US1 point
-
Bath tomorrow. Dead tired today...
 1 point
 -
This is something we are hoping to do. This year we opted to go back to Tampa because they have been so good to the Summit and promoting aviation safety. We didn't consider hurricane season at all, but you are right. Maybe we can change it next year. Cheers, Dan1 point
-
It's an extract from this: https://www.clubcherokee.com/wp-content/uploads/2015/07/Mooney.pdf I have added that link already in this thread.1 point
-
I have 2,000+ hours in my Rocket over the last 21 years. I use it several times a week to commute between offices in the SF area over a distance of around 55 miles. The flights are all at 4500 and 5500 ft. and are affected by gusty winds over the Oakland Hills and the MAyacama Mountains. Thus, I am encouraged to keep the speed down and putter along. In the cruise portion of my flights I use 27MP and 2200RPM. I obtain 154kph indicated. I lean to 75deg. rich or around 17gph. I could go faster but the bumps would be more emphatic and I would be close to or in the yellow arc. I keep it leaned out on descent and landing (unless there are thoughts of a possible go-around) and religiously pull the power back in 2" increments per minute. The result of this operating procedure is that engine #1 went to 2400 hours and the mechanic on the last oil change noted from the oil analysis the engine looked like a teenager. It was still using a qt. every 10 hours. This procedure is comfortable for me but I would appreciate any input - but forget the "you should fly a 201" comments. I like the Rocket. It is a wonderful plane. The extra power is always there when one needs it. It is a good instrument platform allowing me to do the ILS at anything between 100kt and 150kt to fit in with the commercial traffic at Oakland every morning. Pilots are commonly lusting over the next plane and I have felt guilty for not joining them but I have considered "moving up" and, as long as I am not compelled by ice protection or pressurization, there is no piston single to move up to and I have yet to convince my wife of the wisdom of a TBM. Steve1 point
-
Based on my research, I personally would not replace the NBS. 1. The 1000 hour recommendation seems to be based on a couple of failures of Plessey actuators and carried over to Eaton. This has never been a serious enough problem to warrant an AD. 2. The failure of an Eaton actuator (and recall of a particular range of serial numbers by Eaton) appears to be due to a particular lot of springs years ago. Those have likely been replaced or have failed by now if they are going to fail. 3. Most of the very few documented failures have been Plessey actuators, the most recent only a few hundred hours after spring replacement. If I had a Plessey actuator, I would consider spending the $10K or whatever the going rate is to replace it with an Eaton if I could find one. 4. Hours isn't really important -- it's cycles. But cycles are not tracked in single engine piston airplanes. According to Don Maxwell, the spring is rated for something like 20,000 cycles. So if you cycled the gear once an hour on average, that would be 20X the recommended replacement interval. 5. A new spring would have some risk because they are not in current production. People are going to have to dig out a 50 year old drawing and make a part that they likely have never made before. Maybe they are simple to manufacture and maybe there is some technique to it. Processes were often not as precisely documented in the age before everything was done on CAD. Who knows? There was some post to the effect that Mooney rejected a batch that didn't fit correctly. I have no first hand knowledge of that. Skip1 point
-
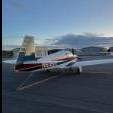
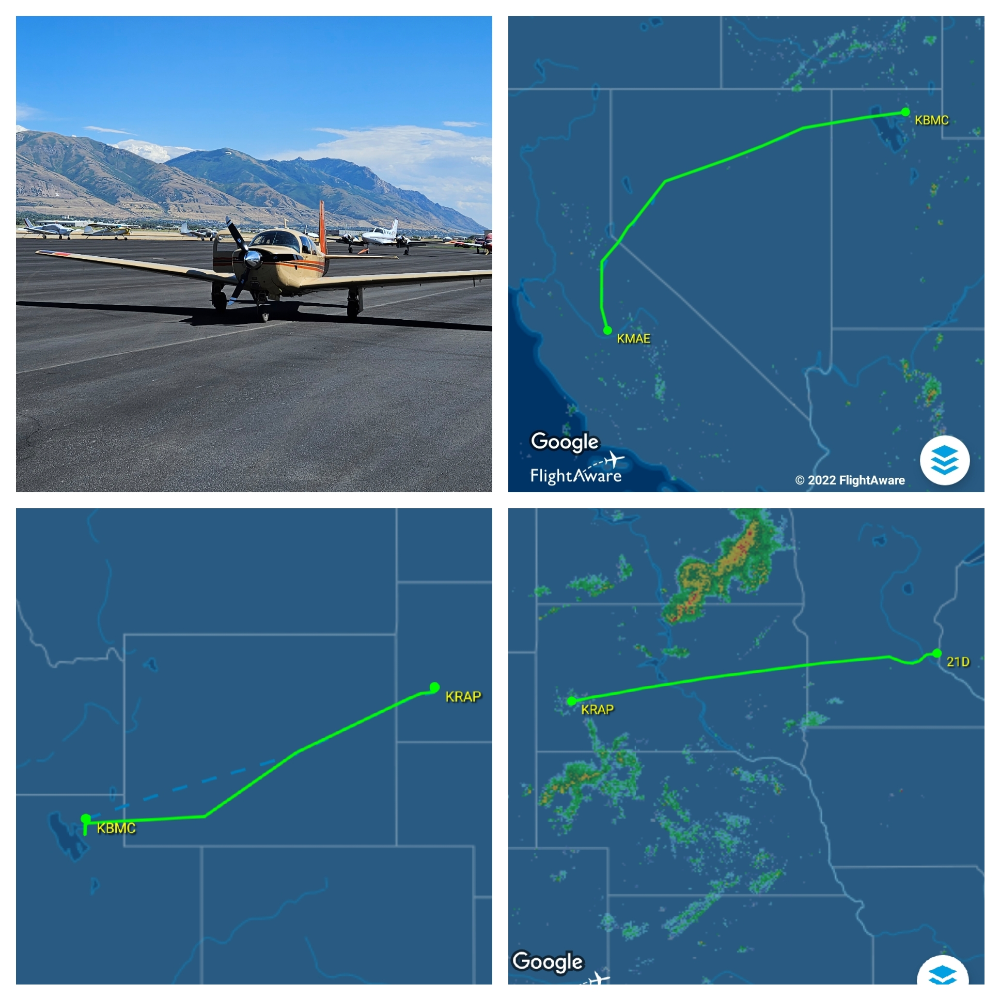
Finally got my new to me '69 E back home. Two stops from Fresno to Minnesota in Salt Lake and Rapid City.
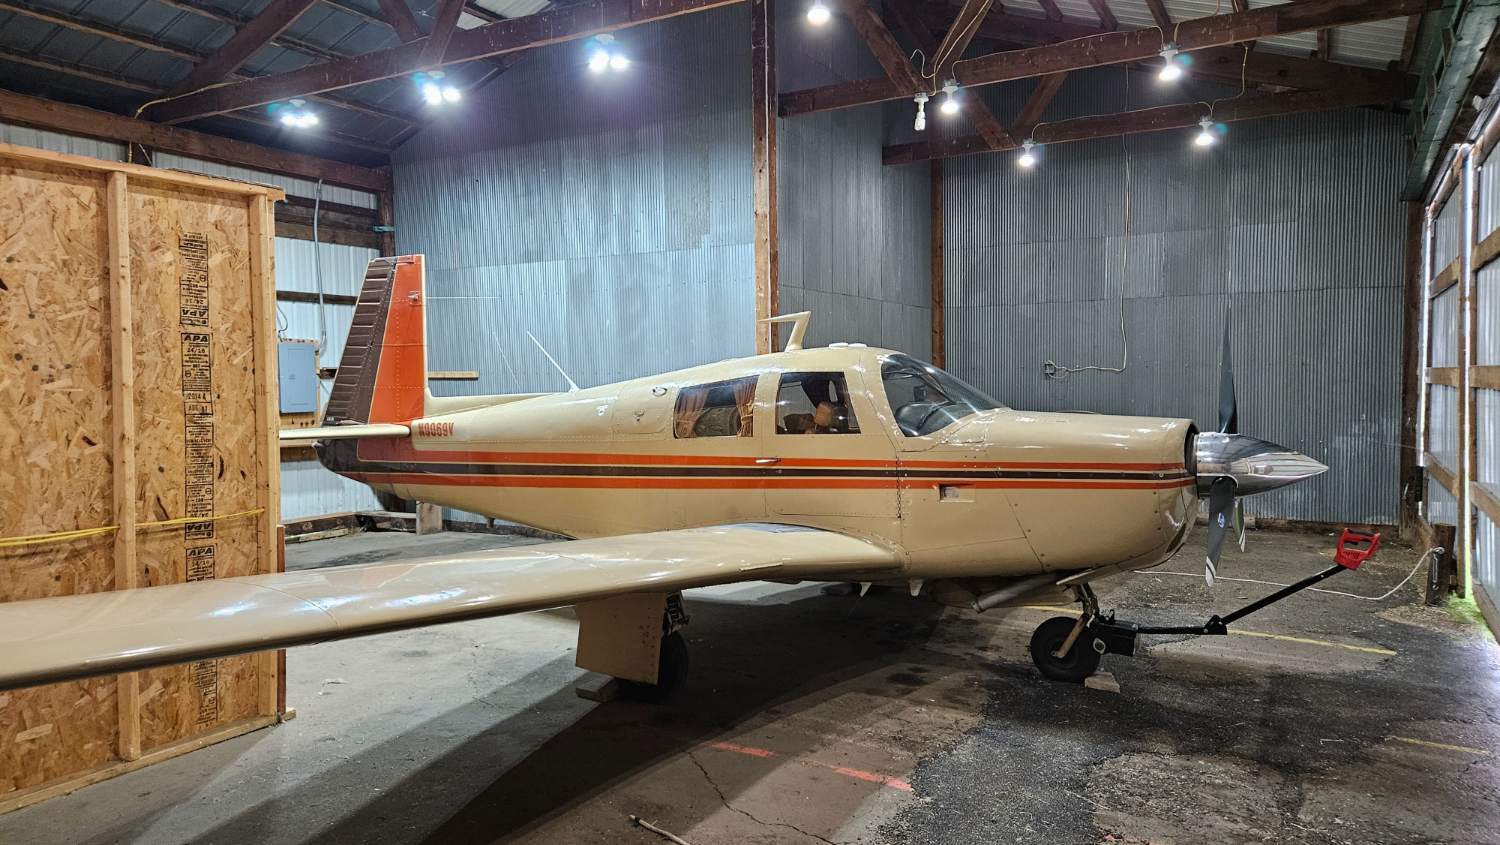
 1 point
 -
Applicable Sent from my LM-V600 using Tapatalk1 point
-
1 point


.thumb.jpg.ed6aafa91f819cec0d83fd72d0471094.jpg)