Leaderboard
Popular Content
Showing content with the highest reputation on 03/12/2024 in all areas
-
I’m not. I’m the guy that annoys the alignment tech by asking questions like an 8 year old.3 points
-
2 points
-
When I get out if the plane, the keys are usually on top of the panel. Been doing that since a Student Pilot. Did it last night, the quick glance at the panel as I'm stretching out the tow bar. If you put in switches, you'll need to look for flashing lights, a new habit to build. If I don't see keys on the panel, I stop and check my pockets. A couple of times in the last 17 years, I've found the keys still in the switch . . . .2 points
-
Dan, I'll hunt down the company who supplied me with one as it fit well. I used glue gone and mek to clean well, and 3M "gorilla snot" to adhere the new seal. Expect closing difficulty until new seal is "broken in" to the frame. A few days in the f47 Sun will expedite this2 points
-
I should look at it again. If it gets too complicated though, I’ll end up putting my perfectly functional vacuum AI back in. I could probably make a quick decision based on the thickness and weight of the various installation and operating manuals. My patience for extended maintenance is growing thin especially if it’s self inflicted.2 points
-
Totally different perspective, I have an impulse coupling mag which can fire big time with minimum prop movement, I kept the key switch because I might just forget to turn those switches off, they are black, hard to see, key in hand feels safer to me2 points
-
I think they are cool too, but just consider the increased risk. Yes, I know it happens with a key too… but it’s pretty darn easy to leave the switches on during shutdown and kill your self hooking up the tow bar and moving the prop over. I just think removing the key with my red streamer on it is one more step in making sure the mags are grounded. The switches are damn cool though. I flew them on a flight school Cessna and my student left them on once. I realized just as she was under the prop hooking up the towbar.2 points
-
2 points
-
I don't know anything about your airplane, how long you have had it, how many hours on the engine, how your predecessor flew it, or how you fly it, but I would be stunned if you needed six cylinders. Not saying it's impossible, but I would absolutely want some additional opinions -- not least of which is from Mike Busch's organization.2 points
-
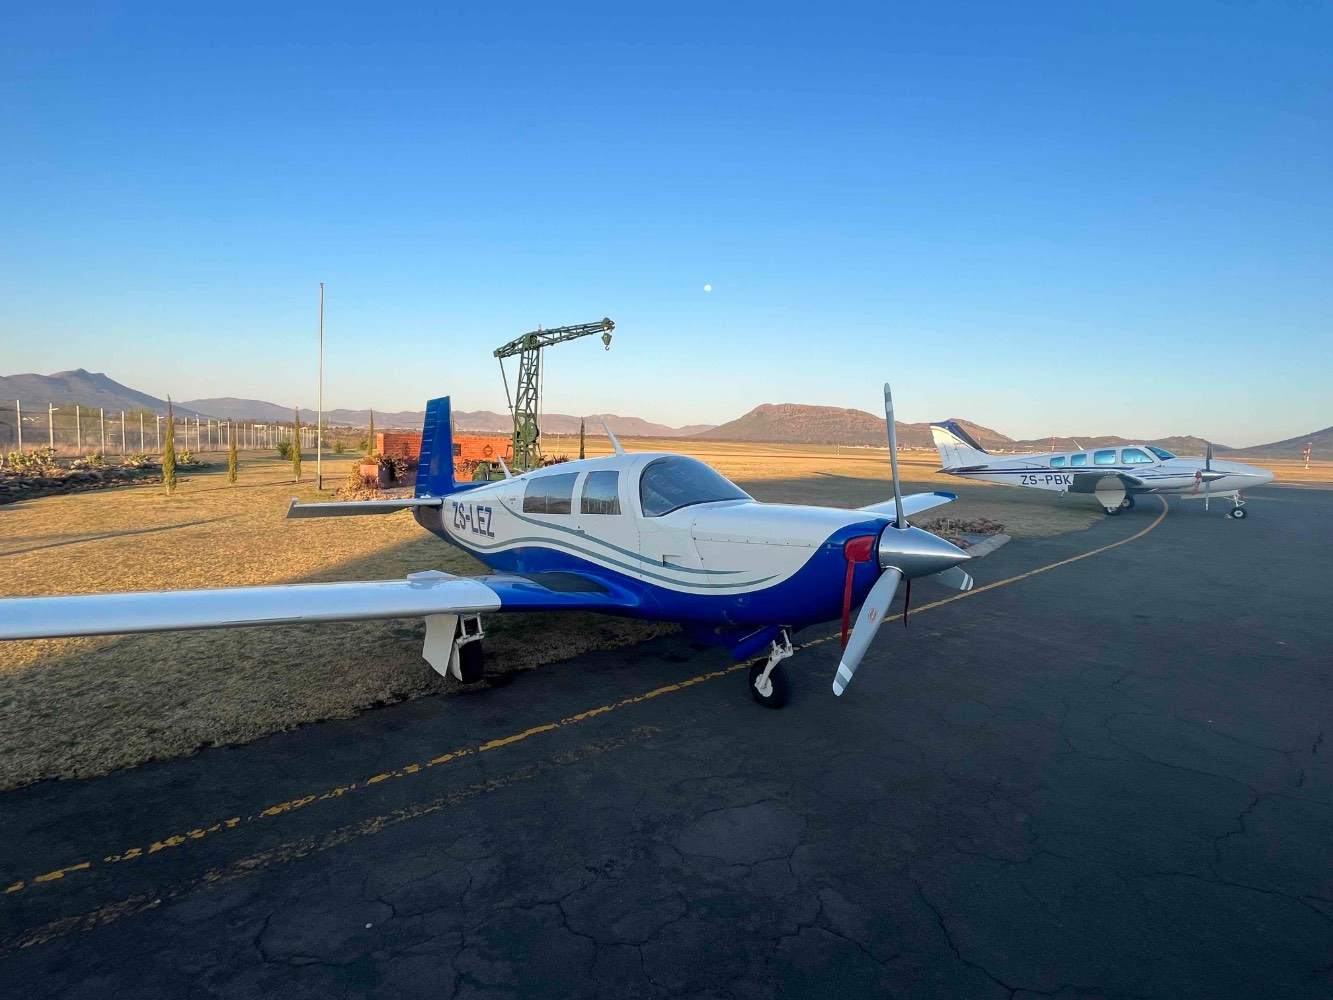
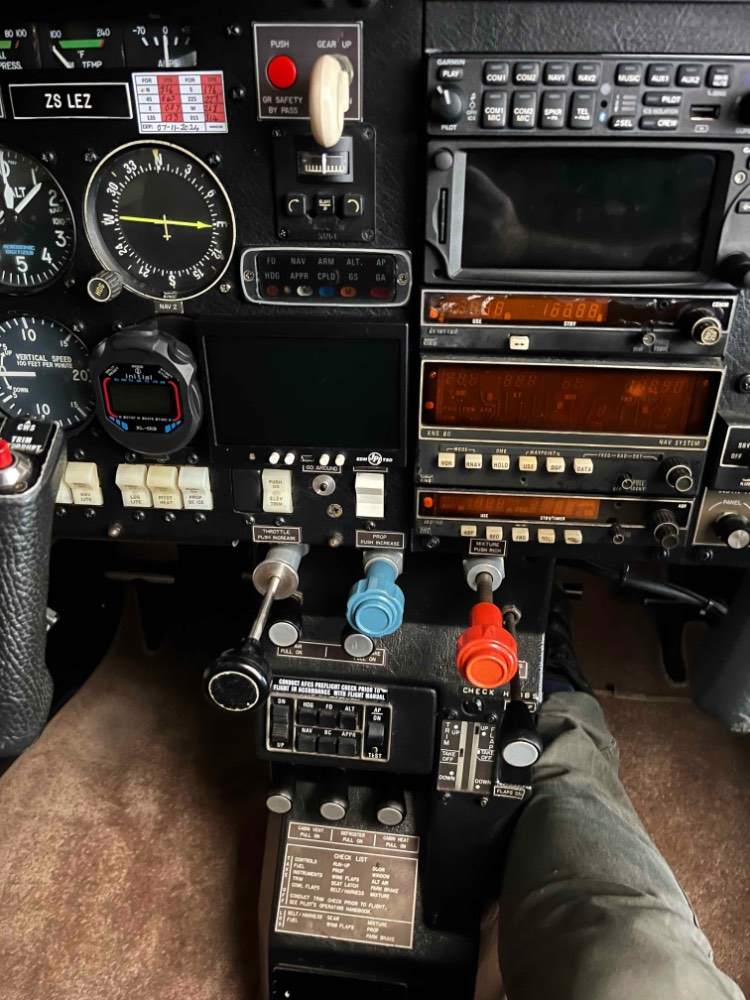
Aircraft Registration: ZS-LEZ Aircraft Make and Type: Mooney M20K 231 Year Model: 1981 Airframe Hours: 3,016 +/- Engine Type and Hours: Continental TSIO360LB (Was replaced on TBO with a Factory overhaul LB engine). 1257 Since Factory Overhaul and Approximately 543 hours remaining. Once the engine went pass midlife (at 1074 to be exact) all 6 cylinders were done. The turbo was replaced with a Factory rebuilt exchange (factory spec) at 977hours. Engine has the Merlin Waste gate and was replaced with a new waste gate Dec 2022. Prop type and Hours: 3-blade. Prop changed from 2 blade to brand new 3 blade in 2020. Avionics and other equipment: Audio panel: Garmin GMA345 with bluetooth. GPS:GTN650 with integrated strike finder Nav/com 1: GTN650 with integrated strike finder - HSI for ILS and Glide slope Com 2: Bendix King NAV/Com with VOR Transponder: Bendix King KT76A with Mode C JPI EDM900 Engine monitor with fuel flow - Primary Auto pilot: KFC200 fully coupled with GTN650 Backup GPS: Garmin 795 mounted on yoke. Viewing Location: Port Elizabeth, South Africa/ Other information: All maintenance done SA Mooney and no expense spared. SA Mooney is the only Mooney agent in South Africa and is a reputable maintenance organisation. Other information: Equipped with factory fitted Oxygen MPI status: Last MPI was 9 November 2023. Contact details of owner: Johan +27 82 457 0680 johan@kdasa.co.za We will be placing our beloved Mooney in the market. We bought LEZ in 2018 and have enjoyed every one of the 550 hours we have flown in her. This was our first plane and we spared no expense. She was pampered and cared for by SA Mooney which is a professional outfit here in South Africa. LEZ was pampered and flown very conservatively by it previous owners, and we followed suite. Although say some it is not necessary, we alway do the 5min additional idle of the sake of the turbo. Our cruise settings are 65% power rich of peak, and this delivers CHT’s well below 380. She runs exceptionally smooth with the 3 blade prop with almost no vibrations, a typical comment when a fellow pilot fly with us. Performance: At low level operation (below 7000) we see +/- 145-150 knots TAS at 65% power 125deg ROP, 12 gph (45l per hour) At FL190 she will run very close to 170 knots TAS at 65% power. You’ll gain about 10-12 knots if you fly het at 75% which she will very happily do for 2 gph more. I found that on longer legs LEZ and myself prefers to be between FL130 and F170 76Gal useable gives you 5hours plus proper reserves at 13gph for planning. That’s 725nm 1350km). A bit more than most bladders can do, although I normally fly PE to Nelspruit direct (600nm) and my average time for this trip is about 3h45min, but found a bottle that works very well. Mods and Upgrades: Cosmetic touch ups and any corrosion gets treated every time she is at SA Mooney. GMA 345 autopanel fitted. All cylinders were done with Top overhaul carried out on 10 November 2021 at 1074.3 hours. Last Oxygen Cylinder Hydro Test was carried out 27 July 2021 Dukes Electric Fuel Pump 10 Year overhaul was carried out on 2 November 2023. New turbo installed 1 March 2021 at 977.4 hours. Merlin waste gate controller replaced around Dec 2022. All windows replaced on 6 June 2023 at 2898.2 hours. Status report can be arranged from SA Mooney Reason for Sale: We are currently flying a Mooney Bravo, a A36 bonanza and a Cessna 182, so it is time to make her available to someone else. Price: We are looking for $105 000. (price low, but the week ZAR make it possible, and the buyer will have to allow +/- $30 000 for shipping and paperwork) SA Mooney has facilitated 3 or 4 Mooney's that left the country, so I'm sure we can arrange contact details to make it easier. She was registered on the N register before coming to SA (N1148Z)1 point
-
Has anyone installed one of these on their aircraft? I own one and am getting ready to set it up on my M20R. I opted for the motorized version. I'm eager to connect with individuals who have hands-on experience or are aware of someone with AMA certification to discuss this. Thanks! I would love to see photos of an install how the seal navigates around the locking pins and the bottom hinge arm. I have the deluxe version so if anyone has any photos of the deluxe install of how the tube is installed from the aircraft to the fuselage. As I get mine installed, I'll edit and post updates here on what was useful. 1. Old Seal Removal - I used Peerco Adhesive Remover 321. It worked like a dream. It's a bit like a gel so you can apply it and leave it to sit for a couple hours and anything sticky wipes right off with little to no elbow grease. I was dreading this part of the process, but the Peerco made it easy. It smells like oranges so it wasn't as offensive as other types of chem removers1 point
-
We will have to agree to agree. I started the post by saying I've owned my Mooney for 20 years. I have 20 years of ownership experience to rely own (plus an MS in Mechanical Engineering and 35 years experience as an engineer with the Navy; and no I still don't pretend to have the expertise of a shop or senior mechanic). "I" wouldn't buy one now without personally inspecting the airplane regardless of the aviation expert or shop supporting me. But with that said, I agree with you; if you don't have any experience, you've gotta find an expert. I was also trying to be positive; a gear up is not a show stopper but be smart about it. [That's the risk of these quick chats on Mooneyspace; the details get lost but it's still much better than the Facebook alternatives.]1 point
-
I've owned a '67 M20F for 20 years with no airframe issues that had a gear up prior to my ownership. I would want to review the repair documentation to see what areas of the airframe were repaired; then I would want to personally eyeball those areas to include dropping the belly pan. Many of the gear up Mooneys have been blessed with a one piece fiberglass belly pan; that's a plus IMO.1 point
-
About seven years ago I found myself with an extra articulating frame (a single one, not pair) and sold it for $2,400. They are probably the hottest single item for the J and K model.1 point
-
Sure, that's always a possibility. But it's much much more likely if the ignition is still on . . . . With zero "ignition button" experience, that appears more likely to happen without a key to remove and set on the panel so you can tell at a glance that it's OFF. So changing from key to button will require new habits and new checks. Just something to think about.1 point
-
There is still the possibility of pulling the key out of the ignition while one of the mags isn't grounded..think that's what a few ADs are about. Scary thought but I'd always assume that moving the prop could cause the engine to start and be ready for it.1 point
-
Brown Aircraft T-9088 and 3M yellow super weatherstrip and gasket adhesive is what Mooney uses.1 point
-
1 point
-
Not sure about the replacement or adhesive, but Peerco 321 Adhesive Remover did a great job removing the old glue from my door where the seal used to be without stripping any paint. https://www.aircraftspruce.com/catalog/cspages/peerco02-00234.php My research showed off-the-shelf factory-style replacements weren't easily available. But I did stop short of calling the factory. Hope you find one.1 point
-
All good calls, typically it takes 2 or 3 guys to cover the horizon, a Mooney airframe guy, an engine guy and an avionics guy, they generally have different skill sets and different personalities, the skilled avionics guy is most elusive1 point
-
I know it’s more $$, but a gi-275 fits the panel as well and has lots more good reviews.1 point
-
That’s a pretty good guess, I definitely saw around 1150 I want to say, but I will go pull the SD card tomorrow and take a look.1 point
-
I was listening to an aviation podcast on my bike ride tonight and they said Textron has no intention of shutting down production, but their order books are full and they just stopped taking orders until they could clear out the order books a bit. They didn’t want to increase their production capacity, which is about 10 Bonanzas and 10 Barons a year. That was hearsay. The company isn’t commenting.1 point
-
Per recommendations, I bought a spool of Gates 27043. It's 7/32". I haven't tried it on the inlet fitting yet; for the inlet, about 14" of hose. Brittain used the blue silicone hose about 15 years ago but it slips off without a clamp and it's tough to get a clamp on that fitting. It's a little too large. I may try the 7/32" hose soon; I've got a filter and some hose on the bench.1 point
-
1 point
-
I need one soon as well. We need a map that shows the locations of all the facilities that can do the ECI and their prices like skyvector does for fuel.1 point
-
1+ for jake at bevan’s aviation. They not only calibrated my freshly overhauled ADI to the autopilot but they are one of the few places that STILL can do repair work on garmin 530w as i had a button that was intermittent that they fixed. One if not the only place that will do that at an hourly rate instead of a flat fee.1 point
-
Prebuy is an annual with emphasis on corrosion inspection, if aircraft is purchased annual gets signed after fixing identified squaks, if not purchased great learning experience. Get really knowledgeable mooney guy for the inspection and pay him well, the gear up is second fiddle to potential corrosion.1 point
-
Solid response. Clear instructions and photos. I wish everyone on this forum could respond like this. Great job!1 point
-
Unless this guy specializes in recent Mooneys I would thank him for his time and pay him and get it out of there. Call Brian Kendrick if you want someone to look at it that knows what they are doing. Mooneysupport.com1 point
-
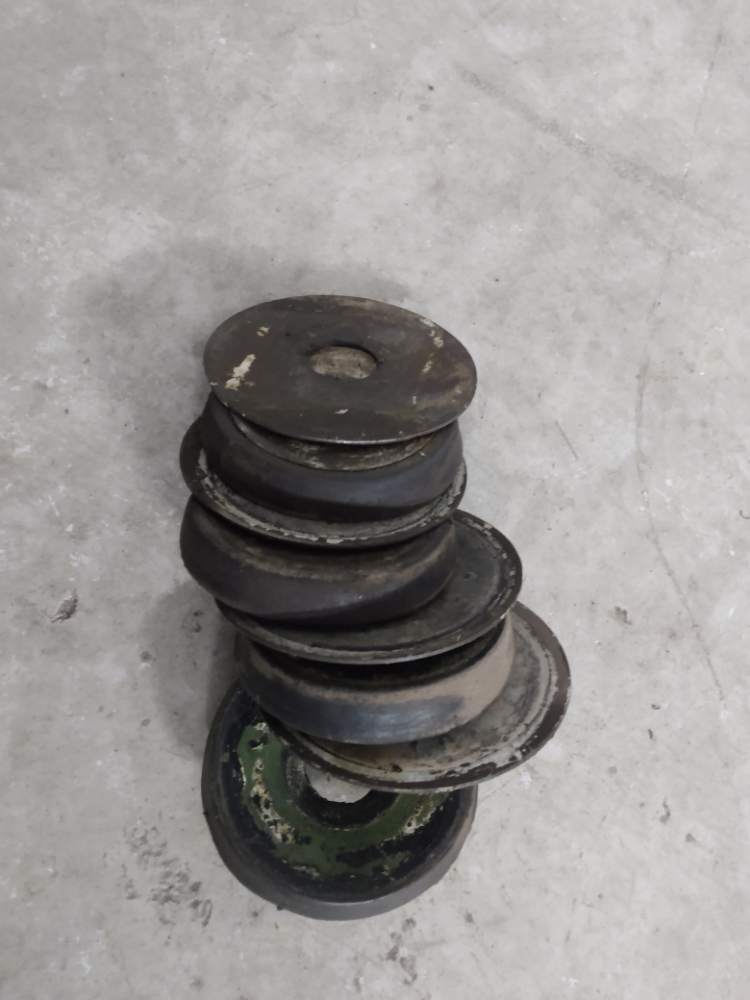
Okay, Have everything out and apart!! Mains, nose gear, steering horn. Thought I might turn a new bushing for the steering horn but I called Lasar first. The brass bushing is $80 The Nas bolt from the SB is $4.00 My steering horn has Torrington bearings where the Nas bolt goes and they look good. And I need additional shims, I don't recall their price but a couple bucks each. Also I might need a reamer to straighten the hole up for the brass bush. The rest of the landing gear is in surprisingly good shape just needs to be blasted and painted. And of course new shock disc's. These look like original era disc's Also my gear doesn't have the Mooney SB M20-202 , I probably should get the spacer in case after the updates the gear requires it era disc's1 point
-
1 point
-
1 point
-
Definitely would recommend Cole Aviation in Dalton, GA. He's a MSC for my Bravo I trust on the East Coast. I fly down to him from VA for my oil changes and mx issues.1 point
-
Hi @hoot777, Also worth mentioning that Kevin Westbrook has come to an agreement with Porter-Strait instruments of Tulsa Oklahoma to allow rebuilding of instruments at that facility resulting in a “yellow tagged” final product. So in your case, he can service that b-11 head and provide the proper paper trail. This is for an additional cost to you, but in my opinion is reasonable. For me, my AP/IA is by-the-book. Therefore, as I move forward upgrading I’ll be running my used parts down this path, so everyone stays happy! Hope you and others find this information helpful! Cheers, Z Sent from my iPhone using Tapatalk1 point
-
Ok, tried it on grey plastic on my Garmin marine radio. Lots of silicon goop in there and it did not craze or deform.1 point
-
1 point
-
Now you are forcing me to google what engine is in my car ....1 point
-
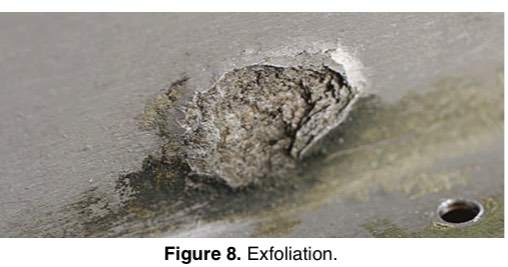
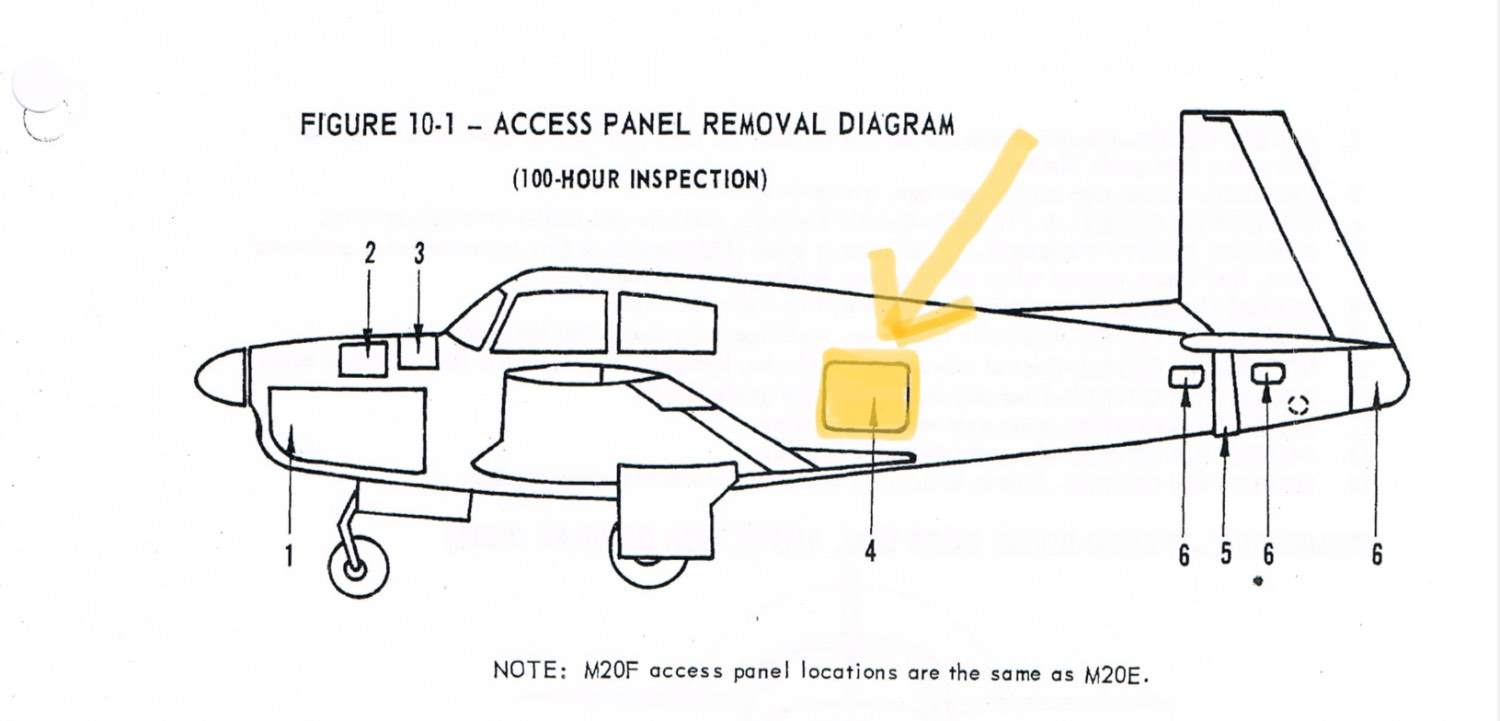
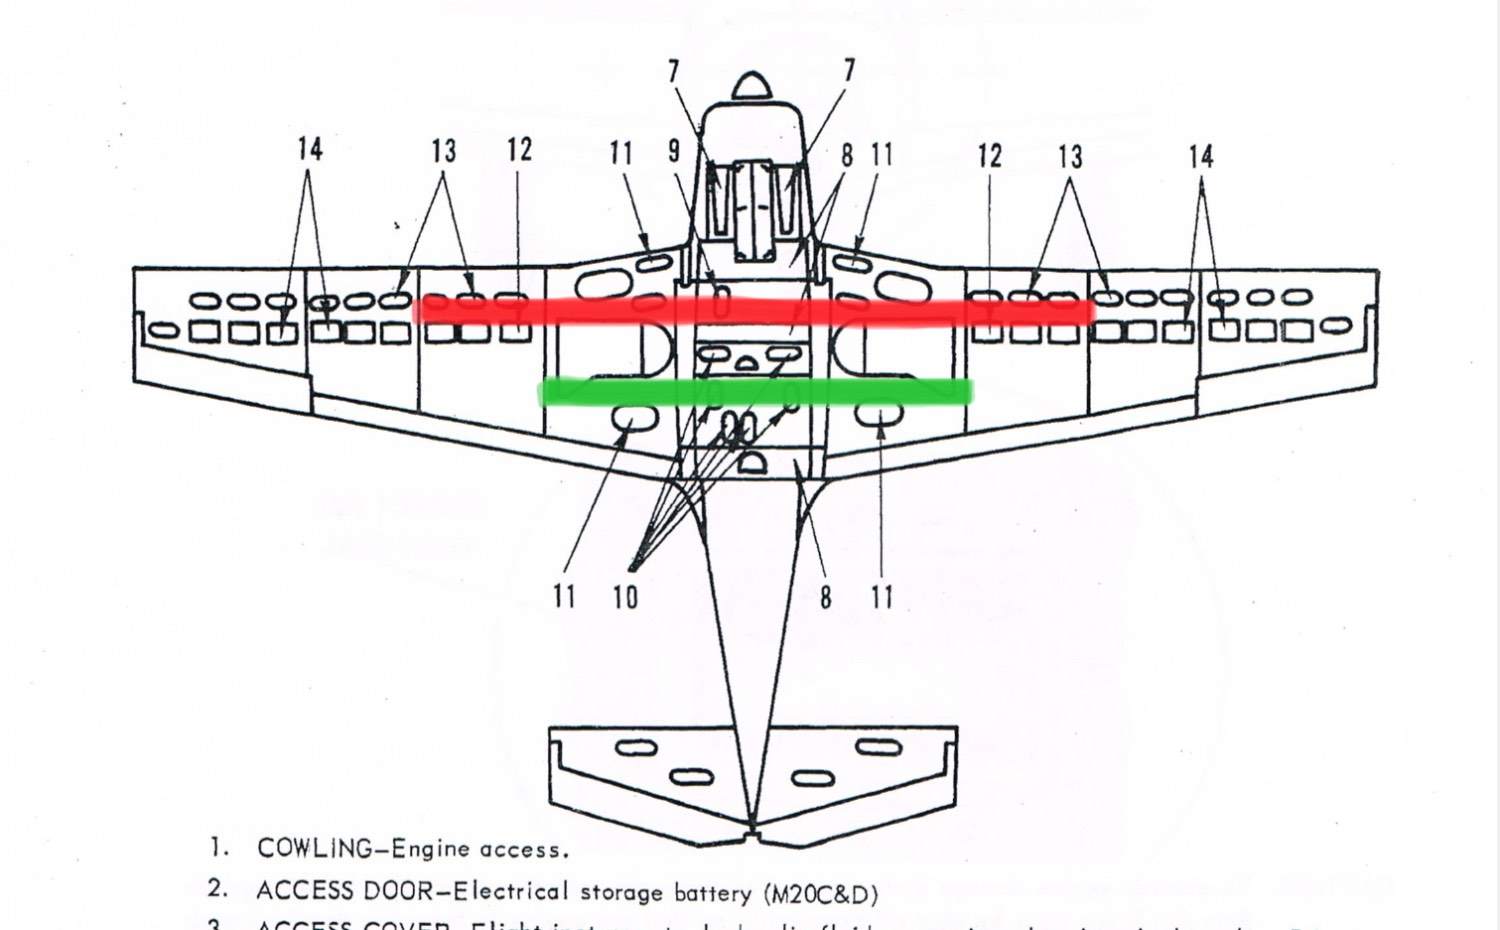
I’ll break my recommendation down into how much time it takes to perform. In general, you need to look at the main spar, the stub spar, the tubular steel frame (covered in SB M20-208), and then general surface corrosion on the skins and corrosion on the angle aluminum pieces. Phase 1 (about 30 minutes: You can see a good bit of the main spar and stub spar in the wheel wells. The main spar is the heavy frame work where the forward landing gear pivot point is. The stub spar is the rear pivot point. Look at as much of those as you can in the wheel wells. You can google search for “aluminum corrosion” and see some good pictures. Surface corrosion isn’t as important as intergranular corrosion, which leads to exfoliation (picture below). Next, look inside the tail cone (see below, marked in yellow with arrow). That panel comes out in less than a minute with 1/4 turn fasteners. Look for exfoliation on the angle aluminum pieces and surface corrosion on the inside skins. While you’re there, look at the pushrods- they are steel and often rust. That isn’t terrible, but does need to be addressed. Phase 2 (about 1 hour): If that initial look is acceptable, then you should dig deeper into the wings. Open up some of the inspection panels and you’ll see more and more of the main spar (red highlight). Look inside inspection panels #11 (see picture below) and you’ll be able to see a good bit more of the stub spar (green highlight). The main spar actually runs wingtip to wingtip, but I’ve noted the location of the extruded angle aluminum pieces that can corrode badly. Phase 3 (about 2 hours): If that seems acceptable, you’ll want to take a look inside the cabin. If possible, remove the back seat and pilot side wall. There are square panels under the back seat- remove one and you can see the inside view of the main spar (red arrow on picture below). Inside the pilot side wall, you’ll see the tubular steel structure that is the subject of SB M20-208. You’re looking for regular rust, particularly below the window frames. On the picture below, the steel tubes are painted green with zinc chromate paint- but you can see at least one tube with a lot of rust on it. That tube will have to be replaced. I’m sure others will chime in with additional suggestions. Good luck! I’m keeping my fingers crossed for you!1 point
-
Hartzell Propeller Inc. One Propeller Place Piqua, Ohio 45356 PIQUA, Ohio, June 21, 2022 – A Supplemental Type Certificate (STC) has been approved to replace McCauley propellers on Mooney M20M/TLS/Bravo series single-engine aircraft with Hartzell Propeller's 75-inch diameter three-bladed aluminum props. Airplanes covered by the STC are powered by TIO-540-AF1A and TIO-540-AF1B Turbocharged Lycoming Sabre engines. “Installing Hartzell’s Scimitar-style prop covered by this STC delivers 8-10 percent improvement in climb performance, a 2-3 knot increase in cruise, and looks terrific on the ramp coupled with Mooney’s signature tail,” said Hartzell President JJ Frigge. “And it has the Hartzell Top Prop 2,400 hour, 6 -year time between overhaul, and warranty until first overhaul,” he added. The Hartzell Propeller Top Prop kit, HC-I3YF-1RF/F7498-1, is available for $15,839 and includes a propeller, all-composite spinner assembly and STC documentation. Additionally, a TKS ice protection kit is available at an additional charge, while electric de-ice approval is pending. Through the years, about 10,000 Mooney airplanes have been equipped with Hartzell props. One of the launch platforms of the first Hartzell two-blade compact aluminum propellers in the early 1960s was the Mooney M20C. Through the decades, the M20 airframe was improved with the addition of metal wings, generations of avionics advances, fuselage stretches, increased gross weights and more horsepower. About Hartzell Propeller Hartzell Propeller is the global leader in advanced technology aircraft propeller design and manufacturing for business, commercial and government customers. The company designs next generation propellers with innovative blended airfoil technology and manufactures them with revolutionary machining centers, robotics, and custom resin transfer molding curing stations. Hartzell Propeller and sister companies Hartzell Engine Technologies LLC and AWI-AMI form the general aviation business unit of Tailwind Technologies Inc. For more info on Hartzell Propeller, go to www.hartzellprop.com. Media Contact: Jim Gregory for Hartzell Propeller James Gregory Consultancy LLC jim@jimgregoryworks.com +1 316-558-8578 FOR IMMEDIATE RELEASE1 point
-
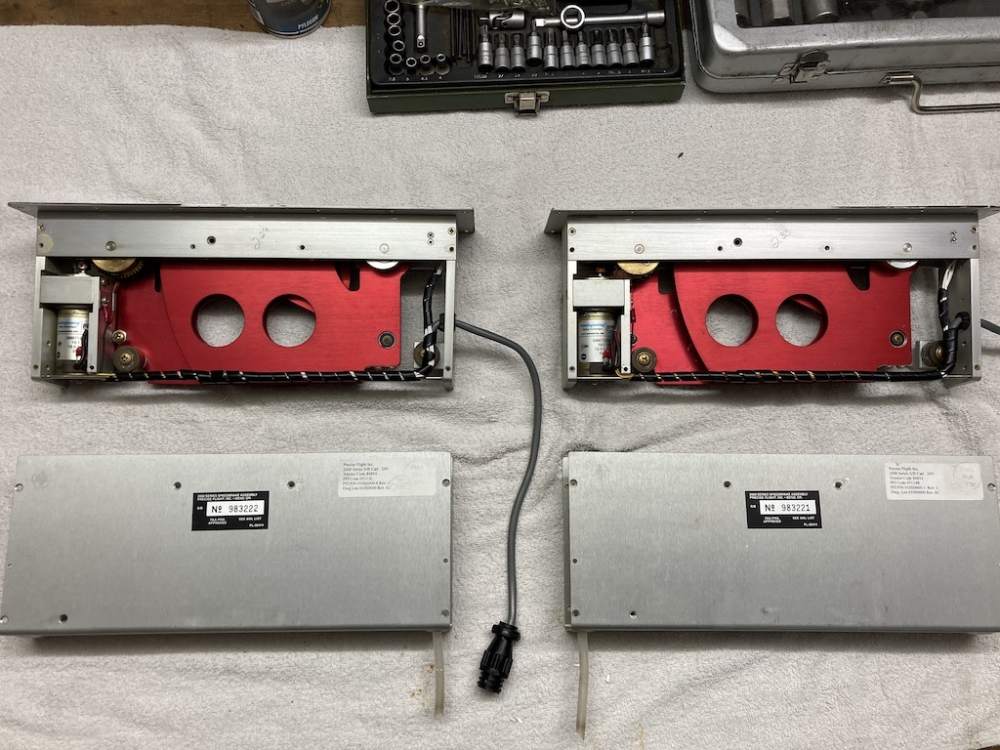
Hallo Fritz, I experienced some problems with my electrically actuated Precise Flight speed brakes as well after I purchased my O2 last summer. PF is not to blame at all - obviously they never got serviced since the plane left the factory in Kerrville in 2006. You can find the service manual at the PF website. I inspected and serviced them in accordance with the manual. Clean, remove the old grease, apply fresh grease (Aeroshell 22 if I recall correctly), apply tons of „Kontaktspray“ to the microswitches (with speed brake flaps in different positions), test them. During the re install take care of the electrical connectors as well (clean and apply „Kontaktspray“). As stated in the service manual apply the suitable Loctite to the screws. Test after installing, make logbook entry. Since servicing they work like a charm! If you have trouble dismounting the speed brakes, gently push from the bottom of the wing.. Regards, Matthias1 point
-
We have an AV-30 in a C140 I share. It has occasionally shown some sluggish behaviour, wallowing and precession….not coming level after extended maneuvers. I thin uAvionix would tell us to check the vibration levels….they are high according to the instrument…but we’ve replace engine and instrument shocks…only so much we can do. .It is a nice unit, the company seems solid, generally responsive, and innovative, but not sure I’m ready for it to be my only ADI. (140 was certified IFR with just a TC…so this theoretically replaces that…but no backup….we don’t fly it IFR). I guess I would consider your flying….VFR or IFR and what backups you have.0 points

