
M20F-1968
-
Posts
1,864 -
Joined
-
Last visited
-
Days Won
3
Content Type
Profiles
Forums
Blogs
Gallery
Downloads
Events
Store
Everything posted by M20F-1968
-

201 canopy cover on a C model?
M20F-1968 replied to Pasturepilot's topic in Vintage Mooneys (pre-J models)
Good find. I have two Kennon covers bought used. You can get a shop to sew you a new N number badge. What did it cost you? John Breda -
Non-turbo Mooneys; your preference if you could find it.
M20F-1968 replied to DCarlton's topic in General Mooney Talk
How did I make that error. Of course, LOP range is considerably more! John Breda -
I cut the hinge off of mine, and am able to hold it in the pilot's window with just the plastic window lock in the airplane. I painted it red just so you do not forget that it is there. John Breda
-
Non-turbo Mooneys; your preference if you could find it.
M20F-1968 replied to DCarlton's topic in General Mooney Talk
My F (functionally really a J) is a great combination of efficiency, simplicity and economy. The vintage systems, Johnson bar and hydraulic flaps, side-step the complexity and maintenance troubleshooting of the more modern systems. (I just sent my Precise Flight series 2000 speedbrakes in due to a sensor failure. Turns out, Precise Flight has had problems with the sensors and has gone to microswitches. Cost for repair about $2000.) I am on the edge between continuing to work and simply retiring. My present plane is likely the best of the choices for a retirement plane. The turbonormalizer turns it into a very different airplane than either the original F or J. The turbonormalizer should be brought back at a reasonable cost as it is a viable choice v. trading for a factory turbo. Maintenance of a turbonormalized airplane is much less than a turbo boosted airplane. The operating costs make it easier to continue flying. At 10,000 feet it is a 160 kt airplane at 75% power, 10.5-11.0 gph. With everything full forward it is a 168 kt plane. At 17,000 - 18,000 it is in the 170 - 180 kt plane. With 90 gallons it has long legs. LOP of course range is much less. UL 993. Yes it is slower than an Ovation, but not considerably slower. When considering it against a Brand P (I do not want to use that word on this forum) Arrow using essentially the same engine it is about 30% faster. I am still impressed with what the The Mooney brothers accomplished in their day which has stood the test of time. John Breda -
Torque Wrench Socket Too Big for Oil Filter
M20F-1968 replied to TheAv8r's topic in Vintage Mooneys (pre-J models)
As I posted my last message I thought of the Phillips X-country aviation oil bottle. Perhaps it would work turned on its side, cut open to fit over the filter with the spout in the lowest position. John Breda -
Torque Wrench Socket Too Big for Oil Filter
M20F-1968 replied to TheAv8r's topic in Vintage Mooneys (pre-J models)
I have no cowl side panels as I converted to a J model cowling. I do not think it will work without removing the lower cowling. But, you have got me thinking about cutting up a medium size detergent bottle that may be close to the oil filter in size. perhaps with a non-centered spout where I could attach a hose. I may have to bring an oil filter to the grocery store.... John Breda -
Torque Wrench Socket Too Big for Oil Filter
M20F-1968 replied to TheAv8r's topic in Vintage Mooneys (pre-J models)
I like the idea, but I usually am alone and need two people to remove and install the lower cowling. I assume you can not use this if the lower cowling is on. You made me start thinking about taking a plastic bottle, cutting it appropriately so as to make a trough with a plastic hose to carry the oil away. John Breda -
Torque Wrench Socket Too Big for Oil Filter
M20F-1968 replied to TheAv8r's topic in Vintage Mooneys (pre-J models)
FYI: I recently hired an A&P mechanic to reinstall my prop. He brought with him a Snap-On torque wrench which have interchangeable heads. I looked into this further and the range needed for many of our needs (such as installing a Hartzell Prop with 3/4" bolts) in a QC2I75. https://shop.snapon.com/product/Torque-Wrench-Bodies-Adjustable/Adjustable-Torque-Wrench-Body/QC2I75 https://shop.snapon.com/product/Open-End-Heads%2C-inches/3-4"-Square-Drive-Open-End-Head%2C-J-Shank/QJO24A https://shop.snapon.com/product/Open-End-Heads%2C-inches/1"-Square-Drive-Open-End-Head%2C-J-Shank/QJO32A The heads are a standard 2 1/2" long so no extra math needed. For installing my prop, I found a this Snap-On wrench in great shape, within specifications, on e-bay for less than $100 and the 3/4" head for $50. I am not saying that you need this to put on an oil filter, but I was unaware of these torque wrenches with interchangeable heads. Also, I have a Snap-On 3/8" Drive torque wrench which I use for oil filter changes and other jobs. It is another e-bay find for about $100.00 and was in new condition. Part No. QD2FR75B https://shop.snapon.com/product/US-Torque-Instruments%3A-Dual-Scale-(ft-lb-N•m)/3-8"-Drive-SAE-Adjustable-Click-Type-Flex-Head-Torque-Wrench-(5-75-ft-lb)/QD2FR75B They take some time to find but are out there. John Breda -
On missed approach, should the S-TEC be in HDG mode or NAV mode. Is there a vertical climb component to the S-TEC on missed approach? Does the position of the GPSS (HDG v. GPS) switch on the panel make any difference on a missed approach? John Breda
-
I have an S tech 60 – 2 autopilot with the S-Tec Altitude preselector along the S-TEC GPSS, Garmin GTN 750 and GTN 650. The system is working and I am able to track both GPS and ILS/LOC sources. However, if I haven't used the system for bit I find one aspect of the buttonology confusing. I have a button on my panel which switches between HDG and GPS (Which should probably be labeled GPSS). There is a CDI button on each of the three Garmin boxes; G600, GTN750, GTN650. When I have not use the system for a while I always have to go out and practice in VF are conditions to remind myself configuration of these buttons for the application intended. In general the panel mounted HDG/GPS button is placed in HDG mode for heading only operation using the heading bug for directional guidance. If not using the heading bug, that same button should be in GPS mode. GPS mode on the panel mounted button will provide for GPS tracking, LPV approaches, and ILS/LOC approaches depending on how the CDI buttons are set on the Garmin units (G600 and GTN750/650). Now we start getting into the subtleties of my configuration and other possible configurations of the Garmin installation. When I was learning the system I made sure that the CDI button on the G 600 and the GTN unit I was using were set to the same setting, either GPS or VLOC. In retrospect, I am not sure whether the setting of the CDI button on the garment G 600 matters at all. Changing the CDI on the GTN unit changes the display from GPS to VLOC. If my memory serves me correctly, Garmin stated to me that there only needs to be one CDI button to change the configuration being used from GPS to VLOC. When the buttons are set properly the unit will fly the approach, holding pattern, and missed approach as expected. However, when needs to be clear what the proper button selection is and it can be forgotten or confusing if not used in the recent past. Thus, I question whether there can be different configurations selected which allows the units to operate with less confusion and more straightforwardly. I am presently not remembering exactly the button configuration for a missed approach will hold after either an ILS or GPS approach. As I recall, one presses activate missed approach on the GTN 650 and it changes the display on the G 600 to display the magenta line of the missed approach heading without vertical management, and in order to capture that heading I need to press the HDG button on the panel. However, since I have not done this in a few months I need to go out on the VFR conditions to confirm. I am hoping the group has people who are operating this equipment who can tell me if there is more optimal way to configure my system to make it more intuitive and to clarify whether my memory of operations is correct, particularly on applying the missed approach. Is there a way for the autopilot to climb per the missed approach instructions? As for the autopilot buttons, I recognize that the approach must be activated near the approach, at an angle less than about 45° and at a location below the glide slope. Activation is accomplished by pressing the NAV button. If being vectored, a two button approach can be used, pressing both HDG and NAV. The autopilot will follow the heading bug until it sees the approach and then will switch to approach mode and follow the approach and bound. On all S-TEC autopilots, heading mode must be selected before ALT can be selected. Once ALT is selected, there is no way to cancel simply the altitude selection without canceling all functions on the autopilot and starting again by first selecting a heading mode. The ST-360 altitude preselector is activated by pressing the VS and ALT buttons simultaneously. The difficulty with the 60 – 2 autopilot is that it was designed before LPV and GPS/GPSS steering were invented. The buttonology is designed to trick the autopilot into thinking the GPS guidance looks and acts like an ILS. The button combinations can be confusing and I need to find a better way to remember what works, and also learn about any possible configuration of the system, either by hardwiring or programming that will make it more foolproof. John Breda
-
201 canopy cover on a C model?
M20F-1968 replied to Pasturepilot's topic in Vintage Mooneys (pre-J models)
It will stretch out longer onto the tailcone but that is a good thing. It would fit better if you had a 201 windshield. It should work in any case. You can always tailor it to fit if you need to take in some loose cloth. You should likely pay no more than about $150 used. As an occasional membor of the CB club, I have purchased all of my covers online used. But they all are in like new condition. You can even take off the N number and have Bruce make a new one for about $35. Then, sew it on yourself (I have a pot motor Singer that is great for straight sewing canvas and leather). Apparently Rolls Royce used these machines to sew their upholstery. They too can be found used. John Breda -
I have the newer Ovation seat belts in my plane that use Amsafe buckles that do not unlatch until the top is opened 90 degrees. Before I found them, I was digging on ebay for seatbelts with the same buckle. I found some along with an extension. That may be a place to find an extension that matches your belts. John Breda
-
Pre-201 Value Guide is ready
M20F-1968 replied to jgarrison's topic in Vintage Mooneys (pre-J models)
Jimmy: I would like a copy of your Vintage Evaluation. You can send it to my e-mail (john.breda@gmail.com) if possible. John Breda -
Pre-201 Value Guide is ready
M20F-1968 replied to jgarrison's topic in Vintage Mooneys (pre-J models)
My post was listed without the information requested by Jimmy. It is: Name: John Breda Email address: john.breda@gmail.com Phone contact: (617) 877-0025 If Owner, The tail number: N954N -
Pre-201 Value Guide is ready
M20F-1968 replied to jgarrison's topic in Vintage Mooneys (pre-J models)
My post was listed without the information requested by Jimmy. It is: Name: John Breda Email address: john.breda@gmail.com Phone contact: (617) 877-0025 If Owner, The tail number: N954N -
Pre-201 Value Guide is ready
M20F-1968 replied to jgarrison's topic in Vintage Mooneys (pre-J models)
My post was listed without the information requested by Jimmy. It is: Name: John Breda Email address: john.breda@gmail.com Phone contact: (617) 877-0025 If Owner, The tail number> N954N -
Pre-201 Value Guide is ready
M20F-1968 replied to jgarrison's topic in Vintage Mooneys (pre-J models)
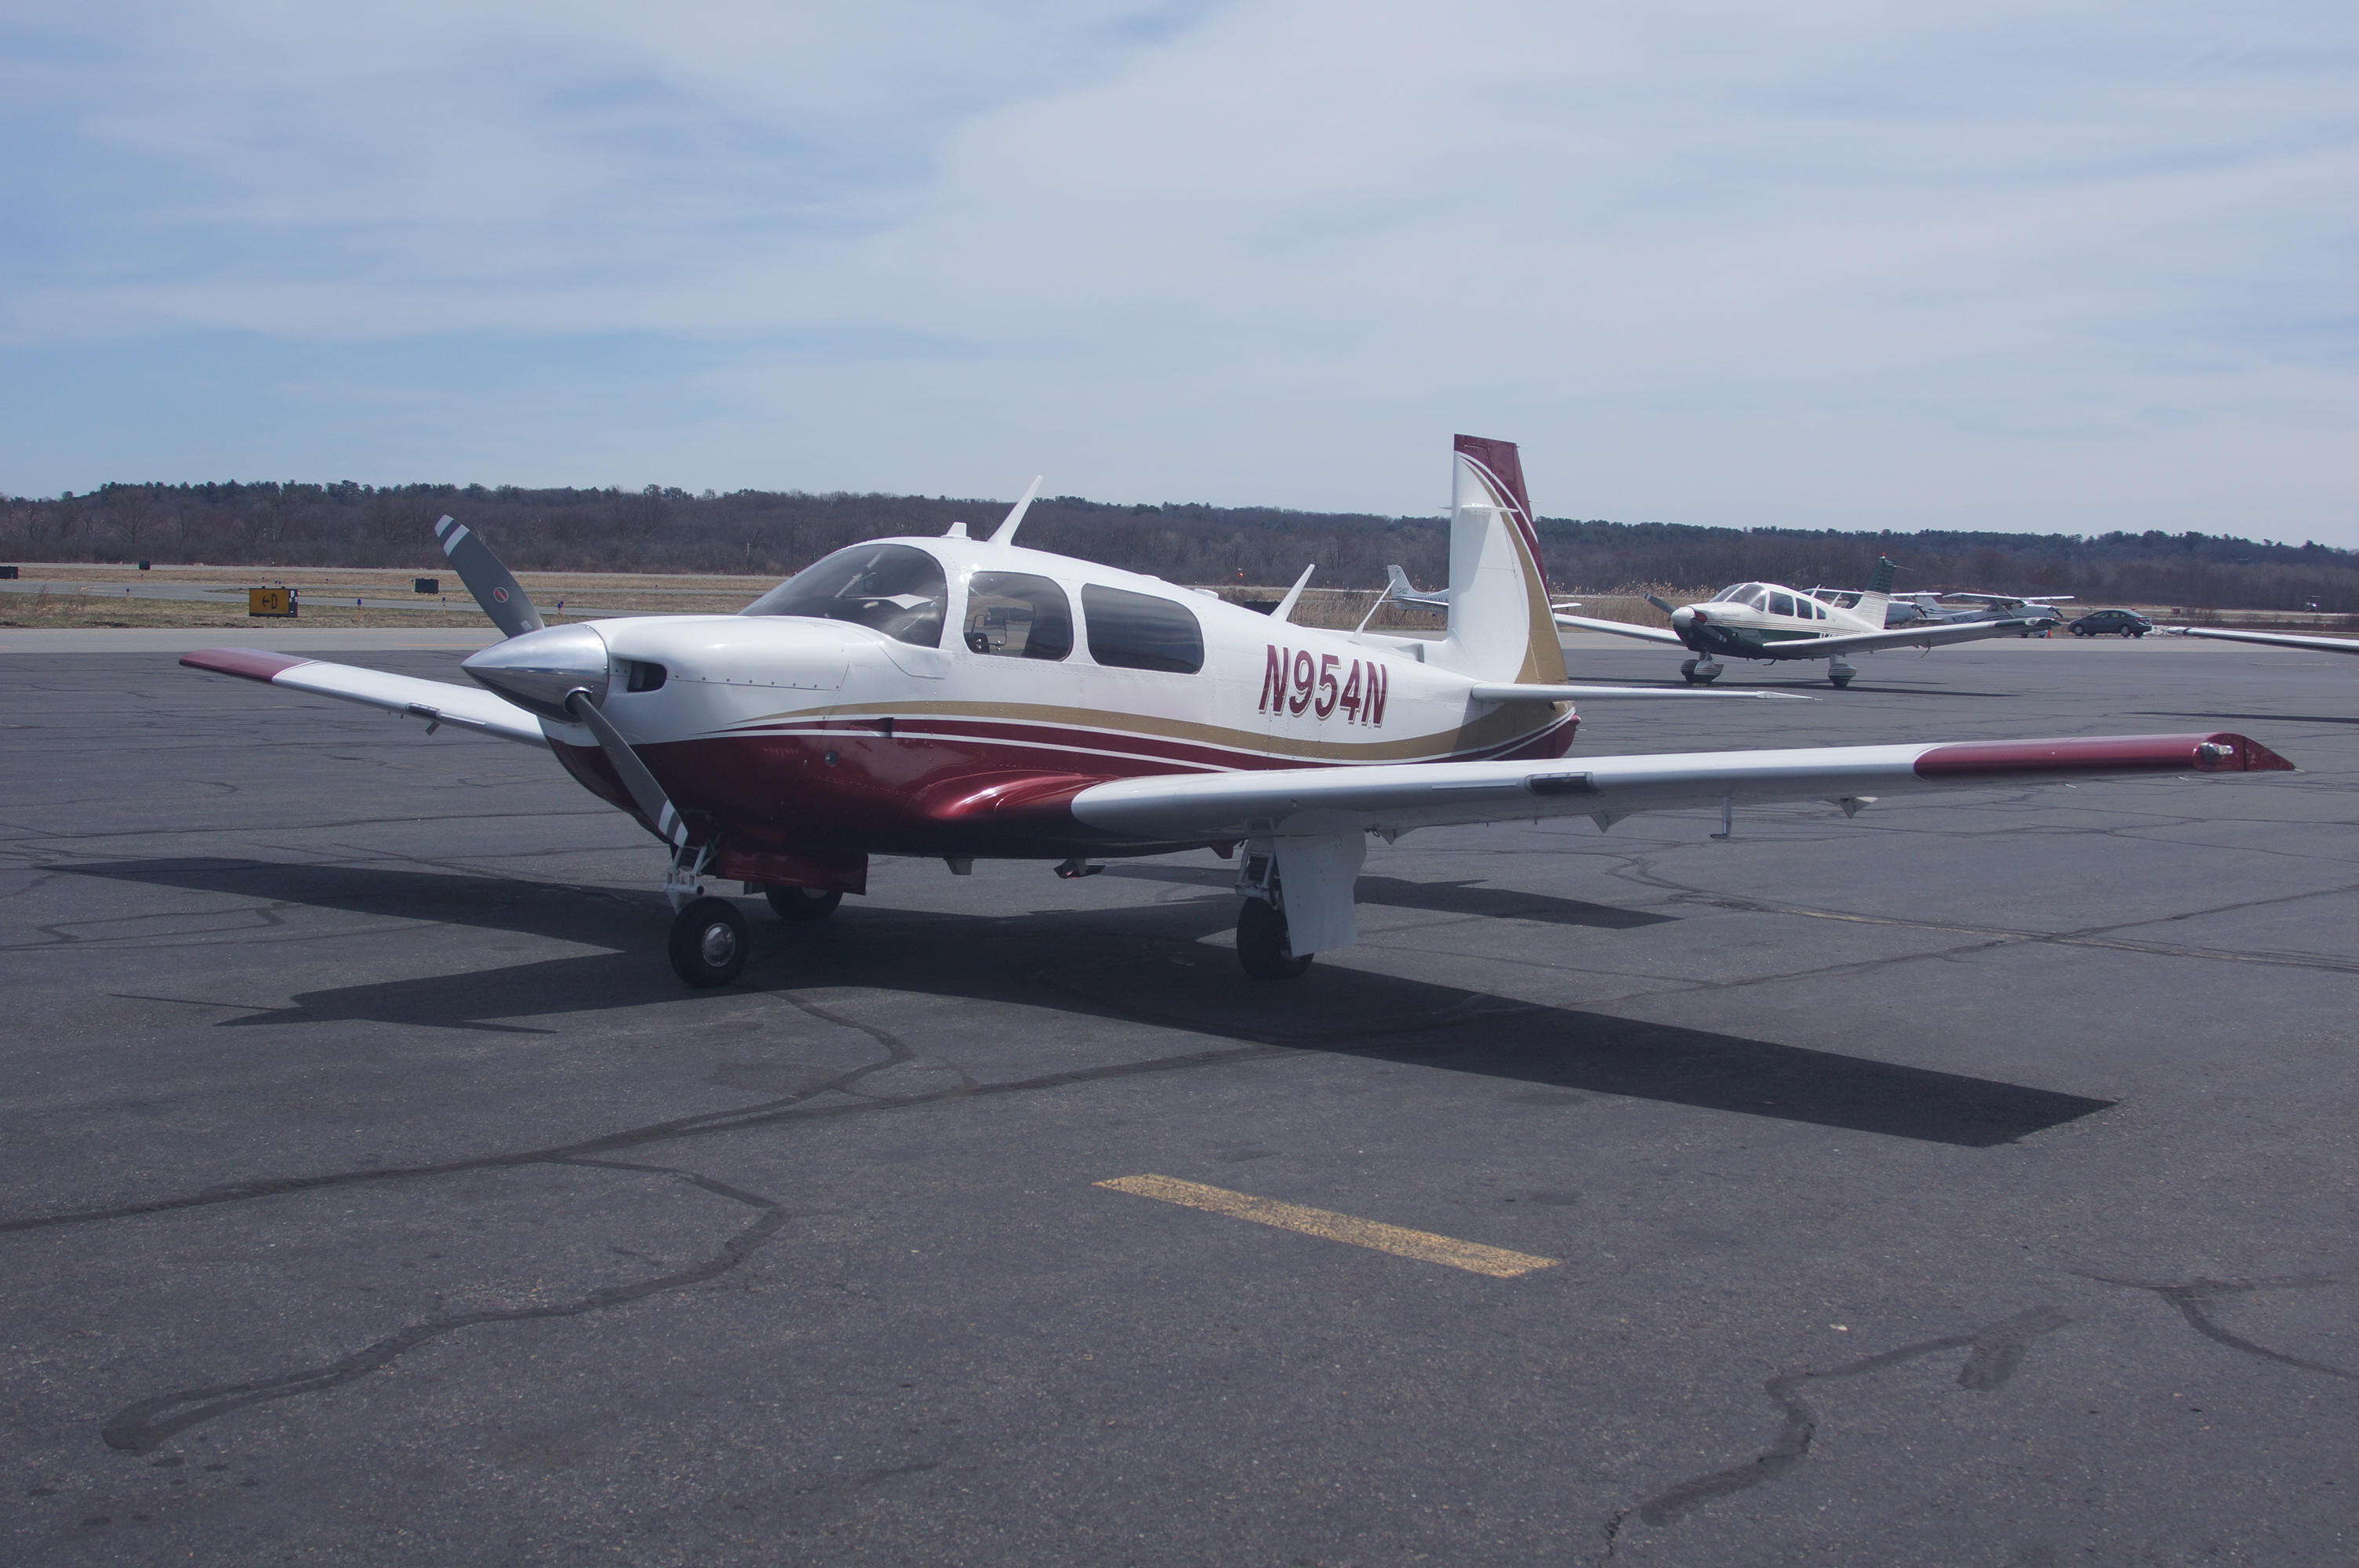
Jimmy, I would like to add support to Marauder's comments and some data from my plane that is off the charts. I have a 1968 F which is completely rebuilt from an empty shell. It is a unique plane. It came into being when I purchased it after it sat for 26 years in a hangar in Dallas. After its rebuild, it has been appraised by a certified appraiser on Long Island, NY at $250,000.00 and is presently insured for that much. When I started the project I was two years out of residency (I am an M.D.), was working too much, and could not afford the distraction and time needed to travel and be an informed bidder in the market. When I found this plane on e-bay, I sent Russell Stallings to take it apart more than it already was and report if it was a good project plane. He supported my idea to rebuild it. The end result is an airplane that looks and acts like a new Mooney. It has long legs (90 gallons), is turbo normalized, the structural cage has been modified to accept an Ovation style panel (with an instrument bow), most if not all 201 upgrades and many parts installed via DER approval from a 1998 Ovation. It has won a Lindy Award (best of show in class) at Oshkosh 2019, Outstanding Mooney at Oshkosh in 2018, and Best F model at the 2017 MAPA meeting. I would obviously like to see the envelope expanded to recognize the work, money and effort that those of us have made to keep these efficient vintage birds flying. I was able to find insurers that recognized that a completely rebuilt airplane is one of a kind and its value is not dictated by Book Value. It is this notion that has given rise to Mooney modifications over the past 30 years. Now that the factory is no longer building new planes, restoration of the existing fleet makes sense, especially if it can be done competently and within an expected predictable budget. There has been a lot of conversation over the near 20 years that I have been around the Mooney community that some want to 201 to return. That is what I have done and others can do as well as there are more owners experienced in the process. The vintage planes are great traveling machines after new equipment and updates are applied. They are also great retirement planes as maintenance in controllable. My thanks to Jimmy for his work considering the value offered by these birds. John Breda -
Flap indicator cable replacement
M20F-1968 replied to JaredDavis's topic in Vintage Mooneys (pre-J models)
The trim and flap indicators were installed differently depending upon the yer of manufacture. The single solid wire is steel and I doubt that you can solder to it. A better connection would to use silver solder (as opposed to lead solder) but you will need an acetyline and oxygen set-up (or similar to do it). You could try to crimp a ring terminal to the wire but I would try to bend it in such a way that it won't come off. I am using a J model indicator in my 1968 F (with DER approval). A picture of a hand lay-up fiberglass wheel well cover and the back-side of the indicator showing the connections is below. John Breda -
TSIO360 Turbo check valve leaking.
M20F-1968 replied to squeaky.stow's topic in Modern Mooney Discussion
I had my check valves rebuild ten years ago by the manufacturer (I do not recall their name just now - it may have been Dukes). As I recall, the rebuild price was about $250.00. John Breda -
This is one example where standard rate turns, or less, are imperative. I do not like turning toward a tank with less than 10 gallons. A more precise answer would be nice to have. John Breda
-
I do not like the thought of fuel planning down to 1 gallon. Knowing how much fuel is in the tank is essential and can be coupled with a fuel totalizer and paper and pen quite nicely. CIES senders help as well. But, a left hand turn to final with 1 gallon in your left tank will get your attention quickly. John Breda
-
Seatbelt shoulder harness downgrade
M20F-1968 replied to philip_g's topic in Modern Mooney Discussion
The factory seatbelts I have came from an Ovation. The retraction assembly is welded to the steel cage near the floor. I did this welding when I had the airplane apart and was doing my rebuild. Installing the Ovation "factory seatbelts" is not trivial. The inertia reels do not simply attach in the same way as the fixed belts would. John Breda -
Seatbelt shoulder harness downgrade
M20F-1968 replied to philip_g's topic in Modern Mooney Discussion
I likely have a set that you can use. Sounds like you have a suitable fixed attachment point for the shoulder belt. John Breda -
Please add me to the list. I am based in the Boston area. My e-mail is john.breda@gmail.com Thanks, John Breda
-
There have been a number of variations on my paint scheme. I think mine makes the plane look longer and less cluttered. The difference seems to be that the maroon red belly does not come up as high as others on the side and the combination of the red and gold striping underplay the overall picture so it does not look to heavy or overdone. I wanted to use white for the top as in reflects more light and heat so there is less issues in the summer sun. John Breda
