Leaderboard


Popular Content
Showing content with the highest reputation on 03/20/2024 in all areas
-
If I am the Seller I would want the buyer to have a pre-buy evaluation done, but there’s no way I’m letting someone I don’t know do an annual I don’t need and risk them declaring it not airworthy and hold my airplane hostage. If the buyer wants to turn their pre-buy evaluation into an annual inspection once the deal had closed, feel free.2 points
-
Most well integrated panel: G3X, GFC 500, GTN Xi (G5 is designed as a standby for G3X, but Garmin has recently updated GI 275 to make it better integrated. There may still be some limitations, so check). This requires a major rip and replace and if you are going to do this, it's ultimately less expensive to replace everything you might eventually want to replace which increases the cost. Mine cost about $80K. Keep KFC 150 option: G500TXi, GI 275 standby. You can add a GFC 500 later if the KFC becomes troublesome because the GI 275 has the GFC software and will drive the TXi FD which doesn't work with the G3X. Lowest cost: Replace the King AI and HSI with GI 275s. You can add a GFC 500 later as described above. If you have a GTX 345 transponder, you can Bluetooth pair it to an iPad and get GPS, AHRS, and ADS-B In using ForeFlight or Garmin Pilot. There are probably a lot of other options for getting data to an iPad. So, this panel, while not quite as sexy as having a big screen will give you most of the functionality at a much lower cost. All the dealers pay the same for the hardware (less some end of year rebates depending on how much they sell). Cost and quality of installation varies widely. I would get several estimates for each option. And always remember, shops are in the business of selling stuff.2 points
-
I almost hesitate to write this, since it is unconventional and requires some care. At least in the old Mooney, the master cylinder under the floor sits flat and the inlet/outlet also horizontal. As Mark indicated, the air can get stuck there and difficult to purge. I’ve tried bleeding right there, but difficult doing that solo, and still opportunity for air to be at the top of the cylinder. Getting some flow through there may help….but I’ve always ended up with just a little softness. Here is where it gets unconventional, but worked for me. If I recall, the forward fitting faces left. While flying, with plenty of speed and coordinated, perform a relatively steep, climbing, right hand banked turn……..and simultaneously pump the brakes. This allows the final few bubbles to to find their way to the left forward fitting and to the reservoir. This is not a surrogate for a full brake bleed….just those final few bubbles. Results may vary…use care…perform clearing turns and don’t spin…have fun.2 points
-
Way cool! one of my favorite topics! my ‘94 (O3 powered) O1 just became an O3! But mine is more valuable than his…. My S/N is lower!!! Whoever is doing the sales job on that airplane is showing that he is not as familiar with Mooneys as we are… The Standing Ovation is an Awesome Aircraft… The O1 is super cool… it can be upgraded, at will, to be similar to the G1000 with waas capability, without the drag of working with both Mooney and Garmin… Now…. If you have the unlimited stack of Benjamins in your aviation account…. There is no reason to avoid the Acclaim… If you are still dragging teen agers around in the back, and never exceed 12.5k’…. Trying to get the right Acclaim will be an extra challenge… 15 years or so with the O1… I would gladly swap for an Acclaim…. just because… PP thoughts only… +1 for Jimmy’s guidance! Best regards, -a-2 points
-
It's way cheaper to fly myself and the wife to dallas than the Vonlane bus. Woot, finally got a win. 17g @ $5.50 < 135$ one way bus ticket1 point
-
Going from Delaware to Texas in my Mooney going home commercial I can’t stomach going back commercial so I’m looking at a one way car rental which I did last year, they gouge us on one way renting but considering I don’t want to do both so I’m driving one way, I guess dumb can’t always make decisions based on cost. Anyone want to fly me down I’m in..1 point
-
There does not seem to be a AN Standard for valves. Probably because there are other standards. Aeroquip is just hoses. But Eaton has some PMA valves, Not sure this is one of them, but it is Eaton kind of Aeroquip. $50 is cheaper than the leaky ones. https://www.hydraulic-supply.com/ff90587-08.html1 point
-
This last time I did my brakes, I was alone. Knowing this would be a challenge, I employed the following procedure which worked flawlessly. Tools: Mighty Vac - This is simply a hand pump that draws air out of the system. This inexpensive pump from Harbor Freight or any other brake/clutch bleeder would work just as well. Motive Power Bleeder This is simply a pressure pot the pushes fluid into the system. Any other pressure bleeder would work as well. I have seen garden sprayers repurposed as pressure pots as well. 1/4" AN flare fitting for Hydraulic reservoir. Various fittings and several feet of vinyl tubing in different sizes. Various hose clamps or zip ties. Clean Bucket/Catch can Procedure: Flaps first - Make sure flap lever is in the up position. Attach 4' of clear vinyl tubing to flare side of 1/4" AN fitting and clamp to seal. This will serve as an overflow. Remove plug from fluid reservoir and and thread on AN fitting with tubing. Ensure tubing outlet is in a bucket/Catch can. Fill pressure pot with one qt of Hydraulic fluid. Royco 782 synthetic is superior to 5606 in my opinion. They can be combined if not fully draining the system. Attach pressure pot to the T fitting on the flap actuator with a clamp. This is the lowest point in the system. It is accessed though a small oval panel just ahead of the stub spar. It is a tight space with which to work. Make sure the pressure pot hose is well secured to the fitting and is not kinked. Pressurize pot (30-35PSI is plenty). Get into the plane and watch for fluid at the reservoir overflow tube. As soon as fluid is visible in the hose, begin pumping the flap handle vigorously. You should feel it pulling fluid into the pump cylinder. Exit plane and have actuator T fitting cover on hand. Depressurize pot, then quickly remove hose from T fitting and replace with cover. Clean up hands/remove gloves. Pump flaps do to lock out position and leave them there. Does not matter how many pumps it take at this point Using a straw as a thumb siphon, reduce the fluid reservoir to ~half full Empty catch can into pressure pot move on to the brakes Brakes - Attach pressure pot to bleed nipple on bottom of caliper and secure with clamp or zip tie. Pump pot to 30-35psi Open bleed nipple Get in the airplane and pump the appropriate peddle as fluid is pushed into the system. You will feel fluid enter the brake cylinder. When over flow is noted, get out of plane and close the bleed nipple. remove pressure from pot and disconnect from caliper. Repeat process on other brake circuit Using a straw as a thumb siphon, reduce the fluid reservoir to ~ half full Attach hand vacuum to reservoir. This can be done using the vent on the top of the reservoir or the fill opening; it does not matter which but the other will need to be blocked so it is air tight. Draw the system down to 20- 25inHg and position the pump so that the gauge can be seen from the cockpit Raise deployed flaps while system is under vacuum. Actuate flap handle (lever in up position) and brake peddles from cockpit while system is under vacuum. Release vacuum and test systems. Repeat if needed Remove pump, unblock reservoir vent and go fly. Notes: Not all hydraulic reservoirs are the same. Depending on year, some are welded aluminum cylinders with AN fittings and some look more like a repurposed solvent container. The person servicing the system will have to procure the correct fittings to work with the installed cylinder. Either flaps or brakes can be done independently without doing the other. I personally prefer to start with flaps when doing both. It may take a few days for all of the air to vacate the flap system. The best way to facilitate the process is to pump the flaps 3/4 down and leave them for a day (or a week). If a freshly rebuilt flap pump is being installed, fluid will travel more easily through the system with the retraction speed adjustment screw backed out to max flow. This is not necessary, but may make the process easier. Conversely, if the retraction screw is inadvertently tightened all the way down, fluid will not flow through the system. I welcome comments if it appears I have left anything out.1 point
-
I think some of it has to do with luck as well, whether or not and where any bubbles might get trapped. I seem to recall only once or twice where it was straightforward for me, including working with my previous IA who always used a pump can at the caliper. I usually start with a pump can at the caliper, and if that doesn't work then I'll alternate between the pump can and a mighty-vac at the caliper. Using a clear tube at the caliper you'll be able to see if any bubbles come out, and usually it's a string of tiny bubbles that may be hard to see. Usually the final iteration that gets it to work will be the pump can. YMMV. There's a local high spot in the system where the soft line meets the hard line in the wing, and the master cylinders make a sort-of local high spot as well. Those both make bleeding trickier than some systems, so I don't find it surprising that some airplanes are hard to bleed. Yankees and Cessna singles are super simple in comparison, with the reservoir at the master cylinder being the high spot. My neighbors with Bonanzas complain enough that I get the impression they're much harder to bleed.1 point
-
I have also been using an oil can for years and it always works. I use a piece of clear plastic tubing from the oil can to the caliper. That way you can see if you are pumping in any air and stop before it gets to the caliper.1 point
-
The pumping up with an oil can from the caliper bleeder has always worked for me. You have to have a good oil can with no leaks. Small piece of tubing and pump rapidly to push the air out. 10 pumps should do it. 20 pumps if it is bad. Safety wire the tubing to the oil can. Shorter tubing about 3". bleed the tubing and don't push air into the system. Have someone watch the reservoir and you should see the bubbles. Also a Turkey injector to remove extra oil. What is an oil can you ask. https://www.zoro.com/goldenrod-oiler-6-fl-oz-capacity-steel-5-in-spout-length-6-oz-reservoir-capacity-600/i/G9972462/?utm_source=google&utm_medium=surfaces&utm_campaign=shopping feed&utm_content=free google shopping clicks&campaignid=20749401279&productid=G9972462&v=&gad_source=1&gclid=CjwKCAjwkuqvBhAQEiwA65XxQJYdbCLuQpsKINw0q9ZFk-2SOACb9QkjirC5f3TPEPtcbfdq0b4U5xoCIkEQAvD_BwE&gclsrc=aw.ds1 point
-
It is a PITA for first timers and sometimes seems to stump seasoned Mechanics as well. A lot of the time it boils down to not having the right tools for the job, sometimes there are assembly problems with a rebuilt pump (I've run into this twice in the last 6 months). However, I system that has had no maintenance other than a drain and flush should be fairly easy to return to service. The reason I suggested the vacuum hand pump is because it will eliminate air from almost all of the system pretty quickly. The exception being the pump cylinder, The last bit of any air trapped in the pump will have to work it's way out. I was not bragging, I was merely posting what is possible when one has the right tools and processes for the job. I was working alone and took the system from full of fluid, to full of air, to full of fluid in under two hours. It is not rocket science, but small details can impede success. If the flap pump has been removed and rebuilt, that adds another area of potential problem. In the last six months I have encountered two different aircraft that have had what seem to be improperly serviced flap pumps (both pumps serviced by MSCs, though I don't recall which) installed. Full disclosure, I was not on site for either situation. In one case the pump was returned to the MSC for warranty repair. Post warranty reinstallation went flawlessly. In the other, I sent them a pump that I had on the shelf and they were able to coble together a working pump by "Frankensteining" them together.1 point
-
No. The pawl engages based on the speed of the reel turning. Slow, it is free, increase the speed and centrifugal force moves the pawls to engage.1 point
-
It’s been a few years, but I recall having to pull the gear.1 point
-
Hi, I will be at he airport and will get some photos of filler neck...2008 Ovation Think it can total 103 gal Alan1 point
-
Here is a post that I did on the RCAllen RCA2610-3P mini6 instrument. Hope this helps, James '67C1 point
-
Hey Dan! see my response above. Best regards, -a-1 point
-
Jason fro CAV informally quoted around 60K for either one (I think inadvertent was a few grand less). This was for a Bravo with Dual alternators. Biggest difference was dual pumps and heated stall warning sensor.1 point
-
Just make sure that kit is for BOTH pilot and passenger; my memory is a little vague, as it has been over 5 years, but it might be 2 X $40.1 point
-
If you can find an Ovation DX (2004 ish), that would be a great choice, all other things being equal. The DX ovations and bravos were the side-by-side steam gauge models when G1000 was introduced, and they got the shorter panel, which is very nice. No doubt some have been glassed with stuff that is in a lot of ways better than G1000. -dan1 point
-
Look more closely. Under the tks panel is a home-made placard saying “flight into known icing prohibited.” FIKI should carry a good premium to a no-hazard installation, which this appears to be. -dan1 point
-
Premium + price for a non-FIKI plane that is being represented as something it is not? Nah. -dan1 point
-
If you want a turbo, get it. When I queried this group 9 months ago about what to get, there were basically two camps: 1) The Ovation should do the job, or 2) you want a turbo. I'm a flatlander in Michigan with no missions out west. But, even Mike Busch says he would not own a non-turbo. I was on the Acclaim bandwagon and called Jimmy Garrison to see what he had and advice. He said, "Look Ed, if you think you'll want to be flying a lot in the flight levels then get a turbo. But if that's not you, let me talk you into an Ovation. The market is 3x larger for Ovations than Acclaims, the cost of ownership is less, dispatch reliability is higher, and below 8,000 feet the Ovation is just as fast." My research indicated that at the same speed/altitude the Ovation will be 2 gph less than the Acclaim (the Bravo will be worse, but less expensive.) The catch is that the Acclaim (and to a lesser extent the Bravo) can fly speeds the Ovation cannot and altitudes the Ovation cannot. But as the turbo guys will point out, don't let my rationalizations dissuade you: if you want the turbo capability, and are OK with the debatable tradeoffs, get the turbo. 100% of the turbo guys say they have no regrets. There are some non-turbo guys that quietly say "sometimes I wish I had a turbo." For me, the jury is still out. Best, Ed1 point
-
Byron’s a straight shooter. If nothing else pans out, I’d have him do it, just ask that a different mechanic do the inspection (maybe even Byron himself, if he has time, after one of his guys opens it up).1 point
-
A neat feature with the G3X CAS is that it has outputs for Warning and Caution to drive external lights. You could repurpose the fuel lights in the annunciator panel for Master Caution and Master Warning. I have a PMA 450B audio panel and I connected these G3X outputs to it so that it audibly annunciates "Master Warning" and "Master Caution" until you acknowledge the indication on the audio panel. That really gets your attention.1 point
-
@Mcstealth Janitrol-MaintenanceManual 2.pdf1 point
-
It’s epoxy, but not all epoxy is the same. We use MGS . Structural Aircraft epoxy. That’s what specified in the Cirrus repair manual, for example. Hardware store epoxy is about 10% as strong as this stuff and the boat resin fiberglass Polyester MEKP cured stuff from the hardware store is about one percent as strong as this. You might as well use some old bedsheets and some fish, glue and save your customer some money on materials because the outcome is going to be the same. Added Weight and nothing else. but if you use MGS and real structural aircraft, fiberglass or carbon fiber, you can make it pretty good repair. I’ll see so many poor repairs on airplanes that come in here with Brown hardware store fiberglass, chop strand mat and resin.1 point
-
GSA reimbursement rate for gov travel is 67 cents per mile for a car. It is $1.76 per mile for your airplane. The $1.76 per mile, works out to $354 per hour for my 252 at cruise (also converting to statute miles for cruise speed). I need to figure out some trips I can take and fly. But they do typically cap the payment to the cost of traveling by commercial air. But that would include parking, driving to/from the airport (or taxi/Uber).1 point
-
The G3X and GFC 500 are part of a system. Most of the autopilot software is actually in the G3X. It’s a completely different architecture than a KFC 150. Garmin’s solution for legacy autopilots is the G500TXi or a pair of GI 275s.1 point
-
I had mine resealed by Johnson Propeller in Shafter five years ago. They had a truck that came by my AP/IA's hangar, picked it up, then dropped it off.1 point
-
***PIREP!*** I put an update and a PIREP in the original post for those that are interested.1 point
-
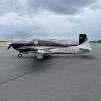
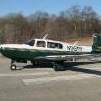
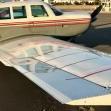
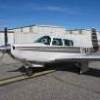
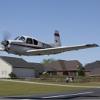
Here’s a few photos of the process to move this old Mooney.


 1 point
 -
I would recommend the inertial reel for at least the front seats. It's so much more pleasant to put on and wear in the cockpit. After nearly 2,000 hours of manual adjustments, I smile every time I use my inertial reel seatbelt.1 point
-
You should look at the overcenter link bushings. Undo the main gear door links so the door hangs down loose. With the gear up, push the wheel up and down and look at overcenter link. If it moves laterally, the bushings or bolts are warn. The slop here can make the gear hang down.1 point
-
The jacks you have are probably rebuildable. Usually it's just replacing some o-rings inside to rehab them.1 point