Vance Harral
-
Posts
1,550 -
Joined
-
Last visited
-
Days Won
6
Content Type
Profiles
Forums
Blogs
Gallery
Downloads
Events
Store
Everything posted by Vance Harral
-
 The actuator in your M20G should arguably be inspected in accordance with Mooney Service Bulletin M20-190B, see https://cdn2.hubspot.net/hubfs/4147179/technical_documents/service_bulletins/sbm20-190B.pdf. While that SB does not specifically call out the ITT LA11C2115 actuator, it does call out the ITT LA11C2110, and there is no practical difference between these two ITT actuators. The SB requires 100 hour grease intervals and 200 hour inspection intervals. Some people argue that installing 40:1 gears per Mooney SB M20-112 should increase the inspection interval to 500 hours. But for whatever reason, Mooney themselves have not seen fit to revise M20-190B. Don Maxwell has some commentary on this at http://donmaxwell.com/dukes-itt-landing-gear-actuator-401-ratio-gears-si-m20-112/ If you're looking for data points about what others' do, we remove the actuator and perform the inspection of the internal gears every other annual, which is a little less than 200 hours for our partnership We do this even though we've performed SI M20-112 to put 40:1 gears in our ITT actuator. Any A&P can perform the inspetion. You can do it yourself, with appropriate A&P supervision. The chief risk in performing the inspection, IMO, is the removal and re-installation of the emergency manual gear extension cable that is necessary when removing the actuator for inspection. The mechanism that engages this cable has to be "rigged" (positioned) correctly, and this is a somewhat delicate operation. Too far in one direction and it will not engage when the lever in the cabin is moved to the engage position, rendering the emergency extension mechanism useless. Too far in the other direction and the cable stays engaged even when the lever in the cabin is in the disengage position, leading to the emergency extension crank spinning when you electrically raise/lower the gear. So whether you do the work yourself or have an A&P do it, make sure a full suite of emergency extension tests is performed after reinstalling the actuator, so as to ensure the emergency extension engagement mechanism is correctly rigged. Every time we perform the inspection, I wonder if it's wouldn't actually be less risky to do it less often than the SB calls out, for fear of mis-rigging the emergency extension cable. The SB is not legally binding, of course, so it's not "illegal" to do it every 3rd or 4th or 5th annual. But for better or worse, we keep doing it every other annual. Pay no attention to the comments in this thread about "no back" clutch springs. Your ITT actuator has no such component, it was introduced in later model actuators. The brushes in the actuator motor do wear out, but there is no specific prescribed interval for disassembling the motor and inspecting the brushes. We replaced ours when our actuator failed the M20-190B inspection about 10 years ago. We sent the actuator to LASAR who installed the 40:1 gears, and they farmed out the brush replacement to some third-party shop (I don't recall if it was George's or Aeromotors or someone else). It just seemed like a good idea at the time, since we were effectively overhauling the actuator. One reason I don't worry a whole lot about the brushes is, I consider failure of the electric motor to be kind of a non-event, provided the emergency extension mechanism is properly rigged. All the bad news stories I'm aware of involving electric gear - including one in the history of our aircraft with a prior owner - involve a failure of the emergency extension mechanism after the electric motor fails. Accordingly, we're actually a lot more paranoid about inspecting and testing the emergency extension system than we are about the motor itself.
 -
Replacing aileron control horns
Vance Harral replied to Vance Harral's topic in Vintage Mooneys (pre-J models)
Excellent point, I'll take a closer look next time I'm at the hangar. -
Replacing aileron control horns
Vance Harral replied to Vance Harral's topic in Vintage Mooneys (pre-J models)
Yeah, Beegles is nationally known. We're fortunate to be just 20 minutes away by Mooney, or about 45 minutes by car in a pinch. The initial appointment this Friday is just for them to take a quick look and discuss options. When it's time to do the actual work, we may take the whole airplane there, or just drive the aileron over. -
Replacing aileron control horns
Vance Harral replied to Vance Harral's topic in Vintage Mooneys (pre-J models)
Thanks to everyone for the replies. We have an appointment with Beegles in Greeley this Friday to take a look and give us an estimate on the job. I'm hoping they'll be able to get a bucking bar in the aileron and refasten the skin with conventional rivets, rather than Cherry Max. Not because I personally think Cherry Max rivets are "bad" in any functional way, but just because they'll cosmetically look out of place. I confess I'm concerned this is going to get pretty expensive - probably involves checking balance on the aileron after repair, etc. But we want it repaired the right way. -
Replacing aileron control horns
Vance Harral replied to Vance Harral's topic in Vintage Mooneys (pre-J models)
That is likely the reason why this control horn is worn in the first place - the bolt holding the rod end was not tightenened, and the bolt was allowed to work in the hole rather than the rod end working as it should. We'll be sure to tighten the rod end bolt properly on re-installation. But we're not comfortable with just cranking the rod end bolt down on the existing horn with washers, and assuming it will stay tight enough not to wiggle. It might be possible to ream the existing horn and insert a bushing, but the no-apologies fix is to replace the horn with the new part. -
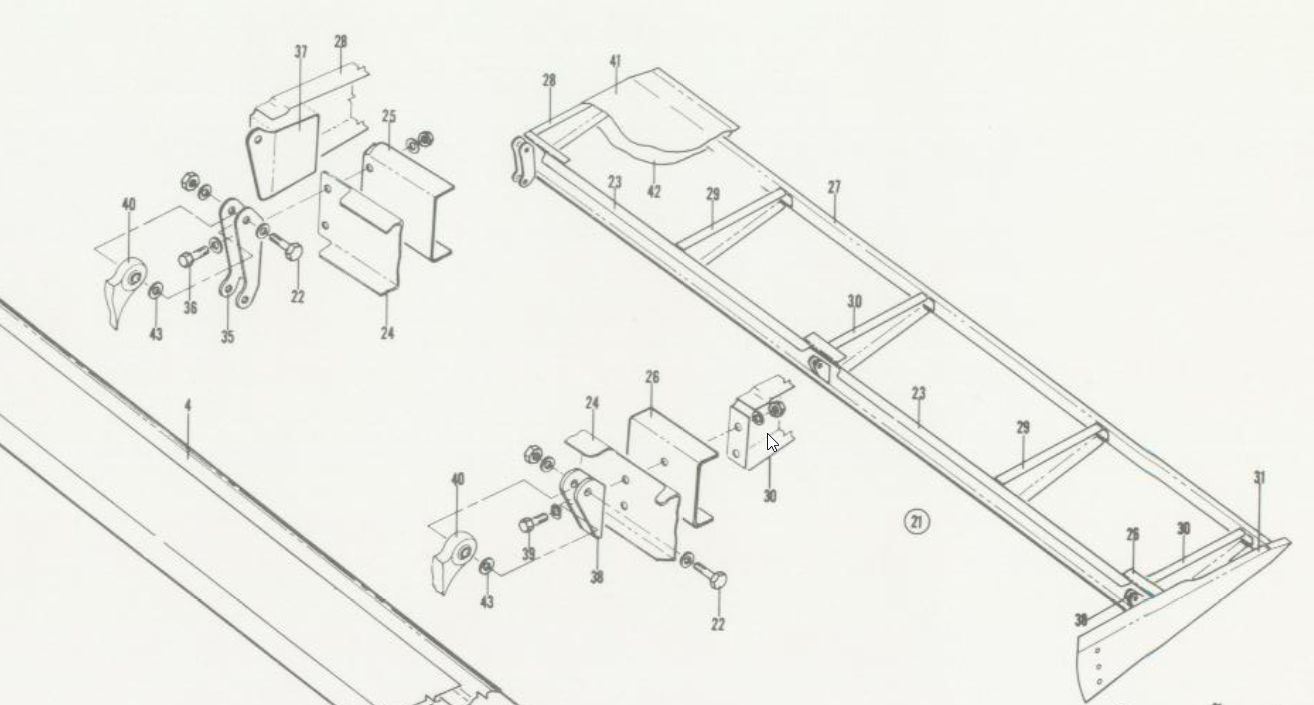
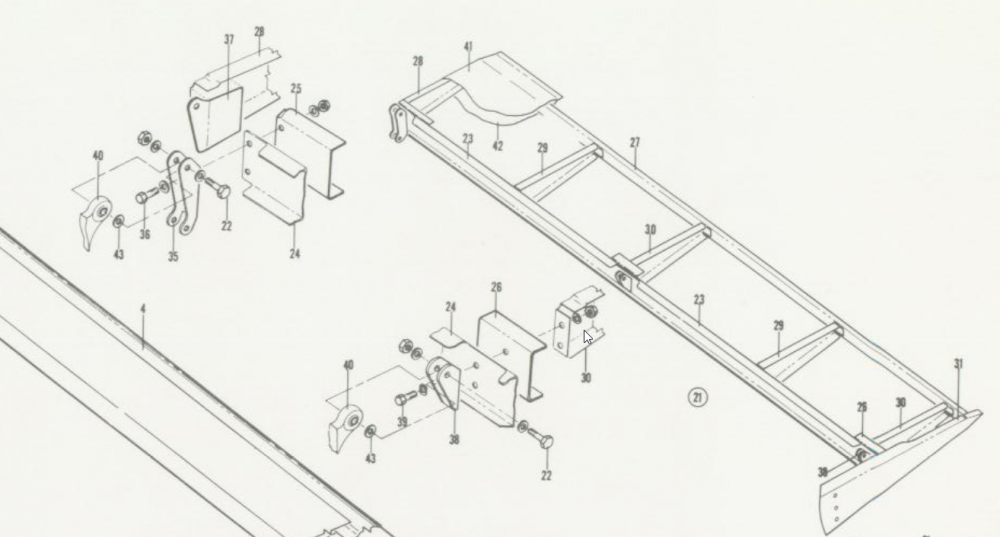
At our annual earlier this year, our mechanic flagged the left side aileron control horn as having enough slop to warrant concern (part #35 in the attached picture from the parts manual). The aircraft is a 1976 M20F, but I think all models have this same hardware. The problem is that the lower holes - the ones which capture the aileron control rod end - are a bit hollowed out, and this allows the aileron to wiggle even when the yoke is held firm. The obvious concern is flutter. We were able to obtain a replacement part from Mooney shortly before the factory hiatus, but we're running into trouble installing it. The bolts which fasten the horn to the aileron spar cannot be turned from the bolt head side, because the flanges of the horn actually capture the head and prevent it from turning. The only way to remove the fastener is to completely remove the nut from the "back" side (i.e. from inside the aileron). The aileron spar does have access holes, and it's possible to get a wrench on the nut. But with a conventional wrench, you can only turn the nut about 1/8th of a revolution before having to remove and re-seat the wrench. As you can imagine, this is a painfully slow process. After fiddling with it for over an hour, the mechanic only manged to turn the nut about 1 full rotation, and he essentially gave up (said it wasn't cost effective to keep doing things that way). He suggested it may be necessary to drill out some of the rivets on the aileron skin, and peel back enough of the skin to get reasonable access to the nut. If that's the only viable fix, we can go that route, but it seems like a major deal to partially (or fully) de-skin the aileron. Anyone ever made this repair and know of a trick?
-
Gear Down annunciation in J
Vance Harral replied to midlifeflyer's topic in Modern Mooney Discussion
While there are always corner cases, it would be rare for only one wheel to have a problem. It would be vanishingly rare - impossible I'd argue - for one wheel to have a problem you could actually do something about in flight except make a normal landing on a normal runway and hope for the best. The Arrow and other aircraft like it have three indicators because their hydraulic gear systems are arguably three independent mechanisms, each of which could fail independent of others. Yes, one wheel can "hang" in those systems, and you might jar it loose with some positive G maneuvers, etc. Not so in a Mooney. If you're really concerned about it and think it would change your piloting in a positive manner to have three indicators, suggest you just mount a camera on the tail tie-down, and look for all three gear to be down on your phone/tablet/whatever. Cheap and easy. -
Aviation Insurance Market Update
Vance Harral replied to Parker_Woodruff's topic in General Mooney Talk
It's part of some - but not all - CFI policies. It sometimes goes by different names, e.g. "negligent instruction" or "previous instruction liability". SAFE offers it as a benefit, see https://www.safepilots.org/programs/cfi-liability-insurance. The "standard" Avemco CFI policy does not include malpractice coverage, but if you purchase Avemco CFI coverage through NAFI it does. The best one-stop treatise I've seen on liability management for CFIs is at https://www.aviationattorney.com/publications/primer-aircraft-flight-instructor-liability -
Aviation Insurance Market Update
Vance Harral replied to Parker_Woodruff's topic in General Mooney Talk
Having a clear discussion about who is acting PIC when an owner pilot flies with a CFI is a great idea. But the majority of the value in that conversation regards who will direct operation of the aircraft in the event of an emergency. It has little - and in some cases zero - value in the context of everything else being discussed here. As mentioned above, the FAA/NTSB start with a basic presumption that a CFI is the acting PIC, when it comes to certificate action. My understanding of the case law is that this is only a starting presumption, and may not necessarily lead to the CFI being disciplined. So if you're looking to protect your certificate, there "might" be some value in relating a PIC agreement to the board. But the mere fact an agreement was made is not particularly protective. In many cases, both heads are actually on the table, and both parties might be disciplined. More importantly, liability lawsuits - including those initiated by an insurance company in the course of subrogation - are not subject to FAA/NTSB jurisdiction. The judge/jury is not obligated to use the FARs or NTSB case law as precedent, and almost certainly won't care about a verbal PIC agreement, especially if the details of that verbal agreement are disputed (as is often becomes the case when an incident occurs). A party attempting to deny liability might have a stronger case if there was a PIC agreement in writing, but who knows? I can easily envision a jury being convinced that The Old Gray Eagle CFI should have protected The Hapless Owner regardless of what was said or written. The point is, all this talk of agreements and rulings about who is the acting PIC, based on FARs and NTSB case law, really has very little bearing on insurance claims and liability law. Where the rubber hits the road is, flight training in piston airplanes simply doesn't pay a living wage. Never has, likely never will. Therefore, everyone who does it is either a young and low-net-worth individual instructing as a temporary gig on their way to something better, or a retired/hobbyist CFI who doesn't need the money. The latter can lay out whatever terms they want, and most of them now insist on named insured/waiver of subrogation, for all the reasons mentioned in this thread. Owners unwilling to accept those terms are welcome to stand on principle, but it restricts their pool of instructors to the young/low-net-worth set. Some of those folks are excellent instructors and I don't mean to imply otherwise. But on average, they are less experienced. They are also more likely to mis-understand the named pilot/open pilot clause on someone else's insurance, and mistakenly think they are covered, when in reality they are subject to subrogation by the owner's insurance company. Those of you in this thread who now understand the difference will have to make your own moral decisions about whether their ignorance is in any way your responsibility. -
Local hangar and tie down costs
Vance Harral replied to NotarPilot's topic in Miscellaneous Aviation Talk
Going rate for a T-hangar in Longmont, CO (North Denver Metro Area) is $300/month. Relatively new hangar (built 2005), bifold door, electricity included. -
Help appreciated comparing Mooneys
Vance Harral replied to mike_s's topic in Modern Mooney Discussion
Our airplane (the one in my avatar) was gear-upped and repaired in 1991. It was not a significant concern when we purchased it in 2004, and I can't recall ever once worrying about it in the 15 years of ownership since. The incident is well documented in the logs, was pointed out by the honest seller, and we paid a price in accordance with that event and others. When it comes time to sell, we'll be similarly honest with prospective buyers, and accept the fact some of them may choose to use a 30-year-old gear up incident as a price negotiating point. Whether it actually has any impact on the sales price will just be a matter of market conditions - maybe none, but maybe some, and in the latter case I wouldn't begrudge anyone offering a slightly lower price based on the gear-up. I would feel uncomfortable selling to anyone who felt a 30-year-old gear up in a 45-year old airplane was actually a meaningful safety risk, as opposed to just a price negotiation tactic. It would indicate they don't understand the nature of old aircraft - or aircraft ownership in general - and would be likely to harass us about every imperfection anyone found in the airframe for years after the sale. -
Help appreciated comparing Mooneys
Vance Harral replied to mike_s's topic in Modern Mooney Discussion
Just one guy's opinion, but I think past a certain age point, a "no damage history" ad starts to look negative rather than positive. The reason is that old airplanes are extremely unlikely to have zero non-wear-and-tear damage events. NDH claims on such airframes make me think the seller is either naive, or outright dishonest. A circa 1980 airframe is 40 years old at this point, and 40-year-old airplanes nearly always have least minor damage events: couple of hail dents, a little hangar rash, a patch where a cowl screw or inspection panel pulled through due to over-tightening, and so on. I'm sure a number of those airplanes have never been crashed into a hangar or gear-upped, but that's not the same as NDH. Each person has to decide for themselves if an NDH claim is legit, but I'm quite certain there are more NDH claims in ads than their are actual NDH airframes. I think we'd all be a little better off if the NDH purists admitted that philosophy is only practical on new-ish airframes. It would go a long way toward combating the incentive for owners to fudge or omit logbook entries. -
You don't have to get a new exam every year. You do have to "check in" with the FAA every year, in the form of sending them compliance paperwork, including a status update from a board-certified sleep physician that usually requires an appointment with that physician. Some people manage the paperwork dance with the FAA entirely on their own, via certified mail. If you choose that route, you have to wait for the FAA to respond with your new certificate, and turnaround time varies. I choose instead to pay $150 to visit my AME, which is what he charges to eyeball the paperwork that's going to the FAA, check that everything is in order, and use his issuance authority to give me a new certificate on the spot. In terms of hassle, it's about as irritating as getting the actual physical, yes. But there is no exam, and it's not possible to "fail" this non-exam checkin with the AME for any reason other than OSA compliance itself.
-
I'm guessing the hold they wanted you on was the one published on the approach charts, as Mike referenced. Requesting clarification is an obvious choice, and I'm sure you did. So the question this raises is, how do controllers know about "published" holds? I'm assuming ATC rarely/never looks at the approach plates and enroute charts pilots do. My guess is that "published" holds are somehow depicted on their radar screens, but I don't know how it works in practice.
-
Unfortunately, you can't convert a certified airplane to an experimental-amateur-built type certificate, which is probably what you meant by making your Mooney "experimental". An E-AB type certificate allows broad freedom to fly the airplane, as you see the RV/Kitfox/etc. crowd enjoying, but requires you actually build the airplane. With a lot of hassle and paperwork, you could probably convert your Mooney to some other type certificate which would allow you the same broad maintenance leeway as E-AB, e.g. experimental-exhibition, or restricted. But it would severely limit the type of legal flying you can perform. You wouldn't be able to just jump in the airplane and go for a $100 hamburger run anymore. More info here: https://www.faa.gov/aircraft/air_cert/airworthiness_certification/sp_awcert/
-
More likely they were lost by someone who disassembled the caps to install new O-rings in the inner shafts. The first set of caps on our airplane were missing these washers too. They "worked", but one side was pretty wonky - I think in part because without the sacrificial washer, the cam-shaped corner of the lever wears against the bulk of the cap. We bought some second-hand units which had the washers and they work better.
-
Apologies for the confusion. I coulda sworn the individual parts were broken out including the cotter pin. But when I looked in my parts manual I found the same thing as you: only the O-rings are broken out, the rest of the cap is only referred to as an assembly. The critical point is, you want aircraft-grade, cadmium-plated cotter pins, like these: https://www.aircraftspruce.com/catalog/hapages/cotterpins2.php. If you just go to the local hardware store, you're likely to wind up with mild steel cotter pins with no plating or other corrosion protection. These are much more likely to rust, and consequently fail and/or drop contaminants into the tank. I bought an assortment of cad-plated cotter pins from Spruce a while back, put them in a fishing tackle box along with other miscellaneous hardware, and use a few at every annual: fuel tank caps, seat rail pins, etc.
-
2019 Acclaim Ultra down at DVT
Vance Harral replied to ragedracer1977's topic in General Mooney Talk
It's definitely beneficial and I'm not knocking it. That said, while I trust its terrain modeling pretty well, I'm less trusting of its wind model, and think it could be misleading. Foreflight has no way to actually measure the wind around you. So it's just using some forecast model, the granularity of which is much coarser than the actual distance you can glide at piston altitudes. Anecdotally, I've flown around the pattern many times in surface winds that should have made the glide circle quite oblong, and yet it was portrayed as generally symmetric. Bottom line, even with the glide circle, you need more than a quick glance at Foreflight to know how far you can glide in any particular direction. -
You want the cotter pins with the specific part number called out in the M20E parts manual. You can order them from Aircraft Spruce, or other online aircraft parts suppliers. While these are "probably" the same cotter pins as the ones in my M20F, I'll let an M20E owner chime in to be sure. If you don't have a parts manual, you'll want to obtain one from Mooney.
-
The thread you want to read is here: My guess is that when your mechanic "re-greased" the jack screw, he just slopped some fresh on the jack screw shaft, through the opening in the empennage. That's fine for regular maintenance, but once every 10 or 20 or 50 years, you've gotta pull that thing out, disassemble, and clean/re-grease it. Among other things, it provides an opportunity to check the bearings which the shaft goes through.
-
$35K is light for sole ownership, but would be excellent for a 2-person partnership in anything up to an M20F model. That's just acquisition cost, though. What is your budget for fixed and operating expenses after purchase?
-
Not a deal killer by any means. But for what it's worth, this would turn me off on a prospective partnership, and would likely have caused me not to join the very successful partnership I've been part of the last 15 years. People who buy the airplane first and only then cast about for partners are communicating they want things "their way" right from the start. Choosing the partners first and then acquiring the aircraft communicates that all the partners are willing and able to discuss and compromise on big choices. This isn't to say that if you have your heart set on a Mooney, you have to entertain some other brand. But if you're highly fixated on a particular model, and especially if you're inclined to buy a specific airplane first before consulting your prospective partners, sole ownership is probably a better route for you.
-
This was and remains technically legal with respect to 91.155. However, the FAA is on record as saying they consider operating in the clouds without a clearance in class G airspace to be a violation of the careless/reckless clause of 91.13. See https://www.ntsb.gov/legal/alj/OnODocuments/Aviation/3935.pdf
-
Installation of altitude hold components varies by make and model. There are actually three "boxes": the pitch damper, the altitude hold control unit, and the altitude reference chamber. Often all three are bundled together such that they look like just one or two boxes, but they are three units. In our 1976 M20F, the pitch damper and altitude hold control unit are in the front of the airplane, just behind the firewall with the avionics; but the altitude reference chamber is in the tail. I'm not sure why ours is installed that way, might be as simple as lack of space.
-
Replacement parts for PC system
Vance Harral replied to nightmoves's topic in Vintage Mooneys (pre-J models)
Brittain was still answering the phone as of a few weeks ago, but they seem to be in hibernation/recovery mode while the new owner gets up to speed. They weren't able to supply parts when we spoke to them, so we bought a salvage part from Texas Air Salvage instead. Hopefully this is a dynamic situation that improves on a weekly basis. Certainly worth giving them a call: http://www.brittainautopilots.com/