47U
-
Posts
1,264 -
Joined
-
Last visited
-
Days Won
5
Content Type
Profiles
Forums
Blogs
Gallery
Downloads
Events
Store
Everything posted by 47U
-
Your mechanic might be able to replace it with a hose and appropriate AN fittings if the bend radius isn’t too tight. Without a picture, it’s hard to give good feedback. I’m probably out on a limb, myself. I’m wondering it Mooney installed those lines during manufacture before the wing was mated to the fuselage.
-
Do you have a picture or description of the discrepancy?
-
What year is the aircraft? Is the sealant original from the factory? Is there history in the logs as to a strip and reseal, or partial repairs? If the sealant is old with no history of repairs then the stains might be indicative of impending sealant degradation. If the sealant has been stripped and resealed since new from the factory, then a few rivets with minor stains might not be so much of a warning sign. Regardless, spot repairs on individual rivets shouldn’t be a big deal and can buy you some time.
-
Contact John Breda… @M20F-1968 Installing the panel you desire will be a major undertaking.
-

Looking at F/J models. Is there a broker or agent that I should use?
47U replied to charheep's topic in General Mooney Talk
You might start here… https://www.gmaxamericanaircraft.com/ -
Aircraft Spruce has links to the TCDS for both Tygon and Polyurethane tubing. The 3/8” ID tubing with 1/8” and 3/16” wall thicknesses are rated in the 25-30” vacuum range. Bend radius is listed, too. A little cheaper than -193 hose, although I don’t know what the service life is in comparison. I know traditional vacuum hose can look fine externally and leak like a sieve, but poly tubing, maybe not so much? Regardless, glad your AI issue wasn’t anything more serious.
-
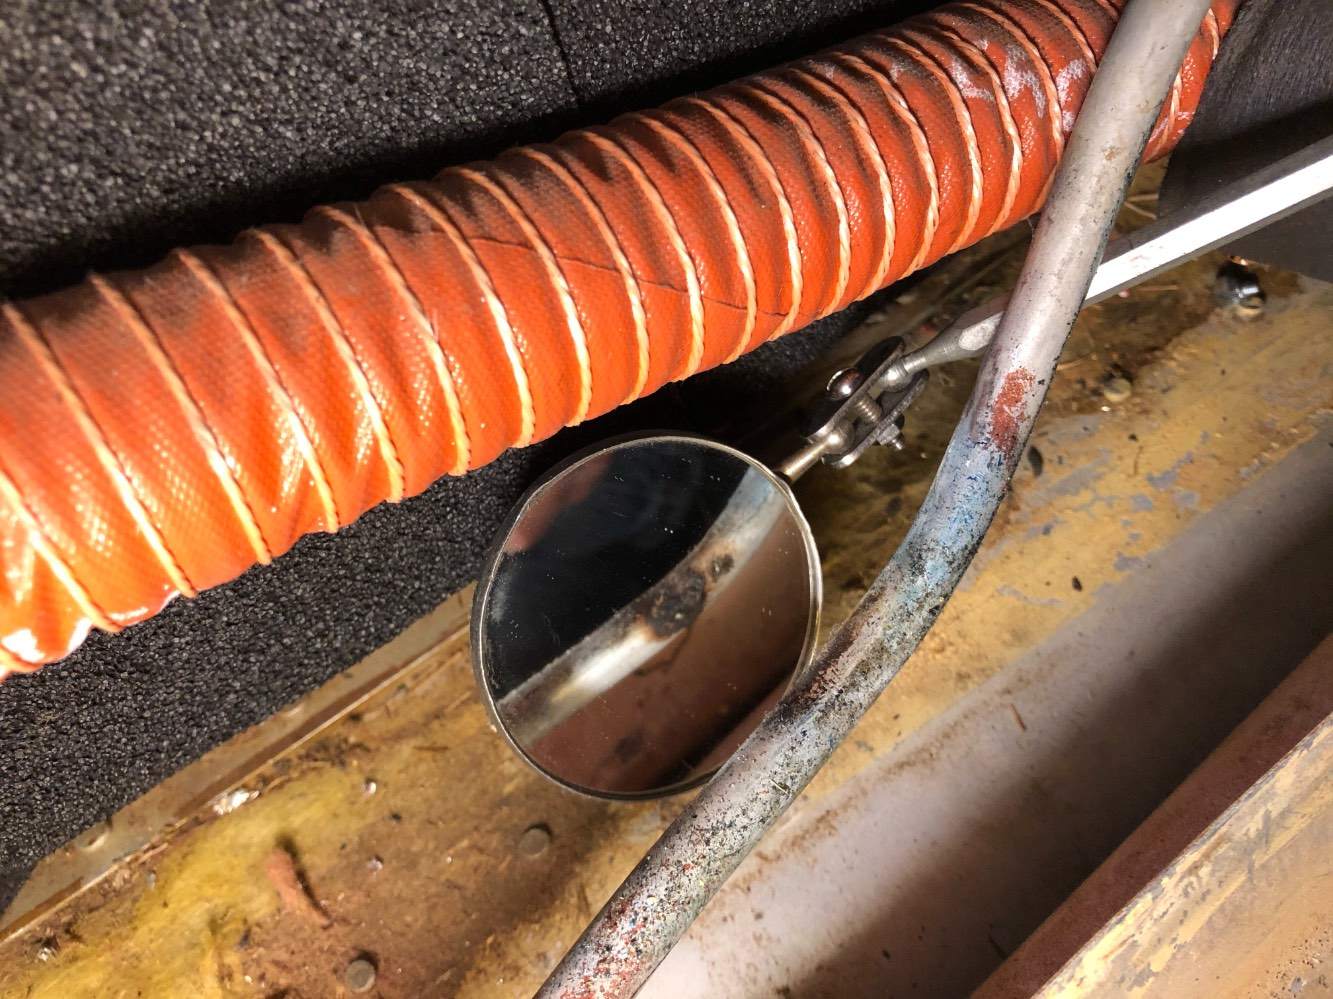
Assymetric flaps...flap tube joined in a 64 M20E
47U replied to Pilot boy's topic in Vintage Mooneys (pre-J models)
Here’s a picture of the linkage that I think Vance is referring to…
-
Were there conflicting statements in the mx manual for lubrication of the trim system over the years? My C also had grease on the trim chain. Whacky. Manual 106 says TriFlow on the trim chain and gears, grease (with graphite) on the trim screw and stops.


-
M20E Replacing Landing Light
47U replied to someairforcedude's topic in Vintage Mooneys (pre-J models)
You might as well start augmenting your tool collection… the local big box or auto parts store probably has something similar. Perfect for tight places.
-
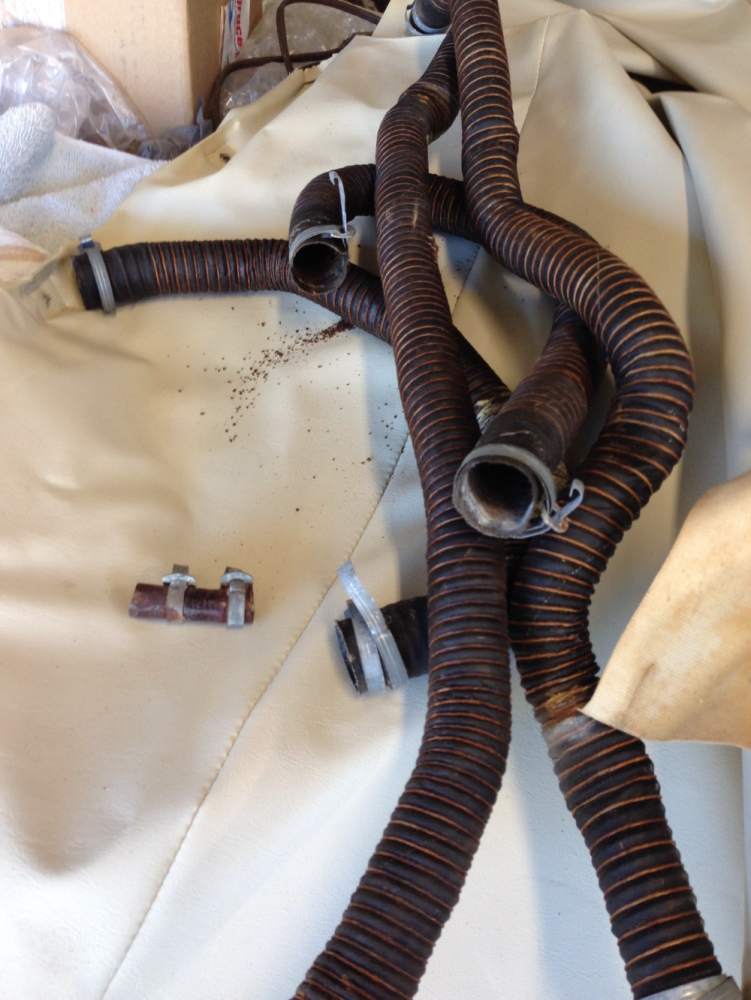
The D Max article doesn’t show a picture of the early model hot air dump duct… If you remove the screw that’s holding the cable clamp and install the proper sized duct, the clamp fits perfectly and no extra hardware is required.

-
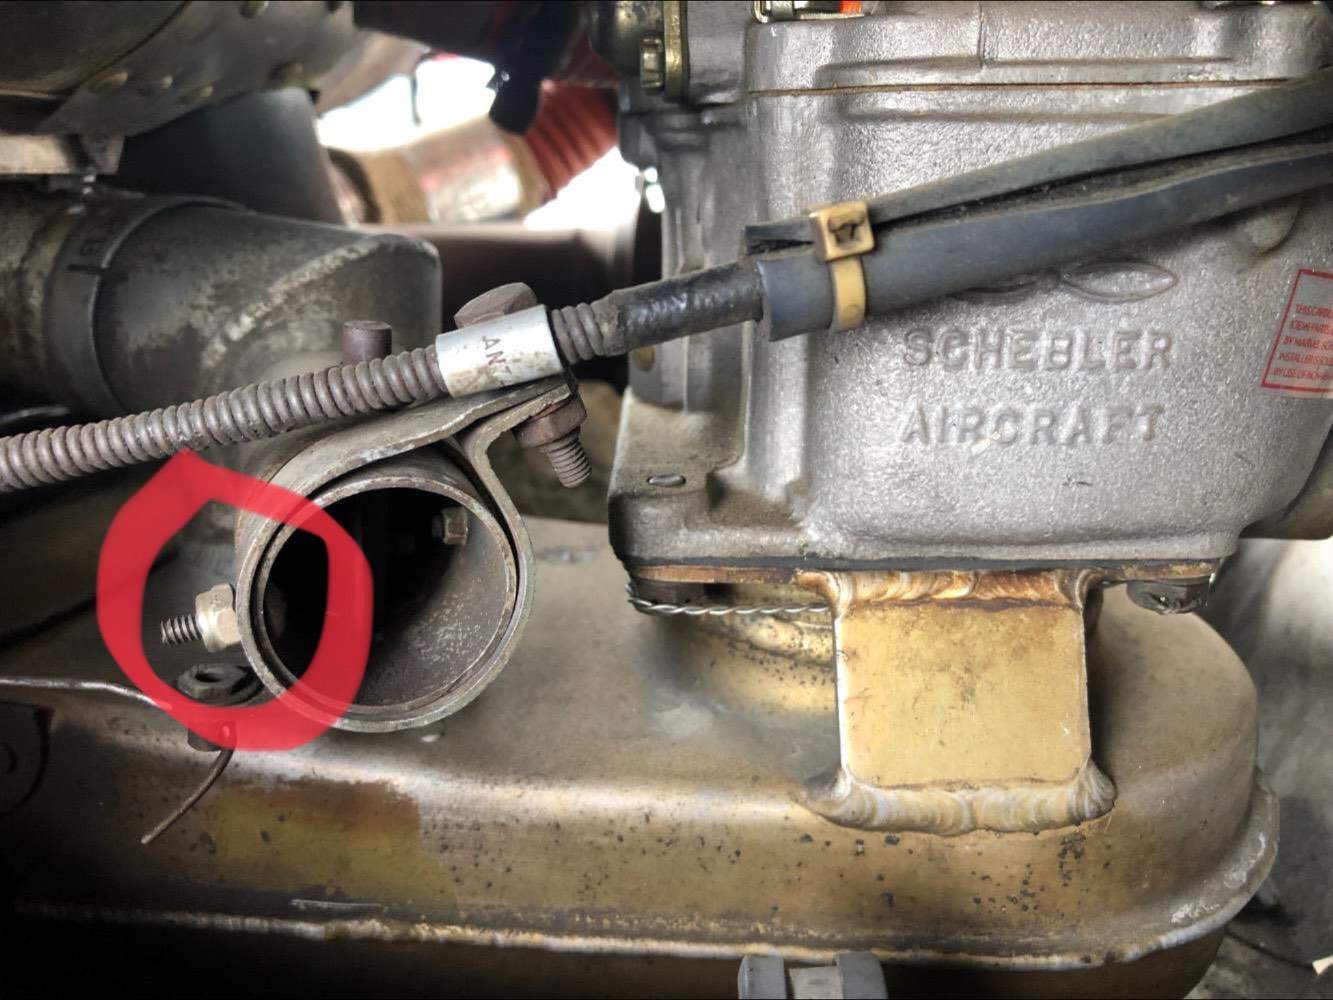
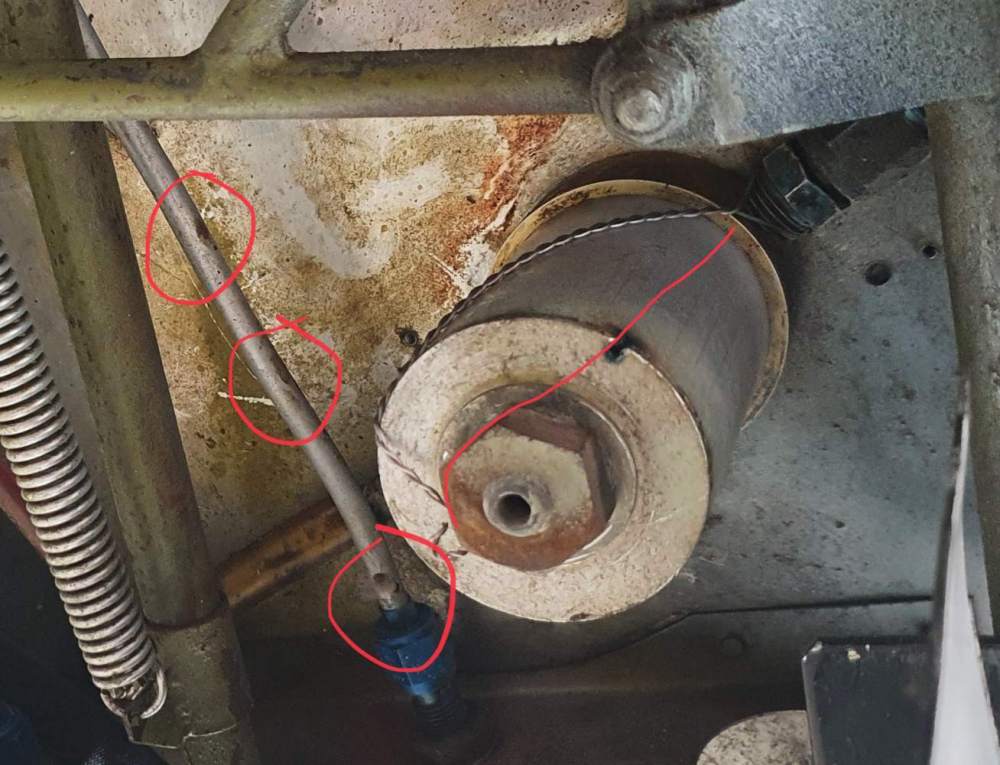
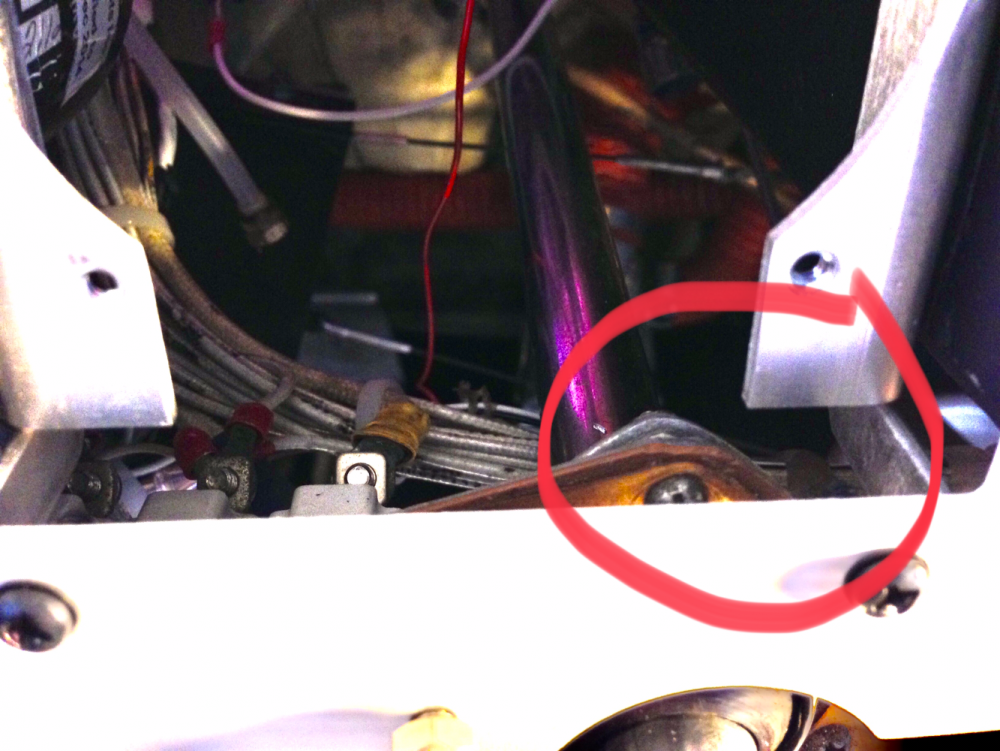
@mike20papa not sure what you are seeing here? The fuel lines going into gascolator looked OK to us. Please forgive my amateur observations. Could it be the brake line that @mike20papa is referencing and not fuel line? Looks like some chafing has occurred in a few places. I think the safety wire job could be better. It doesn’t take a direct route from the nut to the anchor point. There should be room on the gascolaoter base to drill a new safety wire hole and then the anchor point doesn’t have to go up to the AN fitting at the top.
-
Zooming in on the picture, did the rivet fail from corrosion? Can you pop any more heads off on that row with your fingernail? Gaining access to the interior skin to install a solid rivet will allow you to inspect the area for corrosion and treat it, if necessary. And a solid rivet will look the same as the rest of the rivets as opposed to replacing it with a blind rivet.
-
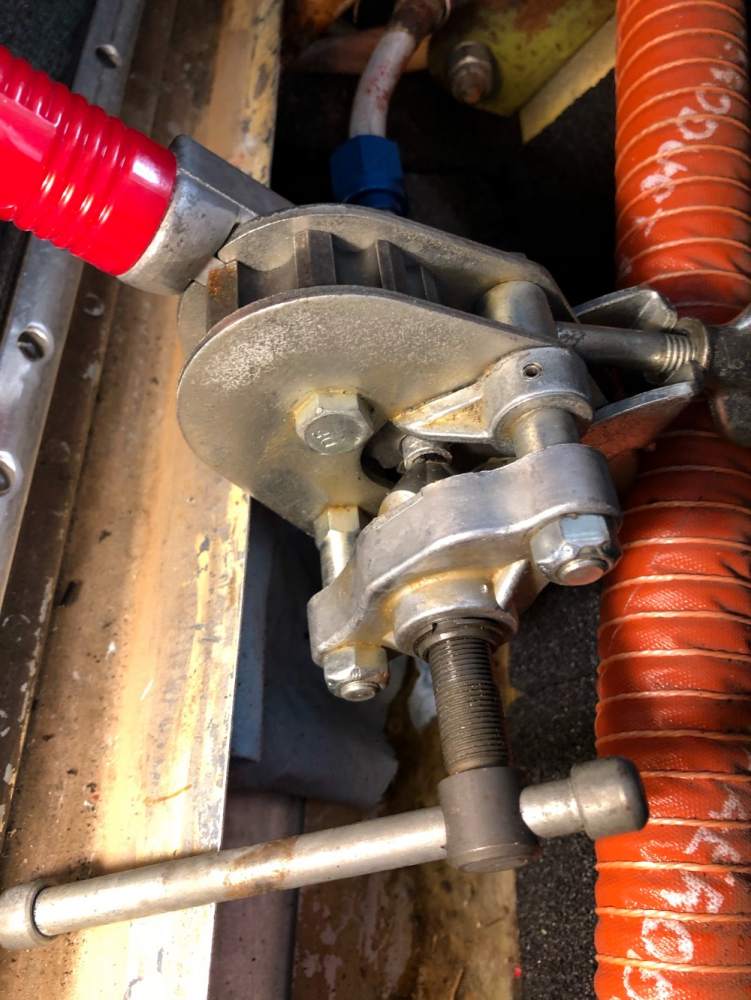
'topping off' flap / brake hydraulics
47U replied to goalstop's topic in Vintage Mooneys (pre-J models)
Here’s a post from 5 years ago installing a 201 windscreen with some pictures of the hydraulic servicing solution. -
Words of wisdom from Cliffy, at least for my ‘63 C. The Airtex headliner I installed was top quality. It turned out great, but my skill set is not upholstery-shop quality. After I was finished, I told my comptroller that I should have requested funds to have the shop install it. There’s lots of measuring and trimming and the retainer strips around the cabin and baggage door frames are evil. If you have overhead panels, your experience will be different, I’m sure. I watched (and rewatched) a couple YouTube videos on vintage car headliner installation. Once the old headliner is removed, inspect the vinyl hose connection between the fresh air box drain fitting and the drain tube. And inspect the drain tube for splits where water may have been trapped and frozen. The vent box fresh air hoses and fiberglass insulation might also need upgrading. My fresh air hoses were original and had exceeded their service life. The drain connection was petrified. (Previous owner carried electrical tape in his fly-away kit and if parked on the ramp would seal the fresh air scoop seams with the tape.) Once the headliner is hung from the bows, the real fun begins. I sat on a bleachers seat (placed on a piece of plywood between the spar and baggage floor) to save my back. It does look a lot better than the old headliner. I painted all my interior royalite parts and replaced the cabin/baggage door windlace, too. It’s a job that’s not beyond the average CB’s abilities, if you do some research and take your time.


-
'topping off' flap / brake hydraulics
47U replied to goalstop's topic in Vintage Mooneys (pre-J models)
Adding hydraulic fluid (5606) shouldn’t be difficult and won’t by itself introduce air in the system, although servicing may be more challenging if you have a 201 windshield and the avionics access panels are closed up. Does the flap handle ‘feel any different’ than ‘normal’ when pumping down the flaps? If the hydraulic fluid is so low that the flap pump is sucking air, then I’d be looking for a hydraulic leak. If the parking brake valve (below the reservoir) is leaking, you might not be aware. -
You didn’t specify model… M22 fuselage aft bulkhead would be my guess.
-
-
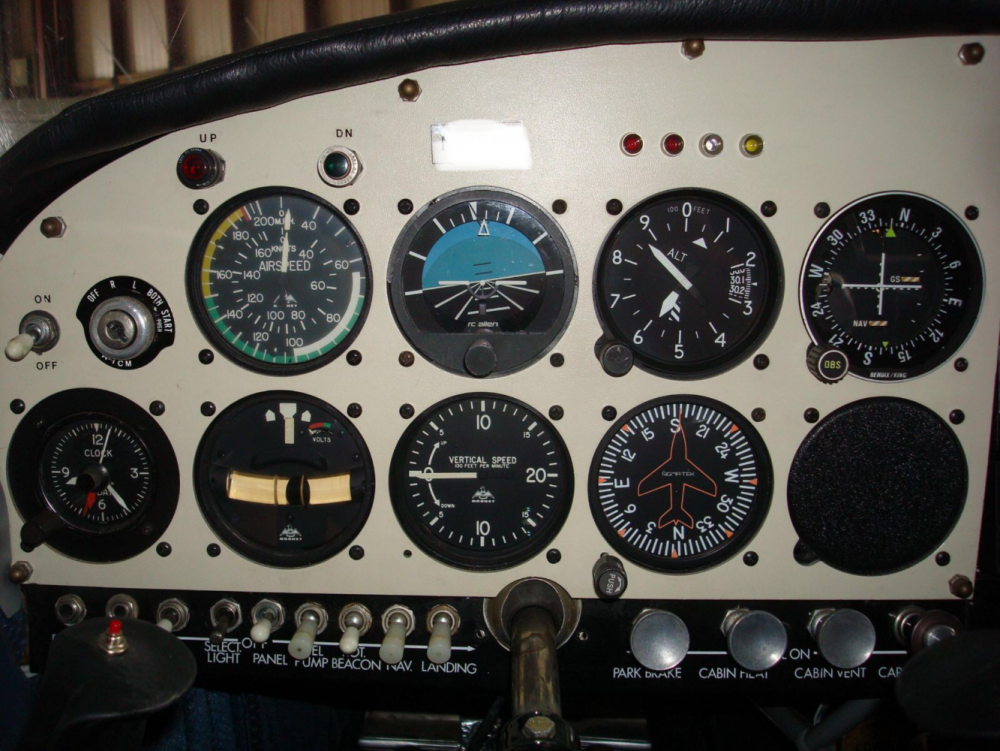
I think LASAR had a template some years ago with a 9 hole layout. I had this pic of a ‘62 C in my archives. I’m not sure if an instrument will fit where the clock is in the lower left, but the panel has 9 holes. Careful analysis needs to be done to determine if this layout will work for you, and more importantly, your A&P/IA.
-
I think the Aspen offset a little to the left of the yoke will be fine. It might look a little odd, but in practice, no problem. Make sure you provide enough clearance between the Aspen flush-mount vertical rails behind the panel and the yoke shaft ball. It’s close on mine, and it looks like your Aspen cutout is a little more left of center (in layout #2) and could present a problem.
-
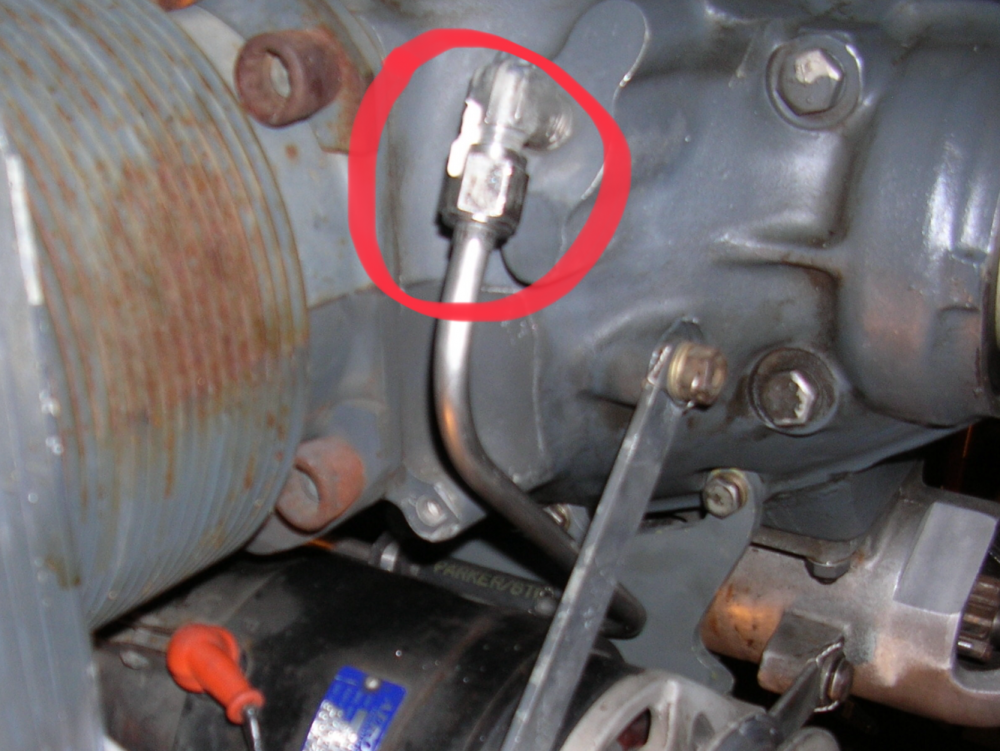
This B-nut? Was it loosened as part of the maintenance to install the alternator? Some mechs will apply a stripe of torque seal to aid in detecting loosening of critical fasteners. Regardless, it’s good to find the smoking gun, and that it wasn’t something more insidious (although this was pretty serious). Agree with everything Rich says above. ^^^^
-
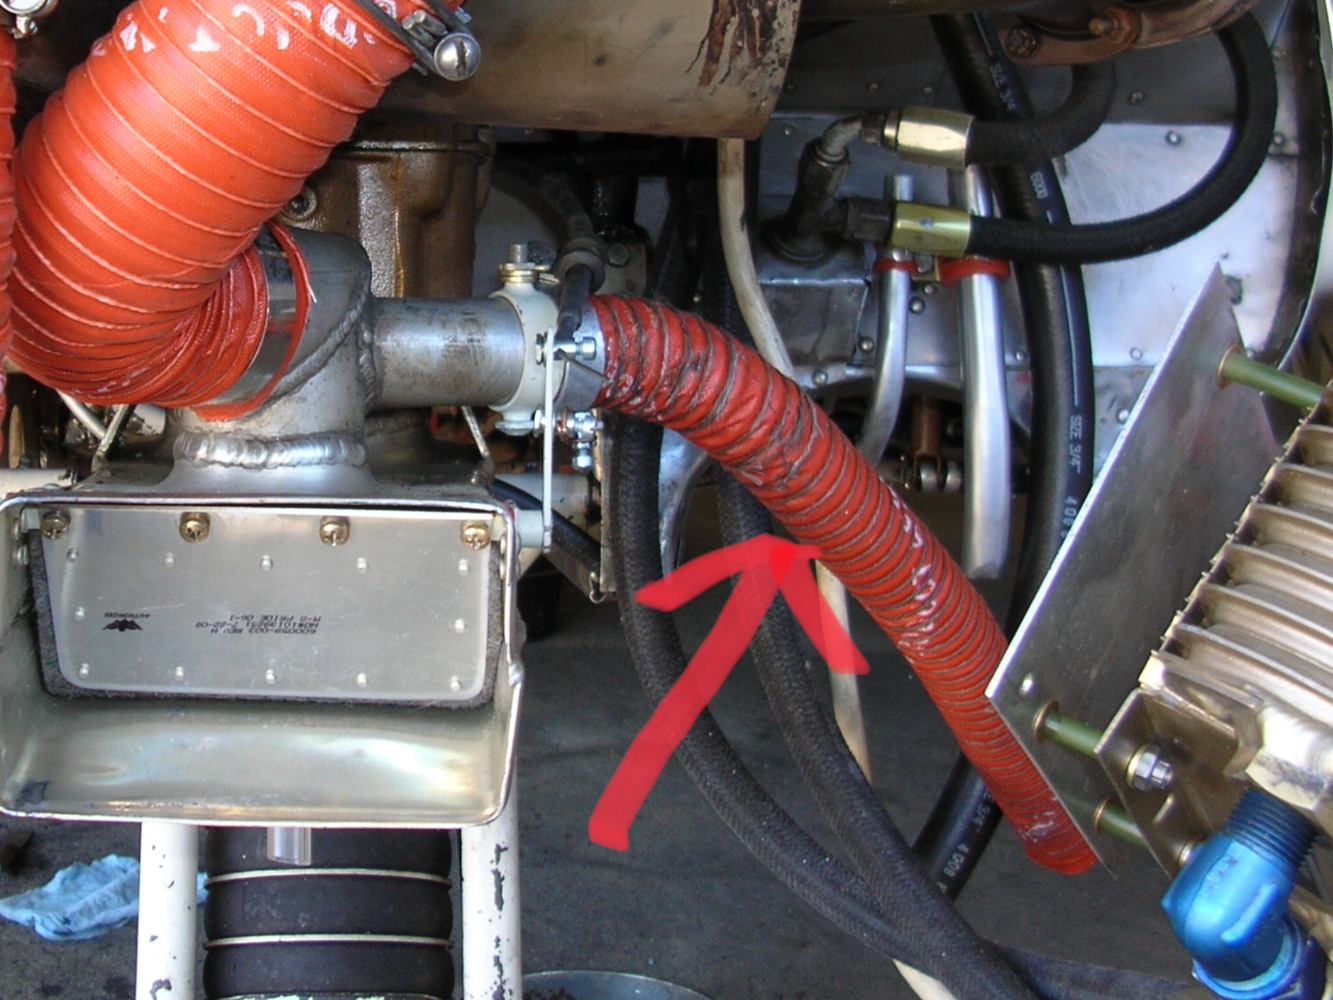
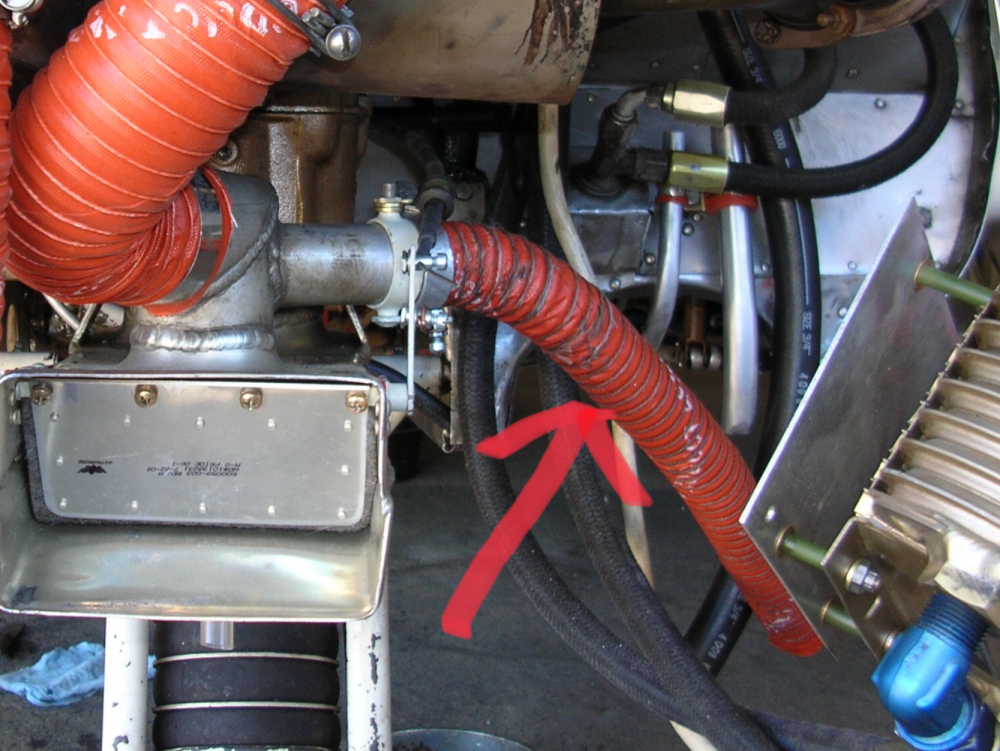
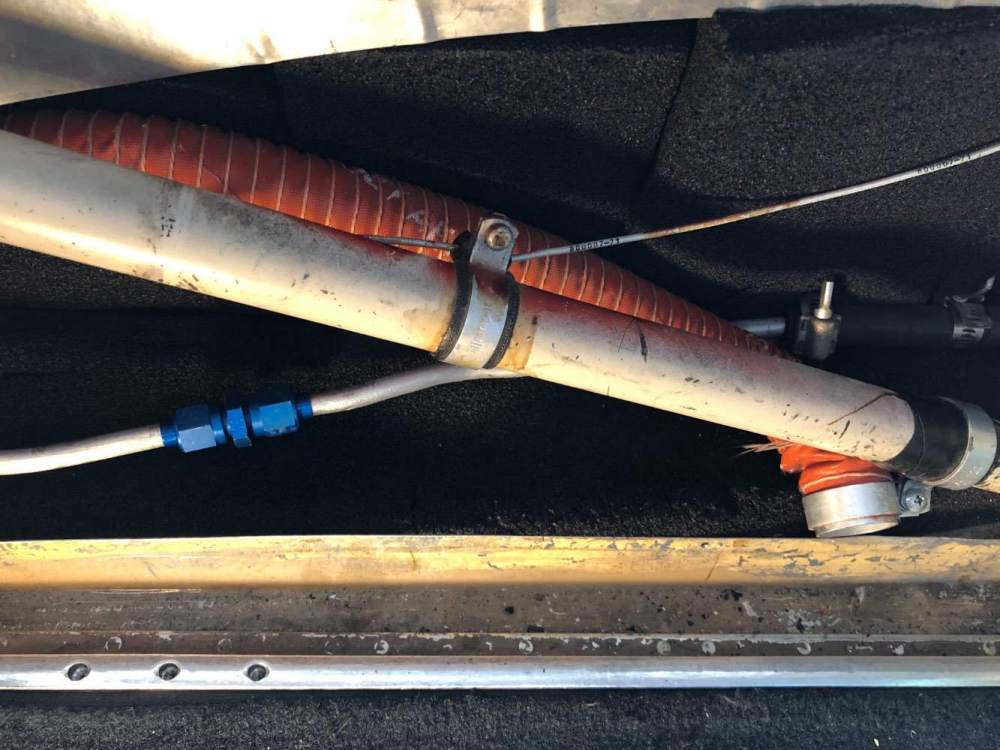
Right fuel line corrosion where it contacts black air duct
47U replied to M20 Ogler's topic in Vintage Mooneys (pre-J models)
This kind of stuff is why you pull the interior for the annual inspection. My air ducts were replaced some 25 years ago, but the corrosion had begun. Last year the blue stain was discovered. I had not yet detected any fuel smell in the cockpit. As you can see, the air duct wasn’t any where near the corroded section. The fuel feed line from the right wing root is one continuous run all the way to the fuel selector. Replacing it would be a huge PIA. It would be easier to replace it with a hose, if that becomes necessary. I replaced the corroded section with AN fittings. There’s just enough room to get the Roto Flare in there. My IA agreed that this was the best solution.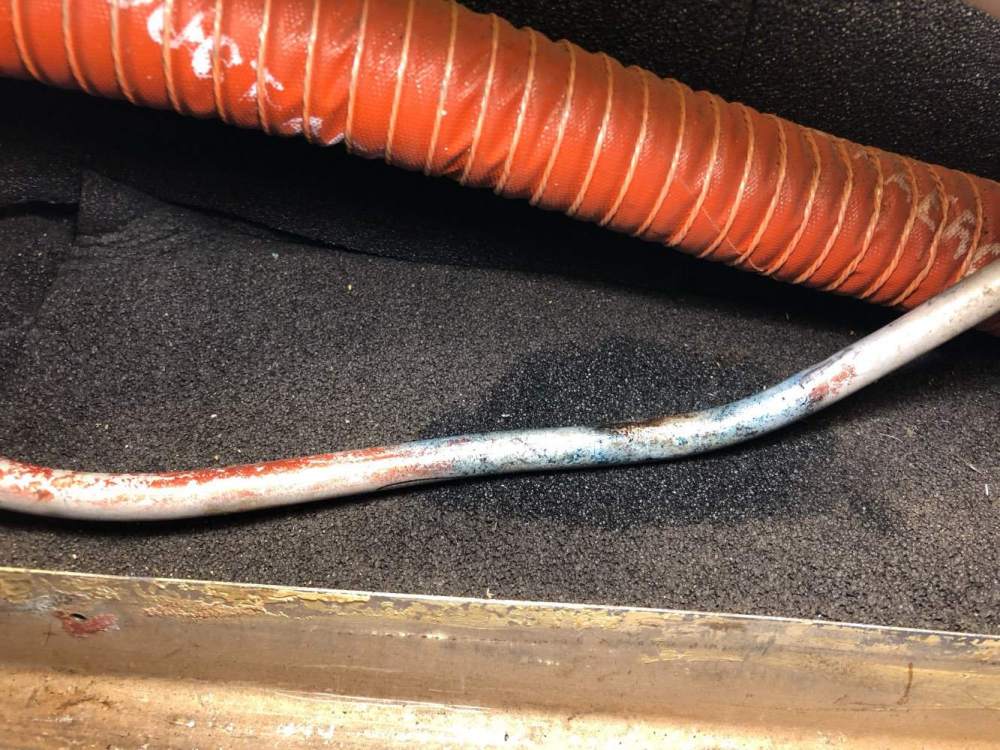


-
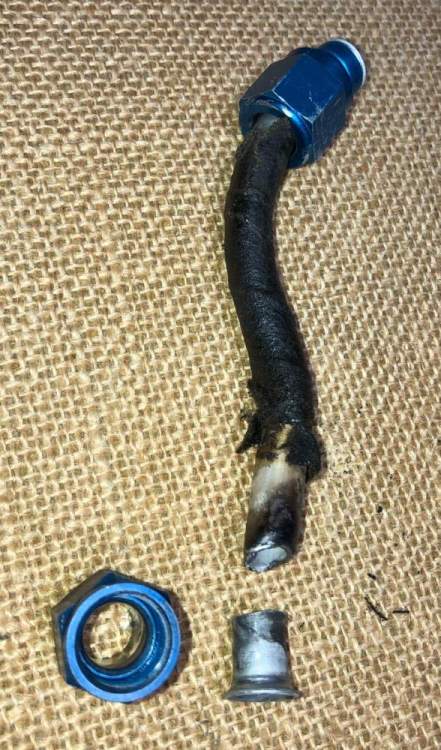
Is it not true that if any of the old fittings (sleeves or B-nuts) are reused to make the replacement line, then it’s technically a ‘repair’ as opposed to a ‘new’ part? Also, use of back-up wrenches are important, where applicable. This fuel line had a crack at the sleeve, then broke when I removed it.
-
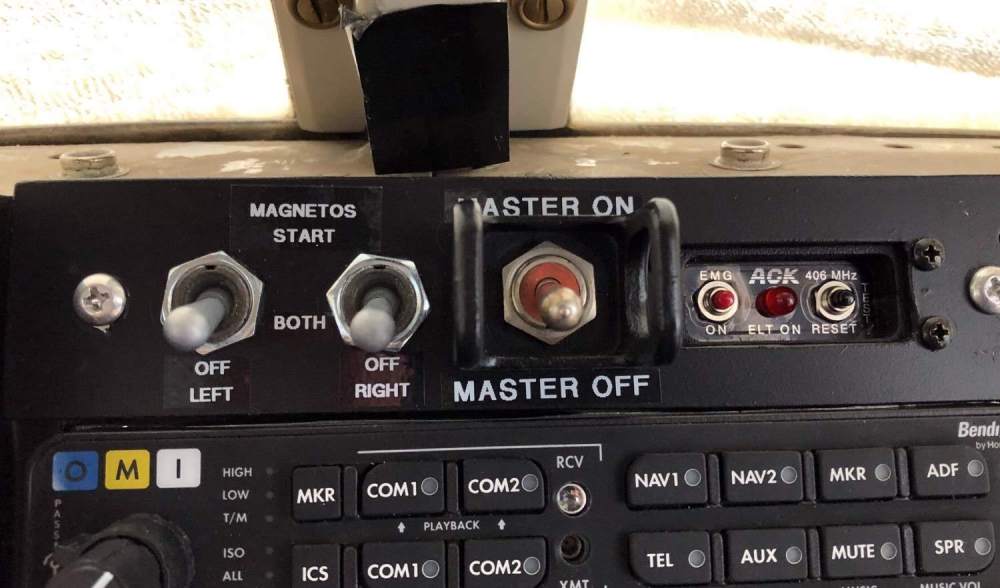
Exactly what I did, except I didn’t use a dedicated start button. I put two DPDT switches above the audio panel in the center stack (where nothing else fits). I modified a mag switch electrical schematic I found on a RV website. I didn’t use a start button, rather both switches need to be UP (spring loaded) to energize the starter relay and simultaneously ground the right mag P-lead. No more after-fire during mag checks with the lag time on the SureFly. In-flight mag checks are a non-event. I moved the master switch there, too, and put a cage on it to prevent the chances of bumping it in turbulence.
-
This thread might provide some insight…
-
Kudos to you and your mechanic. How frustrating when there’s an error from the manufacturer. I needed to get a Slick-style harness when I replaced my left mag with a SureFly. It was a special order. They transposed the part number and sent the wrong harness. Finally… got that straightened out. Then I thought, the right harness looks pretty ratty in comparison (after 30+ years), so I order a new Bendix-style harness from the same company for the right mag. I looks great, but the plug markings are the same as the left harness… i.e., two “B-1”, etc. I ended up putting SureFLy mag on the bottom plugs and the right mag on the top plugs. The plug wire routing worked out ok, but if I were paying someone to maintain my Mooney, I’d not be happy. Or, maybe I wouldn’t even be aware?