
47U
-
Posts
1,111 -
Joined
-
Last visited
-
Days Won
5
Content Type
Profiles
Forums
Blogs
Gallery
Downloads
Media Demo
Events
Store
Everything posted by 47U
-
Your’s is a ‘62C? The auxiliary power plug wasn’t on the C until ‘69, I think? Here’s a screenshot from Man 106, with a link to the downloads section. It’s probably going to take some digging through the manual to see if what you have is what came from the factory. There’s versions for C & G models and different versions for the E & F models. Maybe the only difference is due to the battery location? Was there any reference in the logbooks as how your AUX plug came to be installed? That might give you some info as to what version you have.

-
Concur. It might be more fun than safety wiring the prop bolts. I bought a shaft collar from the local ACE Hardware, drilled a hole in it, and replaced the set screw with a knob. I thread one strand of the safety wire through the hole in the collar and give it a couple twists with the free end of the wire. That way I can keep tension on the wire while twisting it. The length of the wire to the anchor point is fine-tuned by sliding collar on the shaft. Just for the prop governor high RPM stop screw.

-
Huh? My money was on the muffler bearing, and I lost again. Glad you’re back to ops normal. And concur that the back of the engine is a challenging location for the prop governor, even on my lowly C.
-
The Cygnet yokes are a PMA’d replacement for Beechcraft… So the logic is, the Cygnet yoke is airworthy on a Bonanza installed by the A&P with a simple logbook entry citing the PMA, but if installed on a Mooney the Cygnet yoke wouldn’t be airworthy? As @Matthew P says, form, fit, function.
-
I think the tower should have a beef with approach control, not with you. The Class C is replacing the Class D. So I would think that Class C rules apply, which is communicate with the controlling facility, Santa Barbara Approach (within 20NM as the inset says). It’d be nice if approach would coordinate with the tower, but that doesn’t always happen. Are you supposed to tell approach that you need to switch to the tower because you’re about to enter Class D, which does not exist? I’m speculating… but I would have done what you did. One of the smart(er) people will be along soon to tell me the error of my ways.

-
Cracked main gear found during annual
47U replied to rbmaze's topic in Vintage Mooneys (pre-J models)
Magnaflux. The shop did remove some paint, at some level. It didn’t necessarily look (to me) like bare metal, but overexposure with the closeup flash might have washed out the image, appearing as some coating still remained. Inconclusive. Maybe some paint still does remain, but if the shop is removing paint to support the dye penetrant, then I’d think they’d remove enough to make the inspection viable. That’s why I like to see the crack under the black light. It might be cracked, or it might be a portion of the weld bead did not penetrate the tube, appearing as though it’s cracked. -
AeroKroil. Give it time to work, overnight or a couple days. You can also try heating up the outside tube with a heat gun, after an overnight with the AeroKroil treatment. As @N201MKTurbo suggested, before putting it back together, clean it up and use the proper anti-sieze. I think something without graphite is recommended, but you should probably verify that.
-
Any old high-temp RTV you find at your local autoparts store will work. The color is up to you.
-
Cracked main gear found during annual
47U replied to rbmaze's topic in Vintage Mooneys (pre-J models)
Continuing the (minor) thread drift. I was able to remove the broken zerk with my valve stem tool. I am resigned to greasing the front trunnion with a flush fitting. It works best with the airplane on jacks and gear in transit (manual gear, anyway). I think if I replaced it, some ham-handed grease monkey would just break it off again.
-
Cracked main gear found during annual
47U replied to rbmaze's topic in Vintage Mooneys (pre-J models)
I’d like to see a picture of the crack taken under the black light. I’m guessing this defect is not common. Rather than replace the leg, you might be better off removing it, having it welded, heat treated, then paint and reinstall it. I think repair and paint would be cheaper than a salvage part, with unknown history. Let us know how it turns out… good luck. -
Is the problem with sliding mechanism of the handle into the block? Or is the problem with the throw of the bar that you cannot get it far enough to try to engage the sliding handle into the block? That might be unusual to have issues on both the up-lock and down-lock functions. @Hradec is correct, it’s not overly complicated, but does require understanding of how the system operates to get it dialed in. An adjustment on one gear will affect the adjustment of the other two. Best practice is to use a dial indicator torque wrench when checking/adjusting preloads (in my opinion). You also might want to check for bent tubes.
-
@Matthew P installed the Cygnet yokes on a 337. No STC. Talk to your IA first, you’ll need buy-in from them. The yoke swap does not change out the yoke shaft, therefore the 500 hr inspection AD is still required. I replaced my yoke shafts lsat summer… ordered them through LASAR and the factory had them in stock. You’ll need to call LASAR for parts.
-
Always good advice. Note the model effectivity box lists the ‘M20 J, M, R’ and then there’s a previous thread from 2021 that provides some insight.

-
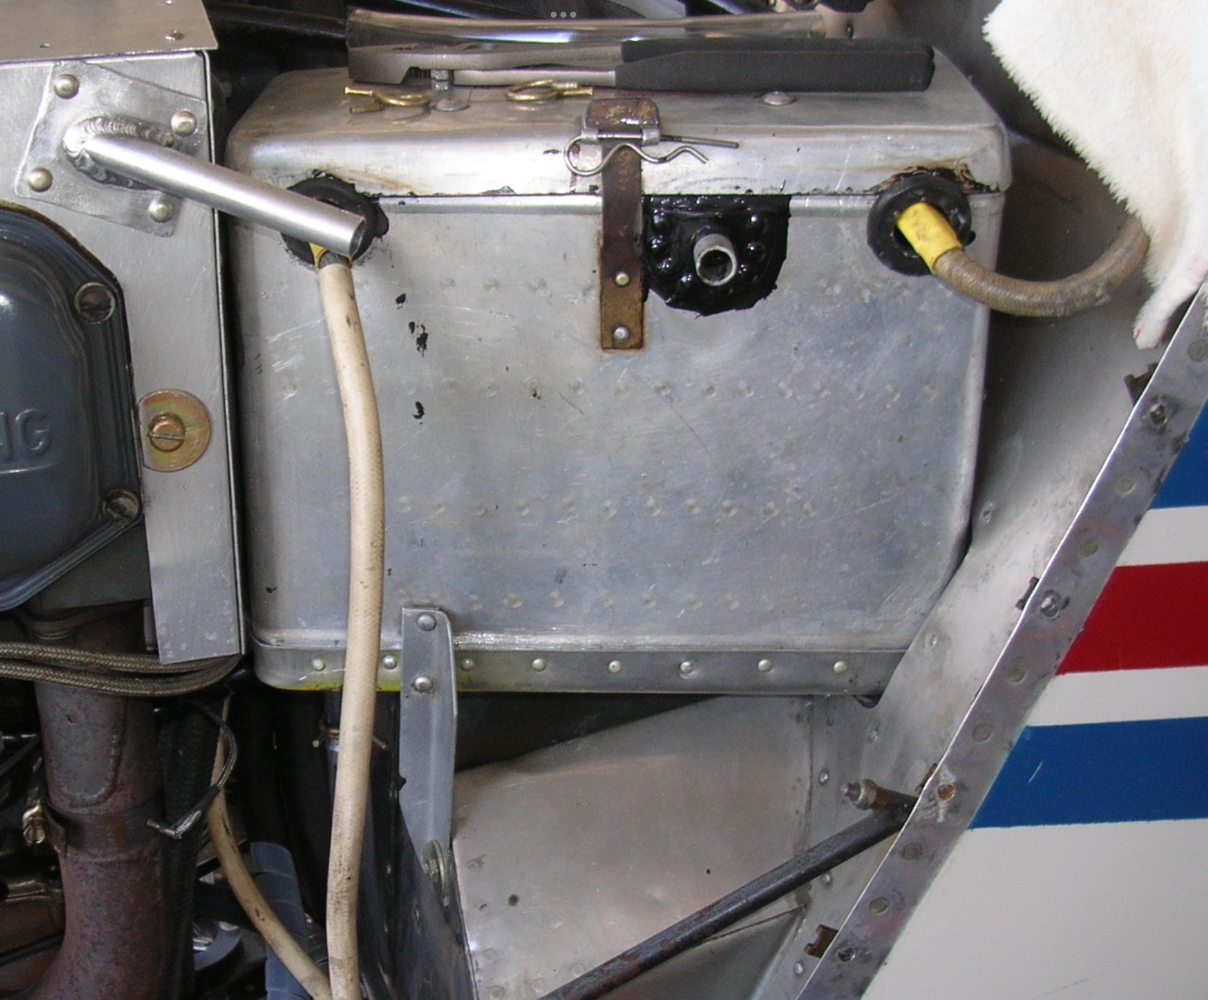
The two forward battery box mount bolts are in the footwell, above the rudder pedals. The back two on the firewall. Removing the rear outboard bolt, I get bloody from the tail of the wire pigtail on the parking brake valve. My bolts were installed with the heads forward, so that’s how I always reinstalled them. But, it sounds like @Hank has his the nuts forward. That might be way easier, putting the nuts on where you can see the threads of the bolts. This is all contingent on you being able to get your right arm down deep (like, up to your armpit) through access panel, avoiding the wire bundles (if there are bundles and not just loose wires running every which way), vacuum hoses, etc…
-
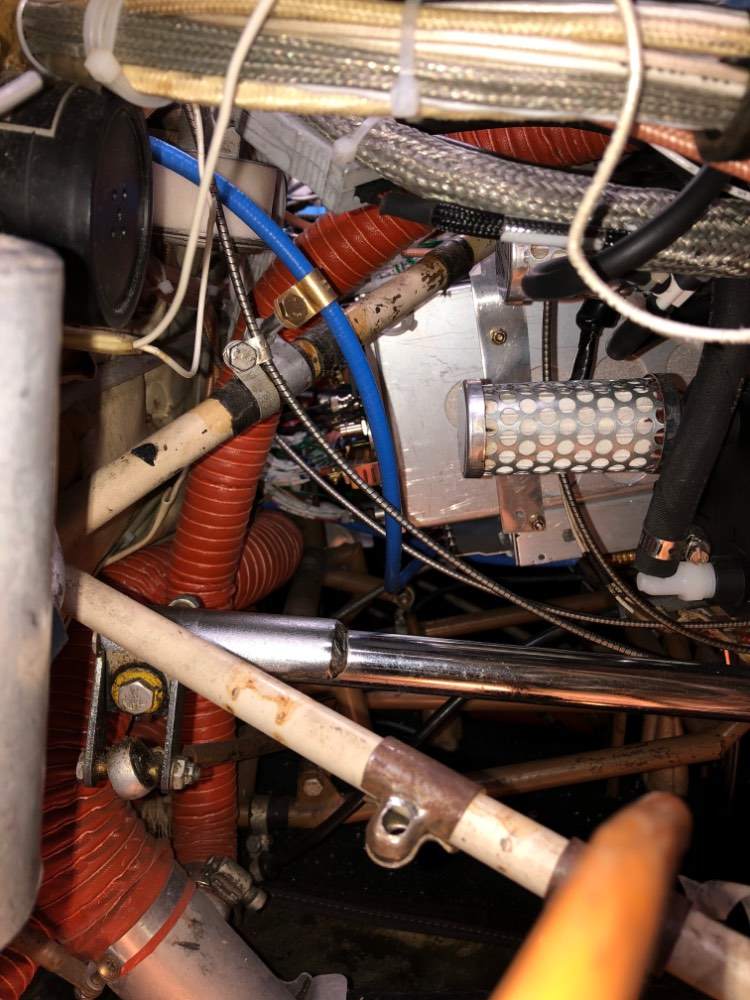
You should be able to get the left mag off without removing the vacuum pump. You might be able to reach the battery box hardware with your right hand by reaching in through the avionics access panel on the pilot’s side (depending on how ‘clean’ your wiring harnesses installation/routing are). The battery box hardware on the firewall side can be reached with your left hand. I can remove my battery box in about 10 minutes. Consider a SureFly for the left mag and you won’t have to mess with it again. The suction screen is what it is. You might have better luck reaching down from the top before you reinstall the oil filter. The support bracket for the throttle cable might be in the way. The fuel line from the footwell to the fuel pump might be in the way. But, with perseverance, the sump screen can (AND SHOULD) be removed, inspected, cleaned, and reinstalled at every oil change.

-
More weird propeller governor issues?
47U replied to sailon's topic in Vintage Mooneys (pre-J models)
@Trego Dugan And make sure the clamps are the right size, -5 as I remember… mine were not. Two styles of prop cable support brackets on vintage airplanes. This… Or this… (Note, the bushing below is on the wrong side of the bracket. It should be between the clamp and the bracket.)

-

-
I trimmed a new VPP overlay for my right-side panel. I don’t remember trimming any of the instrument holes, but I did reduce the height of the outside perimeter. I think I used my heavy-duty scissors (or sheet metal shears?) to trim the excess. I also did some filing/sanding. Dremel? Try wrapping the cutout with some blue painter’s tape, cut the excess tape off with a razor blade. Then draw a line where you want the remove the excess plastic and snip away. A nibbler might have better reach than a shears/scissors into areas where the cutouts are close together. I used a step drill to make the holes for the mount studs and various circuit breaker locations. That was 15 years ago, so I probably need to update it again after the most recent round of avionics upgrades. But, still an improvement from where I started.


-
The same flush vent door as on my ‘63C. Screen repair… it looks like major surgery to remove the rivets and replace the screen in the same way the factory built it. It looks like there might be clearance to fabricate a frame out of some thin aluminum sheet that just fits inside the vent opening. Cut the new creen to size and install it with some #4 sheet metal screw into the old structure. Oh, remove the old screen first. Or, speed tape around the sides and top and bottom to hold the new screen. It wouldn’t look very professional, but would probably work just fine.
-
Absolutely… I wasn’t trying to suggest that Mooney is working out of shed on the back lot. But, you get the irony. Mooney farming out some of the parts procurement to LASAR, seemingly under constant threat of financial stress. I hope the deal with LASAR provides a percentage back to the factory for the parts they sell. The reason the app puts the name of the factory right over the shed is puzzling. Conspiracy alert… the chicom investors hacked in with an algorithm, just out of spite.
-
Apropos? Looking at Kerrville on my iPad map app, I noticed this. Talk about downsizing… but I didn’t think it could be this dire.


-
I forget where I found this clamp, but Wraplock would work well, or chain together a couple of long worm gear hose clamps. I think the blue-line drawing that came with my carb heat/dump valve overhaul kit spec’d the Wraplock. https://www.efc-intl.com/viewitems/screw-drive-clamps/wraplock--shape-conforming-drive-clamps

-
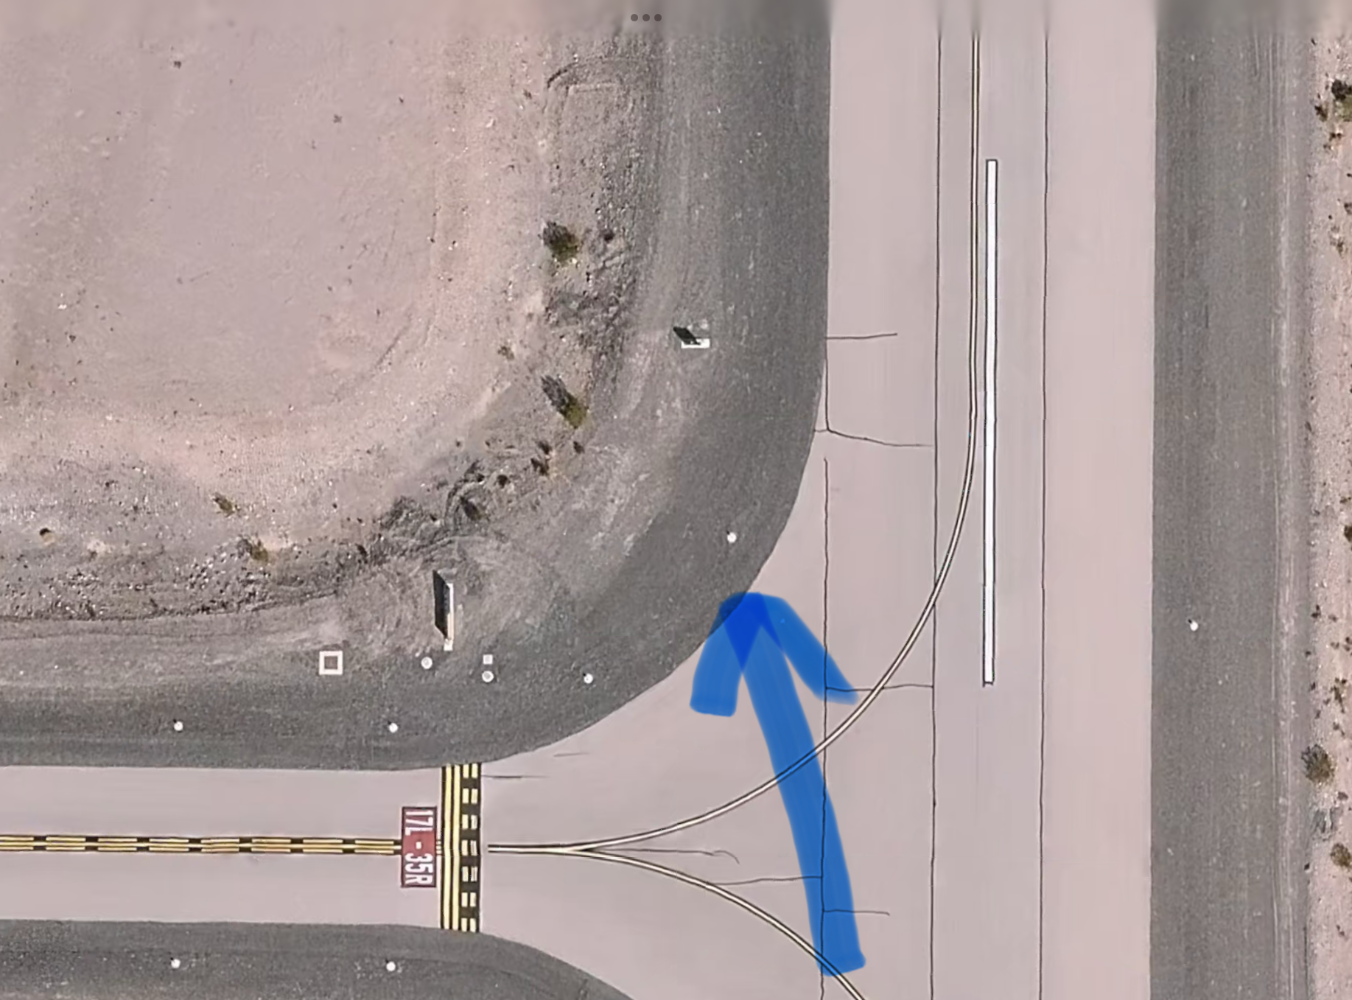
Rocket in landing incident at KHND.
47U replied to NickG's topic in Mooney Safety & Accident Discussion
I think the spinner took out the TAXIWAY E sign which would account for the prop blade bent under, and the remnants of the sign are lodged in the horizontal stab. A runway light might have been involved, too.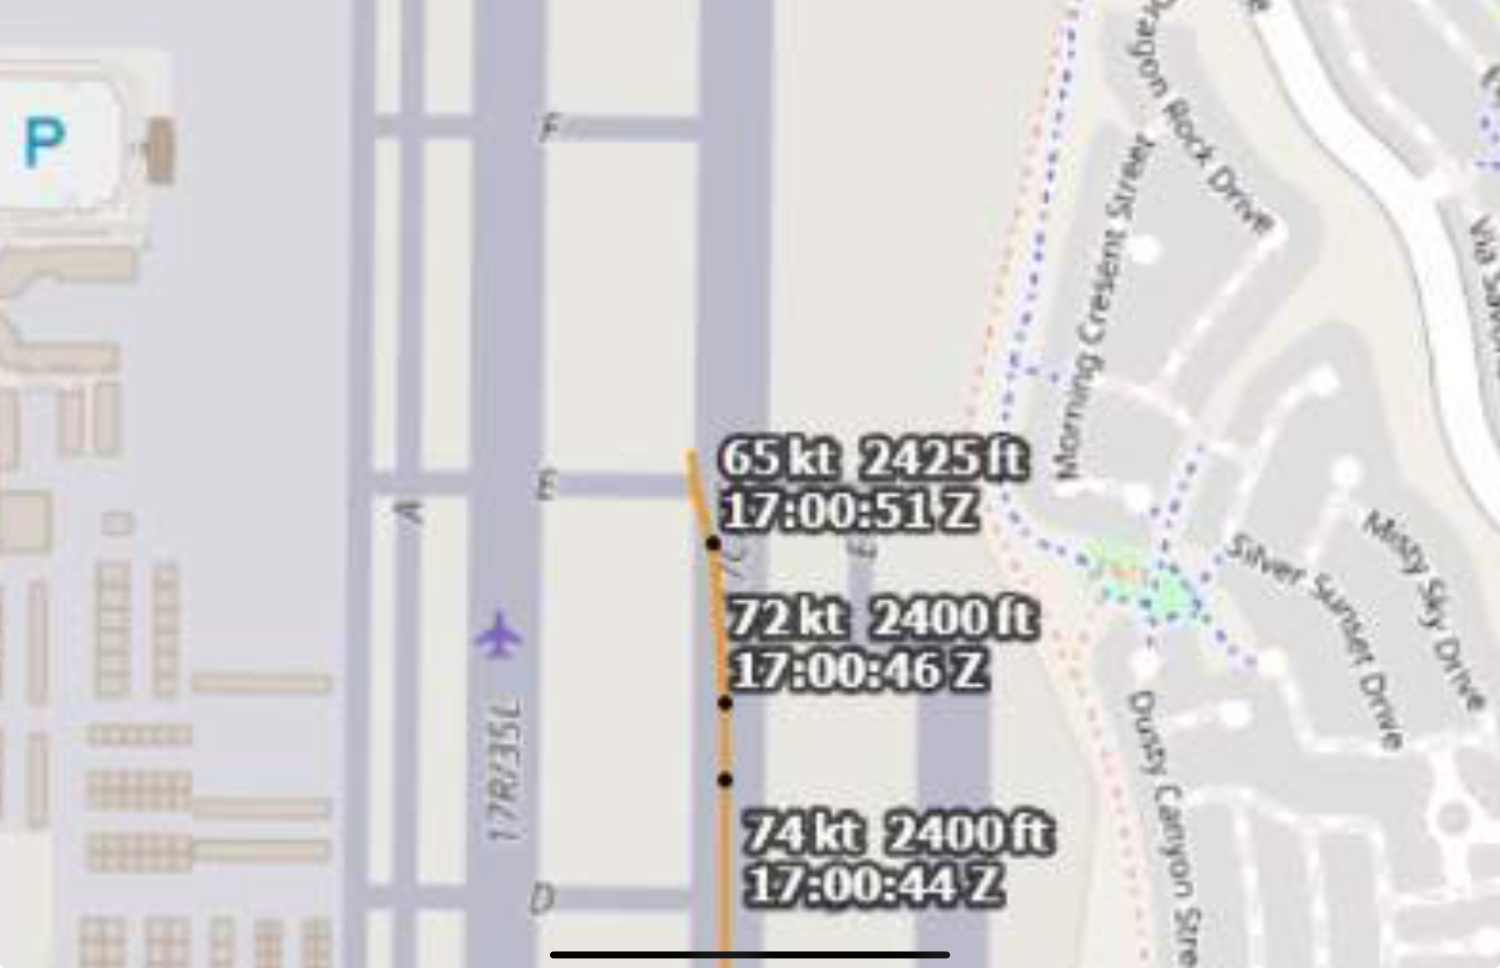


-
Easy peasy… I used a much larger button and stepped the attachment bracket aft to (hopefully) prevent disconnecting when I wanted to xmit, or vice versa. Now I need to get the autopilot installed. A point of caution. Mounting the switch bracket on the front of the yoke using the clock holes is preferred. Mounting on the back side of the yoke like I have, when I updated the instrument panel to a flat panel and put in the Aspen, there was minimal clearance between the switch bracket and buttons on the Aspen when the yoke was full-forward. Can’t be having that now, can we. I ordered the updated yoke shafts from Mooney which are 1.5” longer and that gives me plenty of clearance. Bonus, I retired the yoke shaft inspection AD at the same time.


-
Did Mooney survive the flooding in Kerryville
47U replied to Matthew P's topic in Vintage Mooneys (pre-J models)
Very dramatic, tragic loss of life. I took this on an SWA flight into SAT. The river runs just south of KERV, but there is some elevation of the airport above the river flood plain. I’ve landed at ERV a couple times and I don’t remember that the proximity of the river was obvious from the ramp.


