M20F-1968
-
Posts
1,832 -
Joined
-
Last visited
-
Days Won
3
Everything posted by M20F-1968
-
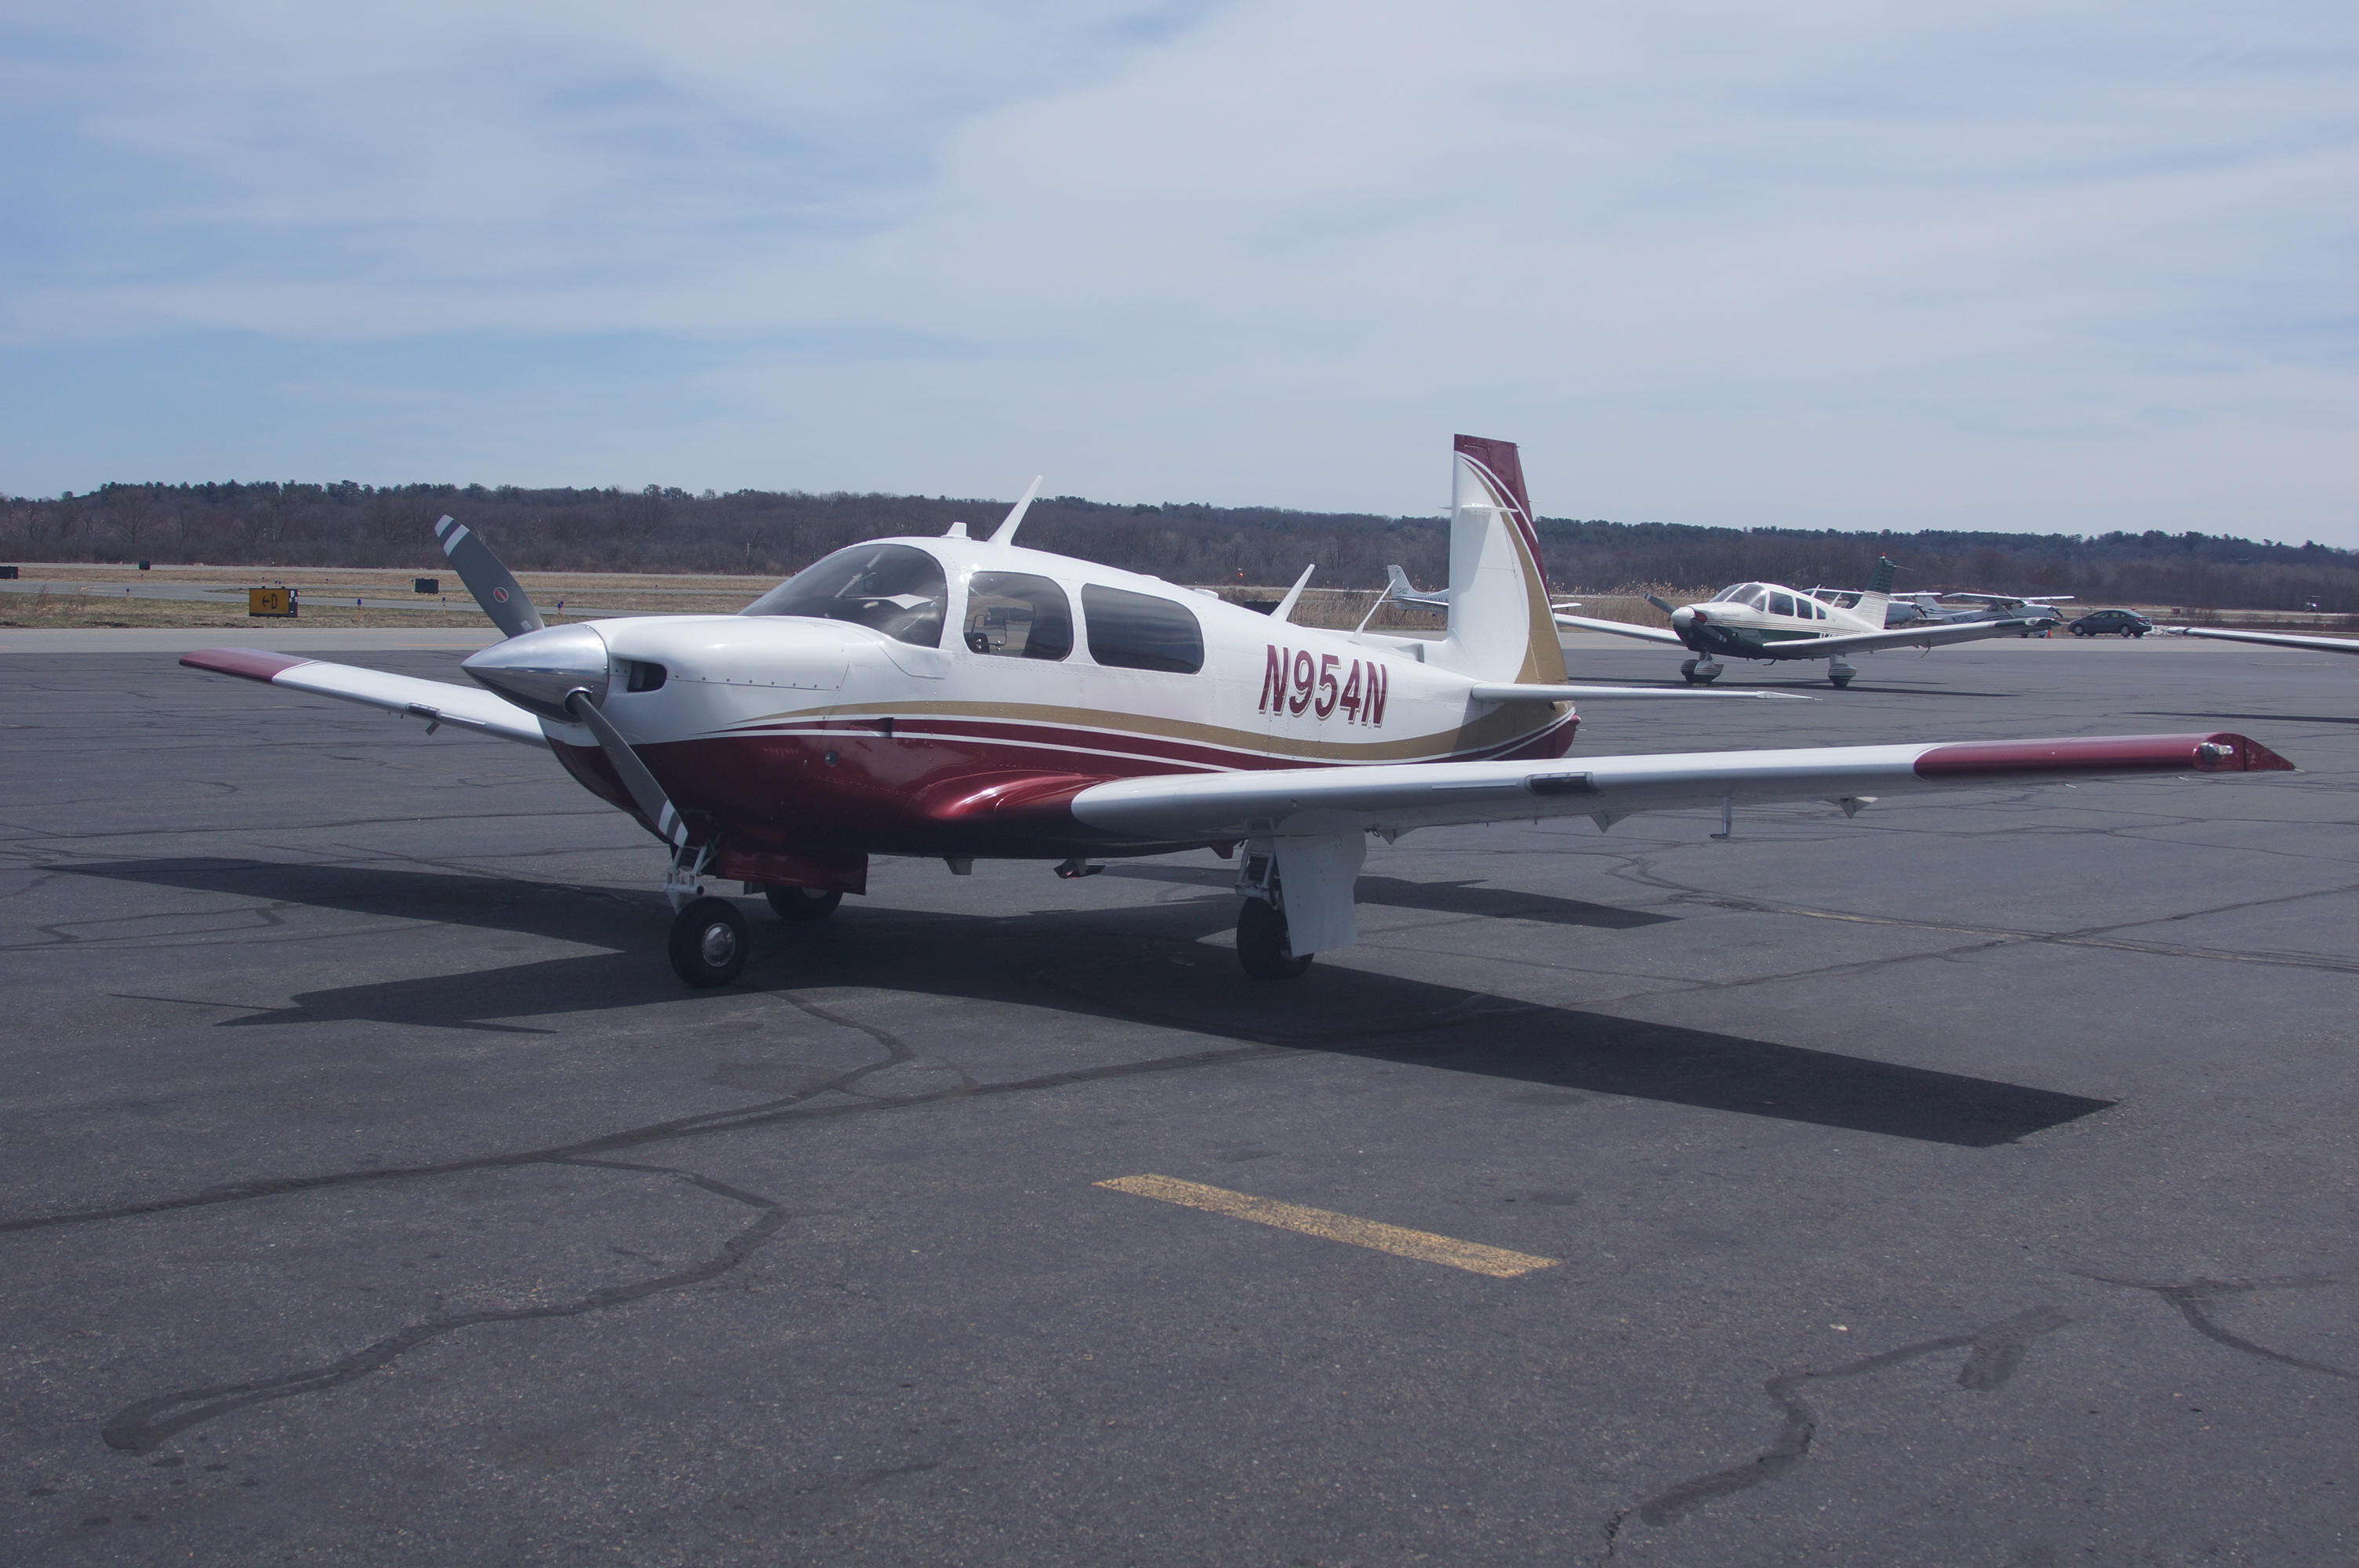
That is in fact my plane. How do come to have the picture? Looks quite a bit different now. John Breda
-
There will always be unexpected aspects to a project like this one. When thinking of unexpected items, the big one for me was that I didn't count on having two A&P Mechanics steal a significant amount of money from me. The first thing to be sure of is that you have 100% control of the project, and that it is close by and under your direct supervision. I had the liability of being 1200 miles away and having to manage the project from a distance (Boston to Dallas). I was optimistic (and probably niave) enough to think that if I treated people well, they would treat me in kind and we would build a healthy working relationship. That only worked after I separated myself from the two dishonest scoundrels (I call them other things when not writing on a public forum). I did find a very talented sheetmetal mechanic from Gulfstream and we took everything apart (again) and worked the project from there. My plane has been re-skinned from the baggage compartment forward. That is why it no longer looks like an F. That work was done in a square hangar in Dallas. Once flyable, I got connected to the Mooney world when the plane was ferried to central Tx and we got the project finished. Things that came up: for example the tanks were sealed twice - once in Dallas where they were sealed sufficiently to ferry the plane, only to realize the work was not done well enough. We then flew it out to Paul Beck where it was done the way it should be. There was a definite learning curve in this project. As for dollars...that question has many unknown answers. Do not think that you will do this project to get a cheaper airplane. You are buying an education, quite literally. You are also doing this project so you can rebuild an existing airframe (rather than start from scratch on an RV) and turn it into a unique, pristine, one of a kind Mooney. You will be amazed how long you will work on any aspect of this project, or an individual part, before it is the way you want it. You will know what it means when someone says a Mooney is a hand-made airplane. There are two fiberglass parts with compound curves in my interior that took as much a 2 years to complete because of logistics. Expect it to cost as much as a comparable newer Mooney, if not more. But, I have a plane that is one of a kind. The closest to it might be an turbonormalized MSE (and then it would not have the upgraded Johnson Bar gear), and likely I would not find a turbonormalized MSE. Russel Stallings did my pre-buy and said to me, project airplanes are great, you can make them any way you want. That is true but you need several things, in varying quantities depending upon your situation: 1. Money 2. Time 3. mechanical skill 4. tools 5. a person from which to learn the mechanical skills you do not have 6. patience to teach yourself 7. or the personnel to do the work for you if you can not or do not have the skill, certifications, or abilities which brings us back full circle to MONEY! You must be willing and able to jump into a part of the project with both feet and figure it out. (I am assuming you have never done this before and I do not know what you do for a living. You may be an accomplished mechanic, machinist and A&P all in one). If I had been retired and was doing my project over again, I would get myself some nice hanger space I knew I could stay in indefinitely, find an A&P/IA that would work with me, (and probably a DER so you do not have to deal with FAA field approvals). Work with your A&P under his tutelage and log time working on your airplane to earn an A&P license. When the airplane and the A&P program are both completed, you will know your plane well, and have the certification to work on it later for annuals and maintenance. (Of course, I would still utilize your A&P as you would be a low time A&P). You probably will have a whole lot more fun on the project than I did chasing people to do work. You will also satisfy any of the misgivings that you might have for not having the fun building an RV, and you will end up with a certified aircraft. John Breda
-
I just realized you had a C and not an E. I believe there is an STC out there to put a IO-360 fuel injected engine into the C. I would go that route if possible. John Breda
-
Your bringing back memories..... I rebuilt a 1968 F model that had sat in a hangar for 26 years in Dallas. It had no corrosion, no damage Hx and 1960 hours total time. Naturally it was not airworthy when purchased, in fact it was in many ways disassembled, although it still had the wing attached. My first mistake was to try to rebuild it from a distance. I did accomplish this, but with many headaches. I do not know where you live or where the plane is, but I would move it close to you, in a reasonably priced hangar/work area where you can be for a long undetermined amount of time. Get an excellent Mooney IA to make absolutely sure that the steel cage and spars have no corrosion. Take the wing off it to move it long distance if needed but get it near you. Take everything apart, and rebuild from the beginning. Once everything is gutted, clean, epoxy paint the inside of the cabin, and go from there. You can end up with a very nice aircraft. Take a look at my pictures on this site. I probably would not replace with an A1A Lycoming, but get a new counterbalance, roller bearing engine. Mine is turbonormalized. You probably can not do this any more as parts and STC are not available. If your remain normally aspirated, consider the top prop or MT prop. Long range tanks makes this a awesome plane -- 90 gallons gets you a long way on 11 gallons an hour ROP or 8.5 gph LOP. Mine is 160 kts at 10,000 feet, 75% power ROP, 168 kts with everything forward at 10,000 ft, 175 kts 18,000 ft and 75% power. OSH --> BOS 5 hours nonstop with 1/2 fuel remaining. The rest are choices based on equipment you want to use, interior choices, etc. I used a DER which allowed me to make many upgrades and customizations copying what Mooney did over the years. That was what made the project viable. I wasted too much time and money trying to go through FAA field approvals. The more work you can do, the better so find a Mooney savy A&P/IA to work with. 201 windshield and new cowling are worth the work since you are starting at this level. Go one piece belly for an upgrade which is also a repair. I would not do the RV thing. If you want to have more freedom in rebuilding, you can always move it to the experimental class. I did not do that as I thought it best to keep it all certified. The Mooney is a much more substantial airplane. Speeds are similar. I have never flown a RV but I suspect the Mooney is a more stable instrument platform. John Breda
-

Johnson bar hard to secure into lower socket
M20F-1968 replied to M20D6607U's topic in Vintage Mooneys (pre-J models)
When I rebuilt my plane, I had a real problem getting the gear up. It required two hands. Two MSC's claimed it was because the parts were new and rebuilt. We first tried to put plastic bushings on the retraction rods to compress the main springs more. The gear worked much better. Then we went to the factory and perused the original drawings and found that there were three different length retraction rods during that era (even tough there were only two different body lengths at the time). We found a pair of the longest retraction rods, bought new springs and now the gear goes up with two fingers. My guess is there is a problem with insufficient assist spring tension or a heim bearing is binding or something is bent or out of alignment. John Breda -
I have a Sidewinder. (I got rid of a Powertow in favor of the Sidewinder). When you pull by hand, you need to build a bit of momentum to get the plane moving. That is where you can get into trouble. The Sidewinder has enough torque, and enough control at slow speeds, you can easily move the plane a few inches at a time, from stop to slow movememt, and also instantly stop if as needed. It seems much safer given the degree of control from a dead stop to motion, with excellent control. John Breda
-
I ordered a set of these. 1. The cut-out is too narrow for the Mooney rail. 2. Even if you were to file the cut-out wider to make it fit, if it were place behind the seat, when you loosened it to intentionally slide the seat back to get out, it would shorten the seat's travel by about 2" due to the cotter pin placed in the rear part of the inboard rail to keep the seat from sliding off the tracks. 3. I thought of a block with a spring loaded pin that could be placed on the rail and behind the rgt front leg/roller, which would drop a pin into the next hole independently of the seat locking mechanism but there is not much room there and the trim wheel also blocks access. I am also thinking of a small clamp like arrangement with jaws machined/filed so they grab the rail from each side and are machined/filed so the fit the contour of the rail and apply even pressure so as not to damage the rail. Is there anyone out there that has a 3D printer that could make a pair of jaws in high density plastic or similar material that would not screw-up the rails? John Breda
-
I have not, however I do use an Ipad mounted to the copilot's yoke for maps, frequencies, etc... My main point is that at the onset of an emergency, I want to be on a known to be reliable set of back-up instruments as my now primary flight instruments. That being said, the Ipad can be used for situational awareness like I use it now. I just want to have a fully operational, tradition AI up and running and not potentially fumbling with non-traditional devices. Looking rgt, down, etc may also be vertigo inducing. Not a good time to get into an unusual attitude. John Breda
-
Of course they would be for discussion, entertainment and novelty purposes only! John Breda
-
I could make some of these. I think I would use spring loaded ball set screws with locking nuts threaded into an aluminum block screwed to the side of the long rail. This would allow for tension adjustment for snapping the U channel onto the rail and would be mechanically solid. May want to use 1/8" thick. U channel stock. I could make them longer than necessary and then they can be fitted and cut with a small hack saw in the field. John Breda
-
I had a wing from a 1967 F which was transported to Air-Mods. You can email me at john.breda@gmail.com John Breda
-
I do not buy the Ipad as a back-up thing. In an emergency situation, you want to quickly find and use traditional instruments as back-ups. You want the back-up instruments to be ready, waing, working and available at a glance. With a heightened level of anxiety, even small changes in procedures or thought processes can be problematic. The cost of additional equipment to insure a seamless transition is negligible when compared to the consequences. I have 3 artificial horizons in my plane, G66, Vac AI and electric AI. Yes, there is a story to that. I started out with a steam gauge panel, with a vacuum artificial horizon and a 2" electric one. When I bought the G600, I though of taking out one, but then realized that: 1. If I had 2, it may take more time to recognize the problem. If I had 3, I can see immediately which 2 correlate, and thus see which is bad. If in IMC, that can save precious time. 2. There is no fussing with transitions, just fly the remaining 2 and cross check 3. I realize there is a push to get rid of the vacuum pump, but in my situation I have redundancy in instruments and also have redundancy in what drive them. All my back-up instruments are traditional gauges. The new electronic stuff is real nice, but it is still a computer. John Breda
-
flap and elevator indicator trim panel
M20F-1968 replied to outermarker's topic in Vintage Mooneys (pre-J models)
My nose wheel cover was shot as well. (It was the only original Royalite part I needed to copy as the rest of my interior was retrofittted from an Ovation). I started with the broken part, used wood, clay, tape and whatever I needed to create the shape I needed. Then started hand laying-up fiberglass over the old part. You lay-up 3 or four layers, then sand as need, then repeat many, many tines until you have a workable part. For the original new part I just used hardware store fiberglass resin. Then, when I had a good finished part, I used that as a mold to make a flame retardant part from flame retardant resin. A picture is attached. All it takes is time, patience, fiberglass and sand paper. (I substituted a J model Trim and flap indicator for the original with a DER approval). John Breda -
I have a vacant steel T hangar, sliding doors, with adjacent storage space at Laconia Airport, Laconia, NH that is available for rent or for sale. Give me a call at (617) 877-0025 0r e-mail me at john.breda@gmail.com if anyone is interested. John Breda
-
I like to do things that I can when the work load is low. The work load is lowest just before I start the plane or just after I have started it and am waiting for it to warm up a bit (it is now winter in Boston). At that time, I just scan the instrument panel (without the checklist) and adjust trim, put in take-off flaps, set frequencies if radios are on, etc... The when I taxi, do a run-up etc... use the checklist so at that point I am just checking things just set, or setting things I have not touched yet. I find it much more relaxed to do many things while sitting in the plane next to my hangar. Then go on to the usual stuff in the usual way. Redundancy is a word often used in aviation. John Breda
-
Realistic Maximum Value for 1976 M20F
M20F-1968 replied to jerrodmonaghan's topic in General Mooney Talk
I started with a shell. Mine is a 1968 F bought in disassembled condition and not airworthy at the time. No corrosion and no damage Hx. I had to make it airworthy from its location in Dallas, TX. (Doing work from a distance is hard and was a problem). This is not a problem for you as you have an airworthy plane which you can fly to be best people to perform the work. My plane was restored using J model and Ovation parts. It is insured at a price equal to most long body Mooneys. It looks like an MSE and has the upgraded gear, (J bar and hydraulic flaps). There are pictures on my profile. You can take an older plane to whatever level you would like. I like the efficiency and simpler maintenance of the F model. 160kts at 10,000 ft and 175 kts at 17500 ft., ROP burning 11 gph. Yes it is turbo normalized. It is valued by appraisers at what it is, which is no longer an F. It was a winner in the "Vintage" class at Oshkosh, but is truely a modern plane. Be sure that the airframe is worthy, then plan what you want, find reliable and honest people to do the work, work with them so you will learn about the airframe and equipment. If it is to be a forever plane, then the money doesn't matter as long as you manage the project well so you get your value out of the plane is usage. John Breda -
EDIT--fixed!! mooney flap question pt 3. need part #
M20F-1968 replied to rbridges's topic in General Mooney Talk
If you can get me a sketch of the teflon parts, and some information about the material, I can probably make then given that I have metal lathe. John Breda -
Seat Belts in a manual gear F model
M20F-1968 replied to M20F-1968's topic in Vintage Mooneys (pre-J models)
Doing it the hard way keeps me out of trouble. John -
Retrofitting 201 Style Yokes
M20F-1968 replied to Marauder's topic in Vintage Mooneys (pre-J models)
This should not be involved. With the J style yokes, you will have to also change out the yoke shafts. The binder bolt hole is 90 degrees off for the older style. I went the next step and also changed out the yoke shafts using Ovation parts because of the bronze bearings in the aft connection. In my case, I needed a DER to sign off as I needed to change out the modified bellcrank as well. It all is doable. John Breda -
I guess I'm not alive if i don't keep finding projects to work on....... I am looking to revise the pilot and copilot seat belts in my F. As you manual gear guys know, sometimes the seat belt buckle opens when putting the gear down (Gets hit by rgt thumb while moving the J bar). I address this problem by shortening the belt with the buckle by about 2". That fixed the problem most of the time, but I am looking for a 100% fix. I want to re-web my belts using the new tear-drop shaped Amsafe belt buckles and connectors used currently on airliners. These belts open with a 90 degree movement of the buckle cover (not 20-30 degrees as in the belts I have). Thus, the problem will be completely eliminated. I have belts with retraction reels from a 1998 Ovation. They too are Amsafe belts and buckles, but an older style not used any more. I spoke with a DER who can help with the certification, but he needs data on the Amsafe buckles and connectors of the ones I am currently using and the new ones that I will be using, so a seat belt shop can make the belts and the DER can approve them based on the data showing they are equivalent from an engineering and load factor standpoint. Anyone here with information that can be helpful in this process. The new belts can be re-webbed for about $170 each. I have the hardware. Just need data and paperwork. Also, anyone know of a DER I could consult with? Any assistance to make the project easier is appreciated. Yeah, I know I could just turn the buckle over, but that does not produce as elegant a result as doing a bunch of extra work. John Breda
-
There is no rule that is has to look exactly as the part you have. It is merely a box to place switches. You can 3D print it as was mentioned. You can make a small box using it as a fiberglass mold to lay-up fiberglass over it. Yo can also get a block of aluminum and work manually on a vertical milling machine and mill out a new box, similar to what you have. This will be the most durable of the options and will be the last one you will every have to make. John Breda
-
I have never put any sort of lubrication on my J bar handle nor the down or up lock blocks. My concern would be getting oil or silicone on the outside of the handle and the chisel shaped tip of the thumb lock. The chisel shaped thumb lock end fits into a groove in the j bar handle. I would think that a bit of friction (accomplished by not lubricating the handle) would add to keeping the chisel tip in place and locked. That is, of course, assuming that handle fits well into the down lock block and the thumb lock springs into place. I wonder if there are some slight differences in the manner the new down lock blocks are machined. If they are geometrically out of spec. slightly, that could cause some problems. John Breda
-
The F offers alot more than you would expect above a C. Cost is really not that much more, and maintenance also is not much more. I would rather have more HP and fuel injection, elimination of carb icing problems, and the ability to run lean of peak. Having said that, if a C is really in your budget, I would not look for a "newer C" since the old C models already have the manual gear "upgrade." The Johnson bar, if rigged properly, is quick, reliable, with no need to fuss with limit switches, worm gears and a back-up system. It is its own back-up. A manual gear plane, being older offers the same upgrade options, with less expenditure up front. No matter what 50 year old plane you buy, you will probably want to do some modifications and updating. You might as well save some money up front, get the manual gear, and have a lower maintenance cost airplane. Whichever 50 year old plane you buy, the long range tanks provide safety and endurance. Both are beneficial. John Breda
-
Inner Gear Doors on a Johnson Bar Mooney
M20F-1968 replied to M20F-1968's topic in Vintage Mooneys (pre-J models)
I have a one piece belly. The MOD-Works style doors are lower profile and do not require anything mounted on the wing. I have new springs, and longer retraction rods (Mooney made 3 lengths back in the day) so the springs are contracted, I think, maximally. The gear moves easily now and can be locked up with 2 fingers. Can anyone comment further. Are there any manual gear Mooneys with the Mod-Works inner gear doors? John Breda -
I used LP Aero glass. I do not think the vendor matters much. When I bought the windows, LP Aero provided a copy of the Mod Work STC. That is probably why I used LP Aero. Be sure to drill out the window significantly larger than the screw size you are using. Also, check the countersink angle. I have attached a document from Dugosh from 10 years ago describing their process. John Breda Dugosh-windows.pdf

