

PT20J
-
Posts
9,512 -
Joined
-
Last visited
-
Days Won
206
Content Type
Profiles
Forums
Blogs
Gallery
Downloads
Media Demo
Events
Everything posted by PT20J
-
Until the leak
-
Looks like the V3L-3-D8 has spade lugs instead of screw terminals. But for the price, I'd probably go with V3-1/JV-5.
-
I usually use LPS 2 for the main and baggage door hinges.
-

Looking for nose gear truss, part # 940042-503
PT20J replied to JackM20M's topic in Mooney Bravo Owners
Are you sure that is the right part number? I don't find a 940042-503 in the M20R IPC. It is listed in the M20J IPC as a retrofit kit. I think the part you want is a gear leg 540004-509. The gear leg is the part that has the stops on it and is what usually gets damaged from oversteering. Mooney made a batch of those (eight, I think) back in May. Skip -
I keep forgetting to lube that hinge. I’ll bet if I lubed it every so often, the spring probably wouldn’t rust out. But I forget.
-
Maybe. I looked in the IPC and also the SMM. Mooney used a few different microswitches: V3-1, V3-3, V3L-3. The V3-1 seems readily available ($24.14 from Newark) and requires the addition of a JV-5 lever actuator ($19.97 from Newark). I cannot find a reference for a V3-3. The black switch in the picture looks like it might be that combination. Mouser shows the V3L-3 as a FAA PMA part that includes the lever actuator. It looks like the red switch. It's $170.10. I think they are all interchangeable.
-
You are right. I just tried it on an iPad and a Windows 10 computer. It used to work but something has changed and now the model and document selections work in a nonsensical manner. If you go back and forth changing selections you can sometimes get the correct sort, but I haven't found a repeatable method. EDIT: I emailed Frank Crawford and he’s going to have the company that builds Mooney’s website look into it.
-
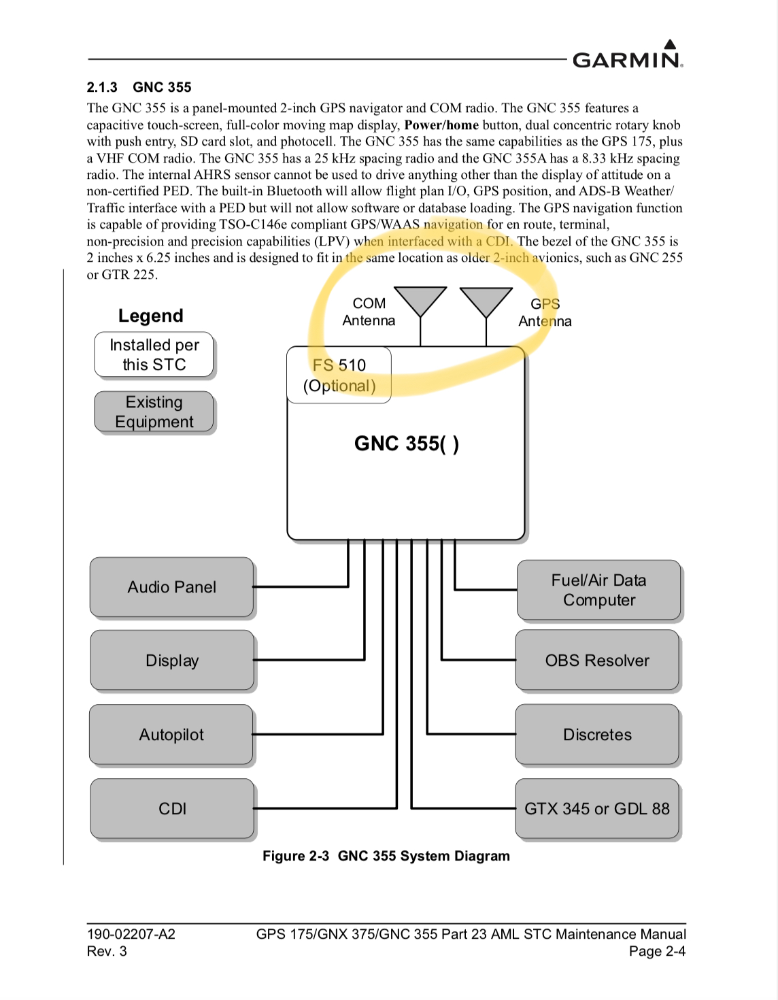
Garmin makes a lot of equipment that can be installed in a myriad of configurations. The only way to understand all the requirements for a particular configuration is to refer to all the installation manuals. Be careful for things that are called out in one manual, but negated in another. For example, in a G3X installation, the G3X installation manual calls for removing the GTX 345 and GTN audio connections called out in the installation manuals for that equipment. Many an installer has read the GTN manual first and installed a connection and then realized after reading the G3X manual that they needed to remove it.
-
Engine won't run on the Left Magneto
PT20J replied to Adverseyaw0317's topic in Modern Mooney Discussion
The dual mag has one impulse coupling for both mags so it can start on the left mag or both mags depending on how the ignition switch is wired. See Mooney SIM20-59A. -
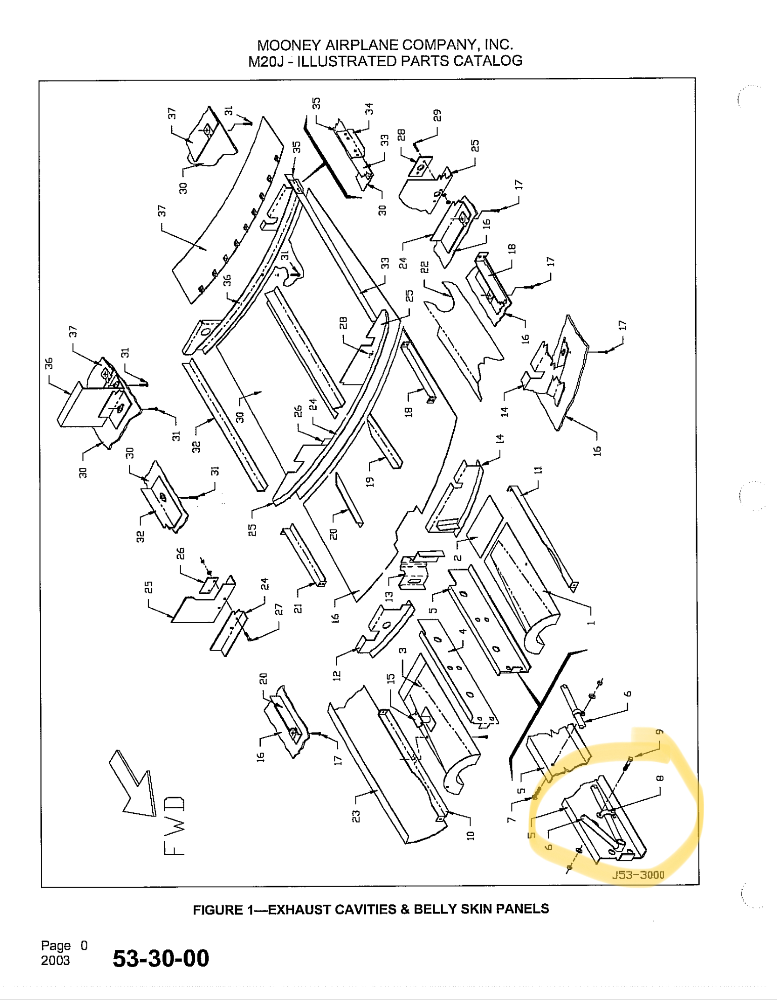
During this year’s annual inspection, my IA noticed that a clamp on each side that attaches the nose wheel well sides to the frame was not tight and was abrading the frame tube. Although the IPC shows it bolted on, mine was riveted. I drilled out the rivets, cleaned everything up. Fortunately, the wear was only through the epoxy primer and hadn’t damaged the tube yet. I wrapped some anti-chafe tape around the tube and bolted it back together with #8 screws and stop nuts. So, the next time you have the exhaust cavities off, you might want to check this.
- 1 reply
-
- 4
-

-

-
Van's following in Mooney's footsteps, and not in a good way
PT20J replied to ZuluZulu's topic in Miscellaneous Aviation Talk
Stuff rolls downhill. Van’s is Lycoming’s largest customer. -
The GNC 355 has a WAAS GPS receiver and VHF com transceiver. It must be connected to a GPS antenna and a VHF com antenna.
-
It is complicated because you not only need to search for Mooney ADs, but you need to search for the engine, propeller, and all the appliances installed. LASAR used to have this neat resource, but I don't believe the new owners have kept it updated. Still it has a lot of information for older ADs and SBs. AD_Log.pdf
-
CAT is neoprene impregnated material. SCAT is silicone impregnated. SCAT will withstand higher temperatures which is why it is used forward of the firewall. In addition it doesn't harden with age as neoprene does. It's a better (although more expensive) choice. The biggest problem is the ends. If you buy bulk material and cut it to length, the metal wire will eventually find a way to eat through the material. There are several ways to finish the end of the cut wire to try to prevent this, but none are perfect. Much better to have Guy (800-556-3160) make ducts with finished ends that will last essentially forever.
-
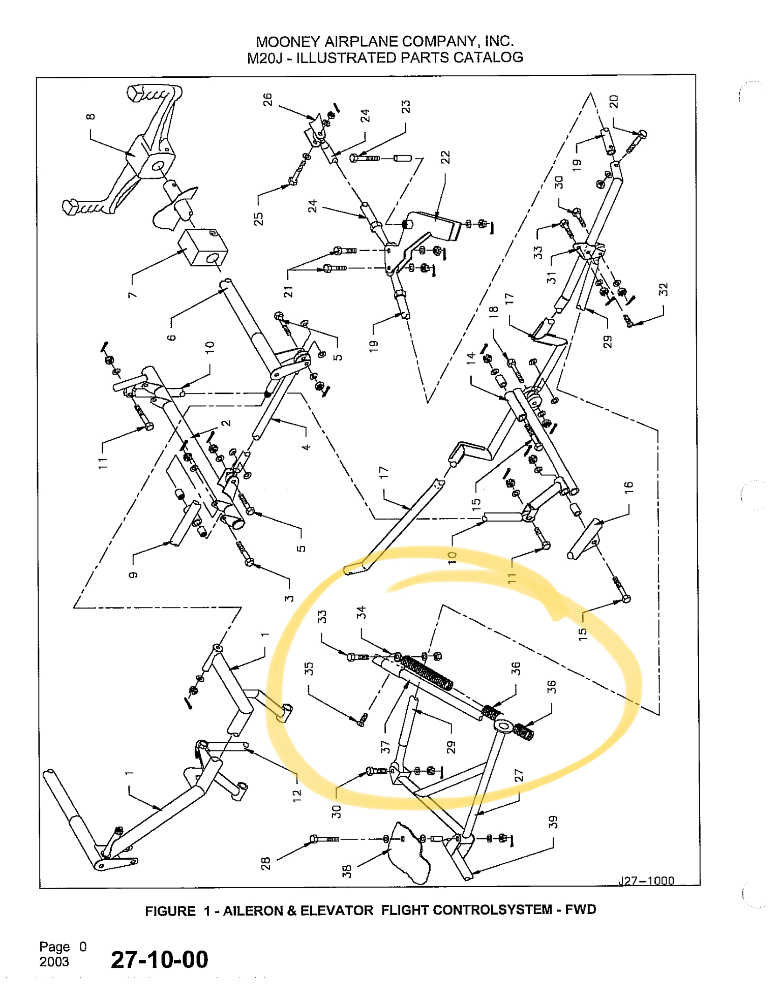
It would seem to be hard to get that much deflection with misrigging without the airplane flying oddly. I would suspect a broken or missing interconnect spring. If you move the ailerons stop to stop on the ground, you should feel the springs pulling equally in each direction. EDIT: And, I'm sure Rich meant to say that it is located under the pilot's seat.
-
Changing Spark Plugs; what should I know
PT20J replied to thomas1142's topic in Modern Mooney Discussion
This is only true if you have a Bendix dual magneto. If you have two magnetos, you should rotate plugs between cylinders in the firing order. This is because the magnetos fire every other plug in rotation at the opposite polarity. If you keep them in the same cylinder, then one electrode (center or ground depending on polarity) will wear more than the other. Rotating them evens out the electrode wear. Rotating top to bottom isn't strictly necessary, but helps with a cylinder that is burning a bit of oil since the bottom plugs get the most carbon deposits. On a four cylinder engine, I find the quickest way to rotate the plugs is to put them in the plug tray in the position removed and then swap them crossways: 1T-4B, 4T-1B, 2T-3B, 3T-2B. Skip -
Changing Spark Plugs; what should I know
PT20J replied to thomas1142's topic in Modern Mooney Discussion
Fine wires have gotten really expensive. They have two advantages over standard massive electrode plugs: They last longer, and the electrodes are more exposed so that they often improve starting and LOP operation and don't oil foul as easily. You get the second advantage with BY extended electrode plugs plugs without the cost of fine wires, but there is more maintenance because you need to gap them every annual and they don't last as long. -
Just cost me $85 each way to ship a boost pump to Aeromotors and back UPS 2nd day.
-
I second that. They’re not building any new ones!
-
My shop charges a flat rate for the certs and checks all altimeters installed: Aspen and mechanical when I had that, and G3X and G5 now.
-
The G3X EIS has a timer in it (actually two) and I set it to "flight time". The Part 135 outfit I flew for had a Hobbs hooked up to an air switch for all the fleet planes. You'd be surprised how much difference it makes.
-
What’s the Best Option for Upgrading Cabin Insulation?
PT20J replied to RoundTwo's topic in General Mooney Talk
The material I ordered from Oasis came immediately because Oasis had a roll of it in stock. I've also heard that Aero Comfort stocks the material, but I haven't verified that personally. -
I'm at the opposite corner or the country, so not a candidate, but I am curious what the insurance might cost for a 60-90 day dry lease arrangement. @Parker_Woodruff
-
It is my understanding that once you file Form 8500-8 it must go through the process and either be approved or denied; there is no way to withdraw it. I agree with @FoxMike: Get it and then do Basic Med in the future. Skip
-
I've owned a '78 and a '94 M20J. The '78 came out very easily. The '94 is a different design with the hump in the middle and it is very difficult to get out with the interior side panels in place because you have to flex it a lot. Also, the '78 had a plate that screwed down the center between the windshield and the post and '94 does not. Mine looks like @RoundTwo's. I repaired the plastic and bought a Glare Shield Repair Kit from Bruce Jaeger. I don't know if the current owners of Jaeger/Wisconsin Aviation still sell this. It is a plate that supports the center of the glare shield from underneath and a metal black powder coated cover goes on top. Four screws attach the top plate to the bottom plate with the plastic glare shield sandwiched in between. This also allows cutting a larger hole in the center which makes it easier to maneuver around the center post. I found that the black metal plate got hot when parked in the sun and softened the glare shield plastic, so I reproduced the plate from a piece of black ABS. I have a couple of thin plastic sheets that I place between A pillars and the glare shield when removing it that makes it slide past the pillars a little easier, and I remove the compass from the post to have more room. I also put some rubber U-channel on the front edge because it tends to scratch the inside of the windshield when maneuvering it during removal. Glareshield repair kit.pdf

