

PT20J
-
Posts
9,512 -
Joined
-
Last visited
-
Days Won
206
Content Type
Profiles
Forums
Blogs
Gallery
Downloads
Media Demo
Events
Everything posted by PT20J
-

Mooney Ovation Interior Refurbish
PT20J replied to William Munney's topic in Modern Mooney Discussion
If it has fiberglass panels you definitely don't want to paint them. I have seen the fiberglass panels that have the ultra leather coming loose. If that's what is happening, then any good upholstery shop should be able to redo that. -
Mooney Ovation Interior Refurbish
PT20J replied to William Munney's topic in Modern Mooney Discussion
I can see why Hector no longer wants to do this. He probably loses money on the removal and installation. These things were all hand built and no two are exactly the same. I've done this a couple of times. Plastic: you can repair it and paint it. Lots of threads here on how to do that. SEM Color Coat Phantom White is a good match for painting the plastic. You can buy it in rattle cans. There are Youtube videos on how to prep the plastic and apply it. The first one I painted with rattle cans in my garage. The last one I took to a local paint shop and they sprayed it all in their paint booth. You will be amazed at how much plastic there is when you get it all out. Most of the sheet metal screws are #4 but you will want to replace the ones that are stripped out with #6 and paint them to match. You can get carpet made to size from SCS or Airtex. The side insulation will be metalized foam on the side panels and probably fiberglass everywhere else. Replacing the fiberglass with foam will be an improvement for temperature control and somewhat for noise. The first one I did was many years ago and I bought an Airtex interior. I had the foam in the seats rebuilt by a local aircraft upholsterer and contoured to match an orthopedic back support and then covered with Airtex covers. They were really comfortable. If you want really top end, have the seats done by Oregon Aero. So, there are lots of options depending on how you want it to look and your budget. If you are planning an avionics upgrade, that is the time to do it because all the wiring runs down the left side and much of the interior has to come out depending on what you are having done. Skip -
That's what I'll try next. I'm thinking it's just one of those things with a hand built airplane.
-
Isn't it just a minor modification
-
On my M20J, some ducts are rectangular. Is it possible that someone replaced an original with CAT or SCAT? Nothing should interfere with the controls.
-
I'd check the IPC for the correct part number (it was an option on some models/years) and then check the salvage places.
-
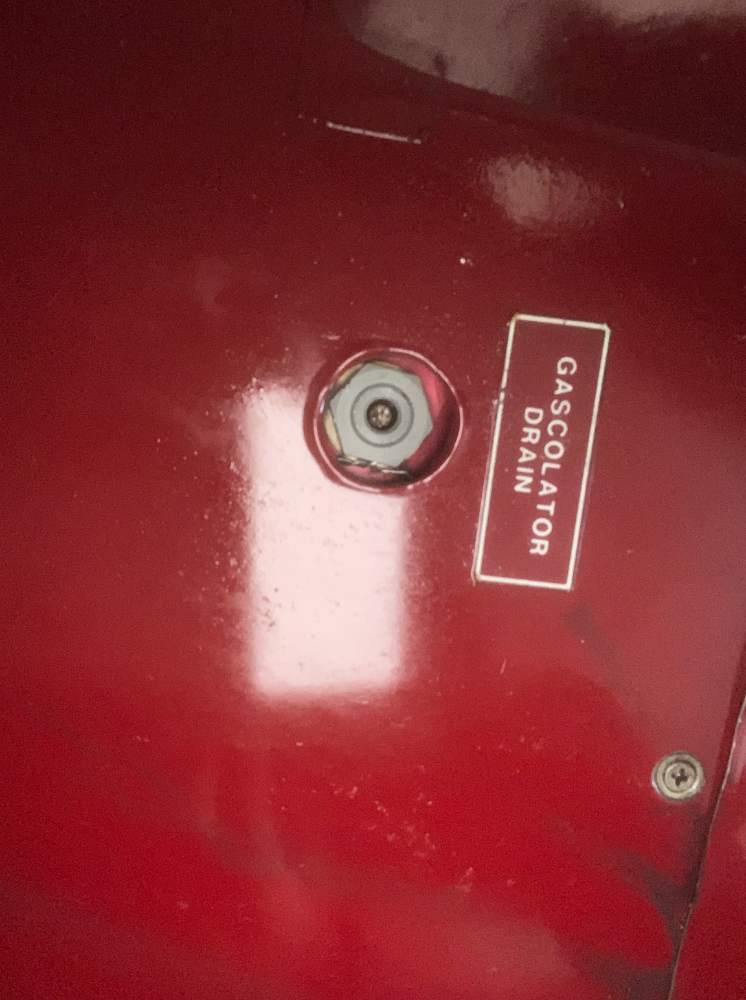
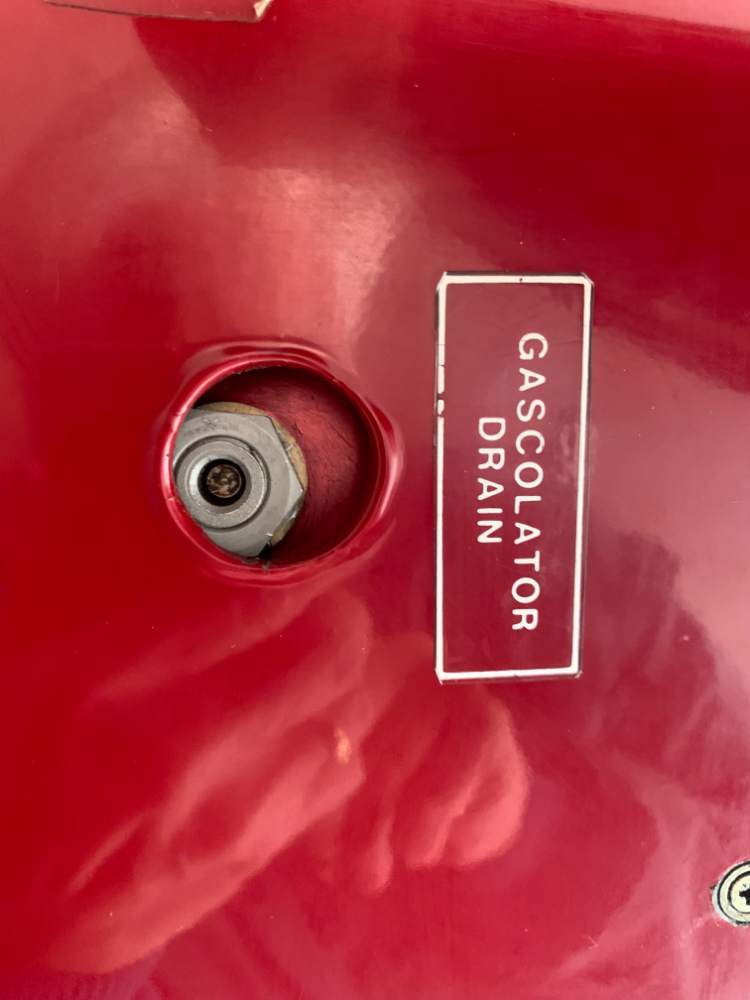
No, there are too many camlocs that all have to line up. When I installed it, I tightened up the mounting bolts and then connected the fuel lines which would seem logical. The only thing I can think of is that if the lines were connected first it would be possible to torque them to make the gascolator line up with the hole and then snug up the mounting bolts, but not tight enough to affect the alignment. But that seems kind of Mickey Mouse even for Mooney.
-
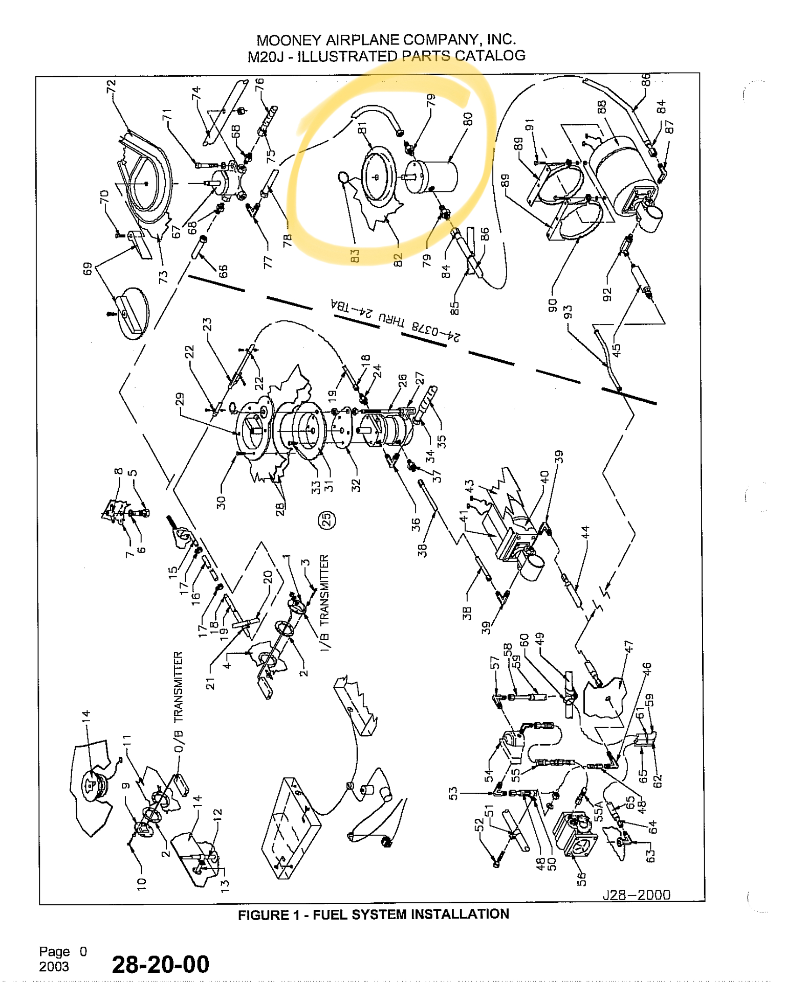
Ha! That would be just like me, but it's impossible because the two screw holes are not on the centerline. You can barely make them out in the drawing. Interestingly, there were a couple of AN970 "fender" washers glued to the top at each bolt hole that space the gascolator from the floorboard. But I put it back as it was when I removed it and they don't seem there to "tip" it because they have too much surface area to do anything by hold it parallel to the floor.
-
I have a 1994 M20J with the one piece belly. While I had my boost pump out for overhaul by Aeromotors, I decided to replace all the O-rings in the gascolator. The gascolator is an Airight (red can). My IA asked why I was messing with something that wasn't broken, but I pointed out that it appeared that the 30 year-old O-rings had never been replaced and now was a good time. I took it apart and replaced the O-rings and put it back. It's pretty simple: two AN3 bolts through the floor and two fuel lines. But now for some reason, it doesn't align with the belly hole as well as it used to. I've fiddled with it but there is no way I can see to adjust it. Has anyone else run into this? BEFORE AFTER AFTER
-
Current install cost of Garmin 650xi and 750xi
PT20J replied to Mark89114's topic in Avionics/Panel Discussion
I estimate labor at 50% equipment cost for a major upgrade (like G3X,G5, GFC 500, GTN combo). For removing and replacing a single unit it’s closer to 100%. Economies of scale. I think that’s why we see so many full panel upgrades being done. If you are happy with the rest of the panel, buy a used 430W or go with IFD. If you are going to replace the autopilot eventually with a GFC 500, do it all at once to do a cleaner installation and save money. -
As I understand it, the theory for bleeding by pressurizing the system from the lowest point is that the air, being lighter than the fluid, will tend to rise anyway, so you are forcing it the way it tends to go. I guess you might accomplish the same thing by lowering the pressure at the receiving end. Either way, you need to move fluid through the plumbing until all the air is removed.
-
The supply line from the master cylinders to the reservoir in the tail is clear plastic in my airplane. This made it easy to see the bubbles. After the gravity draining, there were very few large slugs of air. It was mainly bubbles. Toward the end the bubbles were tiny and fully entrained in the fluid. We used a pump oil can and piece of clear tubing to attach to the bleeder. We only had to pump about two cups through each side. I used a turkey baster to bring the level of the fluid back down to the full line on the reservoir.
-
You may well be right. It's just what Scott told me based on his experience.
-
I think that was the idea: Moving the pistons rapidly mixes any air with the fluid and he said it will take a long time for it to separate. He also told me that the easiest to bleed are Cessnas, and the worst are Cherokees (four master cylinders and a brake cylinder with plumbing running all over the place).
-
I got mine filled at a local dive shop. They had the correct fittings. Didn't ask for anything except a credit card. They wanted a couple of hours because the tank gets hot if filled too quickly.
-
I reached out to Joey Ferreyra at Garmin and asked why the GFC 600 is approved for transition to approach but the GFC 500 is not. He didn't directly answer this, but he did say that the development team is looking at it and may approve it in a future release. He didn't say if a software change might accompany the release. Skip
-
Also, Mooney used Wraplock band clamps in two places on each main gear to secure the flexible brake line to the landing gear leg. This product is obsolete and requires special tools to install as do currently available Band-it clamps. I just used standard hose clamps. I put a few turns of friction tape around the hose at each location to cushion it which appears to be what was done on the original installation. Skip
-
The left master cylinder on my 1994 M20J was seeping a bit of fluid. I removed both cylinders and had my IA (Scott) inspect them and install new O-rings. I also replaced the hoses to both brake calipers and a hose between the left master cylinder and the parking brake valve, and installed new brake linings. When reassembling, I used a pump oil can to fill the lines and master cylinders with brake fluid. Now it was with some trepidation that I faced bleeding the brakes because I've never done it before and there are multiple threads on MS about how difficult this is. It turned out to be a nonevent. Scott suggested opening the bleeders and allowing the fluid to gravity drip. I ran a quart of fluid through the system this way to thoroughly flush it. Scott recommended stopping several times and closing the bleeders and slowly moving the pedals through complete strokes several times. He cautioned to move the pedals slowly to avoid aerating the fluid. After doing this we let it sit for a day and then did the standard bottoms up bleeding. Because the feed line from the reservoir to the master cylinders is clear, it's easy to see when all the bubbles are out. It worked great. Brakes are nice and solid. Skip
-
Engine won't run on the Left Magneto
PT20J replied to Adverseyaw0317's topic in Modern Mooney Discussion
If you’ve methodically eliminated everything else, it must be the mag. There are only a few shops that work on dual mags anymore. I would call Top Gun or Maxwell and ask where they send mags and use a shop they recommend. -
It’s not a limit switch. The defroster butterfly activates a microswitch via a piece of wire. The microswitch turns the blower on and off as the door is opened and closed. The wire can become detached from the microswitch and then the blower won’t run. Noise is relative. You’ll have to listen to it to determine if it’s just the air moving or if a bearing is going bad. Skip
-
It attaches to the switch with the switch mounting screws, so it should be easily swapped.
-
I have a zero tolerance for electrical parts acting up. Earlier this year my landing gear wouldn't retract. I put the plane on jacks, verified the failure and opened the belly and tapped on the relays, and it started working. I replaced both up and down relays. The problem with electrical contacts is that once the thin precious metal plating wears through, the base metal corrodes increasing the contact resistance. Contact cleaner can be a temporary solution and is useful for troubleshooting. But, at least for me, a decades-old electrical part that fails once gets replaced. Skip
-
What did it cost? I notice that LASAR is stocking fewer parts and marking them up more lately. Any MSC can order parts from Mooney. It might be best to get pricing from more than one if the part is expensive.
-
No, it doesn’t have the roller at the end of the lever.
-
I think Tri-Flow is recommended for rod ends. My M20J SMM recommends MIL-L-7870 oil for hinges. I don’t think it matters much.


