Search the Community
Showing results for 'Patch'.
-
Don’t think of it as a patch. There is nothing in the service manual about patching a tank. It is not approved anywhere. What is approved is resealing a portion of the tank.
-
Possibly the word "patch" implies a small area to be dealt with. Greg is excellent at patching beyond a small area. He's excellent!
-
I suspect this is beyond a patch but I will give him a call and send pics
-
If you wanted to try another patch, Advanced in Troutdale Oregon is real good. Greg used to do full reseals but just does patching now, but he’s really good at fuel tanks and good to work with.
-

hose for Brittain TC and servo valve?
DCarlton replied to AJ88V's topic in Vintage Mooneys (pre-J models)
Not at all. I did the same thing. Procedure: Pulled the hoses off the Brittain turn coordinator and applied suction to the left and then right vacuum lines (the ones that go to the red and green hard lines that run along the pilot side fuselage). I used a vacuum pump from Harbor Freight with a built in gage and quick release valve. Connecting the pump to the hose has to be leak proof; the slightest leak and you'll never pull and hold a 5-6" vacuum. Tape the connection with electrical tape. One of my lines leaked and one pulled a steady vacuum without any additional pumping (I think my right one leaked and the right rudder servo is the one by the battery; would have to look it up to verify right or left). If you identify which side is leaking, you still haven't isolated whether it's a T in the line (T between rudder and wing), a hole in a line, a fitting or a servo seal. In my case, the rudder servo near the battery was easier to access and test than the wing, so it was tested next. Plugged the hoses at the turn coordinator; pulled a vacuum first on the rudder servo near the servo. Got lucky; it was leaking and had a hole in the seal. Sent it to Kevin to get the seal replaced. New seals are hard to come by now; they can sometimes be repaired with a rubber patch. Also, if it's not obvious, when you break the vacuum line connection at the rudder servo, while plugging the hoses at the turn coordinator, you can test the line forward to the T fitting, and wing servo from the same location. Just FYI, if you go to the Gates web site, the 27073 hose doesn't appear to exist any longer. 27043 is still a good P/N. Specs are all over the place on the internet and the various auto parts web sites; IDs, ODs, nipple sizes, some in inches; some in mm. Plenty of sources for errors and confusion. -

1966 M20C Mk 21 1&1/4" Scat Tube Routing Question
47U replied to Dirty Bird's topic in Vintage Mooneys (pre-J models)
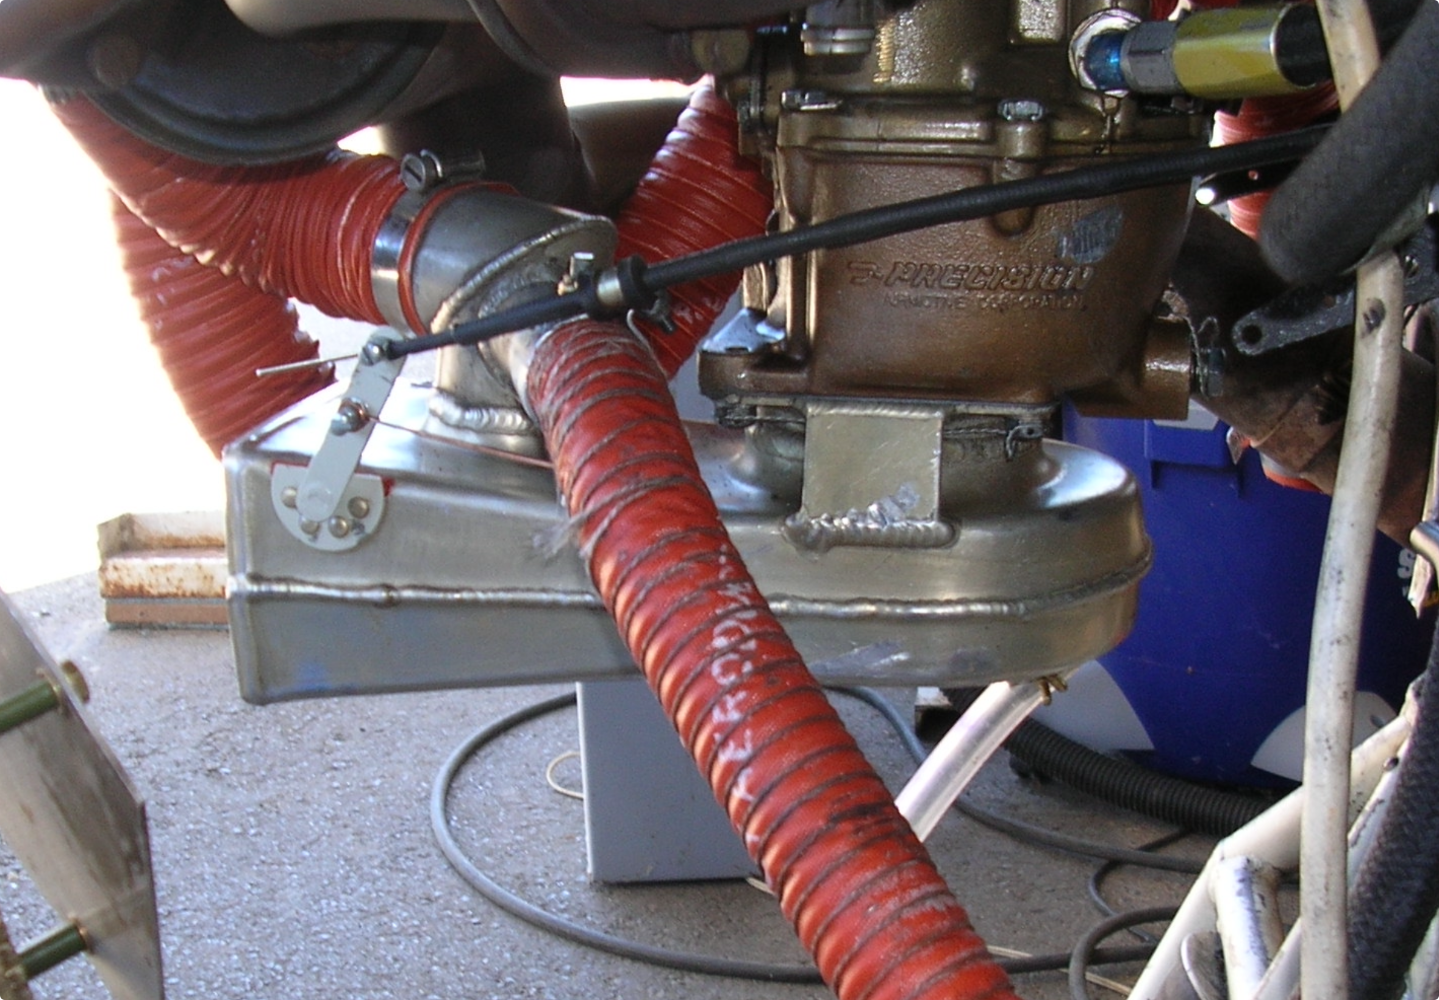
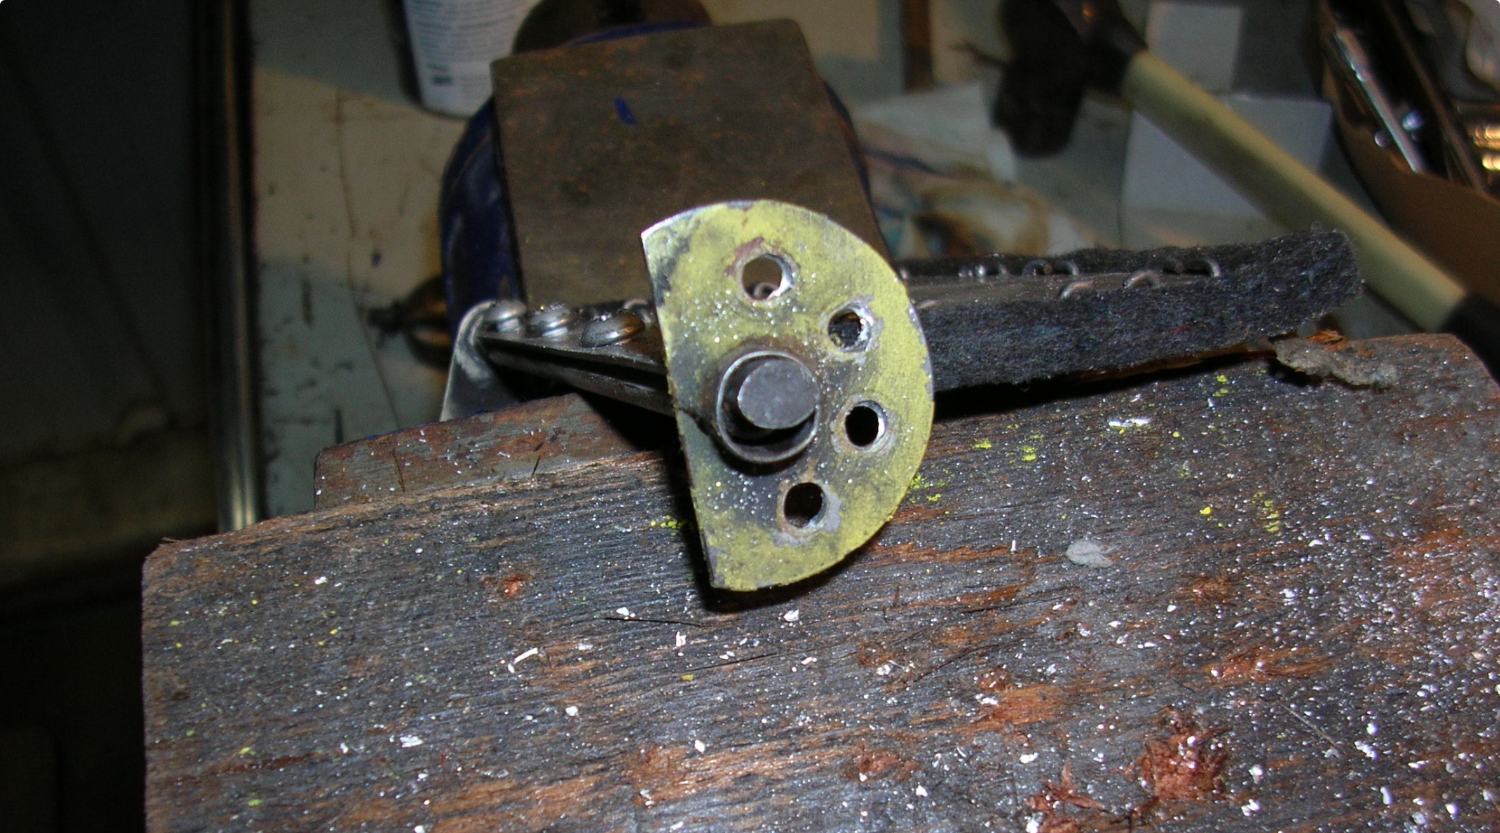
Pics from 2010, when I did the carb heat overhaul kit that LASAR recommended. The carb heat flapper shaft was so worn that it was eating into the air box. I had to make a little patch for it.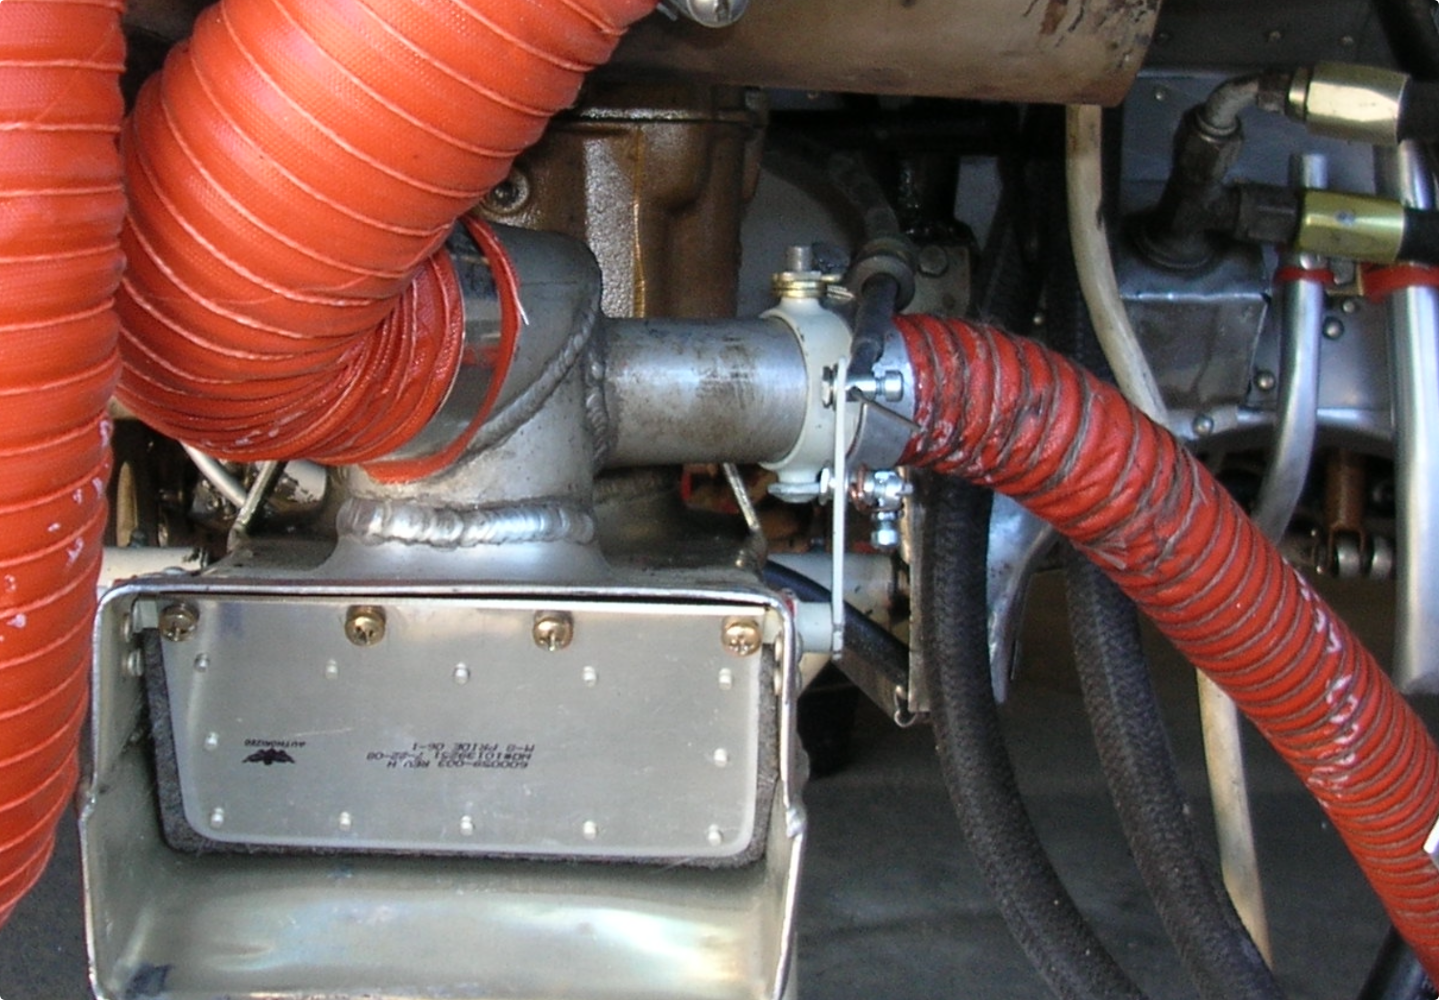

-

Rght out of the gate? Seriously???
LANCECASPER replied to Freddb34's topic in Vintage Mooneys (pre-J models)
If there aren't bladders, which the original ad says it had (maybe incorrectly), and it has sealed wet wing tanks, then it is the original 61 year old sealant and any subsequent patches coming apart. If that's the case, then not only does it need a strip and re-seal, the fuel system needs to be completely gone through. (Since one tank has debris and one doesn't, I would almost bet the farm on whatever they used to patch that side coming apart.) You have bought a project. If you can get out of it - run, even at a substantial loss. If you can't then buckle up for the ride. -

Rght out of the gate? Seriously???
Paul Thomas replied to Freddb34's topic in Vintage Mooneys (pre-J models)
Were the tanks resealed or patched? If its a full reseal, who did the job? A fuel reseal should not have any particulate left over and the sealant should not be coming loose. On a patch job, risk increases depending on how it was done. Either way, I wouldn't think it would result in an immediate shut down but a gradual loss of power as some fuel should still be pushing through the system. -
So last weekend, we began to tackle the ratty old, worn out, 34 year-old M20J cowling. This is prep for a repaint this fall. The paint was cracking next to the hump and all the cowl fastener holes were worn out. Additionally, both cowl halves were split right behind the spinner and there were some shoddy repairs made before we owned it. In other words, time for a total rebuild of the cowling. My first post will be about the carbon fiber stiffener mod and spinner ring. The fastener holes, cowl edges, ram air hole delete, and lower spinner ring will follow as we do those. The upper cowling is made of epoxy impregnated fiberglass, with aluminum strips embedded along the edges where the fasteners go. The factory also used 3 strips of 1/4" honeycomb about 1" wide under the final layer of fiberglass to act as a stiffener. Where the honeycomb makes the transition at the edge of the hump it is crushed, and fails there first. The fiberglass over it cracks and it begins to flex. Then the cowl begins to flex, and the paint cracks at that transition next to the hump molding. It's easy to tell, just set the cowling upside down on your lap and push down on the sides, the gaps open up. cracks form here As mentioned earlier, the previous owners attempted to fix this, but the execution was terrible. They used common boat store fiberglass and either contact cement or polyester boat resin to place a large 16" square patch over the entire area. It peeled off in one sheet, and about half the fiberglass cloth was not even wet, it was white, dry, and flexible. The honeycomb under the hump area was completely crushed down and broken, the only thing holding it together was the very thin skin of 3 layers of fiberglass from the factory. Terrible. This is the before picture of the inside of the cowling, after removing the scab patch and during prep for the carbon stiffener. Our solution was the use of 19.7oz/sqyd carbon fiber bidirectional 8HS weave fabric cut to strips and laid up to replace the stiffener. More on fabric selection later, but this is what we had. For epoxy only one thing will do, and that is MGS. It is a certified epoxy from Germany they build gliders over there with, and Cirrus and Diamond uses it in their airplanes as well. It is a very strong product and has a high TG, or, the temperature at which the epoxy gets soft and loses strength. We chose MGS L285 resin with a 50:50 mixture of fast and slow hardener. Also, per the M20J SMM, Structures section, 5% Antimony Trioxide by weight of resin must be mixed for flame retardant properties. The SMM also lists several epoxys to use for repairs, but none are suitable for laminates. They are more of a PRC-type paste. I went the modern solution and contacted a few Cirrus repair centers, they all use MGS L285 for cowling repairs. The stiffener was cut down flush 2" from either side of the hump mold line and scarfed back at a 30 degree angle. You can see this in previous pics. For the rear two stiffeners, 5 plies of carbon in width from 1.75" to 1.25" were used, to give it a trapezoidal shape, and 2 capstrip plies were used that extends past the scarf line over the top of the factory honeycomb, 2" either side to transfer the load. The front stiffener consists of 6 plies of carbon fabric from 1.75" to 1.25" in width, and three capstrips, one extending 2" either side, the next 2.5" either side, and the final top strip extends 3" either side. Then the front two stiffeners were covered in three layers of the 19.7 oz fabric, the middle layer cut on a 45 degree bias. All of this was vacuum bagged with 20" of vacuum. Due to time constraints, the rear two stiffeners were laid up along with the first 3 layers of the front stiffener and bagged. The next day we finished the layup of the front stiffener and the large patch layers, and vacuum bagged that all together to finish the job. Midway through the job, the rear stiffeners are laid up and 3 plies on the front. Cutting the carbon proved to be a real issue. The 8HS weave is very loose and excellent for draping over complex curves, but it falls apart with scissors. The solution was a 45mm OLFA razor cutting wheel against a metal straightedge as a guide, cutting epoxy-wet cloth on glass. After a few cuts to refine technique, it comes out very smooth and can be laid up immediately. For vacuum bagging we used a 5CFM a/c vacuum pump and a set of R-12 gauges. That along with a 7$ fitting to connect the vacuum bag fitting worked great. It is massively stiff and really was overkill for the work needed. If I were to do it over again, I would use 1.5" wide 19 oz carbon fiber unidirectional tape on the same layup schedule. It would be far easier to cut and layup. We basically made our own strips. Only 2 plies of the large area patch to tie the front two stiffeners is needed. After stripping of the old shoddy repair, total weight gain was approximately 1.5 pounds. Final product:


- 64 replies
-
- 7
-

-

-
- carbon fiber
- fiberglass
- (and 2 more)
-

Open Door In Flight training?
Tom Mc replied to wombat's topic in Mooney Safety & Accident Discussion
Yep all true- PIC is PIC...Check lists are a must. We all can get complacent at times, and that is when you get bit. Even after 1010 times the door was closed and latch correctly, one distraction is all it takes. The reality is during warm summer days the cabin door can be opened and closed several times during ground operations. Good communication is important. In my line of work, the captain is the captain, however when the other member says "check" then the captain most likely trusts it. My story was reality - detailing there was no way my M20C door can be closed in flight without maybe sever slips at low airspeed. Even then, I don't think 'my door' would close. If the door opens, just fly the pattern and land. Your Mooney will fly just fine around the patch. And if you do have an open door, sunny days would be preferred over dark rainy nights.... -
I was very lucky to find a nice clean doghouse that matched my C on Ebay, and I installed it when I overhauled my engine. The favorable impact on cooling even after having previously done everything I could to patch up my decrepit old one was dramatic. Sadly folks are unlikely to find any help from LASAR (which effectively IS the Mooney factory now) or anyone else with their doghouses. Owners without sheetmetal working skills / resources are likely out of luck. And these doghouses were still intrinsically terrible cooling designs even in perfect condition and degrade pretty quickly from vibration. Still hoping for the @Sabremech as a more durable solution....
-
If I was a betting man, I'd probably put money on the GSA 81 Roll Servo. We maintain the CAP AZ Wing aircraft (almost all G1000 + GFC700 AP), and I've yet to see a GIA failure for the autopilot, but in the past year have had to replace 4 GSA 81 servos (3 roll and one pitch IIRC, but they are identical servos... just the strapping is different). Typical failure mode is they stop talking on the RS-485 bus back to the GIA (had one that was still talking, but wouldn't actually actuate). Pretty easy to test in the config mode on the G1000, can then ring out wiring, make up a pass through cable to patch the wiring to another servo, or fairly easily swap the servo with another one from the ship to confirm wiring is functional but servo isn't talking. The GFC700 is nice for servo replacements, like the 200 series King servos, where you replace the servo independent of the servo mount, makes it pretty painless. The only other GFC 700 failures I've seen in the last year was a short in one of the two trim signal wires (there is a trim arm, and then a up or down command), the arm wire had chaffed and was continuously shorted to ground causing an AFCS failure in the PFT, and there was one broken wire in the connector for a pitch servo. These aren't what I'd call premature failures on the servos though, they all had several thousand hours of being in the aircraft, and their operations are pretty AP usage heavy.
-
25 hours to patch a baffle, clean the oil separator, generate a landing light 337, chafe protect a baffle, replace four exhaust gaskets, change an ELT battery, lap a valve, remove a bird nest, clean and paint some of the crankcase, and change a nav lamp bulb....everything else is part of the annual. It's about double what I'd expect, to fix those squawks.
-
On the bravo engine tach pickup is mounted to bottom of the right mag if memory serves, maybe broke off or loose, there is a panel mounted certified RPM gauge that has LEDs, have seen that in Bravos as a patch after the Moritz gauge died and also in Eagles that have the 310hp 2700 RPM STC
-
Most race cars, even in amateur series, can corner well over 1g with race tires. Add aero downforce and cornering g-forces can go significantly higher. So even without aero a properly set-up car on sticky tires will often outcorner even a race bike. Bikes don't make enough downforce due to either aero or weight or have a tire contact patch big enough to provide the lateral forces needed to match a car. Straight line acceleration is a no-brainer, though, that's where the bikes get all their speed and lap time.
-
He's right for racing. Bikes generally don't have enough tire contact patch or downforce to corner or brake as well as a decent race car.
-
Based on the G100UL fuel leak thread what's your position?
Marc_B replied to gabez's topic in General Mooney Talk
Scott Perdue wrote: “I have to add a mea culpa- I got the AOPA Baron Fuel Leak at Oshkosh wrong. There was a 100LL leak, but there was also a G100UL leak and the culprit was an overfill and the cork gasket failed. Just wanted to correct the record. Once a video is up I can't really edit it without taking it down completely. I also made a note in the video description.” It was highly public with the G100UL leak on the Baron with the black goo under the wing as Osh24. I’m not sure where Perdue obtained his background research for this video. I suspect GAMI? Certainly makes it appear that Flywire is GAMI’s new advertising spokesperson. https://flyeagle.org/wp-content/uploads/2024/11/AOPA-Baron-Fuel-Cells-Report.pdf "Given the areas of stain and stickiness observed during the receiving inspection, we expected the left hand auxiliary cell to leak as well. However, the stickiness could have been caused by seepage into that cavity. The stickiness of the leaking main cells was in keeping with the number of leaks found. There is no doubt the patch may have been partially loose given its location however, the extent of the detachment in situ is in question. The removal and subsequent handling would have further separated the repair. The important question is why the repair began to detach. It may be possible that the missing internal rubber may have allowed the solvents in the fuel to penetrate the fabric and the exterior rubber coating and then getting beneath the external repair. This is most likely the reason given how the repairs are bonded." There’s more to the story than “move along folks nothing to see here” that Mr Braly likes to suggest. It’s striking that Mr. Perdue would suggest in a video that “surprise, it was only 100LL that leaked.” This suggests that his video isn’t researched and educated but just parroting support. -

Based on the G100UL fuel leak thread what's your position?
Ibra replied to gabez's topic in General Mooney Talk
Turbine or turbofan fuels don't have lot of odd aromatics? Maybe the new stuff like SAF or bio-ethanol would have required careful compatibility teste and monitoring. Anyway for their tank or rivet reseal, they send someone inside to inspect, scratch and patch every year -

Interior firewall insulation replacement
DXB replied to Matthew P's topic in Vintage Mooneys (pre-J models)
It does indeed look like a very sturdy golden/amber fabric encasing fiberglass - just not sturdy enough, as it has come apart at the bottom of the foot wells behind the rudder pedals, and in a few spots above. It seems like one should just fasten some more fabric over it in the areas that have just opened up. I don't see any way to replace it fully without entirely dismantling the avionics, most all else behind the panel, and the panel itself. Even then cleaning it out will be a messy job. I might even tackle the patch job myself if someone can tell me what fabric to use. I want to avoid doing a sketch job with dissimilar materials so as not to inspire regulatory scrutiny (or premature demise in a fire). -

Looking at Buying Unairworthy M20J for $45k
Pinecone replied to Ted_G's topic in General Mooney Talk
While I agree, in general, things could be better than expected. A local A&P/IA got a F model that was last in annual in 1997. It was painted, parked in a hangar and left. He got it for a couple of months hangar rent. He knows Mooneys somewhat. He pulled the interior and inspection panels and did a deep dive into the internals for corrosion. There is some surface corrosion on the steel tubes, with within limits. No spar corrosion. Engine borescope showed a small (quarter sized) patch of rust in each cylinder. But not deep. Things were good enough that he pulled two cylinders to inspect that cam. And it is fine. And this is also a Mid-Atlantic plane, but closer to the water. It still has a few niggling things but looks like it will be a nice plane for someone. @jetdriven is closer to the plane (KGAI) and a very good Mooney mechanic. He owns and flies an early J also. -
The guy that did it feels bad. The shop owner feels bad. Trying to patch it and pretending it never happened, no bueno.
-
It will need a good bit of weight. I would consider doing the same patch on the other side to get them closer.
-
OK. My question was based on thinking once the composite fibers were compromised (i.e. shredded) the integrity of the blade was destroyed. Glad to hear there is some method to 'patch' a hole in the blade of a composite prop.
-
Footballed? LIke this? The rebuild kit isn’t available? If worst comes to worst, remove the shaft from the flapper, take it down to your local machine shop. Have them weld some new material onto the shaft then file it down to size. If the end plate is also worn, that’s another issue. Mine was so worn I had to patch the hole it wore in the airbox. I still have this shaft, if you need a donor.

-
 What about a lubrication issue? What gets the oil to heads, and is it flowing properly or blocked? Is it a common feed to all the heads, or each has its own feed? If the hydraulic push rod is in constant contact with the valve, and there is not the right amount of oil getting there, it become metal on metal instead of the proper oil film. Similar to what happens with the cams from dry starts. Or possibly if the CHT's are too high, the oil may be burning off instead of lubricating. Though that would leave coking indications, I think. Just thoughts on a different direction that creates wear at that interface. The push rod has equal force on the cam as the valve, but only one end is wearinng. The cam is constantly rotating, and the valve is pulsing, so the motion and contact patch area are different, even if the forces are the same. -dan