Bob E
-
Posts
213 -
Joined
-
Last visited
-
Days Won
1
Content Type
Profiles
Forums
Blogs
Gallery
Downloads
Events
Store
Everything posted by Bob E
-
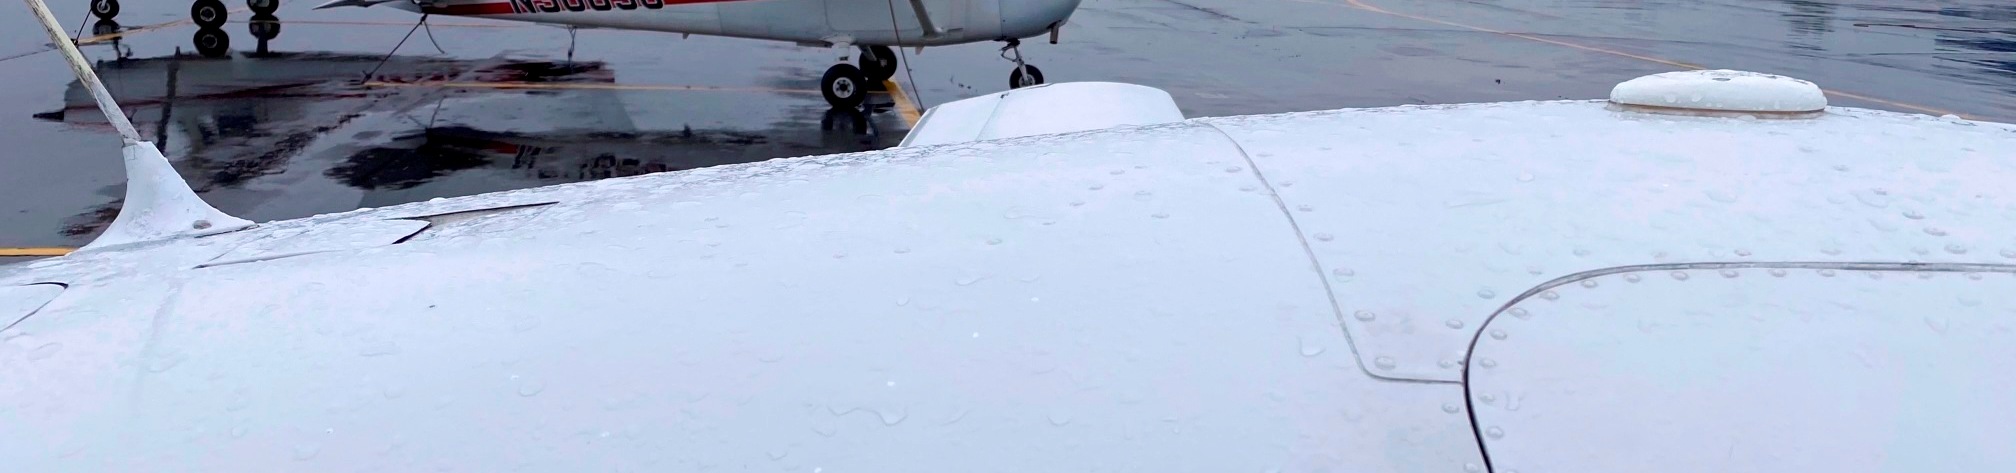
I should have posted this earlier, I suppose. Earlier this year (April) my '65 C got a zero-time Lycoming remanufatured O-360. The excellent shop at Marysville, Ohio did the install. As everyone knows, a zero-time engine has to be broken in, and the first hours are flown near the installation airport at full throttle. So there I was, flying around and around KMRT, which is just northwest of the Ohio State University Airport where I'm based, and it occurred to me, in the immortal words of Doc Brown, "why not do it with a little style?" I knew what I had to do. GO BUCKS!
.thumb.jpg.bc34f5b8e7316198dd6fe1842d52fced.jpg)
-
Definitely on board with the 70 degree stem. Much less expensive and maybe even easier to service than the 90 degree. Hey takair, when you get the tubes, please post some photos of them before and after the install !
-
The stem is centered on the nose wheel but not on the mains. (See photos) Although I don't have any straight-stem spares, as I recall the straight-stem tubes for the mains are also off-center to the same extent.
-
Can't speak to the difference between 90 and 70, but unlike the nose wheel, the mains with bent stems have plenty of space. Checking air pressure and adding air is much easier. (With the straight stems, doing those things required bending the stem to the side even more.)
-

66’ E air filter and landing light
Bob E replied to Nukemzzz's topic in Vintage Mooneys (pre-J models)
An LED landing light is almost a must these days. I got tired of having the radios and everything else dim when I switched on my old halogen landing light. An LED landing light is easily twice as bright as a halogen, the light is pure white, and it won't fail when you need it most. The life expectancy and low amperage of an LED landing light means that I can fly (in congested areas for example) with the landing light always on. They're well worth the price differential. -
Very astute, takair. Had I known about the 70 degree version I could have bought quite a few more pizzas.
-
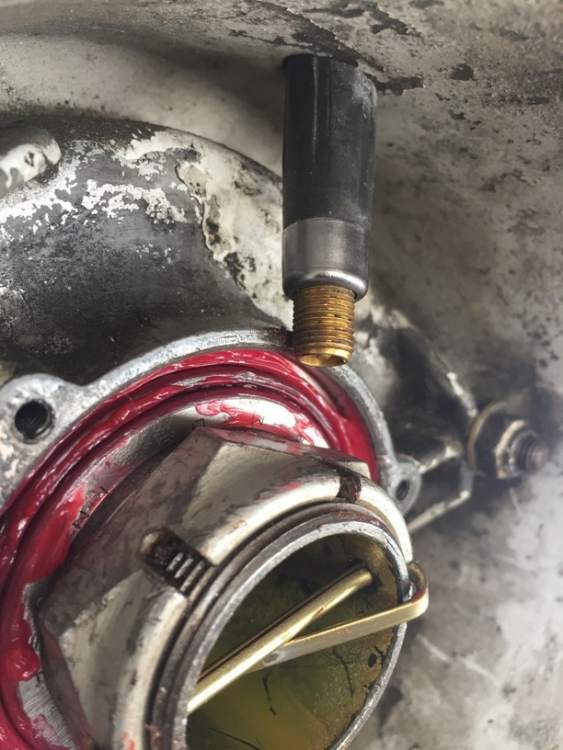
RobertGary: As far as I can tell, there's no way to install 600-6 straight tubes in my '65 C main rims without the stem being pushed off to one side. My A&P agrees (although he seemed to think it wasn't that big of a deal when he installed a set of straight-stem tubes earlier). Your aircraft is 11 years newer than mine. Maybe the rim design was improved for the F??
-
I don't have any photos handy regarding the 90-degree bent-stem, but it's exactly what you would expect (basically looks like the nose wheel stem). Never heard of a 70-degree stem; that's pretty unusual, but 70 degrees should work nicely.
-
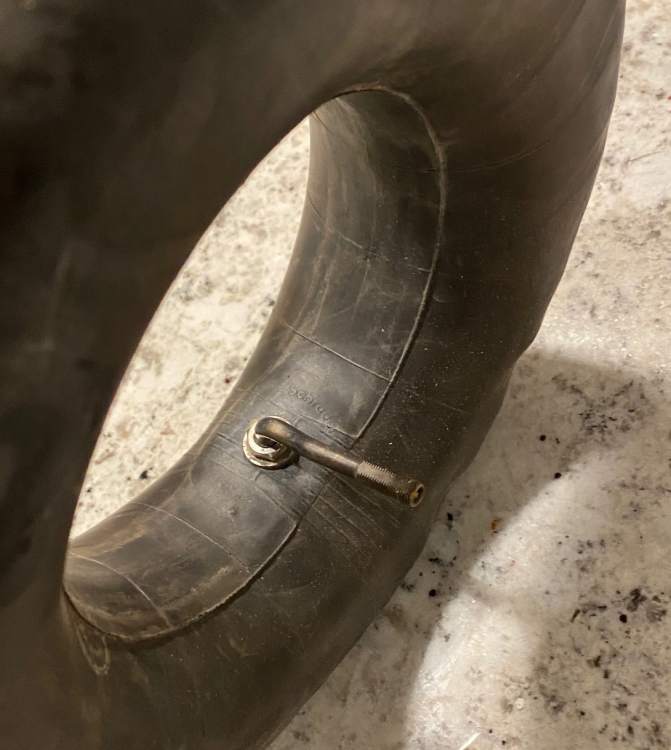
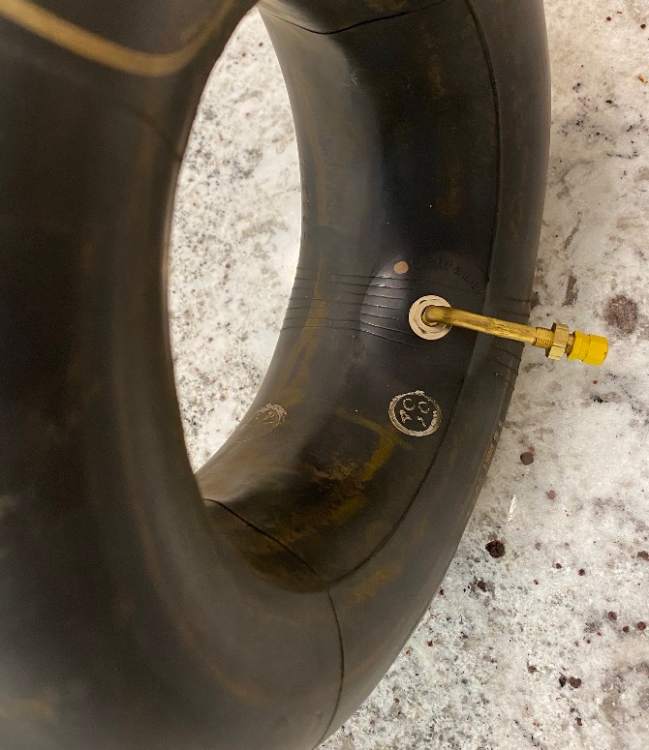
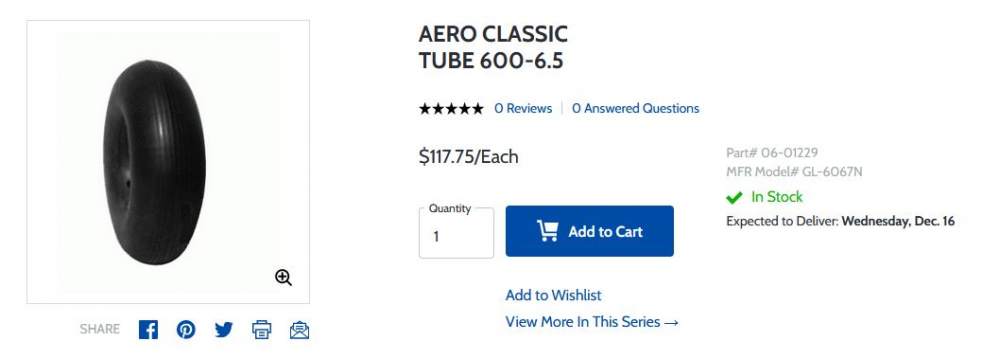
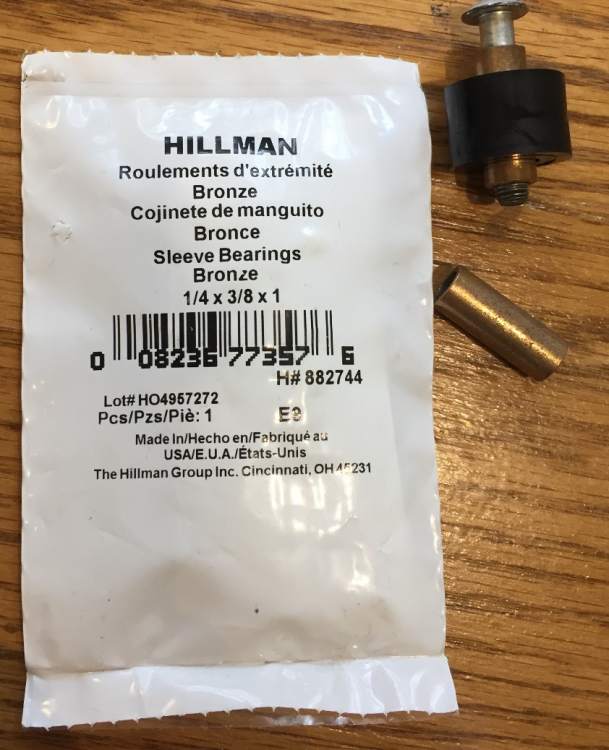
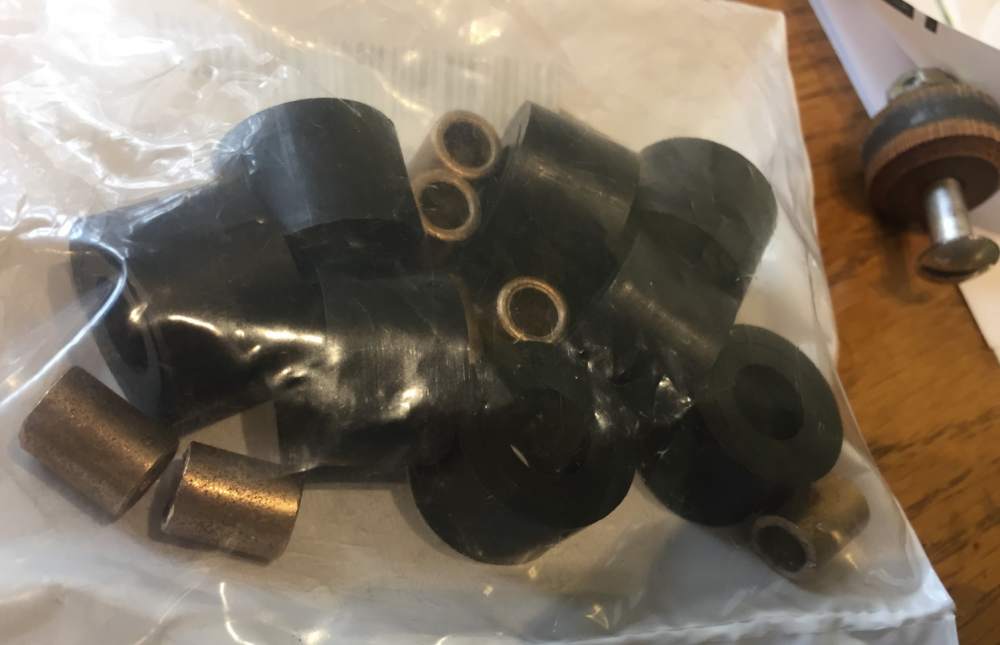
It's a small design flaw in early Mooneys that straight-stem main tubes in WILL eventually fail because the stem is pushed slightly off to one side, placing a constant stress on the rubber, leading to failure at some point. This is true for properly installed and properly inflated tubes, even if you remove the valve stem cap and even if you remove the bearing cover. (See photo.) In the years I've owned my '65 C, I had three such failures (all on landings). I finally bought bent-stem tubes. They cost twice as much, but that has solved the problem once and for all. The manufacturer spec sheet and the Aircraft Spruce listing for tube are in the photos below. There are, however, a couple of CB solutions I tried in the past that did work; no failures but I decided they weren't really kosher: 1. I found bent-rim snowmobile tubes of the same exact size at a fraction of the price and installed them. The problem was that they rendered my aircraft non-airworthy. Turned out that non-aviation tubes are MUCH thinner than aviation tubes and aren't designed for the sudden rotation when the tire makes contact with the runway. Bad idea, but they worked for more than two years until my A&P noticed. 2. A truly effective CB solution is to wrap a bunch of twine around the base of the valve stem before installing the tube. The idea is to use the twine as a spacer, preventing the valve stem from fully protruding out of the hole. All you need is about 1/4" reduction in valve stem height. It actually does work. But I figured, this is one of those situations where, "if you can afford the aircraft, you can afford decent tubes." Especially since proper-spec bent-stem tubes will last for many years.
M20C.JPG.327a20d9e18b34d7e73d89ecabf6f65f.JPG)
-
Where did you mount the Flightstream 210?
Bob E replied to Glen Davis's topic in Avionics/Panel Discussion
The FS 210 has internal motion and pressure sensors and must be mounted with the front of the unit oriented toward the front of the aircraft (there's a big arrow on the housing). Mine is just below the radio stack. It's a tiny unit; takes up virtually no space. I don't see why anyone would want to mount it somewhere other than the avionics area. -
Mysterious water leak from speaker grille
Bob E replied to Bob E's topic in Vintage Mooneys (pre-J models)
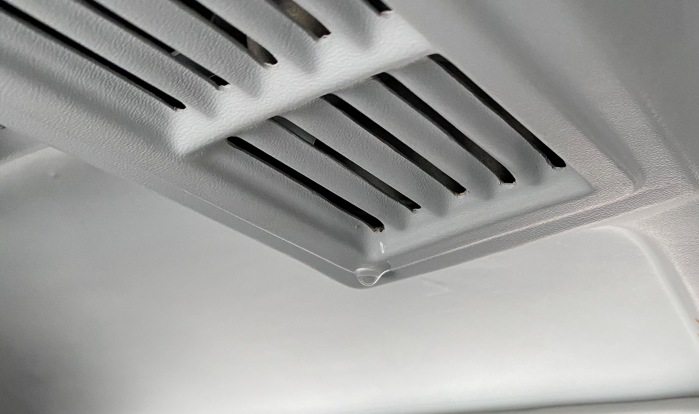
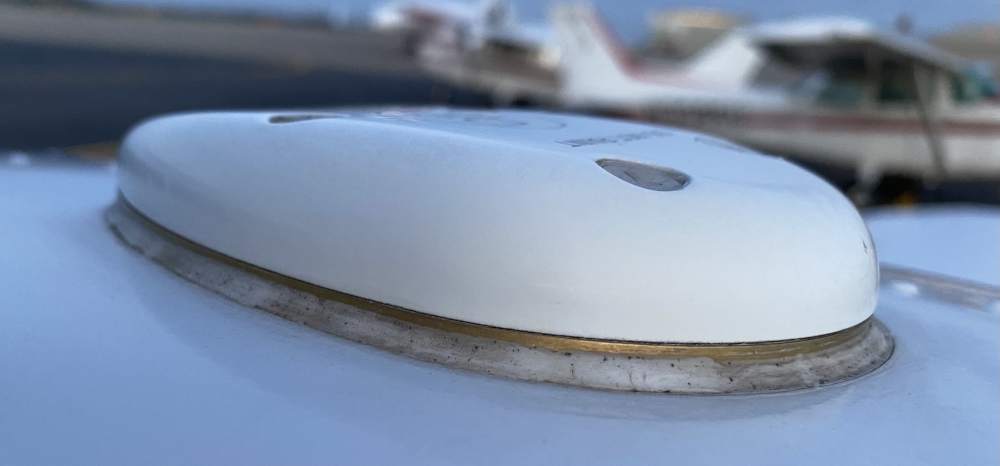
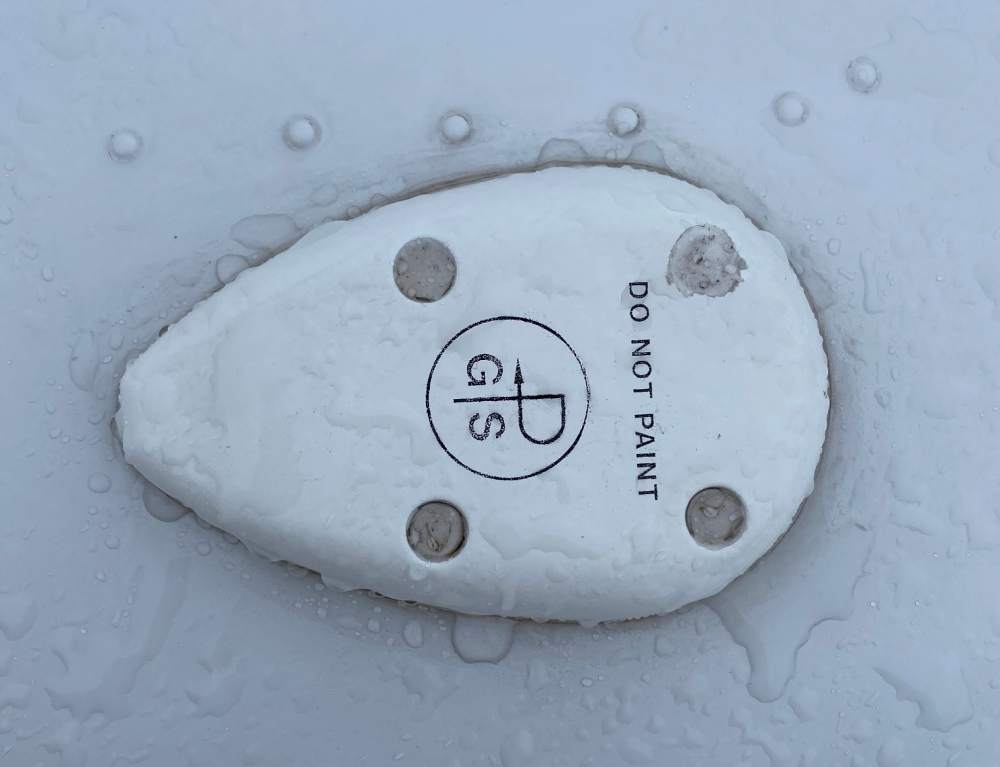
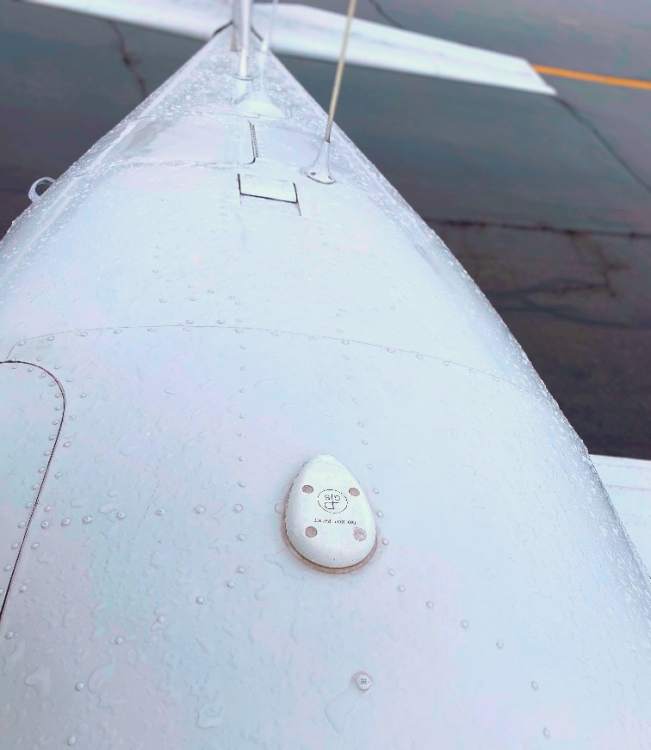
Thanks for all these suggestions N201MKTurob, OTreeLemur, and carusoam. I agree that I'll probably have to remove the ovehead panels and test for leaks by pouring water around. If I don't remove the panels I'll only be able to confirm where the leak is but not what's going on. The GPS antenna was installed four years ago. The air vent drain pipe has never been replaced, and the last time I looked at it was 10 years ago when I replaced the open/shut cable mechanism. -
Here's one I can't figure out. My '65 C is a ramp airplane and has never leaked water from the roof before. But after a heavy rain a few days ago, I noticed water dripping from the speaker grille. (See photo.) Not a lot, but enough to make a towel I draped over the pilot's seat back moist. I thought it had to be a leak in the cabin air intake drain, but that's not possible: The cabin air intake is a good inch or two lower than the speaker grille and water would have to run uphill, including over various indentations in the plastic, to reach it. The only other place in the roof where there's an opening is the GPS antenna. It looks pretty solid, but just in case I smeared a very thin layer of clear silicone sealant around the base. The next day the drip was back, or still there. Any ideas? (The top of the cabin door entry opening is solid metal and is also downhill from the leak.)

-
Mooney Service Center or good place Near Ohio
Bob E replied to BigD's topic in Vintage Mooneys (pre-J models)
SkyVista Aviation in Marysville, Ohio (KMRT). Superb work, reasonable prices. 937-644-2055. Ask for David Holden. He and his shop know Mooneys well and have done my annuals for years. I switched to them when the service at OSU Airport (where I'm based) kept getting slower and more expensive. David, Larry and the others have made sure my aircraft, which has been a ramp airplane all its life, has stayed in good shape. Within the past two years they have installed my GPS-430, EDM-900 and G5s -- and a new Lycoming O-360. David is not only an A&P, he's an AI, a Jet Blue pilot, and a Mooney owner! Just noticed that the original post was 2+ years ago. Oh well, I still recommend David. -
Garmin GFC 500 AP for C, D, E Mooneys
Bob E replied to Greg Ellis's topic in Vintage Mooneys (pre-J models)
I guess there are at least two schools of thought regarding spending AMUs on autopilots and other expensive upgrades: 1. View the matter from a financial standpoint: Can the expenditure be justified as an investment that will increase the resale value of the aircraft? Other than expenditures that are required for airworthiness or to make the aircraft sellable, the answer will almost certainly be "no." I spent a ton of money (at least for me) for a Lycoming zero-time remanufactured engine, two G5's, a used Garmin 400W WAAS GPS, a GTX-345, a JPI EDM-900 engine monitor, a new Garmin audio panel, LED upgrades to my KX-155 displays, a Garmin Flight Stream, a new vertical card compass, and new AirTex seat upholstery and carpets. Of all that stuff, only the new engine was required for airworthiness. From a financial standpoint, everything else was a terrible investment, completely unjustifiable, especially for a 55-year old aircraft. Especially for an owner in his 70s. 2. View the matter from an aviation standpoint: Can the expenditure be justified using the same reasoning that one used to purchase the aircraft originally? Was the idea to purchase it and sell it later to maximize ROI and minimize the cost of ownership? Or was the idea to buy it and enjoy it as much as possible? When I first bought my '65 C back in 1986, I didn't know which school of thought I fit into. I never dreamed that I would still own the same aircraft more than 34 years later and that my sons would grow up never knowing what life without a Mooney is like. (My older son now has a set of keys.) We've flown to Oshkosh, around the Statue of Liberty, had many breakfasts at the fly-in restaurant at Urbana, Ohio. We flew the path of the total eclipse back in 2017. I've been through several sets of avionics and this is my third engine. One forgets about the money spent but doesn't forget the wonderful experiences. And there will be lots more to come. GFC-500? Maybe. -
Mooneys are water resistant not water proof...
Bob E replied to Trenta's topic in Vintage Mooneys (pre-J models)
Bob Where did you get the new seal? It's just clear silicone sealant applied sparingly with a caulking gun and then pushed into the gaps with one's fingers. When you have to open it up, the sealant can be removed pretty easily and when the cover is reinstalled new sealant applied. -
Mooneys are water resistant not water proof...
Bob E replied to Trenta's topic in Vintage Mooneys (pre-J models)
The avionics cover cowling piece in the early Mooneys (mine is a '65 C) is notorious for leaking water if it isn't really well sealed. I had an experience similar to yours a few years ago, and didn't identify the problem at first. The carpet was wet at the very back -- where it meets the rear passenger seats -- so I thought it had something to do with water coming in the overhead air vent. Then my top radio in the stack started acting erratically and powered off sometimes. I didn't connect the two issues, but then I noticed that the carpet over the nose gear hump directly beneath the avionics panel was also wet. The water was leaking through the cowling, making its way through my avionics, dripping onto the carpet below, and then finding the lowest spot in the passenger compartment. The solution is to seal up every millimeter of the cowling, with silicone sealant if necessary. Just seal it every time you remove & replace. My C has been a ramp aircraft all its life, and other than the avionics cowling, the only leak problem was years ago when water started getting through the little pilot window opening. A new trim seal fixed that. -
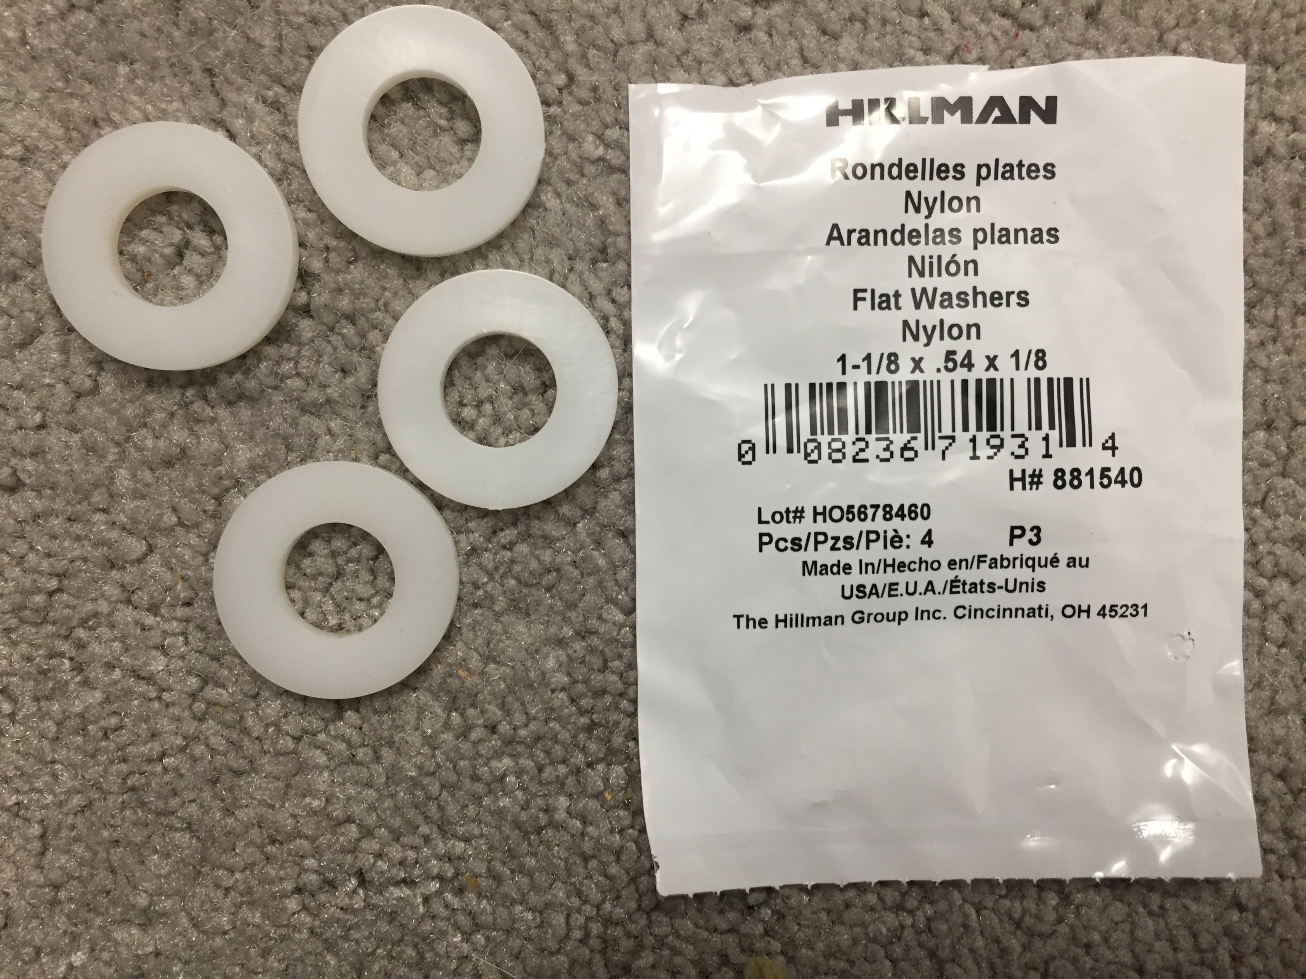
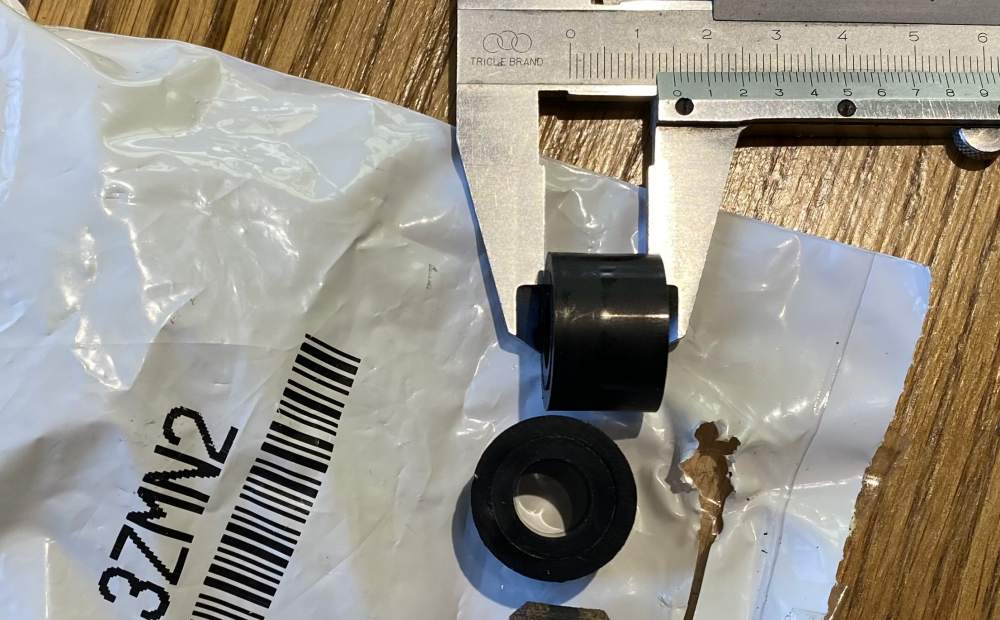
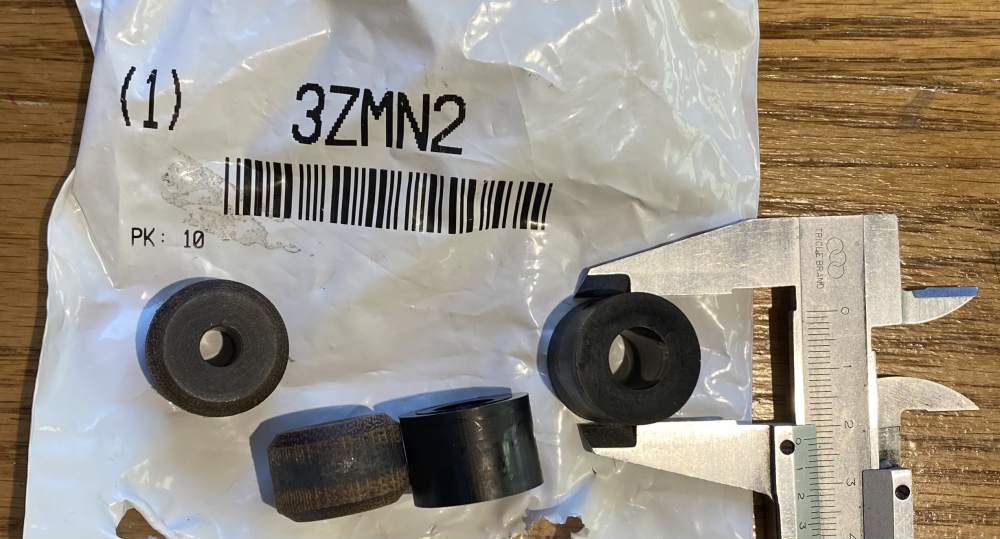
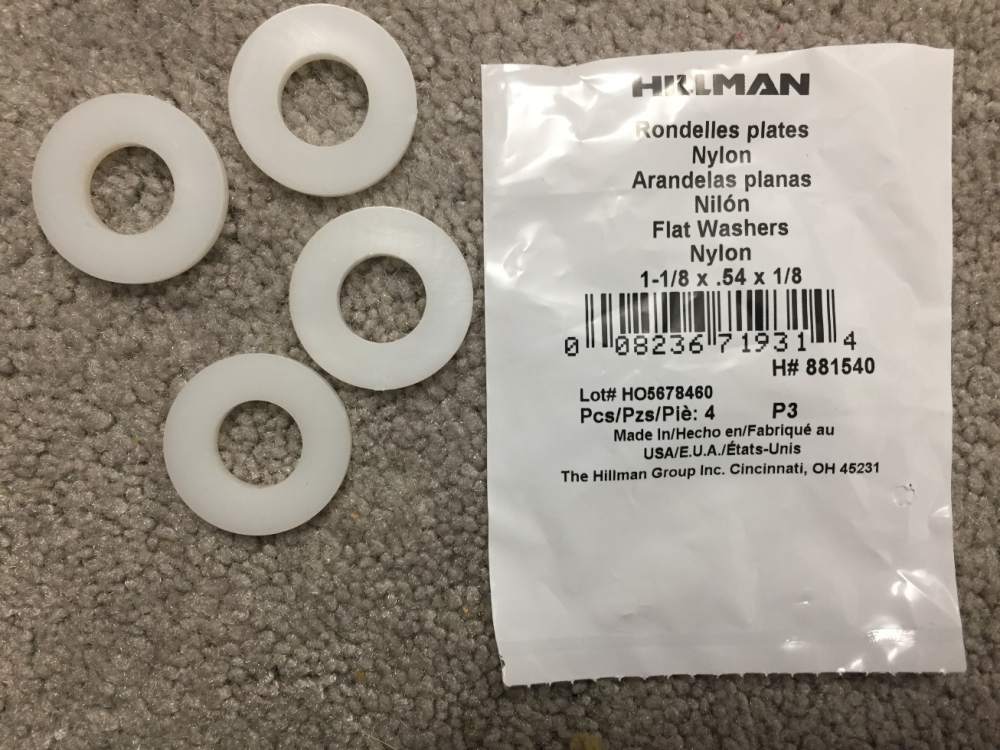
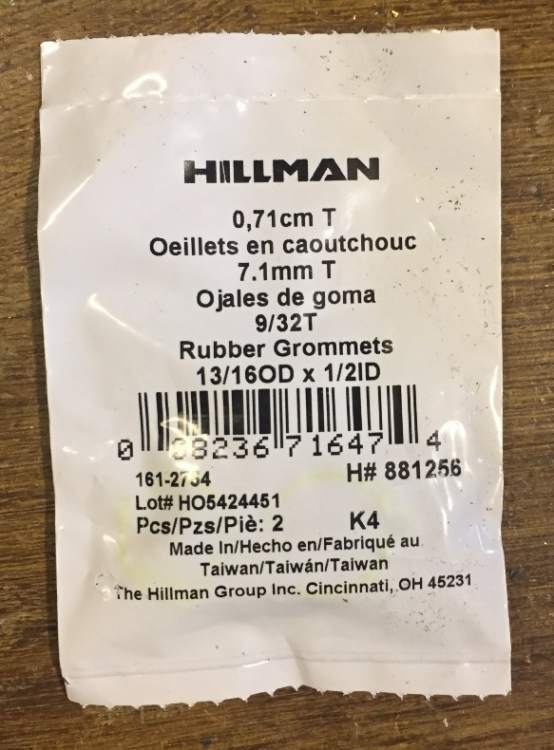
It's not shown on the package, but I just measured them: inner diameter 10.5mm, outer diameter 22mm, and thickness 15mm. I got them from Grainger Industrial Supply, and they are described as "Round Spacer, Nylon, M10, 15mm," item number 3ZMN2. Photos attached.


-
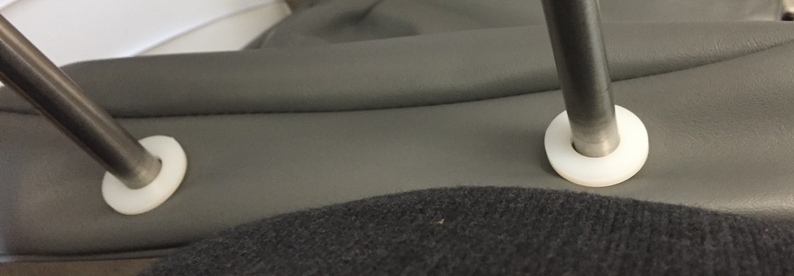
Almost forgot the most important part: the detailed instructions! These are from me, not Airtex. A good project to undertake while the plane's in annual. How to do the front seat headrests: Use ½” steel tubing (rather than 3/8” that Airtex refers to, if you have the Airtex specs). Cut two 36” tubes in half, and attach the aluminum plates to them per the photos. (BTW for drilling the holes in the round stainless steel tubing, you have to use a drill press; it helps to flatten the ends somewhat – flatten the ends with the rough edges where the tubes were cut in half – with a heavy mallet and to use a sharp nail or screw to make a starter indentation.)Airtex has instructions on how to do the foam and the upholstery covering. Drill 5/8” holes in the seat tops exactly 6” apart and insert rubber grommets with an inner diameter of ½” (bought at Lowe’s). That size grommet fits a 5/8” hole perfectly. Slide the assembled headrest tubing through the grommets and mark the spots where the tubing makes contact with the center crosspiece. Should be exactly 6” apart as well. Drill 5/8” holes there too. You have to drill just a bit laterally but it doesn’t affect the fit. It helps to start by tapping a nail in the exact center of the hole to guide the bit; start out with small bits/small holes and then switch to progressively larger bits. The result is that the headrests are nicely adjustable with just the right amount of friction. See photos. You can’t tell from the photos but the tubes are exactly parallel. If you want, put a setscrew or cotter pin at the bottom to prevent lifting the headrest out of the hole. (I didn't bother; we haven't ever raised the headrests since I installed them.) To do the back seat headrests: Use two 36” x ½” stainless steel tubes, cut in half, and rubber grommets with an inner diameter of ½”, just like for the front seat. Drill holes in the tubes and matching holes in the aluminum plate exactly 6” apart. At the top of the back seat frame, measure and mark the positions for the four holes where the headrest tubes will go. Two sets of 5/8” holes precisely 6” apart. It helps to mark 6” lines down the back of the frame for later. Drill the holes, insert the grommets, and glue the foam piece on. Use one of the tubes to gently punch holes in the foam. Assemble the headrest tubes and plates but don’t put the foam or vinyl covers on them yet. To drill the lower set of holes, a long drill bit is required. Extra-long 5/8” metal bits are hard to find and are expensive, but a 5/8” wood-borer bit works just fine on aluminum. It tears up the bit a little but it cuts perfect, clean holes. (I planned on using a small extra-long metal bit to drill the starter hole but didn’t need it.) To mark where to drill the lower holes, insert the headset tubes through the grommets in the top holes and push down until the tubes make contact with the lower cross-brace. Then tap the tops of each of the tubes sharply with a hammer; this will clearly mark the places on the cross-brace where the lower holes will be drilled. Pull the headrest assemblies back out and remove the top grommets. While someone holds a light, put the wood-borer bit down through the top holes, carefully position the center tap, and drill each bottom hole. The cutouts are easy to retrieve from underneath. Put the grommets back in the top holes and have someone with small hands insert the grommets in the lower holes. Put the large upholstery piece on the frame. Locate the top grommet holes and use a Philips screwdriver to punch matching holes in the vinyl. Trim a little bit of vinyl so the tubes can pass through freely. Assemble the headrests. Put nylon washers (same as used for the front seat headrests) onto the tubes and insert the finished headrest assemblies through the upper and lower grommets. Glue the washers to the vinyl. That's about it. Re-assemble everything and enjoy a much more modern look!
-
Adding headrests to M20C, and replacing original wooden seat rollers with nylon View File These photos show how to add headrests to an M20C using Airtex instructions for fabricating the actual headrest, and a DIY process for adding the support tubes. Submitter Bob E Submitted 11/07/2020 Category Safety & Techniques
-
Posted in the downloads section under "Safety and Techniques" (since it's a technique)!
-
While you're at it, you might want to replace the wooden seat rollers (which I used to have to replace at every annual) with nylon rollers.


-
I added headrests to my '65 C when I re-did the seats with Airtex upholstery a few years ago. Airtex has some instructions and also supplies the (legal) foam; I supplemented them with some help and advice from local people. I have detailed instructions and a lot more step-by-step photos if you're interested.


-
Ha. Reading comprehension -- should have noticed that. My guess is that if the non-retractable step is welded to the frame, a gear-up would likely bend the frame.
-
I'm a member of the gear-up club: 1994 in the same plane I own now. The step doesn't extend until the engine stops (that is, until there is basically no vacuum to keep the step raised), so the step is the least of your concerns in a gear-up situation. The experience was like landing on a runway paved with empty beer cans: lots of clatter. I had no idea what happened until the plane skidded to a stop. Took about 15 seconds to register. Very strange sensation to walk from the wing to the pavement without having to take a step down. We jacked up the aircraft, lowered the gear, put on a used prop after getting an ok to ferry the aircraft to my FBO 30 minutes away, and flew it out of there. The engine needed to be replaced, and the pavement scraped off the transponder antenna too; no damage to flaps. I used the insurance money toward a replacement engine and a paint job. That replacement engine lasted me until last year, so I'm now on engine #3.
-
Happened on Sept. 15. Looks like a pushrod departed the aircraft. https://www.youtube.com/watch?v=-A_iV7s-9IA https://flightaware.com/live/flight/N3275F Anyone we know? Whoever the pilot was handled it really well -- calmly and professionally. If you're the pilot it would be great to hear the first-person version. (Apologies if this is already covered elsewhere; didn't see it.)
.jpg.58bef14f7e7c58d7d75564a519ed2103.jpg)