

Bob E
-
Posts
213 -
Joined
-
Last visited
-
Days Won
1
Content Type
Profiles
Forums
Blogs
Gallery
Downloads
Events
Store
Everything posted by Bob E
-
-
 If you're referring to my post: No, if you source them from the site I linked to, they're just bare wire leads. I added a plug.
 -
Five years later those supplementary LEDs I describe in my post above are still working great! They dim right along with the incandescents, and now we have multiple dimmable red spotlights. Can't imagine flying at night without them. Here's a good place to get them cheap: https://www.frightprops.com/lighting/led-lighting-darklight/nano-spot-mini-spotlights/nano-spot-miniature-spotlights.html

-
A step works great in the hangar. I used one for years. But seriously: Once the aircraft is outside, to use it before startup or after shutdown, you have to have outside assistance.
-
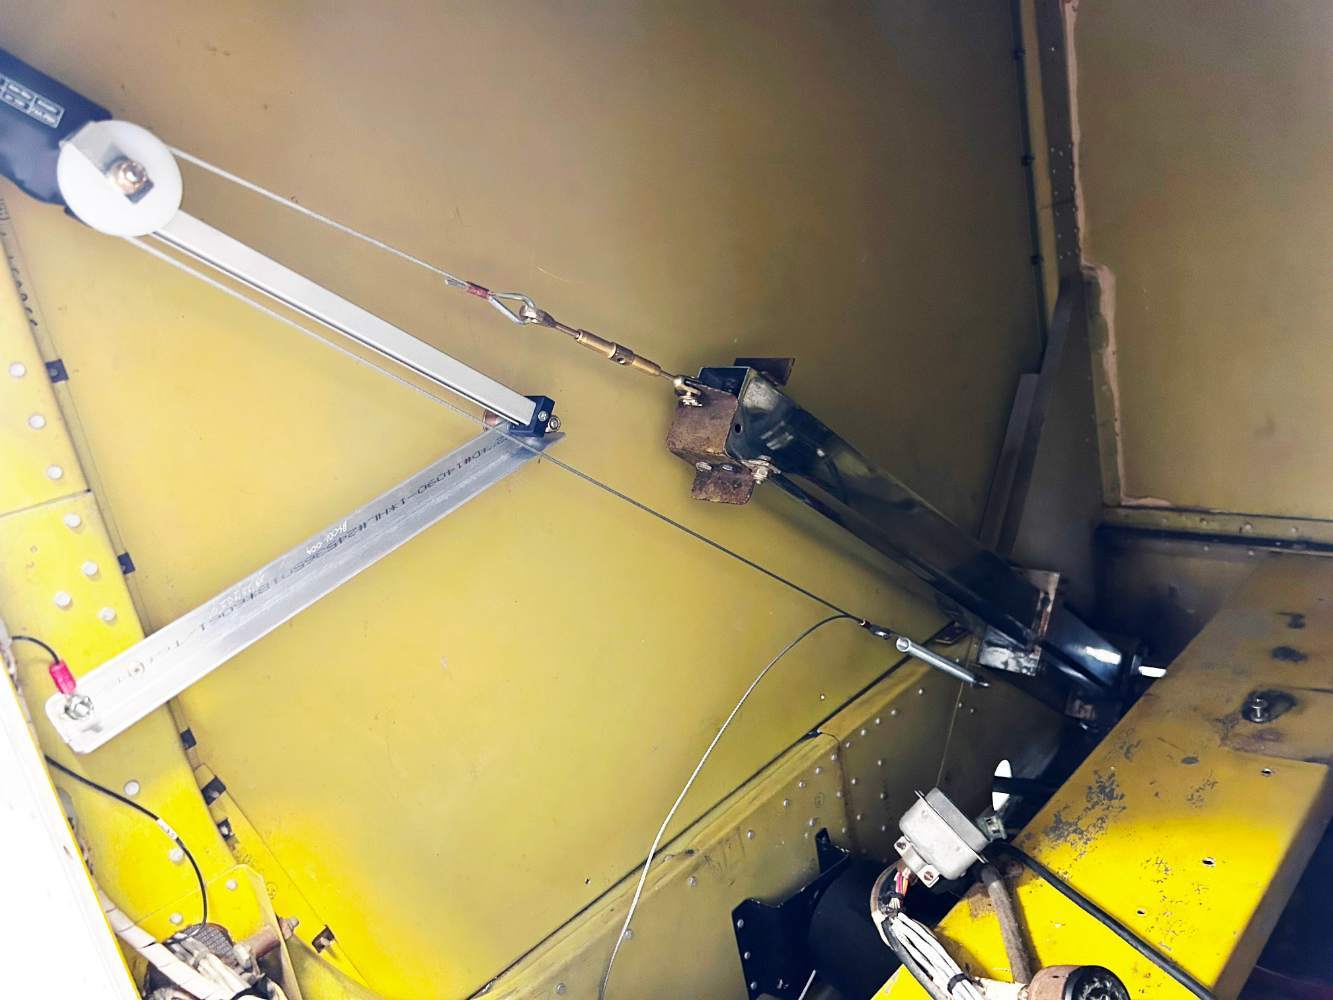
I have the flight enhancement step and am very happy with it. I removed the vaccum system several years ago and lashed the step in the retracted position; just didn't seem right so I finally sprung for the electric step. It's very lightweight, but sturdy and well-made. Many people have it hooked up to the beacon wire; I decided to install a toggle switch on the panel, matching the avionics master right next to it. That way it's kind of like the electric window control in a car (works only when the master is on). Here's a photo of the interior view. Outside it just looks like a normal Mooney step.
-
-
Being a Buckeye, when I was breaking in my new engine I decided, why not do it with a little style? SCRIPT OHIO:
.jpg.06832de66194f1de92060afacaff6ba9.jpg)
-
Hank, see my Aug. 27 post. That cheap bag of tire talc is enough to supply an entire GA airport for about 10 years!
-
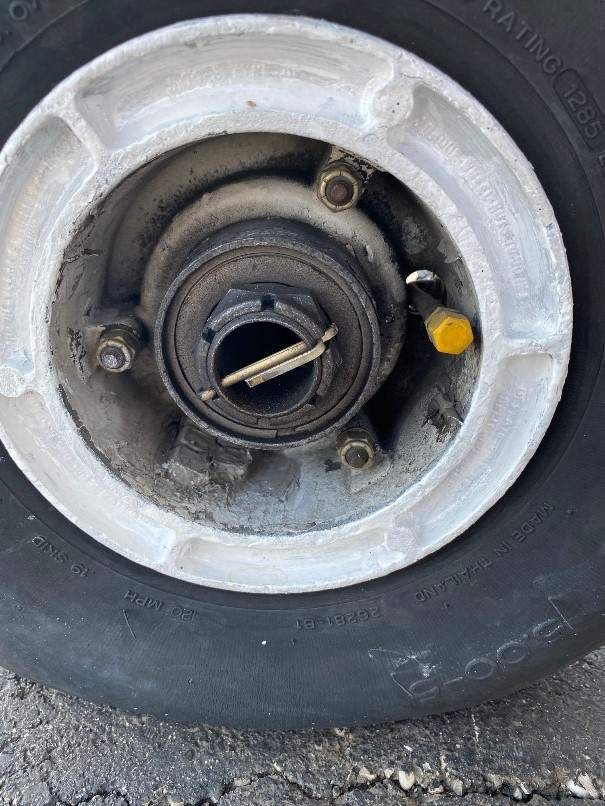
That photo is of the nose wheel. All nose wheels on Mooneys of our vintage have bent metal stems (AFAIK). The correct tube is a TR67A, a 500x5 tube. The TR87 is the short-stem version.
-
From the M20C Type Certificate (Aircraft Specifiation No. 2A3, Revision 52, Dec. 9, 2010). And there you have it.


-
IMHO very few mechanics, even Mooney mechanics, take notice of this issue. In years past, before I discovered bent stems and just let the shops maintain the aircraft (Clyde Wittenbrook for those who recognize the name), they did excellent work but nonetheless it was impossible to install the straight-stem tubes specified without bending - and straining - the stems. (Photo) So after switching to bent stems, before I started mounting tires myself, I didn't realize that the bent stem, when installed properly, does not touch the rim. The shop guys (usually assistants) who do the installation don't realize it either. If they were willing to install straight stems that look like the photo and not raise questions, then they definitely won't notice if a bent stem touches the rim.

-
If it does, it's installed incorrectly. One advantage of DIY is that you can position the valve precisely as it should be, which is NOT pressing against the hub.
-
I've owned my '65 M20C for almost 40 years. Straight-stem tubes resulted in numerous flat tires, often on landing. About 20 years ago I switched to 90 degree bent stem tubes on both nose and main gears and have had zero problems since. Specs that work for me: Nose gear tube: Aero Classic Leak-Guard Tube 500 x 5 90 deg stem, part # 06-00755: https://www.aircraftspruce.com/catalog/lgpages/leakguard_06-00755.php Main gear tubes: Aero Classic Tube 600-6.5, part # GL-6067N: https://www.aircraftspruce.com/catalog/lgpages/aero_tube_600_6_67a.php If you want to change the tires and tubes yourself, I recommend Harbor Freight's mini tire changer: https://www.harborfreight.com/mini-tire-changer-58920.html. Very easy to use. You'll need tire talc. Don't use baby powder; it's now corn starch and has no talcum powder. Amazon has the correct stuff: https://www.amazon.com/mGanna-Natural-Make-up-Cosmetic-formulations/dp/B0BM4PKJ8K/ BTW most people recommend getting new tubes with each tire change. I agree, but frankly the old tubes fit so well they are perfectly serviceable, so I save them and keep one of each (nose and main) in the baggage area as spares. They weigh almost nothing. If I have to replace a tube, I'll take a used bent-stem over a new straight-stem any day.
-
That would be me. Thanks for the info!
-
New Garmin GI-275 install, I want it to display knots!
Bob E replied to ElisiumNate's topic in Vintage Mooneys (pre-J models)
My '65 M20C of course has an owner's manual rather than a POH, but it definitely also has an "F.A.A. APPROVED AIRPLANE FLIGHT MANUAL" (approved Oct. 20, 1961 for my specific aircraft serial number by H.H. Slaughter, Chief, Engineering and Manufacturing Branch, Federal Aviation Agency, Southwest Region). It lists all V-speeds as miles per hour of CALIBRATED AIRSPEED. But the "units," whether CAS, IAS, or TAS, are still in mph. So I think PT20J is right. But he's also right that no one will notice. I've had several AIs, CFIs, and DFEs as passengers, and some have flown left seat. No one mentioned anything about mph/knots on the G5s. (They mostly just complimented me on a nice panel!) I'm sure they know as well as I do that as a practical matter, reprogramming the digital displays to show MPH rather than knots would reduce safety: ATC speaks in knots, charts are in nautical miles, plates show elapsed time numbers for airspeeds in knots, etc. The risk of enforcement action on this one is basically zero. I'd be interested if ANYONE has a G5 or similar programmed in MPH, and if so what their reasons are for doing so. -
New Garmin GI-275 install, I want it to display knots!
Bob E replied to ElisiumNate's topic in Vintage Mooneys (pre-J models)
My G5's are also in knots, but two factors tell me that's ok: (1) the original airspeed indicator shows both MPH and knots, so I had and still have all the info I need regarding MPH. (2) The Mooney's V-speeds are programmed into the G-5's airspeed ribbon, as pointers rather than numbers when the aircraft is in motion (photos), so knots versus mph isn't relevant.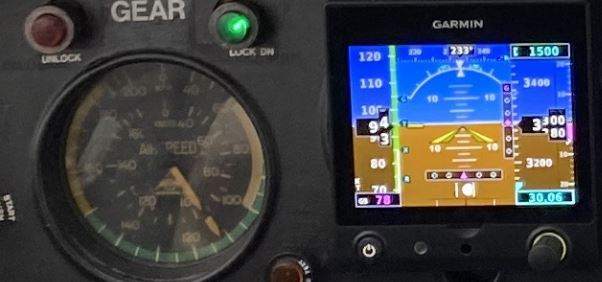

-
iPad Yoke Mount for M20E w/ Clock
Bob E replied to Steve Hughes's topic in Vintage Mooneys (pre-J models)
We removed the clock and replaced it with the separate clock and timer you see at the top center of the panel. Timer: https://www.amazon.com/dp/B07HGYZBW8. Clock: It's a GH102A, hard to find now. Any LCD clock with a seconds display will do. None of the commercial iPad mini mounts are simple and compact, so we made DIY mini-ipad trays by pairing old Garmin yoke mounts with office-style steel bookends cut to shape. (Any stiff sheet metal will do.) Simple spring clamps at the top to hold down the iPads. Black duct tape over the clamps and in the groove at the bottom to cushion the iPads. We also routed a charger cord to each iPad. In hot weather we remove the iPad cases and charging cords to keep the units cool. We've had these for about five years and they've become invisible, just part of the aircraft..jpg.bb4d461ed70d54bf3402703ee34cce76.jpg)

-
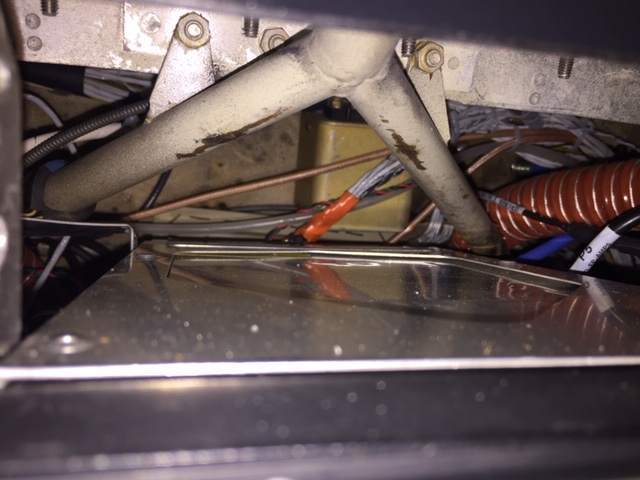
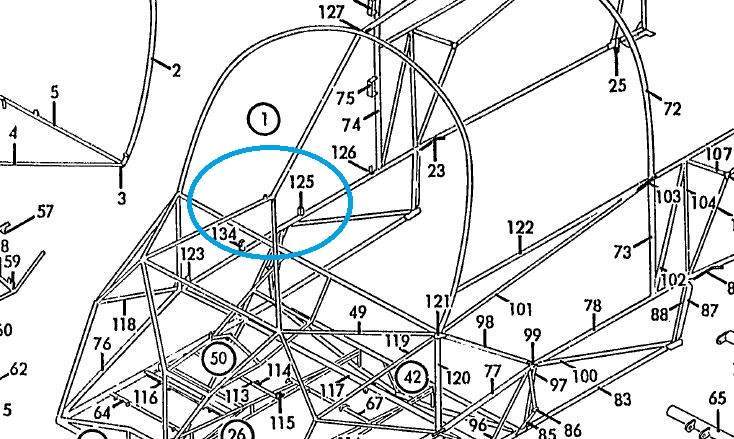
47 U just said pretty much the same thing as this post, but a couple of minutes earlier! I'll post this anyway. ------------------------- Ok, where to start? First off, it's a nice Mooney! The irritating stuff can all be fixed. You can get replacement fuel-filler flanges. You're right, that's where the water is coming in, and new o-rings won't help. Replace the entire racetrack-shaped piece on both sides. You do it once every 30 years. I was able to find new ones 15 years ago and the filler flanges still look new. (I've owned my '65 C for 40 years now). Given the deterioration of the fuel-filler flanges, it's safe to say that this aircraft wasn't hangared for years (similar to mine until 5 years ago). That means the weak VOR signals are probably the antenna connector, either at the radio itself (likely) or at the antenna, or both. That's a really stupid avionics stack install. Whoever did it should have known better. The fuselage steel frame has a y-junction that takes up some space at the top of the radio stack (photos), which means you can't install something that has much depth at the top of the stack. It should be a fairly simple matter to reconfigure the install to take into account the y-junction. Just put something that doesn't have much depth at the top.
-
My son and I like the iPad minis, which we have for both pilot and copilot positions. The advantgage of having approach plates and all other ForeFlight info literally at your fingertips at all times, being able to zoom etc. without even moving your hands off the yoke, is preferable to anything displayed on the panel, at least for us.

-
Looking for a replacement Flp/Elev Trim indicator Housing
Bob E replied to cliffy's topic in Vintage Mooneys (pre-J models)
I second Andy95W's post. Plane plastics is a great little outfit. They produce top-quality parts, each one made to order. The material on the replacement parts is just a tad thicker than the originals, so the replacments are more robust without affecting the fit. I replaced my flap/trim indicator housing, kick panels on both sides, and trim wheel chain cover. Super happy. -
I guess I'd still recommend keeping the VOR even without a glideslope, if you have panel space. Especialy if you have a nav-com radio that's driving it. USB charger port is a great addition. If you use one or more iPads, they'll always be fully charged when you're flying. If you retain the cigarette lighter receptacle, here's a great little carbon monoxide detector; I've had mine for several years: https://www.amazon.com/Multi-Function-Monoxide-Detector-Charger-Adapter/dp/B07GH3612F/ref=sr_1_4_sspa
-
That VOR has a glideslope. I'd recommend keeping it, especially since it doesn't involve buying new equipment. I assume you have the panel space. (I have an EDM engine monitor, a GPS 400W, two G5's, and two KX-155's (one with glideslope). I like having the VORs and definitely like having the glideslope.) VORs and glideslopes aren't going away any time soon. It's good to avoid dependence on single form of navigation.
-
Same - and one thing I bet a lot of people on here discovered: Once you learn how to properly maintain an aircraft, you can maintain cars to make them last virtually forever as well!
-
CO2 detectors the "Good The Bad and The Ugly
Bob E replied to Jpravi8tor's topic in Vintage Mooneys (pre-J models)
I posted this back in October. I've used this excellent little CO detector for years. Have tested it every few months by lighting a match a couple of feet away. https://mooneyspace.com/topic/49675-cigarette-lighter-socket-as-usb-power-source/#comment-878225
