All Activity
- Past hour
-
Don’t be surprised if the new valve doesn’t stop the leaks. On my J, replacing the valve didn’t fix it. I had to remove the nut plate it screws into, clean the tank where it attached and re-rivet it in with new sealant.
-
Reproduction in any manor (sic) without the written express permission of the author is prohibited.
-
I would say, someone at some time disconnected your trim drive shaft and got it out of sync.
-
Based on the G100UL fuel leak thread what's your position?
Ibra replied to gabez's topic in General Mooney Talk
Turbine or turbofan fuels don't have lot of odd aromatics? Maybe the new stuff like SAF or bio-ethanol would have required careful compatibility teste and monitoring. Anyway for their tank or rivet reseal, they send someone inside to inspect, scratch and patch every year -

Retract Gear or Flaps First in a Go Around ?
Hank replied to donkaye, MCFI's topic in Modern Mooney Discussion
What's a vario? My Mooney has an Instantaneous Vertical Speed Indicator, which will tell me that I'm climbing, since just pointing the nose upwards doesn't guarantee a climb (i.e., heavy weight, high DA, slow speed behind the power curve, etc.). Before I raise the gear, I want to know that I'm getting further away from the ground and not still sinking. -
Bunti started following Retract Gear or Flaps First in a Go Around ?
-
Retract Gear or Flaps First in a Go Around ?
Bunti replied to donkaye, MCFI's topic in Modern Mooney Discussion
Here are some insights of go arounds with larger airplanes: If you fly an Airbus 320 or a Boeing 737, during a go around, always the flaps are retracted first by one step or to a certain position. Then the gear is retracted after the positive climb is confirmed. With the Airbus A320, the call of the pilot flying would be "go around, flaps". Then the pilot monitoring checks the speed and retracts the flaps by one step and confirms the action. Then the pilot monitoring checks the attitude and the climb rate + rising radar altimeter and calls for "positive climb". Then the pilot flying calls for "gear up". For example, if we land an Airbus with full extended flaps, it is a flap setting which is never be used for a takeoff. Retracting the flaps by one step brings the plane in the same configuration which may be used for a normal takeoff. So, retracting the flaps first brings the Airbus into a known takeoff configuration. My Mooney M20F manual does not say anything about go arounds. It looks like that 1967 no go arounds were flown. - Today
-
@dc0341 Go with the Saf-air ones. They're cheaper, you can change the o-rings in the future if they wear out, and currently come with fluorocarbon o-rings. The spring isn't that stiff and I don't find them much harder than my old ones. SAF-AIR SA53S (F-391-53S) - Mains SAF-AIR SA72 (F-391-72D) - Aux Monroy outboards if you have them Torque value 40-65 in-lbs max; use EZ Turn lightly applied and not on last two threads. You don't need much torque to seal and these are MAX, not recommended torque. Replacement o-rings: M83248/1-006, -012 (SA72), -015 (SA53S)
-
This drain takes fuel from the very bottom of the tank, along the surface of the bottom aluminum wing skin. Any debris, flakes, rust, contamination can work its way into the valve and settle onto the valve seat. Repeatedly poking at it with a fuel cup wire often flushes it clean. While I haven't tried it, in stubborn cases where it continues to leak, I thought gently blowing air into the valve with an inflation stem for sports balls might blow it clean.
-
What a coincidence. Just today I sumped the fuel in my J and the valve would not close. I had to drain the full tank and order a new part from Aircraft Spruce. I needed the same part numbers detailed by others in this link.
-

Based on the G100UL fuel leak thread what's your position?
Jackk replied to gabez's topic in General Mooney Talk
They have their pluses and minuses like any design They also have a team of full time mechanics -

Retract Gear or Flaps First in a Go Around ?
Jackk replied to donkaye, MCFI's topic in Modern Mooney Discussion
sure as it does to go to max lift flaps and positive rate go gear up. Even in the jet world rotate is not a command as much as situational awareness -

Retract Gear or Flaps First in a Go Around ?
Ibra replied to donkaye, MCFI's topic in Modern Mooney Discussion
This makes accelerating in ground effect straight and level more useful in under-powered piston. As example, in takeoff or go-around in high density, it takes ages to accelerate straight and level in ground effect, you may even need to retract gear in ground effect to get to your target climb speed. One can't simply pitch up and hope it will climb? For "gear up", this comes naturally on takeoff or go-around: I don't think one need to pitch for climb or and check vario like in Jets. I know few instructors who insist on +8deg pitch (or +15deg) for go-around, immediate power, drag flaps, positive rate for gear up, clean flaps... These techniques seems like an overkill in Mooney, we just go slowly, 1/2 power, get level, breath or trim, raise gear, full power accelerate level, raise flap... It's doable without vario? Mooney is small, it climbs by itself during takeoff or go-aroud: if the nose climbs 20ft, the tail climbs 20ft. In Jets, one can have aircraft nose at 50ft with wheels still on the ground, so after rotation, they check vario > 0 before raising gear. -
Based on the G100UL fuel leak thread what's your position?
redbaron1982 replied to gabez's topic in General Mooney Talk
Aren't all airliners wet wing designs? Are those flawed designs as well? -
Based on the G100UL fuel leak thread what's your position?
Paul Thomas replied to gabez's topic in General Mooney Talk
The argument that wet wings are "bad" is not one we should fall for. Wet wings are used in other airframes and, to me, are the best choice. Nothing last forever, I've see metal tanks and fuel cells fail -- at some point everything fails due to age. When Mr. Braly states that there is an inherent design flaw in our wet tank, what I'm hearing is that our airplanes should never have been certificated with wet wings. He's just wrong. G100UL and proseal or its equivalents just don't happen to play well together, which means G100UL is not a drop in fuel. Composites don't seem to do well either, there was a photo of an SR22 that looked like it was eaten by the fuel. -

Pirep - Gee Bee Aeroproducts Baggage Door Seal
Gee Bee Aeroproducts replied to Z W's topic in General Mooney Talk
Those are aftermarket seal shown. left to right are the versions in silicone. I was going to offer BST foam seal , same as we mfg for late Textron aircraft . The mooney market will not pay the cost of this material extrusion. -
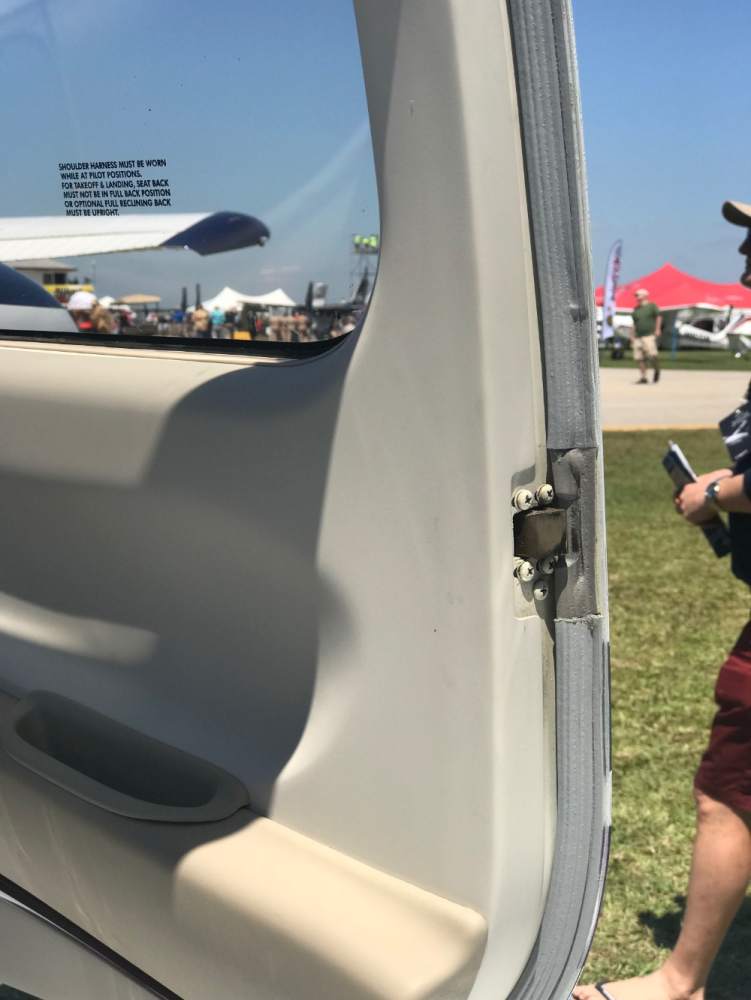
The baggage door seal needs to be place away from the edge. So you apply the seal with the BULB out / TAIL inside. But you need to place the tail following the raised profile so that essentially the tail of the seal ends at the edge of the trim panel. This places the bulb essentially not extended much past the rivet line/riding the groove. The tail rides the inside profile and this allows the seal to easily turn the corner smoothly as well. You also want to hug the interior panel on the hinge side.
-
Based on the G100UL fuel leak thread what's your position?
A64Pilot replied to gabez's topic in General Mooney Talk
Ref Wet wings being bad, leaves two choices. Metal tanks which are rare, but do exist or fuel cells. Problem with fuel cells is most are made from the same materials as regular O-rings, perhaps a Viton fuel cell exists, but I’ve never heard of one. If it “eats” O-rings, why won’t it fuel cells? I suspect it will, just will take longer. Then we have a great many composite aircraft, which often have composite fuel tanks. What about them? -
kortopates started following Retract Gear or Flaps First in a Go Around ?
-

Pirep - Gee Bee Aeroproducts Baggage Door Seal
Gee Bee Aeroproducts replied to Z W's topic in General Mooney Talk
I believe the Bulb on the baggage door is rotated inward vs along the edge of cabin door . I have seen many original seals and placement of the bulb from used doors with Mooney part number on eBay . What aftermarket seal/ installation is different than oem seal . Note: I suggest one coat of seal and let dry or use hairdryer. Then wet seals in 3-5 inches increments and dry as you install. I have a new employee and she installed all inspection panels seals after painting of both sides and a avionics bay panel that the oem wanted 3375.00 for a replacement seal and 90 days . We duplicated the seal with a new die. We die cut .025 thickness for various inspection panels . Its all the same process -
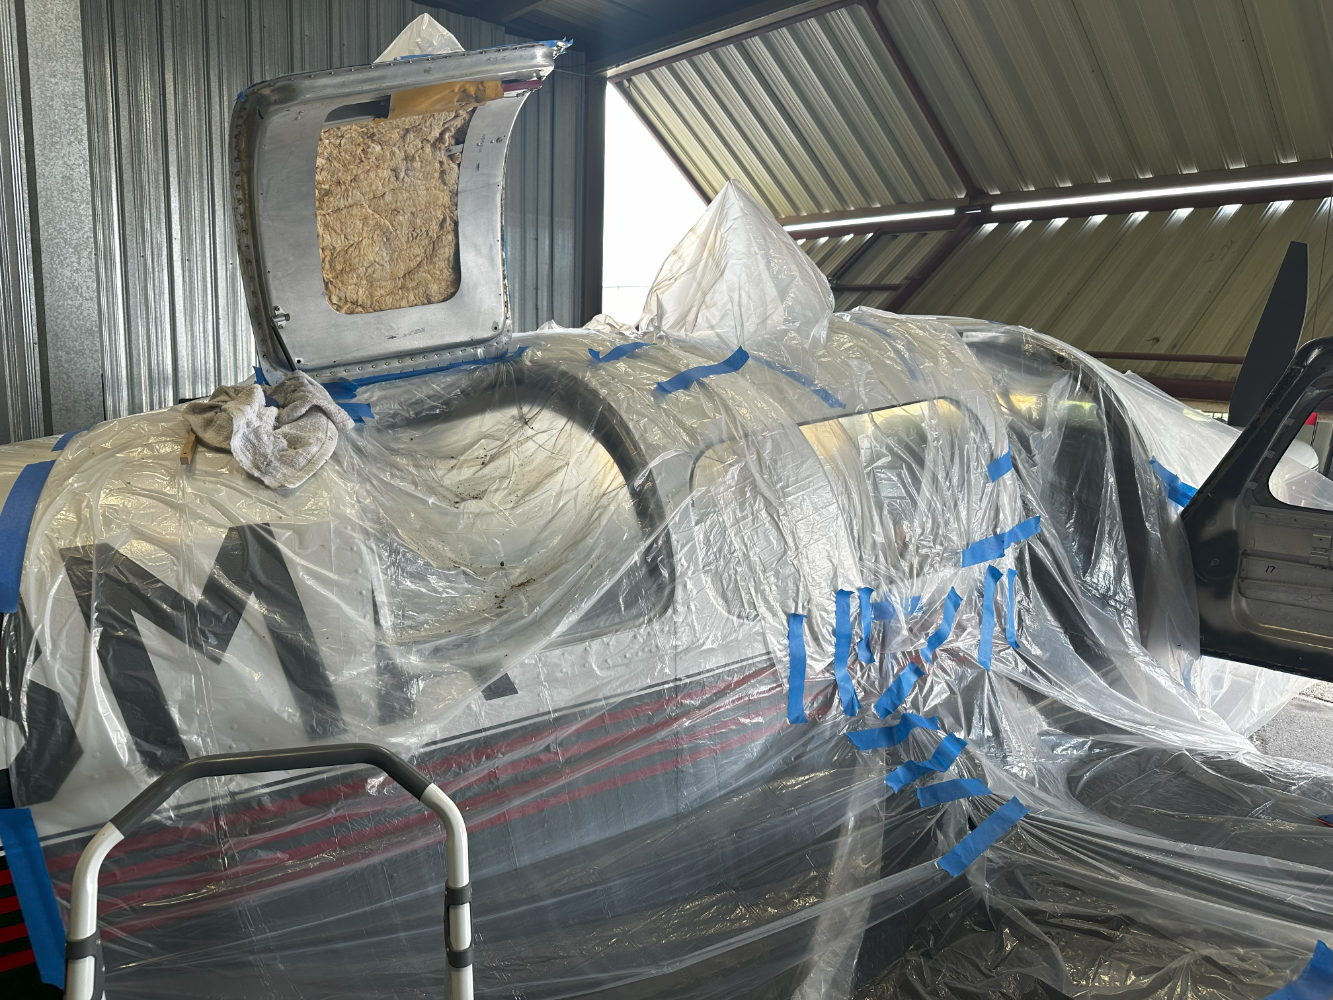
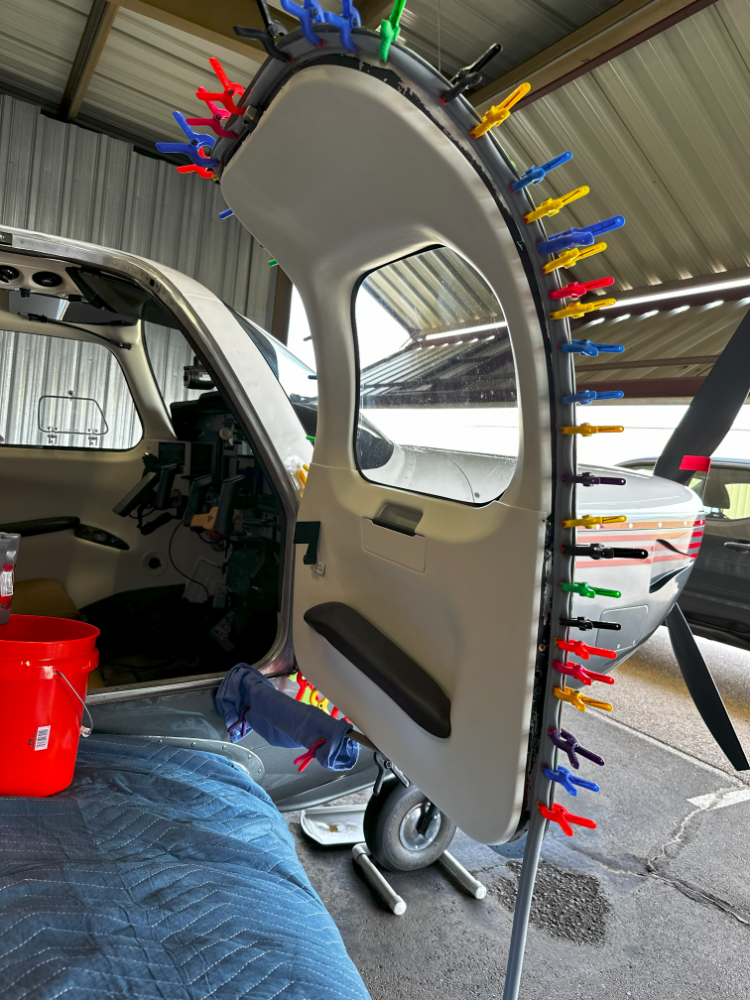
Finished installing the GeeBee seals. First off, after reading all the previous descriptions of issues with seals I was apprehensive...but in hind sight I think this was unfounded. I installed the new profile (larger bulb, less durometer) on both baggage and main. New GeeBee (left), Old GeeBee (middle), Mooney seal (right) Cleaning off the old seals: Baggage door seal looked different than the cabin door. Baggage door was the foam core rubber seal, but the main door was dense crunchy foam seal. Baggage door came off cleanly and way too easily, but the cabin door came off in chunks. The money was to use plastic razor blade scrapers to scrape off the foam between the rivet heads and get down to adhesive. This worked surprisingly well but was a little tedious in places. Main Baggage I used cheap thin plastic drop cloths from Home Depot with some painters tape to mask things and keep any remover or parts off the paint and out of the aircraft. It was an easy step that made clean up super easy! I took off the interior panels for both the doors. I initially removed the hold open arm on the main door, but it really didn't open that much more and I think you could easily just leave it on and be fine. But it makes it a little easier. If you do take it off, be mindful of the washers and the cotter pin when removing. Hold open arm parts: Door Cotter pin AN380-2-2 (MS24665-132); Washer AN960-10; Washer AN960-10L I then used white shop terry cloths (and a brass brush as needed) with a small spray bottle filled with Adhesive remover. Given the fumes I'd recommend good ventilation and a respirator/glasses/gloves. Depending on how thick and crusty your old adhesive is, dictates how much you need to use a brass brush. Some have described using drill mounted brass brush, and I found that I could control the use of a brush easier without worrying about damage to the underlying frame by hand. Being able to spray the adhesive and keep it wet as it softened the adhesive made it MUCH easier. With softened adhesive sometimes using the corner of a terry cloth rag dipped in some adhesive remover pulled off the top layer of the glue and that coupled with a brush turned it into about an hour+ per door. I think the 3M General Purpose Adhesive is less damaging to painted surfaces than other types of removers. I think overall it worked well and I had no damage to paint or any surfaces inside or outside the aircraft...although I did mask with drop cloths very well. Ounce of prevention is worth a pound of cure. 6-pack of cheap plastic drop cloths from HD Plastic Razor Blade Scraper 3M 08984 Adhesive Remover Small 2 oz spray bottle Wood handled brass brush After cleaning off the old adhesive, I used isopropyl alcohol to clean off the metal, cleaned up the drop cloths/area, and reassembled the hold open arm and reinstalled the door panels. To prepare for door seal install the next day, I remasked using painters tape along the back edges of the doors to protect the paint from glue/from clamping. I threw a clean moving blanket over the wing walk and wing around the main door to keep things off the paint and prevent paint drips on the wing. QUICK ASIDE: I debated using the 2-part silicone cement that GeeBee includes based on comments here on MooneySpace about something like 3M 08001 yellow "gorilla snot" that has "more working time"...THIS WAS COMPLETELY UNFOUNDED. First off, you can't use rubber cement on a silicone seal...so don't even try to use 8001 on a GeeBee seal. But I've used gorilla snot and it's stringy, messy, and goes on way thicker than you need. I think the cement GeeBee includes is Momentive SilGrip PSA529 & SRC18 Silicone Contact Adhesive. And a huge shout out to Guy as he has this packaged with mixing stick, measured bottles, a pipette for mixing small amounts, and even paint brushes to apply...its clear, just the right consistency to lightly apply just where you want it without running or dripping, and is SO much easier to use than 8001. If you're apprehensive about using GeeBee's cement...don't be. That's just silly. BAGGAGE TIPS: For the baggage door you want to install so that the "tail" of the "P" seal goes on the raised part of the door ~right around the edge of the door panel. You want to make sure you have enough exposed metal at the edge as there is a slight profile at the edge that will bind if you put the seal too close to the edge of the door. Also, by putting the tail on the raised section, it allows you to easily and smoothly turn the corners. The part closest to the hinge (top of the baggage door when closed) should be close to the raised section away from the hinge. So basically on the baggage door it's easily to follow the tail along the raised part lined up with the edge of the interior panel. Make sure you put your seam at the BOTTOM OF THE DOOR which is the higher part when you have the door open. MAIN TIPS: Get inside your aircraft and use a thin pencil stuck into the gap in front of the hold open arm. You can use a pencil to make a mark along the bottom frame of the aircraft to see where the seal should go. You can't quite get the entire bottom marked with a pencil, but you should be able to get enough to see the idea of where the radius of the door frame goes. Along the sides and top you want to center the "P" bulb roughly on the rivet heads, however you want to make sure that when compressed that the seal doesn't flatten past the edge of the door frame. Take a look at your door frame and it should be obvious where you want the bulb to hit the frame. Really the only tricky point is really at the front lower corner due to the gap from the hold open arm. If you followed the interior panel the seal would be in the gap and not sealing anything. With a pencil mark you can aim to have the edge of the tail at the pencil line to make sure the bulb is contacting the frame. Then once you turn the corner you can again align the bulb with the rivet line. I mixed up the epoxy into a small "baby food" size container that I got a 4-pack from Target. Take a small piece of seal to see where you need to apply the seal. So use the paint brush and apply a THIN layer of adhesive on the frame where you're going to put your seal. If you're doing both seals, then I'd suggest starting with the baggage door, then main. So apply think layer of adhesive to the frame of the baggage door, then apply to the main door. You can use a hair dryer to "speed up" the drying, but what I'd suggest is apply glue to both, then only use hair dryer on the baggage door and the main will dry while your applying the baggage seal. Use isopropyl alcohol to clean the seal. then start at the BOTTOM of the door (high point when door open) and apply a thin layer of adhesive on the seal tail up to the bulb (just the part that will lay flat). Use a hair dryer to dry until tacky. Then place the seal TAIL inside / BULB to the ouside. Extra points to apply the seal end between rivet heads so that each end will glue to flat metal instead of right over a rivet. If you're at a point where you can apply glue to the hanging seal you can apply to 10" of seal and dry. But slowly apply the seal when the glue is tacky and press firmly to adhere. I used small clips from Harbor freight (I bought 2 x 22 piece packs and it worked perfectly) to hold the seal as I moved along, but with the adhesive properly tacky the seal will hold itself. When I ran out of clips, I'd harvest from the initial clips placed and move the clip train along the seal. The adhesive is pressure sensitive so press the seal firmly and it will hold. When you get back to seam, cut the end of the seal LONG. Then slowly cut a little at a time until it requires very slight compression to fit. This will allow you to join the ends together with cement. Then move to the main door and make sure the adhesive is tacky...if not, you can use the hair dryer, but I'll bet you'll take at least 20 min standard dry time to apply the baggage door seal. Clean the seal with IPA. I started on the bottom of the main door and worked towards the hinge. That allowed me to follow the pencil line and turn the corner. Then it was smooth sailing to follow just inside the rivet line. HINT: you don't want the center of the bulb closer to the edge of the door than the center of the rivet line. Basically when the bulb is compressed, you don't want it extending past the edge of the door. I think mine were actually centered on the inside edge of the rivet line. On the main door with a moving blanket on the wing, its easy to keep the seal laying on the bulb and apply adhesive in a longer length of seal. But still apply to the door in 3-5" increments and press firmly to adhere and then use the clips. Once the seals are in place, go back though and make sure the seal is firmly pressed to the door after you've removed the clamps. Then let cure with doors open for 12-18 hours. The next day is the moment of truth. If you closed the door prematurely, you could possibly glue more of the bulb seal down to the frame than you need. I applied a thin layer of silicone lube/paste to the seal, wiped off the excess and then closed the door. Firm, but not cumbersome. Seals well all around. If you need a new seal, I wouldn't hesitate to use the seal and kit from @Gee Bee Aeroproducts. I was way more apprehensive about this than I should have been. But give yourself a good 3 day stretch to make sure you have plenty of time to finish and take your time. Day 1 clean off old seals, clean up and reassemble interior panels. Day 2 to apply new seals. Day 3 lube seal and close, then leave in the sun to fully dry and cure.
-

Retract Gear or Flaps First in a Go Around ?
Jackk replied to donkaye, MCFI's topic in Modern Mooney Discussion
Who said to rotate a single engine piston? I’m big fan of teaching not only is the runway left behind you useless, as it the runway left ahead of you, accelerate build energy and pitch for vx or VY as appropriate. That’s what I do in my personal planes (one only has a A65) That said, positive rate and picking the best lift setting on a GA is universal, it extracts all the performance you’re going to get and unlike the jet the mooney has way less performance in a go around, I can bust 250kias single engine in the jet and have a initial climb rate at sea level on a OEI GA that beats the rate of a new Mooney, so if we want to be clean and high lift in a jet on the GA, I’d wager the piston pounder is even more so -
Brad3384 joined the community
-
Engine Monitor Recommendations
DCarlton replied to gwav8or's topic in Vintage Mooneys (pre-J models)
We installed overhauled J model senders from Air Parts when we installed bladders this year. We made sure we had good wiring, new gaskets, new insulators, good grounds, etc. They work great now. No bouncing. No jitter. They even work well with the original fuel gages. I have an EDM-730 for everything else. -
Something is not right. It looks like there may also be a longer vertical crack under the paint. I would definitely figure this out and fix it before it damages the vertical stab as that might be a very expensive repair.
-
Thank you very much.
-
Excellent, Thank you!
-
Aircraft Spruce 05-00037


