47U
-
Posts
822 -
Joined
-
Last visited
-
Days Won
1
Content Type
Profiles
Forums
Blogs
Gallery
Downloads
Media Demo
Events
Everything posted by 47U
-
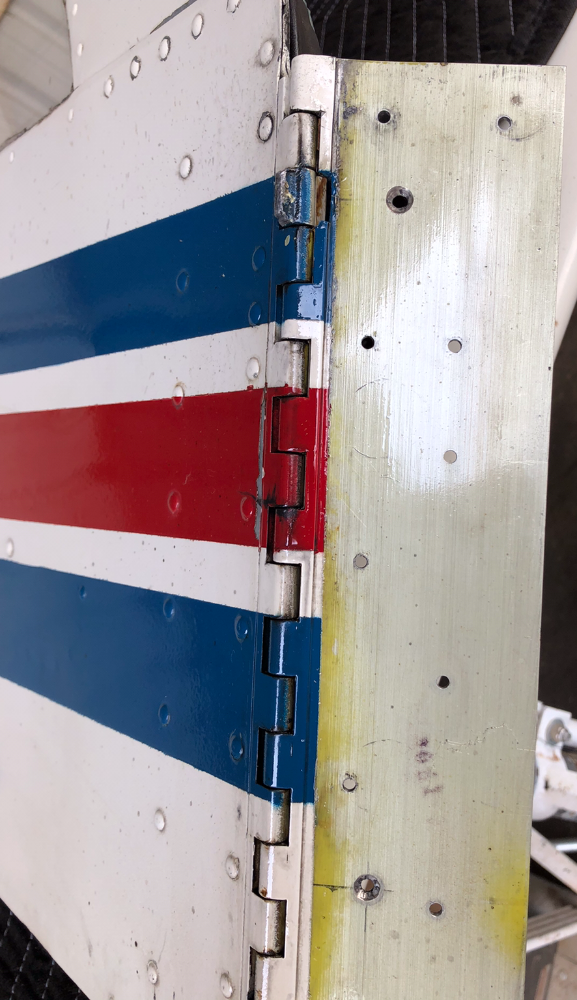
Not sure if your F model attaching hardware is the same as my ‘63C… I had a broken lobe on the ship-side hinge half. Drove me nuts to look at it. Door removal looked simple enough… a dozen or so screws visible on the outside of the skin and the nuts were visible on the inside once the interior side panel was removed. I removed the screws visible from the outside, but the door hinge wouldn’t slide out. Closer inspection on the interior revealed two nuts for which there were no corresponding screw heads. Apparently, the door was hung on the fuselage with two countersunk screws before the exterior skin was riveted on over the top of the ship-side hinge and hiding the countersunk screw heads. It took a couple of sharp ‘rotating motions’ of the door to shear the screws and the hinge slid right out. I think my screws were all -6, but later Mooney used -8 screws. Needless to say, I did not de-skin the fuselage to replace those countersunk screws. The replacement hinge from Loewen Mooney Salvage was from a J model and did not have any countersunk screws. The two countersunk screws holes are visible below, top and bottom of the ship-side hinge.
-
Merced has a BC approach. Perhaps more rare, at least in California central valley, is the NDB approach.

-
How much time has passed since the installation? Before going to the shop, slide the xponder out of the tray and inspect/clean the connectors. Unplug the connector on the G5 and do the same. It’s the intermittent problems that can be the most difficult to fix. Good luck!
-
Wraplock? From the J model IPC…

-

does your mechanic test fly your airplane after annual?
47U replied to rwabdu's topic in General Mooney Talk
They even count the shop rags… commercial rags uniform in size and color so the knuckle-draggers won’t tear one in half if they‘re missing one (I can call them that because I was one). Better that than being a ‘grinner,’ though. -
I like it, too. I like the look of a dark lower fuselage. If I may pass on to you a bit of advice that the previous owner of my C told me; he said that after parking, set the stab trim back to somewhere close to the takeoff position to align the paint stripes across the fuselage-empennage seam. He said it just looks better.
-
does your mechanic test fly your airplane after annual?
47U replied to rwabdu's topic in General Mooney Talk
If the shop is following the Mooney 50 hr/100 hr/Annual Inspection Guide, pre inspection and post inspection engine runs are required.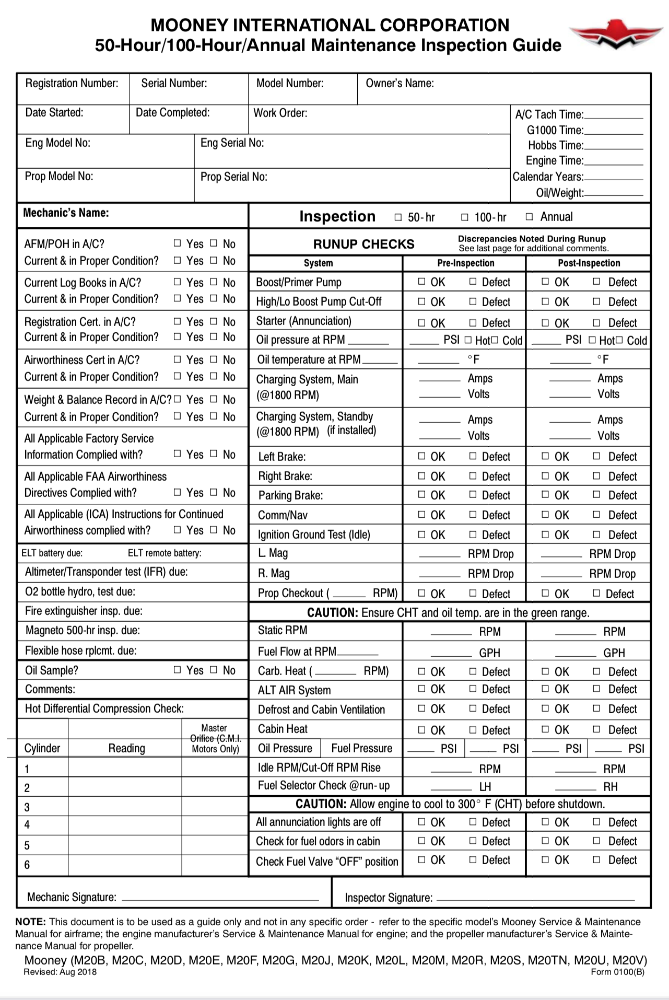
-
Ummmm. The Doc’s figure shows the bolt as index 26, pn AN3-11A, which is does not have a drilled head. You have an AN3H-11A installed (or -11 if the shank is also drilled, which we can’t see). It’s a high-vibration environment… perhaps mx thought the nut plate was a lacking in free-running torque so installed the bolt with the drilled head and safetied it for peace of mind (rather than change the nut plate?). I’m obviously just guessing, my tailpipe support has springs. That’s a good job to notice something that you thought might be suspect and ask the question.

-
Mount external Stratus L-band antenna?
47U replied to 0TreeLemur's topic in Avionics/Panel Discussion
Which antenna did you buy… a blade-style or stick and ball. Where do you plan to mount it? Some considerations in AC43.13-2B, Chapter 3. https://www.faa.gov/documentLibrary/media/Advisory_Circular/AC 43.13-2B.pdf You’ll need your A&P to sign the logbook. -
Great news… sorry I was late to the game.
-
I’m guessing the vacuum line to the low vac switch is compromised which is why the light is on. Before tracing wires, trace the vacuum tubing to the switch and you might find your problem there. It’s a very small hose and doesn’t have a hose end, it just pushes onto a small nipple on the switch. This excerpt from the Precise Flight install manual might help visualize what you’re looking for.

-
Being you have a D model, do you have co-pilot brakes? Does the co-pilot right brake act the same as the pilot side?
-
What License Plate To Get?? So Confused :)
47U replied to PeteMc's topic in Miscellaneous Aviation Talk
How about M20K231 ? -
Is the inspection panel on top of the wing or bottom of the wing?
-
The Clamp Keeper from Monroe Aerospace. https://catalog.monroeaerospace.com/item/all-categories/clamps-1/ma12-02588# Use a needle-nose pliers to squeeze the clamp closed, align the holes with an awl, put the bolt or screw through the hole, and slide the slot over the threads, holding the clamp closed. Now the washer and nut can be easily threaded on. Sized for -10 on one end and -8 on the other end. Pricey at $10, minimum order is 5, so $50. But, can be used in pretty tight spaces, and faster than safety wire. Pass the extras out to your friends.

-
Pilot side panel re-do, flat vs angled panel
47U replied to TuomoMooneyFlying's topic in Avionics/Panel Discussion
Pics below from the LASAR flat-panel installation kit 4 or 5 years ago. Three standoffs with shock mounts on top, three shock mounts on the bottom. The bottom row shock mounts are inserted into a ‘cup’ which helps prevent panel sag. With the aircraft leveled longitudinally, the result was an 8 degree tilt. There were no instructions in the kit, but I didn’t buy the flat panel from LASAR, they sold me the installation kit by itself.

-
Any idea where to find a Spinner Bulkhead/Fillet?
47U replied to sw1024's topic in General Mooney Talk
There are a number of hits on controller.com when searching the root p/n 680031. Some are the for full spinner assembly, no doubt, and would be pricey. If they are in fact the right spinner assembly for your aircraft. Is the shop holding up the annual for this part? Are they saying that structural integrity of the spinner/backplate assembly is lost because this piece is broken? Hmmm. I’m wondering if this part was broken in the course of performing maintenance, i.e., mx-induced? If not, investigation might be considered to determine why it broke. Something might be out of balance. I’ll shut up now… -
The developers have been salivating to close RHV for years. Purchase of 100LL was banned a couple years ago. Threatening certificate action for failure to maintain alignment with the runway centerline is just another scare tactic to intimidate pilots and instructors. It’s an ambiguous standard. What does ‘runway alignment’ to the ‘standard’ actually mean? Are they monitoring radar returns? Or ADSB data? Tower personnel visual sightings? This is BS. I wonder what the AOPA is thinking?
-
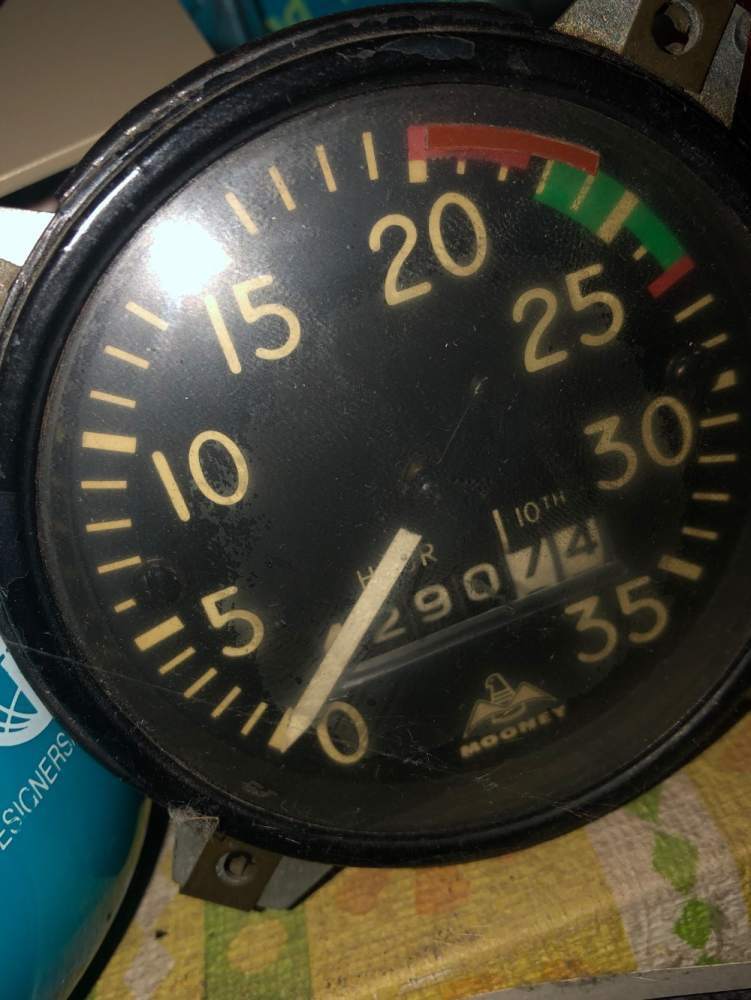
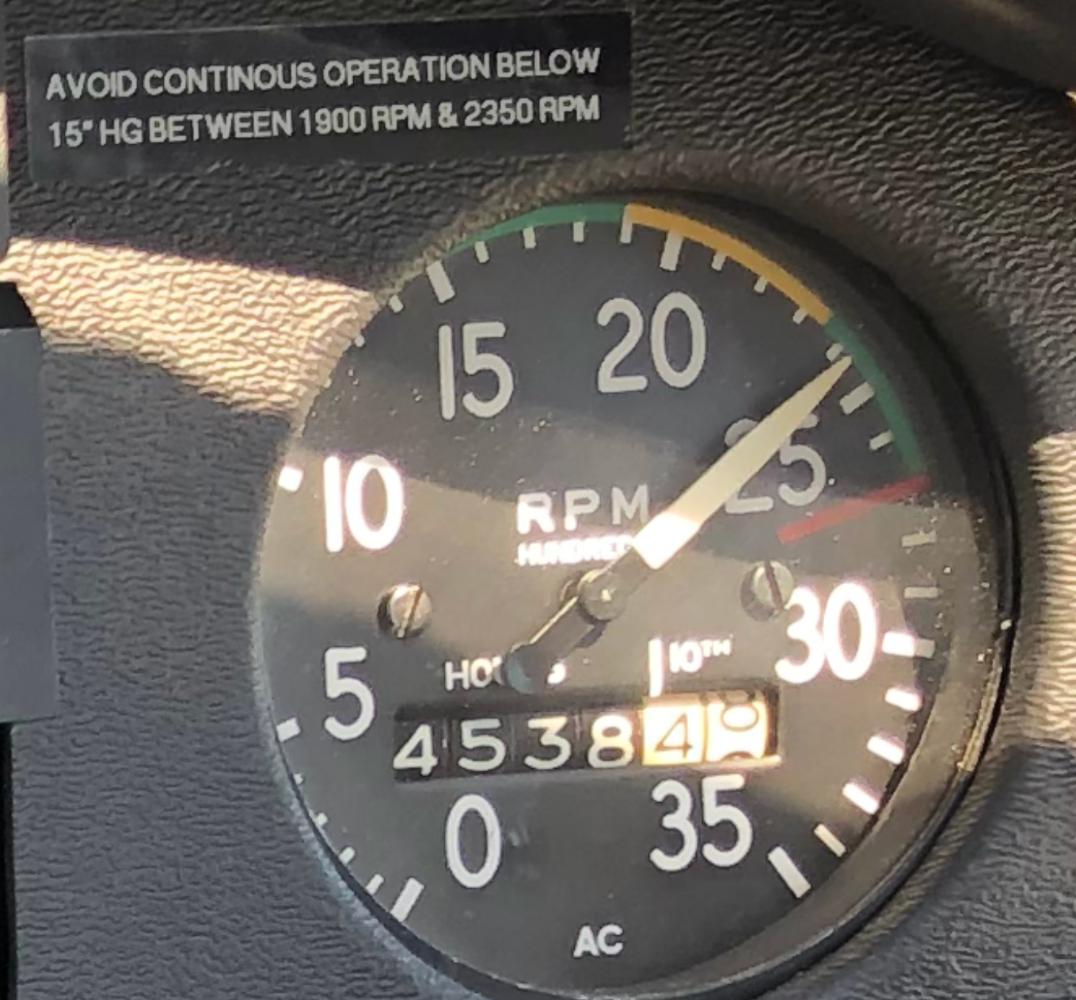
I’m not surprised that my tach wasn’t the only one with the wrong ‘restricted operation’ range markings. Technically, aren’t improper range markings not airworthy? (And who is responsible for airworthiness?) When the 3-blade McCauley replaced the 2-blade on my ‘63C in the early ‘90s, the range markings on the tach were not changed per the STC. It wasn’t that hard to do, and really cheap for a range marking sheet, .00295 amu at Wag-Aero.

-
Yes, the same. Provided the below SB has been accomplished. https://www.mooney.com/wp-content/uploads/2020/12/SBM20-188A.pdf
-
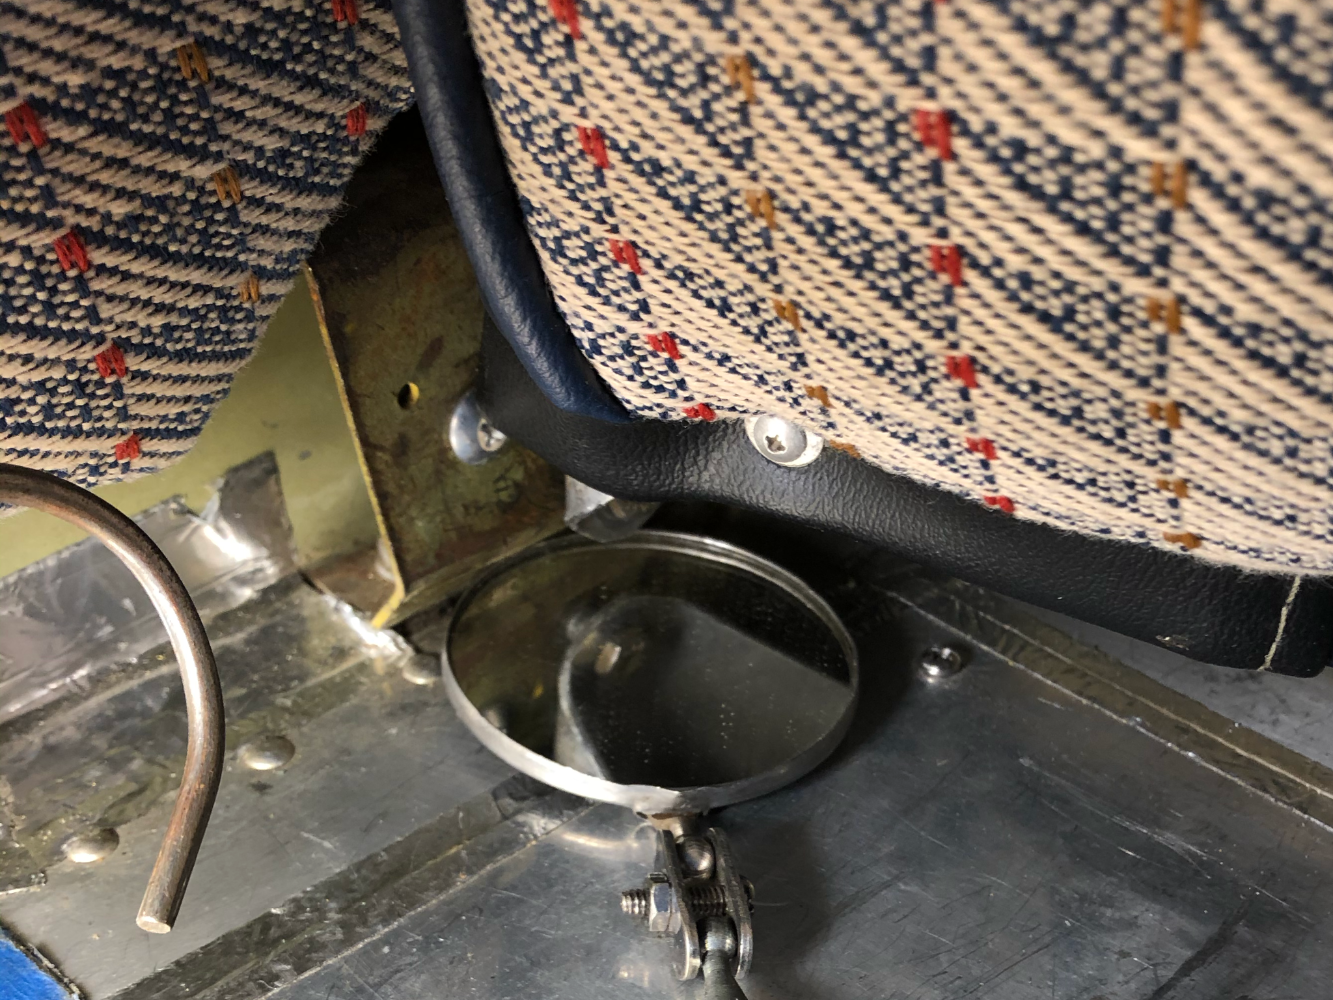
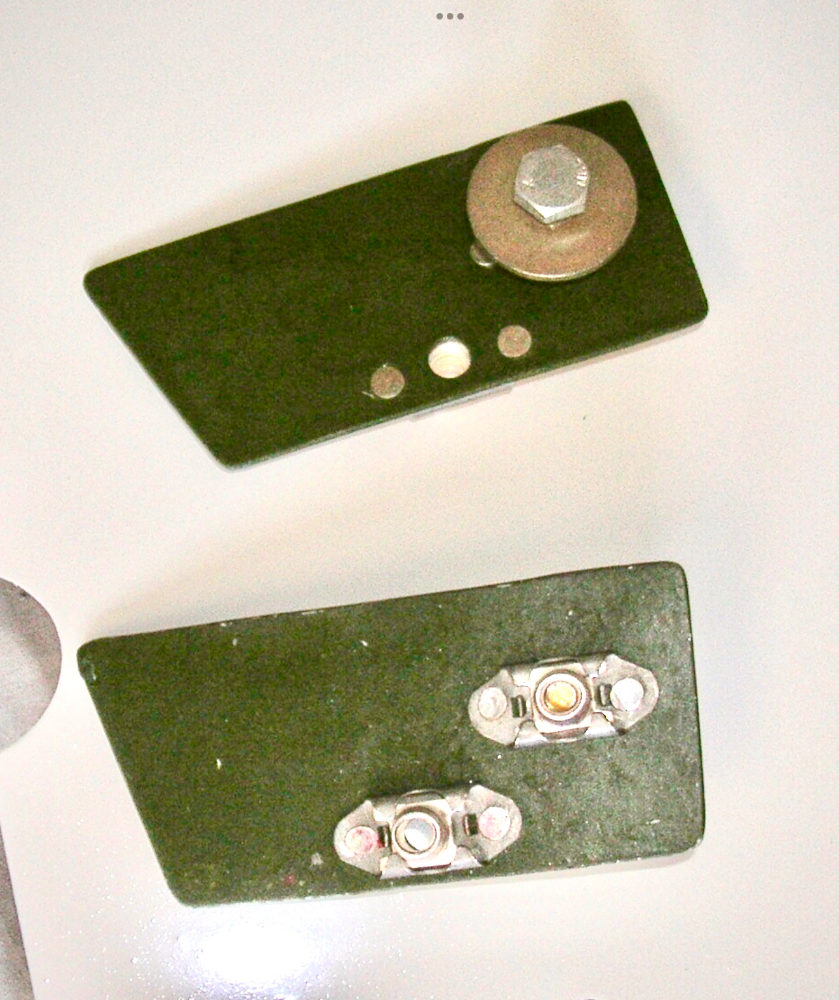
Bolt through the seat bracket, then the bushing, then the through the airframe mount. On my ‘63C, the upper seat mount brackets attach on the aft side of the airframe mounts. The seat back has a little more recline and is more comfortable. I riveted a couple floating nut plates to an aluminum back plate to slide behind the airframe structure because my fingers don’t fit back there to get the nut onto the bolt threads. The screw holds the back plate in position lined up with the hole for the mount bolt.
-
Prop restriction on my 3-blade McCauley…
-
Light Plane Maintenance did an article back in the ‘90s, maybe? They said the number for the ‘2300’ tachs was 2310 for it to be timed 1 for 1. They explained how you could verify the accuracy of the tach by timing how long it took to turn over 1/10 of an hour on the hour meter, which is gear driven and shouldn’t have any slippage like the needle. At 2310 rpm, it should take 6 minutes to turn over 1/10 of an hour. Crude, I know, but this was way before iPhone apps and cheap handheld tach sensors.
-
TKM MX11 is a slide in replacement for the Comm 120. Spruce has new ones for 2.5 amu, Bennett Avionics says they sell used for 1.4 amu… or the Reaper might have one… https://www.bennettavionics.com/brands/TKM.html

-
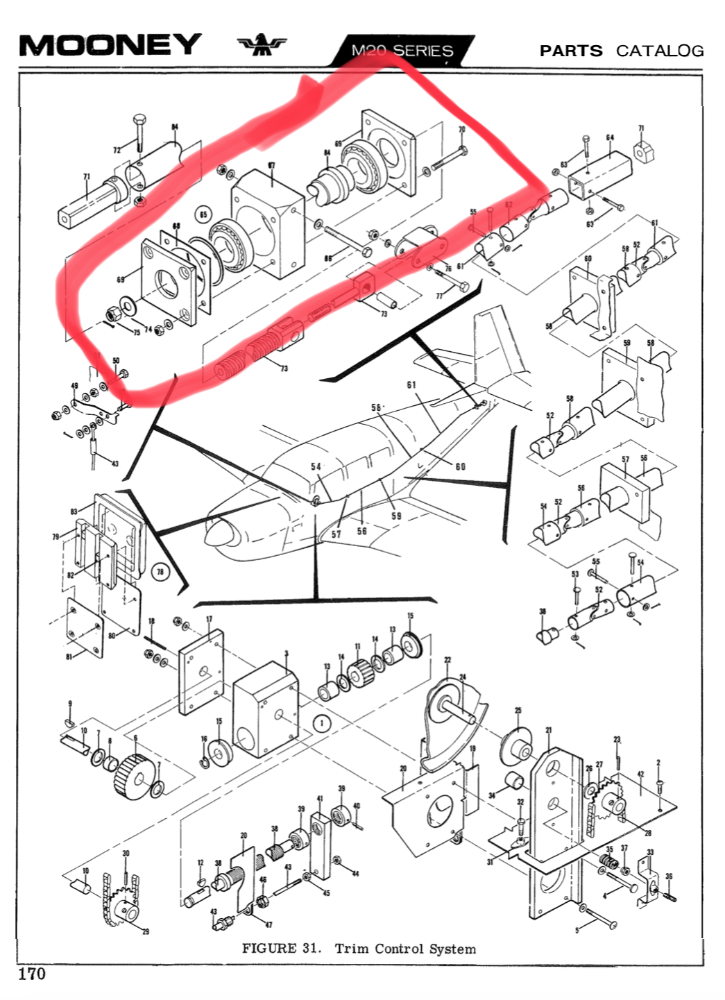
Certainly have the installer review the electric trim system for installation/operation. But, being able to manually trim from stop to stop ‘with really no issue’ doesn’t lend itself to much confidence. It really should be smooth as butter. What friction you feel while manually trimming could be enough to limit effectiveness of the electric trim. The jackscrew should be cleaned first, then the light layer of grease is appropriate. This doesn’t sound like your problem to me. One thing that doesn’t get any attention during the annual or 100 hr lube schedule is the ‘trim housing’ in the tail. It is greased and then sealed during manufacture at the factory. If it’s never been taken out and cleaned, reshimmed, and greased, it very well could create the friction that is giving your electric trim system trouble. Good luck…