

redbaron1982
-
Posts
873 -
Joined
-
Last visited
-
Days Won
1
Content Type
Profiles
Forums
Blogs
Gallery
Downloads
Events
Store
Everything posted by redbaron1982
-
Based on the G100UL fuel leak thread what's your position?
redbaron1982 replied to gabez's topic in General Mooney Talk
I get what you're saying, but from a practical point of view, does it matter much? I see this because we have something that works well (100LL) with our current fleet. It doesn't matter if the paint is not in perfect shape or if the paint job was not correctly done, 100LL seems to have no significant effect on it. The same applies to sealants, bladders, o-rings, EZ Turn, etc. It could be that all these things are worn out, or they are not the best, or they were not applied as they were supposed. But at the end of the day, what matters is that the fleet is safely flying using 100LL. If changing 100LL for G100UL makes 10% of the fleet have issues with paint, seals, bladders, etc. I don't care if the main culprit is a job poor done, what I care is that G100UL is the variable that changed. I'm not saying we shouldn't move to G100UL (given that it is safe), but I think GAMI has to be transparent stating it is not a drop-in replacement. Maybe something like: "Hey, if your airplane is new and everything has been done according to best practices, your are safe, G100UL will not affect you. But, if your airplane is old, your sealants are not in the best shape or you have a poorly done paint job, G100UL could have these effects: fuel leaks, paint peel off, etc." -
Based on the G100UL fuel leak thread what's your position?
redbaron1982 replied to gabez's topic in General Mooney Talk
It reminds me of one of the finding from AOPA G100UL test: heavy dark deposits on the exhaust and spark plug. GAMI dismissed that as "they go away if blown, so nothing important", but what about the environment? -
Based on the G100UL fuel leak thread what's your position?
redbaron1982 replied to gabez's topic in General Mooney Talk
It would be great if a renowned and requested third party could do some tests. But all this mess is such a hot potato that nobody wants to get involved. -
Based on the G100UL fuel leak thread what's your position?
redbaron1982 replied to gabez's topic in General Mooney Talk
You're are absolutely right! I was going to share my own analysis of G100UL taste: on the nose, G100UL makes an unforgettable entrance with bold, industrial undertones reminiscent of freshly cracked refinery vats, balanced by an edgy zing that might just remind you of the kind of paint stripper that could strip memories. The palate is daringly complex: it opens with a smooth, almost buttery ignition, followed by a volatile crescendo that dances between high-octane ambition and a faintly caustic whisper of "am I supposed to inhale this?" The finish? Crisp, clean-burning, and surprisingly engine-friendly, leaving behind only the faintest tingle of existential questioning. -
Based on the G100UL fuel leak thread what's your position?
redbaron1982 replied to gabez's topic in General Mooney Talk
I'm starting to have issues telling sarcasm from true believers. -
Based on the G100UL fuel leak thread what's your position?
redbaron1982 replied to gabez's topic in General Mooney Talk
Looks like GAMI is already aware of RV issues too:
-
Based on the G100UL fuel leak thread what's your position?
redbaron1982 replied to gabez's topic in General Mooney Talk
Not sure if this was already shared here: https://www.lycoming.com/fuels "To ensure the safety of the flying public and to meet its obligations as a TC holder, Lycoming has refused this “gag-restriction.” If we determine that any candidate fuel creates a safety issue when used in our engines, we must be able to appropriately warn the public and the FAA." -
Based on the G100UL fuel leak thread what's your position?
redbaron1982 replied to gabez's topic in General Mooney Talk
It's unbelievable the gag restriction to report any negative findings. It's truly amazing. It's really hard for me to trust GAMI or anyone supporting this way of doing business. It doesn't surprise me though, because it kind of aligns with the denial and elusive answers in this forum to the sealant compatibility and the paint peeling issues reported. -
Based on the G100UL fuel leak thread what's your position?
redbaron1982 replied to gabez's topic in General Mooney Talk
Probably, still, not a drop-in replacement.... It looks like latex is not affected by 100LL but G100UL is. -
Based on the G100UL fuel leak thread what's your position?
redbaron1982 replied to gabez's topic in General Mooney Talk
That guy is mentioning leaks and peeling, same as you. -
Based on the G100UL fuel leak thread what's your position?
redbaron1982 replied to gabez's topic in General Mooney Talk
Everyone affected by G100UL should get in touch and share experiences, maybe it would be a good idea to share their experience with the judge who is going to analyze this matter. -
G100UL paint testing by YouTuber mluvara
redbaron1982 replied to Shiroyuki's topic in Modern Mooney Discussion
Can't hot spots within the cyl cause detonation? Like a carbon deposit that gets too hot? I don't know if this has been posted here before: -
Based on the G100UL fuel leak thread what's your position?
redbaron1982 replied to gabez's topic in General Mooney Talk
The idea that GAMI is not charging a royalty per gallon was mentioned here, but George didn't confirm nor deny it. I would guess that they are getting a cut from the STC and also from each gallon sold. -
Based on the G100UL fuel leak thread what's your position?
redbaron1982 replied to gabez's topic in General Mooney Talk
If that would be the case (GAMI not charging a fee for each gallon of G100UL sold or blended) it would change how I perceive all this. -
Good call on going around! Don't forget to retract the landing gear! Remember: power, right rudder, trim down, gear up, take off flaps
-
Yeah, I should do some tests pulling the throttle to idle, and with either RPM full forward or in the low rpm setting.
-
I'm pretty sure I wouldn't be able to do that with my J with 3 blades MT Prop. The engine seems to have failed at around 2:35:28, 30s after takeoff. How high AGL that would be? 500ft at best. My J has a sink rate of ~800fpm at best glide, which would put me back on the ground in 20s. Somehow the guy in the video glide for 1 minute after engine failure.
-
Based on the G100UL fuel leak thread what's your position?
redbaron1982 replied to gabez's topic in General Mooney Talk
Someone already mentioned this: it's a waste of time to keep replying here. There are two different points of views, and none of the positions will change their opinion. All that had to be said was said. I'm not saying that continuing the "fight" for each part's different interests doesn't make sense. I'm just saying that maybe it would be better to call your house rep and ask them not to ban 100LL, talk with fellow pilots to make them aware of your experience or make more / better tests to convince customers that your fuel is safe. -
Is it safe to pull the mixture to ICO? Several months ago I was doing a GAMI spread test and pull the mixture too lean and the engine started to die and the RPMs surge like to 2900 for 1 sec before I push the mixture back in. I don't know if it is an issue with my airplane or the if after 1 additional second the rpms would have gone down to windmilling... but it did scare the sh**t out of me.
-
Based on the G100UL fuel leak thread what's your position?
redbaron1982 replied to gabez's topic in General Mooney Talk
Do you have any doubts that GAMI is lobbying to get 100LL banned? With this story of "the infrastructure can handle only one fuel type at any given airport" the only way for G100UL has a chance to succeed is by banning 100LL. -
Need help with this part, please.
redbaron1982 replied to Glen Davis's topic in Modern Mooney Discussion
It looks like PN 660199-001 or 660235-001, depending on which engine you have (dual or single mags). https://lasar.com/control-cables/prop-governor-control-cable-bracket-660199-001 https://baspartsales.com/660199-001-mooney-m20j-propeller-governor-support-bracket As @EricJ is a good idea to have the IPC and get familiar on how to search through it. -
Based on the G100UL fuel leak thread what's your position?
redbaron1982 replied to gabez's topic in General Mooney Talk
4 out of 100, that's not small... It means that G100UL is not a drop in replacement for at least 4% of the fleet. I wonder what's is the threshold required to consider that there is an alternative to 100LL. Is it 80% of the fleet? 90%? 95%? -
Mystery hole appeared next to cowl flap, M20J
redbaron1982 replied to Lax291's topic in Modern Mooney Discussion
I haven't had a hole through the cowling, but the stiffener around the cowl flaps was getting some damage. It turned out to be the muffler shroud. Completely removing the cowling could also help identify what is rubbing. Just look for some shine metal. I would bet that is related to the exhaust system/muffler shroud. -
Based on the G100UL fuel leak thread what's your position?
redbaron1982 replied to gabez's topic in General Mooney Talk
I think it would be wise for GAMI to remove this from their website: It is clear at this point that G100UL is not transparent to the engine, aircraft, and pilot. Hard data is pointing out that: Paint staining has been reported by many, in none of the cases buffing or polishing was able to remove the stains. Paint damage (as in paint peeling off) has been reported. Fuel tank seal damage has been reported. Some o-ring materials swell significantly more than with 100LL. If that generates any issue, it is still not clear. I'm not saying that G100UL is good or bad. I'm saying that it should be clearly stated in which aspects it is different than 100LL and in which scenarios (certain o-ring materials, wet wing aircraft with old sealants, paint that is not in mint condition, etc) there is an elevated risk of having issues during the transition.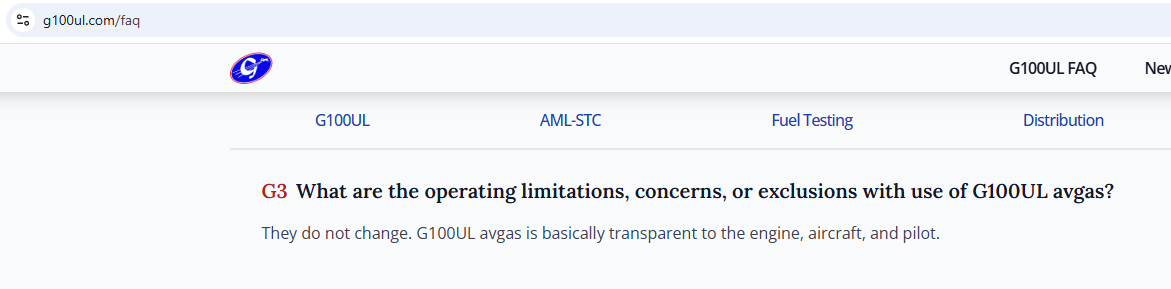
-
Based on the G100UL fuel leak thread what's your position?
redbaron1982 replied to gabez's topic in General Mooney Talk
You're are right, my bad. Just edited my message.


