Utah20Gflyer
-
Posts
879 -
Joined
-
Last visited
Content Type
Profiles
Forums
Blogs
Gallery
Downloads
Media Demo
Events
Everything posted by Utah20Gflyer
-
Was there any talk about what the install would cost?
-
TailbeaconX is a remote mounted transponder, therefore needs a control head. In an older Mooney this is an interesting option because you can install an AV30 that can act as a transponder, backup AI, backup CDI and also a display for traffic information. Combines a lot of functionality into one 3 and 1/8 round hole. We older Mooney's don't have a lot of excess panel real estate so definitely considering it. I do wish it had ADSB in though.
-
I've had a couple Bruces covers for a year now with zero noticable wear. I couldn't imagine it failing in only another year. I have no experience with Macs but would say I am very happy with the Bruce's covers and will likely add some wing covers next winter.
-
Given an adequately long runway it's seems perfectly reasonable to do touch and goes. I do them all the time, likely hundreds of them just this year. Once the nose gear is down, carb heat off, flaps, nose down trim, full power. Goes pretty quick. At least it does in a G model. As for too much heat I would strongly disagree. I find that my engine runs the hottest on my first take off. On touch and goes my engine easily runs 20-40 degrees cooler in the climb. I suspect this is because I'm rolling down the runway at idle power doing approximately 50 mph while I quickly reconfigure. The time at full power to go from 50 to 65 when I rotate is only seconds, then only a few more seconds and I'm at 80 maybe 10 more seconds and I'm at 100. I think it's the 0 to 50 at full power that builds up the heat in the engine that can be difficult to get rid of 30 -60 seconds later.
-

Normal Procedure for Upgrading?
Utah20Gflyer replied to Parttime_Pilot_Blake's topic in Avionics/Panel Discussion
When I did my last upgrade I paid for the cost of the materials when it went into the shop and the remainder upon pick up. -
Have you verified that the temperature readings are accurate? Could be a bad sensor or gauge.
-
M20C Engine and Prop Needed
Utah20Gflyer replied to BlueMoon's topic in Vintage Mooneys (pre-J models)
The cost of a serviceable used O 360 is going to be similar to the cost of an Iran except in the case of an Iran you will know exactly what the condition of the engine is and will have the opportunity to address what ever it needs. In the case of a used engine it could have a bad cam and you are not going to know about it until you’ve put a hundred hours on the engine and the filter is full of metal. Personally I would do the IRAN in your situation. -
It may be model dependent but I can slow down and descend at the same time in my G model but it requires pulling the throttle back to idle which I generally won't do because I have an aversion to listening to the gear horn for long periods of time. There is also the potential for shock cooling although Im not really much of a believer in that. I have had to do it occasionally but really try not to but sometimes terrain or airspace requires it. Usually I do what most here advise which is full power decent, normally at 2400 rpms, this makes sure the engine won't overspeed. I usually plan for a long decent often 60 miles out if possible at 100 to 300 fpm. I try to be at pattern altitude maybe 3 to 5 miles out from the pattern so I have time to slow down. Slow down technique is pull power to 16 inches, hold altitude and slowly trim the nose up. Once I hit 105 mph prop goes full forward, check mixture and I'm ready to enter the pattern. Just a private pilot, so not expert advice.
-
Does anyone else get anxiety starting the engine?
Utah20Gflyer replied to Dream to fly's topic in Miscellaneous Aviation Talk
Given a sufficient period of trouble free flying I suspect the current feeling will fade and you will be able to enjoy your plane more. Maybe give it some time, fly as much as possible and see how it goes. You can always sell it later if you end up never enjoying it the way you want to. -
I think the conundrum is that is you have a high enough net worth that you can reasonably self insure then you would also have enough income to easily pay the premium, so why bother trying to save some money and except all that extra risk. If you do it to save money when you can't really afford it then you are risking taking yourself out of aviation when you total your plane and can't replace it. Another thing to consider is that no insurance may affect your decision making process when in a life threatening situation. If my engine quits and I have to choose between trying to save the plane or taking the best option to save my life I get to choose the safest option for myself with no financial consequence. In my opinion insurance is worth it, even if it is seemingly very expensive. Obviously that is a personal choice though. Which ever way you go I hope things work out well for you.
-
Will it ever fly again? Shall I dare rescuing the abandoned bird?
Utah20Gflyer replied to Irmin's topic in Videos
You would have to get it for next to nothing to make it worth it. Between engine, prop and avionics plus misc repairs you probably are looking at 100k to 125k to get it updated and flying again, and with the current supply chain issues it’s going to take who knows how long. Pricing in a margin for who knows what and your time and risk there isn’t a ton of value in the airframe. Just a wild guess though, but if it were me I would offer them 1k to 5k. That might not be realistic but rescuing planes is not usually a realistic activity, at least from a financial standpoint. -
This is the inflation bear trap! Need to raise interest rates to fight inflation but can’t because we have too much debt. For all of the fools who said government debt doesn’t matter here is one of the reason financial responsibility in government is important! High debt limits your options. I suspect this is only going to get worse as China and Russia are taking about dropping the petrodollar. With lower international demand for US currency more of it is going to flow back into this country exacerbating our inflation problems. I would expect high inflation is going to be with us for sometime. We can’t raise rates enough to actually address the problem and there is no interest in reducing the spending of the government and our foreign policy is steering us right over an economic cliff as large numbers of countries are looking to drop our currency. This was all avoidable which is really frustrating. good news….My Mooney will keep going up in value rapidly…..at least in US dollar terms.
-
Much of what is going on in our society reminds me of the novel 1984. Specifically the reduction of the number of words deemed acceptable along with the redefinition of many words to mean the exact opposite of what they meant originally. Considering how depressing I found the book I don't like our trajectory.
-
Thanks everyone!
-
How do you know if your engine is a narrow or wide? Is there an easy way to determine it? Thanks
-
Landing Gear Retract Assist Bungee Assembly needed
Utah20Gflyer replied to ZamF16's topic in Modern Mooney Discussion
I'm just a vintage Mooney guy lurking but during my last annual my IA wanted to replace my gear assist bungies because they had some corrosion on them. I contacted LASAR and they didn't have any, that was probably 3 or 4 months ago. Fortunately for me I talked the IA out of needing to replace them right away. Apparently I dodged a bullet. -
I made my own plastic panel to go around my Johnson bar out of abs sheet I bought off Amazon. Those arent particularly difficult shapes to reproduce. That could be an option.
-
Positive control doesn’t like cold weather
Utah20Gflyer replied to Eric fddt's topic in Vintage Mooneys (pre-J models)
Maybe you have a crack in the system and when it gets cold the material shrinks and opens up the crack to the point the vacuum gets dumped? I'm far from a PC expert and actually I'm working on troubleshooting my system as we speak, but I would look for leaks in the lines or vacuum servos first, and then go from there. Preferably while it's cold since that is when the problem exhibits. -
I’ve been doing oil analysis at every change at approximately 50 hours and they always come back with the oil being in good condition. This could be influenced by the fact that I am adding a quart every 6 hours, essentially I do an oil change between each oil change. If the oil analysis indicated the oil was in less than stellar condition at 50 hours I would shorten the interval until it did.
-
In my case I got 1 hour dual in a J model before I bought my G. I asked the insurance company if I could count it and they said no. Had to be my plane.
-
PC system and cleaning exterior and interior
Utah20Gflyer replied to TSC1020's topic in Vintage Mooneys (pre-J models)
One of the downsides of the AV30 is the HSI doesn't provide vertical guidance. This may change in the future but that means you always have to have a separate CDI for any approach with vertical guidance. A bit of a bummer, but I guess if it's a VFR only plane it wouldn't be a big deal. I understand the precession issue was resolved but have no direct knowledge on the matter. -
Mooney M20F rear seat recline lever
Utah20Gflyer replied to TheMooneyAnomaly's topic in General Mooney Talk
I printed 5 of these trying different settings. I have 2 black ones that look like functional parts. They are someone else's design so I can't sell them ethically but if you want them I will mail them to you. The print quality is not excellent but they look ok and seemed to fit my plane. FYI you will need slightly longer screws. If you want them send me a message with your address.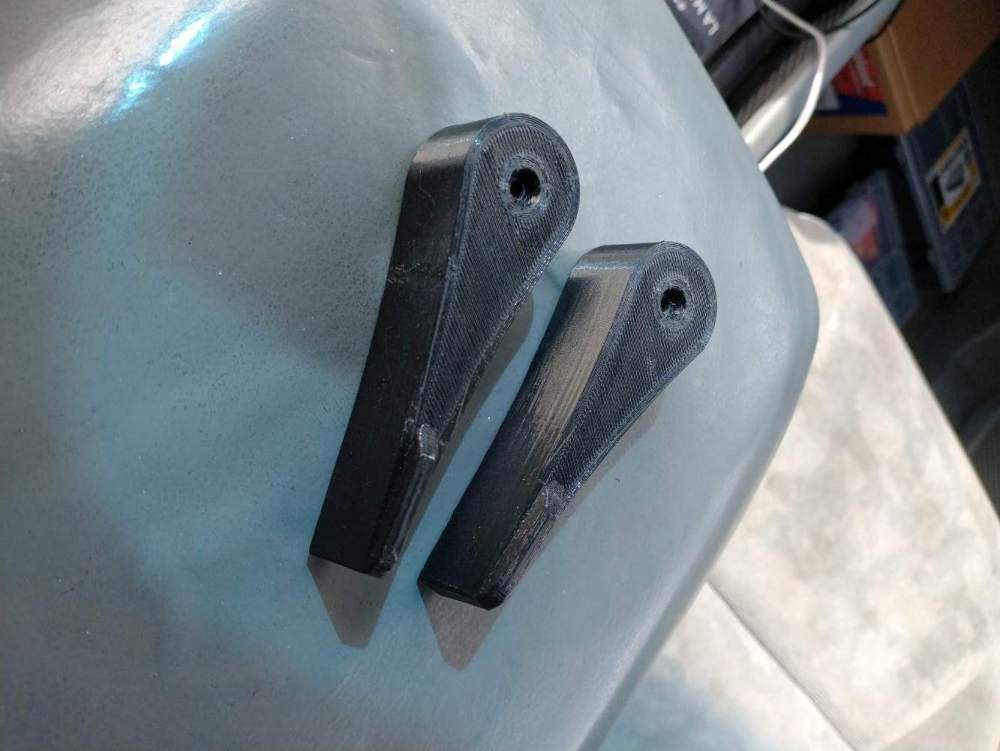
-
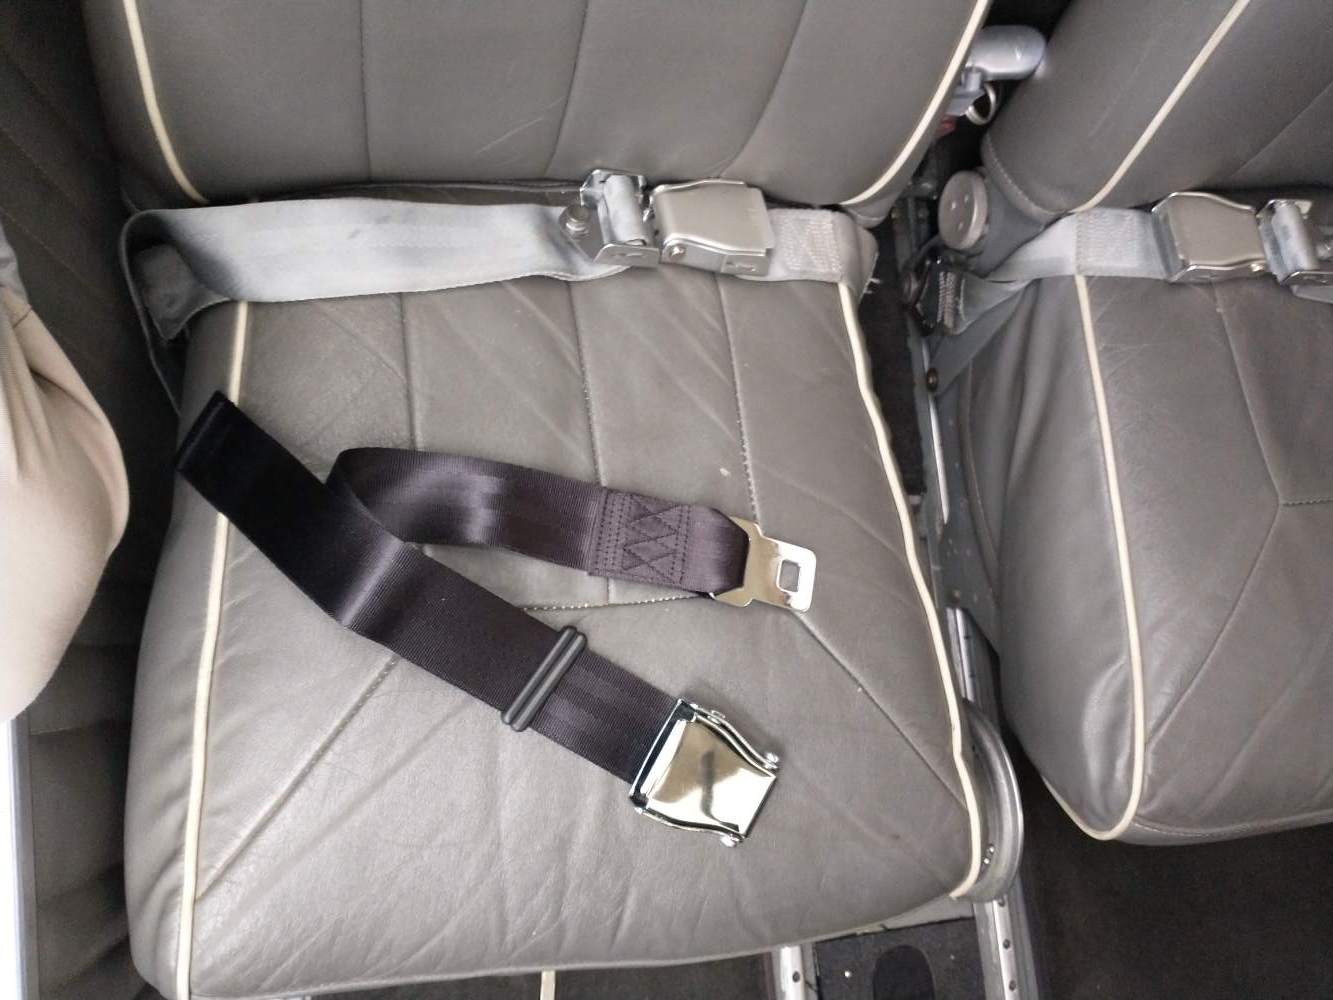
I got the seat belt extender yesterday so this morning I stopped by the airport to see if it works. Good news. Perfect fit. For 18 bucks seems like something useful to have available. link to the one I purchased https://www.amazon.com/dp/B09PQN3CRY/ref=cm_sw_r_apan_glt_i_N5MJNPYC1JGRGBGTSMYZ?_encoding=UTF8&psc=1

-
I was required to do 10 hours dual when I purchased my Mooney last year. It seems to be pretty standard now when transitioning to a new aircraft. In my case I needed to ferry the plane from Tucson AZ to Salt lake which we spent 5 hours doing, then the next day we flew 5 hours and I was done. Not a big deal.
-
Help me decide - Manual vs Electric Gear
Utah20Gflyer replied to gwav8or's topic in Vintage Mooneys (pre-J models)
Same for me, in fact I never even look at the lights. Gear down and locked is checked by tugging down on the j bar. The lights are a waste of time in my opinion.