

Utah20Gflyer
-
Posts
887 -
Joined
-
Last visited
Content Type
Profiles
Forums
Blogs
Gallery
Downloads
Events
Store
Everything posted by Utah20Gflyer
-

Semi-rant... Pilots here prob feel the pain as I do...
Utah20Gflyer replied to mstephenson51's topic in General Mooney Talk
Typically inflation punishes people who trade their labor for money and benefits those who make money from owning assets. For example rent goes up but if you have a fixed mortgage on the property then it becomes increasingly profitable. If you work for wages then typically what ever extra you make gets eaten up by increased cost. In economic terms they say that wages are "sticky" meaning that wages tend to increase slower than other goods, in particular the ones that are essential. As for the official inflation numbers I wouldn't put much faith in them. Anyone who has been paying attention knows they changed the way they calculate inflation in the 80s so they could screw over retirees, ahem I mean save the government money on COLA increases. So how do you deal with inflation? Convert earned income into investments that do better during inflationary times. Unfortunately that is a long-term process unless you were born with a trust fund or sold your start up for big dollars. Not a investment advisor or economist -
There are holes in the front of the seat rails to prevent the seat from traveling too far forward but there doesn't seem to be anything on the rear of the rail. I'll take one last look later today but I hadn't seen anything. The only solution I can see is to have something clamp on. On the front of the rail the original mooney solution is actually a cotter pin. I bought some but ended up using #4 machine screws which fit nicely through the hole and are easier to install and remove. I've made sure to use set screws with flat tips and the plastic has some flex to it which should help minimize and wear to the rail. Is anyone else using seat stops on the rear of the rail? If so what have you used? I've had passengers run the seat to far back and then had some difficulty getting the seat lined up again so it will go forward again.
-
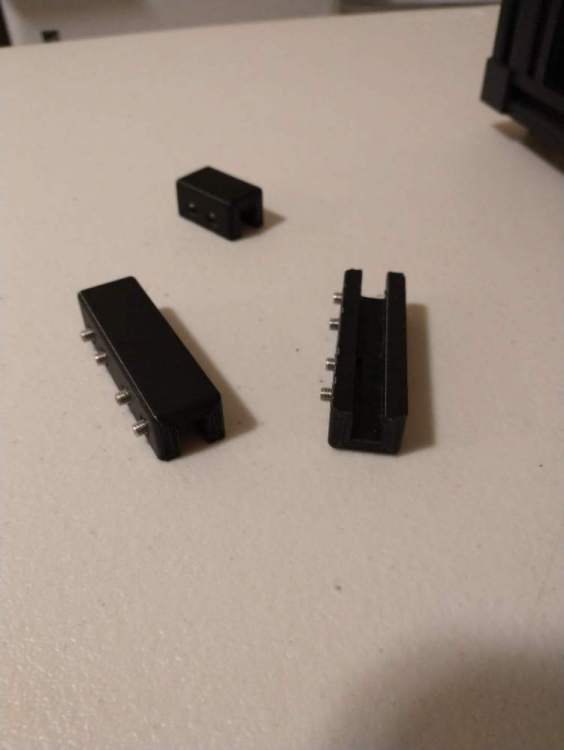
Hello Mooney community! I didn't really like the home made rear seat stops that came with the plane when I purchased it and the weather sucked today so I decided to start another project. The originals were made from some aluminum extrusion and then were tapped for a thumb screw to tighten it down. They didn't fit too well and tended to pop off regularly. It was difficult to get them tightened down without a tool but it was difficult to get a tool where I needed it to do the job. I 3d printed these as replacements. The small one in the back of the picture is version 1. It worked pretty good but I could get it to pop off by repeatedly slamming the seat into it like a passenger might. The two longer ones are V2, I'm hoping they will have greater staying power. I'll post a picture of them installed tomorrow if I get a chance to get out to the airport.
-
Sorry that happened to you, that's so frustrating and stupid. But then again if the average criminal was smart they would be a politician.
-
Main landing gear wheel alignment
Utah20Gflyer replied to woodman86's topic in Vintage Mooneys (pre-J models)
During my planes first annual we found there was a 1/4 to 3/8 side to side play in my main landing gear. The cause was some worn parts and lack of adequate tension. I was fortunate to get the problem fixed before the gear collapsed on me. I would suggest jacking up the plane, check for potential damage/wear and correct tension as that is quick and inexpensive insurance against a very expensive gear collapse. -
If my fuel pump sounded like that I would get it overhauled. Not a mechanic but that doesn't sound right. At least mine doesn't sound anything like that. Can't think of anything external to the pump that would cause it to sound like so I would assume it's some sort of internal issue. Maybe someone more informed will chime in.
-
You are not going to believe this…I did my solo flight!
Utah20Gflyer replied to Nukemzzz's topic in General Mooney Talk
Congratulations! That's great! Mooney brakes are just fine if in good condition and properly bled, maybe would be a good idea to get them checked out, preferably by someone with plenty of Mooney experience, there is a learning curve to getting the brakes properly bled. -
Heavy elevator authority...common to M20J?
Utah20Gflyer replied to Davo's topic in General Mooney Talk
The only time I feel like my plane is heavy in pitch is when rotating on takeoff, as soon as I'm in the air the pitch feels light. Out of trim it can feel heavy but I don't experience that much as I am constantly trimming to keep things where I want it. I have flown a J model before and it didn't seem much different than my G model. Maybe the elevator travel is not set correctly? Maybe check your planes elevator with the travel boards make sure everything is to spec. If the travel is set incorrectly that could make your trim settings incorrect. Check all linkages for free movement, potential obstructions, good condition and clean and lubricate everything. Check the hardware between the elevator and horizontal stabilizer and make sure everything is in good shape and lubricated. That's about all I got. I find the control pressure to be about the same as a 172/piper Cherokee, etc. So something is probably not right if control pressure is consistently heavy. -
Buying a plane is a lot of work and owning a plane can be a lot of work. Especially the first year or two. I love owning my own plane and never want to go back to renting but the last year of ownership has not been conducive to working on my instrument rating. I would say given all the factors rent for your private. Then buy and do your instrument while you build hours in type.
-
Mooney M20F rear seat recline lever
Utah20Gflyer replied to TheMooneyAnomaly's topic in General Mooney Talk
My plane is a 68, so that's what I'm going to check it against. Would you prefer black? I have black filament as well. -
Mooney M20F rear seat recline lever
Utah20Gflyer replied to TheMooneyAnomaly's topic in General Mooney Talk
Did you still need two seat recline levers? I printed one last night and will be checking it later today for fit and function.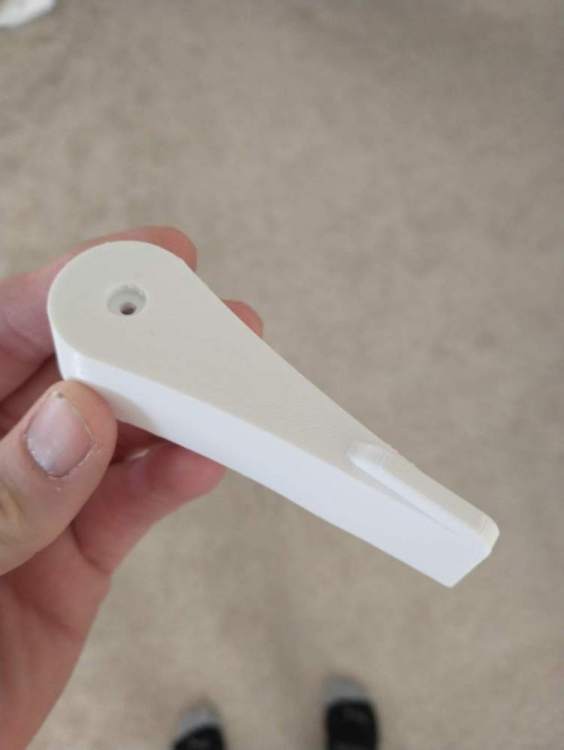
-
Overhead vent upgrade project
Utah20Gflyer replied to Utah20Gflyer's topic in Vintage Mooneys (pre-J models)
Pirep time. So I finally got my plane back from it's 3.5 month annual and had an opportunity to fly it. The vents work as I expected with the air flow hitting me directly in the face in the centered position. Airflow is low on the ground but once in the air is more than adequate. The vents are attractive and should be much more durable than the ABS plastic deflectors the plane came with. Overall I am very pleased with how the project turned out. I just wanted to thank everyone who contributed to this process. It was helpful to have input from lots of people with much more experience in many different areas. To those interested in aquiring something like this I am still planning on producing something in the future that people could purchase but it's going to take a little while to make that happen. I'm thinking along with vent adapters I may try to produce a lot of the levers, etc that can be difficult to find for our older birds. To keep the costs down they will be owner produced parts. I need to think that through though. I understand that inspecting a part for quality fit and function can qualify a part as owner produced even if someone else made it. Anyway, I'll post more projects in the future. I have two in the beginning stages now. Thanks again! -
The supply chain issues are both real and seemingly random. So it's possible it was something completely out of their control or it could just be an excuse. I just got my plane back after a 3 and a half month annual so I feel your pain to some degree. It sucks to own a plane and not be able to fly it.
-
Mooney M20F rear seat recline lever
Utah20Gflyer replied to TheMooneyAnomaly's topic in General Mooney Talk
https://www.thingiverse.com/thing:3074623 I think this is what you may be looking for. If you know someone with a 3D printer it looks like an easy print. -
CiES fuel senders & Mooney annunciator panel
Utah20Gflyer replied to PeytonM's topic in Avionics/Panel Discussion
I just installed CIES senders in my plane a couple weeks ago. As kortoplates said you have to have a device to process the signal coming from the CIES gauges and know when to indicate something like fuel quantity or a low fuel condition. Unfortunately I don't think anyone has thought it worthwhile to make something that would be a bridge between a new digital device and the analog warning light as most digital devices can already provide their own warning. In my case I already had a JPI 800 which can't do fuel indication but already does a lot so I didn't want to spring for a new expensive primary engine monitor. Instead I used an aerospace logic digital fuel gauge. It was a little over 900 dollars and was a pretty simple install. I wouldn't suggest using the old Mooney analog fuel gauges. It will make calibration much more difficult and may in the end cost you more money than a new fuel gauge while giving inferior results. The aerospace logic gauge turns the fuel reading yellow at 8 gallons and red at 3 gallons. Thats sufficient warning for me. Overall I love them, I had completely inop fuel gauges before and it's awesome to have that function back, and much more accurate than ever before. -
I don't know enough to give you a definite answer but I know one of the big advantages of the GI 275 is it's ability to interface with older equipment including autopilots. I'm not sure about your application but may want to check and see if the GI 275 can drive your autopilot without the GAD43. I think it does with a 500 dollar add on. I have a 355 and like it quite a bit. If you are keeping the 530 I don't think there is any reason to upgrade to a 650. Although since you already have a wass GPS you don't really need another one anyway. You could just do a 225 to get another com or a 255 if you wanted another nav/com. That would save you some money.
-
Fuel line Gasket AN6291-6 or alternative.
Utah20Gflyer replied to Cruiser73's topic in Vintage Mooneys (pre-J models)
Not trying to hijack this but why is leather being used for a fuel system gasket? What properties does leather have that you can't get from other available materials? Pardon my ignorance... Thanks! -
A Better Cup Holder + iPad Storage
Utah20Gflyer replied to GeeBee's topic in Modern Mooney Discussion
I used #6 stainless machine screws with a few extra washers and a nylock nut, that's on an older g model Mooney however. -
Overhead vent upgrade project
Utah20Gflyer replied to Utah20Gflyer's topic in Vintage Mooneys (pre-J models)
I was thinking you could add some vertical fins that go from the base to the dome, it would make the base much stronger and could possibly assist with the warping issue. -
Overhead vent upgrade project
Utah20Gflyer replied to Utah20Gflyer's topic in Vintage Mooneys (pre-J models)
Those look good, Could the issue with the ABS be moisture related? I haven't tried printing with it yet but understand it can have issues if not dried adequately. Are you going to install a gasket around the perimeter of the base? Maybe double sided tape would be a good way to seal it against the plenum and also provide some support? -
Overhead vent upgrade project
Utah20Gflyer replied to Utah20Gflyer's topic in Vintage Mooneys (pre-J models)
I'm considering different paths forward at the moment, including uploading files to thingaverse and also potentially fabricating parts and selling them. Unfortunately work is really busy so progress is slow. Hopefully this week I'll get my plane out of annual which will give me some additional free time. I've been doing owner assist and been spending a lot of time at the hanger wrenching on stuff. I spent the whole weekend refurbishing my headliner. It's going to be nice having a flying plane again rather than a part time job fixing a plane. -
Overhead vent upgrade project
Utah20Gflyer replied to Utah20Gflyer's topic in Vintage Mooneys (pre-J models)
Here is what the finished product looks like. Now the only thing left is to test for function in the air.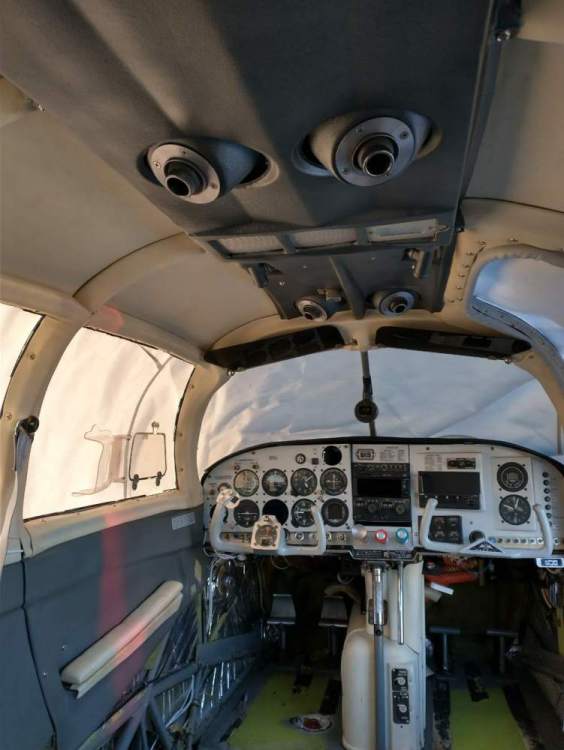
-
Overhead vent upgrade project
Utah20Gflyer replied to Utah20Gflyer's topic in Vintage Mooneys (pre-J models)
Combination, pushed it in with a soldering iron. Pretty quick process, I changed the design to provide a correct size hole for the metal insert. -
I just replaced all my seat rollers. Sourced them from LASAR, cost was about 80 dollars for the 2 seats. Things roll much smoother now.
-
Would You Rather have 2 x GI275's or a G3X 10"?
Utah20Gflyer replied to GeneralT001's topic in Avionics/Panel Discussion
If you are trying to economize on panel space the GI 275s replace the 6 pack completely and don't require an additional backup. They also have the advantage of you want to do things incrementally or need to interface with older equipment. I went for the 275 and like them quite a bit. They have a lot of functionality for their size.


