

Mooney-Shiner
-
Posts
299 -
Joined
-
Last visited
Content Type
Profiles
Forums
Blogs
Gallery
Downloads
Events
Store
Everything posted by Mooney-Shiner
-

PIREP: LASAR Oil Cooler Relocation Kit
Mooney-Shiner replied to Mooney-Shiner's topic in Vintage Mooneys (pre-J models)
Actually, not too bad once I turned the fittings on SW oil cooler. (Which was a pain to do since Pacific Oil Cooler Service used a Teflon tape to reinstall these 90s).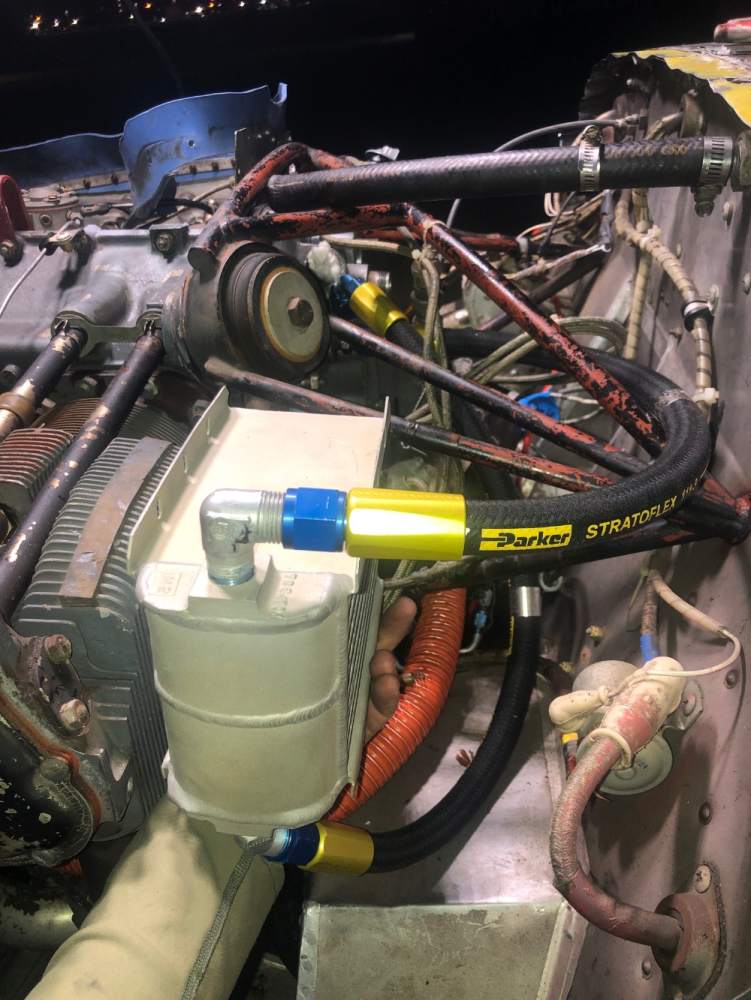
-
PIREP: LASAR Oil Cooler Relocation Kit
Mooney-Shiner replied to Mooney-Shiner's topic in Vintage Mooneys (pre-J models)
I’m just doing some tinkering with dry fitting the set up and noticed that the included hoses are pretty long. It will be fun, stuffing them to avoid any kind of chafing. Kind of wish that they were half a foot shorter
-
PIREP: LASAR Oil Cooler Relocation Kit
Mooney-Shiner replied to Mooney-Shiner's topic in Vintage Mooneys (pre-J models)
Thank you. I definitely understand the need for manufacturing. I am far from being a perfectionist. But I figured that I should communicate what I see since it is a PIREP. -
PIREP: LASAR Oil Cooler Relocation Kit
Mooney-Shiner replied to Mooney-Shiner's topic in Vintage Mooneys (pre-J models)
James, my F has battery in the back. I do know that C has battery in the front -
PIREP: LASAR Oil Cooler Relocation Kit
Mooney-Shiner replied to Mooney-Shiner's topic in Vintage Mooneys (pre-J models)
Thank you. I did read your post about it and was going to ask you a question about it. So far I didn't notice any potential striking of cooler against the mount. Do you have any photos of your install so i can visualize the problem? How did your chin cover plate install go? Unrelated: I wish they still make the second taxi light STC replacement of cooler. -
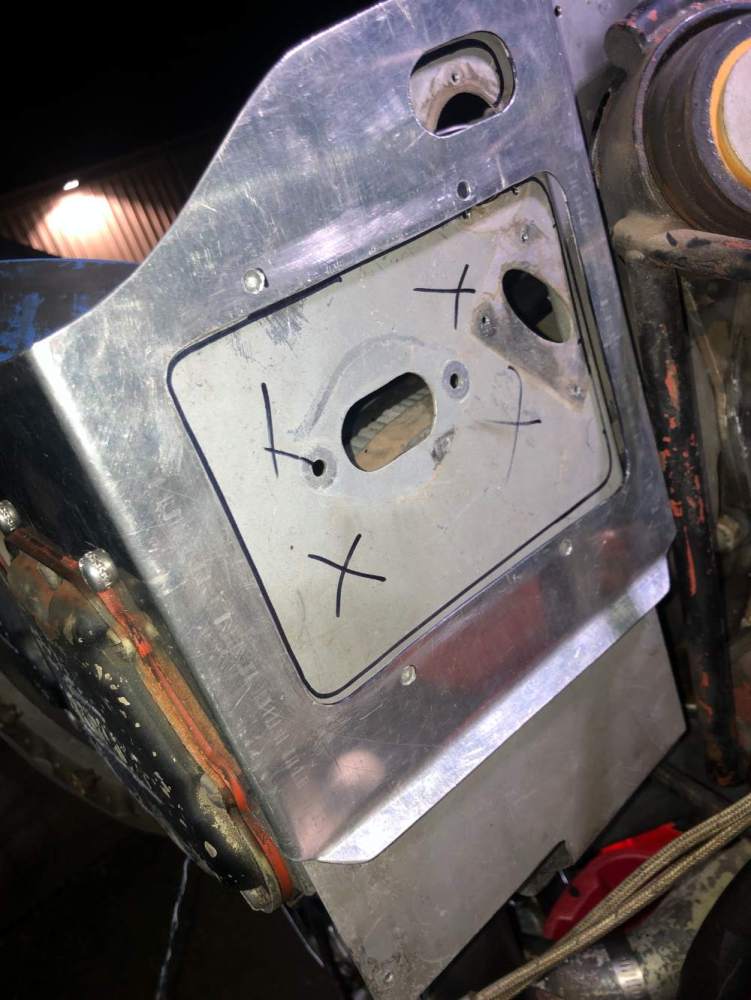
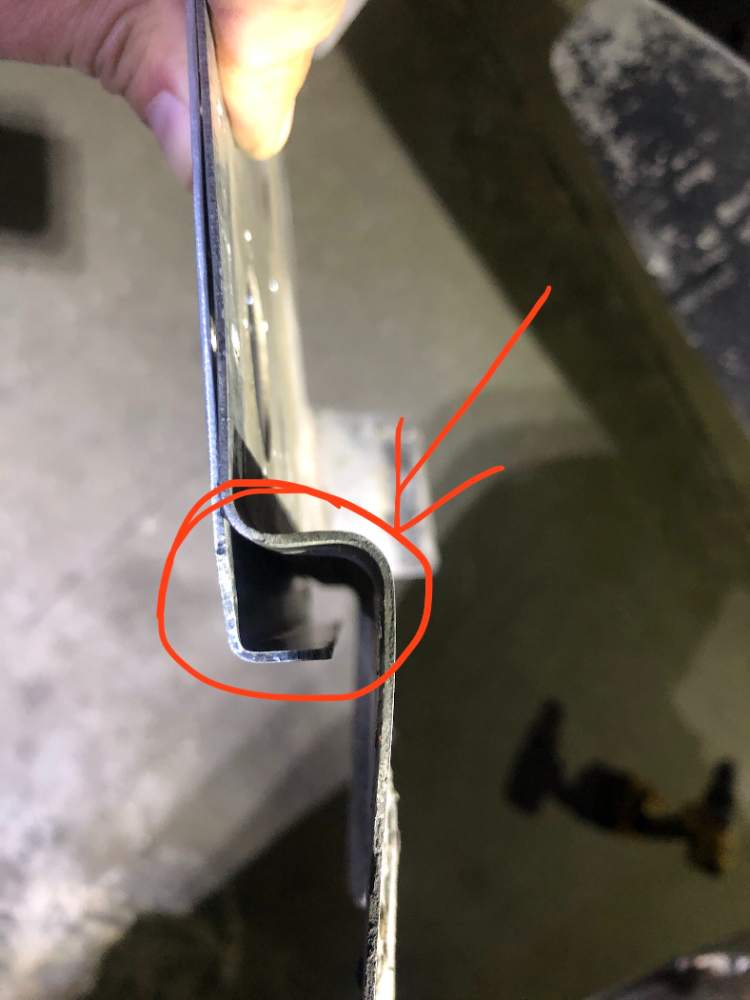
Since I had to replace my 20 yo oil cooler hoses, I decided to do the oil cooler relocation since the price of materials are pretty much the same. I decided to do the PIREP since I have seen SOME info on MS about this kit, but the details were always lacking. I received the kit pretty fast, but right away noticed some discrepancies: 1. The provided doubler plate with was not aligning with existing left rear baffle plate. The inboard fold was closer to the engine mount than on the original baffle. LASAR told me to go ahead with the install as is. 2. The holes on the doubler plate were not aligning with my oil cooler. LASAR recommended to rim out the doubler holes until they align. 3. We (A&P and I) noticed that the cover plate didn't fit the hole left by the removed oil cooler. Not all the rivet holes were aligning to the cover plate and several would have a sufficient "bite" distance to hold the plate. We made a template of present opening and rivet holes, and noticed that the cover was not aligning to cover all of the holes. So it seems that we will have to skip some of the rivet holes to make this cover fit. I will contact LASAR to see what they want me to do. More details to follow as we continue an install. This is an In-Progress Review, so thoughts and prayers are welcome.


-
Thats an interesting plumbing that you have running to the top inspection plate. What is it?
-
One more question on the template building. I thought about using a clear vinyl sheet to trace the outline of the right side panel. Something similar to this material: https://www.amazon.com/Clear-Vinyl-Fabric-Wide-Gauge/dp/B01N18L85Z?source=ps-sl-shoppingads-lpcontext&ref_=fplfs&smid=A35NCMPGL9UC2&th=1 Is this most efficient way of doing it? Happy thanksgiving!
-
Good point. Its an 89B. But I'm still VFR for another year (not certified for IFR yet) or so. I can definitely see your point on ditching the 89b. I would cut a full panel, but I'm still saving up for the left panel update...It will be couple of years before I will be ready to this, and I'm still deciding how my left side will look (dual G-5/Aspen/G3x?). So focusing on the right side for now.
-
Ok, the project is shaping up. We removed all the old engine instruments. Now I want to install the panel fascia that would cover the old holes from legacy avionics (see yellow field). I want this fascia to also have cutouts for the avionics that I will retain until I will win the lottery. Some of the decisions that I'm facing: 1. Make the panel myself or find the specialty shop that can make this panel fascia? Does anyone have a lead on the good shop? 2. Make this fascia out of metal and then powder coat it or get a fancy carbon-fiber fascia?

-
Thinning of the sealant is a little tricky. I think its not recommended to thin the sealant with anything but toluene. I learned that the best way is to get two types of sealant to prevent any need for sealing: 1. Class A that is self-leveling to apply on horizontal surfaces. 2. Class B that can be applied to the vertical surfaces without sagging and is more widespread in supply chain. I used the FlameMaster and had pretty good results. http://flamemaster.com/cs-3204-class-a-b-c Apply the top protective coat afterwards. Verify repair with Plexi and vacuum.
-
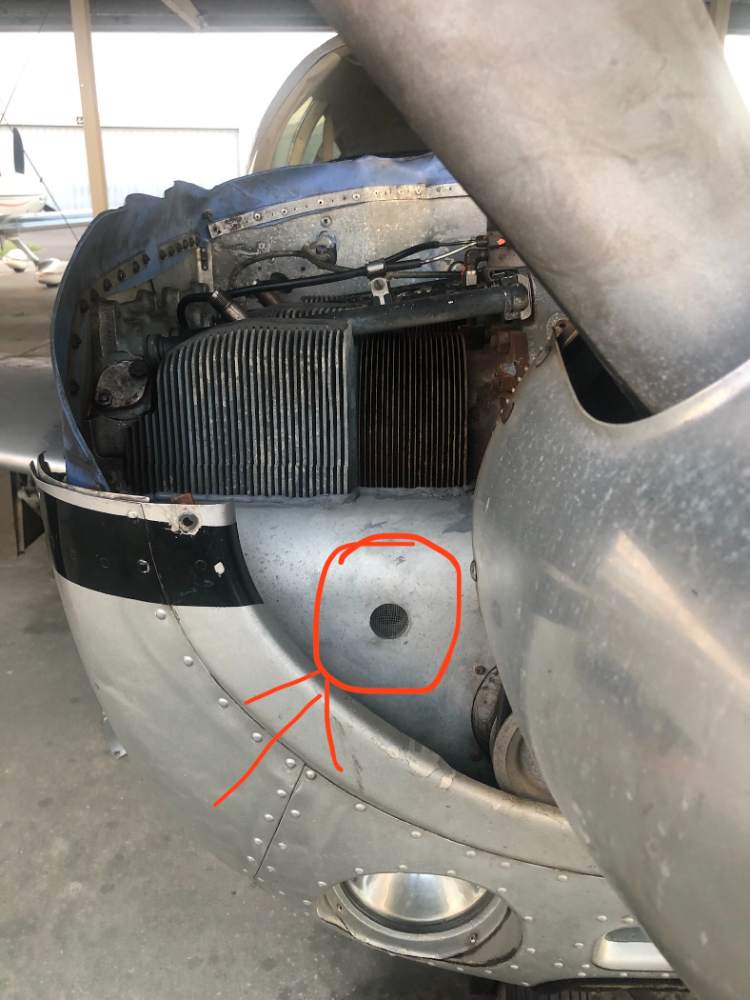
I do have a separate blast SCAT tube going to engine fuel pump, but its on the LH side. No issue there. The above posted port is on the RH side.
-
Seeing this legacy thread, I checked the blast tube connection to my Delco generator and found out that it is missing. After two annuals and one prebuy, we totally missed the fact that this ram port was never connected to the generator on my 67F.

-
Oil control rings and lessons learned - with pics!
Mooney-Shiner replied to canamex's topic in Vintage Mooneys (pre-J models)
Mike Busch has a procedure of ring flush of using mix of 1 gallon Varsol (mineral spirits), 1 gallon Xylene (dimethylbenzene), 2 quarts Aeroshell W100. Its a hydro locking procedure, but you are hydrolocking it by moving the prop by hand. DO NOT run your engine with ring flush mix. -
For my 67F, I treat every hot start as a flooded start. The throttle wide open, MX closed. Count 10 blades, and let it catch. Then richen the MX.
-
Thanks, man. Definitely all great points, and worth of pondering. I like to read your posts. Yes, I made though the wet and cold sun-tanning in BRC, "when I wore a younger man clothes." Where you in Marines as well?
-
Sorry to bring this thread from the dead. Looks like the EarthX Lithium battery got their STC for the Mooney install. Price is twice of Concorde RG-35 that I have right now ($895 v $435). Also the lithium battery allows the full discharge to zero without damage to the battery, which is not the case with AGM or flooded. EarthX also claims 4000 charge/discharge cycles, which is more than Concorde? One limitation that I noticed: your generator/alternator must put out less than 80 amps. Has anyone tried them yet? Caveat: I live in FL, so no worries about sub 0F temps.
-
Thank you. I'm looking into Aspen to delete my vacuum system within next 48 months after I will recoup from JPI900 install .
-
Oil control rings and lessons learned - with pics!
Mooney-Shiner replied to canamex's topic in Vintage Mooneys (pre-J models)
Why did your client decide to pull the cylinder at all? -
Oil cooler relocation kit.
Mooney-Shiner replied to Newowner's topic in Vintage Mooneys (pre-J models)
I just ordered the Lasar oil cooler relocation kit, since I have to replace my timed out oil cooler hoses anyway. Hoping that with a shorter oil route to cooler and lack of the exhaust systems near the oil cool hoses it will help to keep my oil temp down. Great point on the overpressurization of the engine compartment. I have no issue with cyl temps, but definitely running out of "green" on the oil temp. Oil pressure is nominal. -
Your suggestion makes perfect sense. The reason for centered location for 900 is so I can have it closer to my field of view and scan. But I supposed I can connect it to my audio panel and just have the JPI give me a callouts for any engine troubles on the audio to bring my attention?
-
Thank you, Anthony! 1. As far as I think right now, yes - forever plane. I have no plans to grow the plane anymore beyond this 67F. 2. I dont fly IMC yet. Still working on my quals 3. Retiring TC. I will postpone my 6pack upgrade to next year or year after to cancel the vacuum. This year I just want to focus on introducing the most logical setup for 900. 4. No WAAS, my ADSB out is a wingtip 5. Good point on clock, back to #2. 6. I will look around for the other thread. Please let me know if you will remember the title. 7. THank you, I love Mike's stuff. Were you at Summit?
-
I would love to install WAAS...But this year's budget was spent on 900.
-
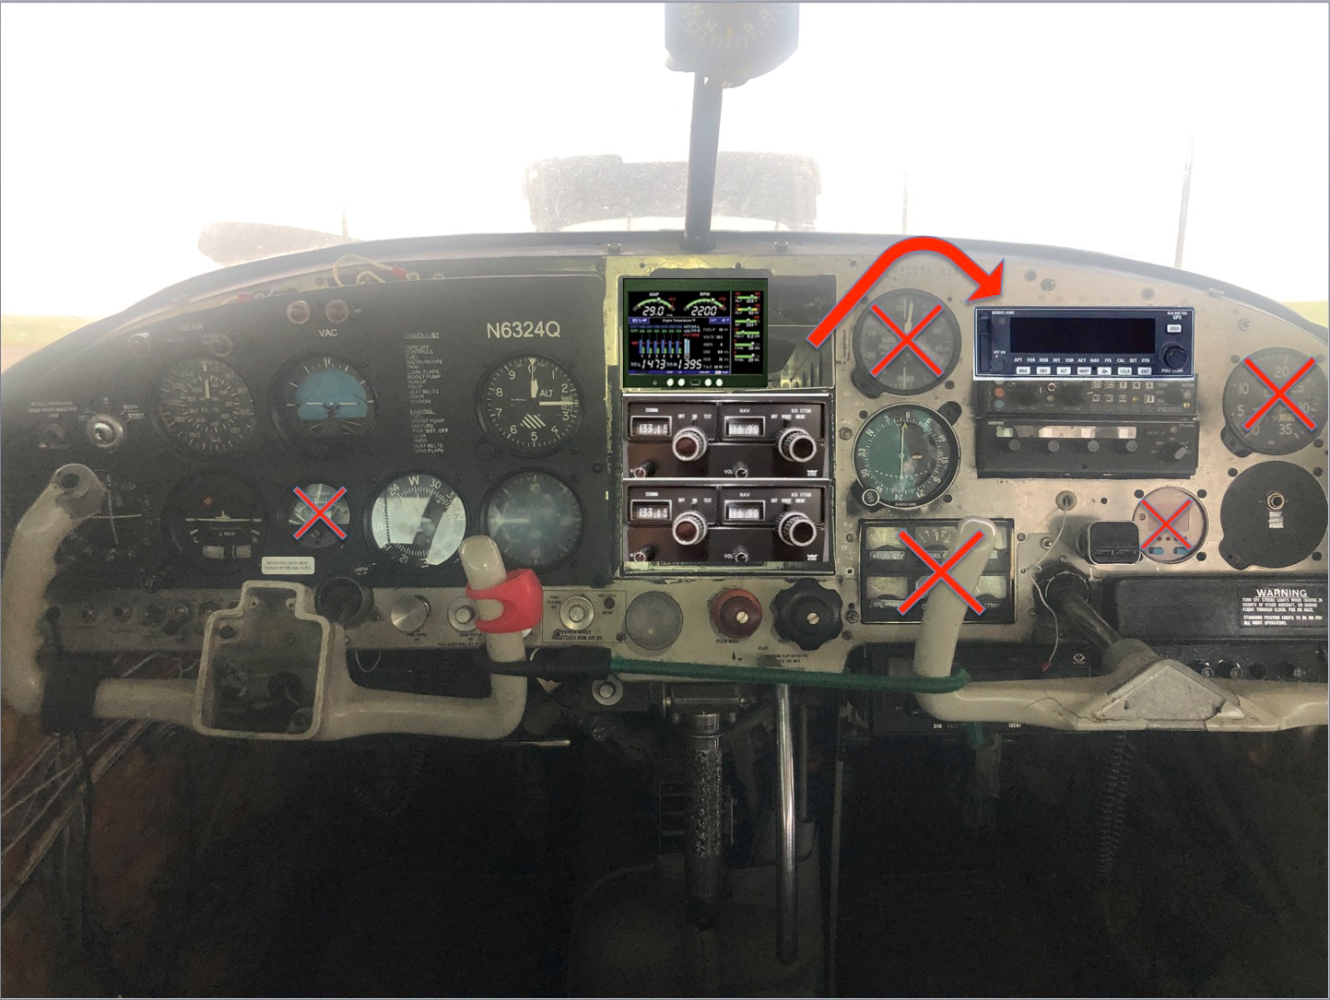
Hello, esteemed board. I want to run my planned set up by you. I finally decided to buy JPI900 and now planning future layout of my 67F. Some of the major items: 1. Moving the KLN89 to the right to join the PS audio panel 2. Installing 900 in place of KLN89. 3. Removing 1-cyl EGT gauge above yoke. 4. Removing the MP/Fuel pressure gauge. 5. Removing engine cluster 6. Removing the RPM tach. 7. Removing the JPI 450 Fuel flow What are your thoughts about this plan?
-
Is this Sigma-Tek p/n 22-1280-4? My non-working one is p/n 22-1280-4 on my 67F. I dont know if there is a difference?
