Mooney-Shiner
-
Posts
299 -
Joined
-
Last visited
Content Type
Profiles
Forums
Blogs
Gallery
Downloads
Events
Store
Everything posted by Mooney-Shiner
-

Vacuum equipment and Edo Aire DG
Mooney-Shiner replied to FlyingDude's topic in Avionics / Parts Classifieds
Do you still have any of these? -
Thank you for this heads up. The vac gauge makes better sense. Was it difficult to find the gauge?
-
I'm considering it, but I'm on my first 50 hrs of the aircraft ownership and still working on my PPL. Once I will check the PPL of my list, the panel re-do is somewhere there as well...right after the engine monitor. Unless the MOH Force majeure will pop out its ugly head.
-
I will check, but best of my knowledge, those light only turn on whenever I push on them
-
Thank you. The VAC lights pass the push test with master on. They never went off. how to isolate the problem between regulator valve and the pump? Or just shot the plane with parts cannon and buy both?
-
I looked around and it doesn't look like I have a standby system. Just Rapco vacuum pump, and 133A4 vacuum regulator.
-
Parting out a 63 C model...
Mooney-Shiner replied to Alan Fox's topic in Avionics / Parts Classifieds
How about one of those ancient Rheostat for Right Dome Light? Mine is getting hot and kicks the breaker. Any King 170s radio? Any boots for aileron servo for old Brittain system? Outboard RH fuel sender for fuel tanks level. -
Yeah, I saw your comment on the previous threads about your 275 experience. Double Garmin failure?! Jeez... What do you think about redundant electronic AHRS system? I don't have ADSB-in, and was looking at Stratus 3, which has a built-in AHRS.
-
Thank you, ShuRugal! Looking through the records, it appears that it hasn't been changed since 2013. I removed it and will replace. Fingers crossed that its the culprit. I would like to get 50-100 hrs from this plane before I will decide to start avionics conversions, although I do see the point of losing the vacuum system.

-
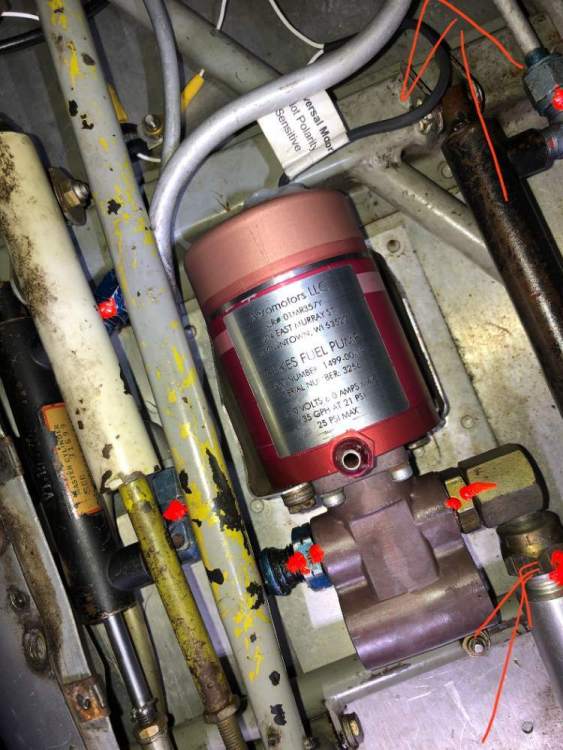
I remember us disconnecting fuel lines in the area marked with crude arrows to drop the whole assembly out. Ended up pulling the curbed aluminum fuel line, along with the pump. Pro tip: video record the initial set up, so you can put everything back together the same way. Particularly, note the locations of the electric connections. You might have to drop the control rod (depicted on the left the pump). You will need a thin 1-1/4" wrench to tie the bronze safety nut depicted on the right of pump (between the pump and the pivoting bronze elbow) whenever you will finish the reinstall.
- 1 reply
-
- 1
-

-
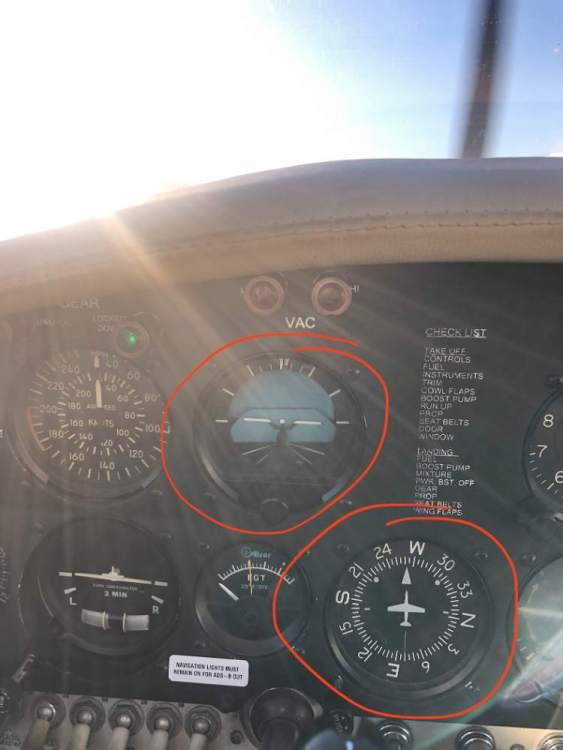
Hello, Esteemed board. I really appreciate the continuous stream of valuable opinions of MS as we are working on repairing our aircraft to get it to the tip-top shape. New chapter in our (my A&P and my) journey is fault with the AI and DG that all of the sudden starting acting up. My CFI and I were doing some pattern work, when we noticed that the DG is doing a continuous spin and the AI card had sagged and didn't show any accurate readings. Neither Low nor High Vacuum light was lit though. We played it safe and landed back to the field. I did some taxiing around the airport and noticed that DG no longer responded to any changes in plane's orientation and AI continued to sag. Now my A&P and I are trying to figure our what could this be. From reading past threads, it seems that we should get a vacuum gage and check the "plumbing" for vacuum at various points to id a potential break in the line. Are there any other troubleshooting suggestions? Note: I recently had avionics shop do a VFR check on my transponder, so they may have interfered with something.
-
Mixture Rich or Best for ground ops
Mooney-Shiner replied to Mooney-Shiner's topic in Vintage Mooneys (pre-J models)
Nice summary of PP thoughts only, A. I totally forgot that I have JPI450 fuel flow scan. I wonder what GPH should I look for for my IO360A1A at taxi, runup, take off? Happy Thx-giving! -
Mixture Rich or Best for ground ops
Mooney-Shiner replied to Mooney-Shiner's topic in Vintage Mooneys (pre-J models)
Thank you, PT20J. This is an excellent explanation. I began wondering why would Lycoming built their IO-360 so inefficiently...Now I know that they built IO-360 with totally different fuel in mind. In totally unrelated note, makes me wonder if this means that low compression IO-360s are prime candidate for a regular car gas STC or just blanket use approval since they would be right at home with lower octane number of car or marine gas. Happy Thx-giving! -
Mixture Rich or Best for ground ops
Mooney-Shiner replied to Mooney-Shiner's topic in Vintage Mooneys (pre-J models)
This is an interesting note... How an excess air in the fuel system causes overly rich solution and flooding my bottom spark plugs with fuel causing a misfire? -
Mixture Rich or Best for ground ops
Mooney-Shiner replied to Mooney-Shiner's topic in Vintage Mooneys (pre-J models)
You are not wrong. I'm Ukrainian-American, who lived in US for 22 years and serve in USMC. When I set up my account I mistook the user name for the email (I'm not good in the computer things). Of course this is an email that I used back when I was 17 back in late 90-s (jeez!), and now using it for all unofficial business. All the Ukrainian tail numbers start with UR-. -
Mixture Rich or Best for ground ops
Mooney-Shiner replied to Mooney-Shiner's topic in Vintage Mooneys (pre-J models)
I know...Tough to believe but the original 1967 POH actually says that. I'm in the good, ol' home of the brave. I had something similar happening today again but without boost pump. I guess I should have leaned even more aggressively on the taxi and run-up with a mixture right above roughness as knowledgable folks suggest above. Thank you for such awesome recommendations, guys.
-
Mixture Rich or Best for ground ops
Mooney-Shiner replied to Mooney-Shiner's topic in Vintage Mooneys (pre-J models)
Thanks, guys. Great knowledge Sent from my iPhone using Tapatalk -
Ever since my first post in this great community, one of the first things said to me was to lean the engine ruthlessly on the ground. It made all kinds of sense since I have fouled my spark plugs quite few times before. Still it was a deviation from the original 1967 POH that directs to keep the mixture “full rich” for ground ops for engine cooling. It also directs to have mixture full rich in addition to boost pump on for RUNUP checks. On the runup the other day, I went mixture full rich with the boost pump on (as per original POH) and instantly flooded the right bottom plugs and caused significant RPM drop during the right mag only check. I pulled the bottom two plugs and witnessed them soaked with fuel. I cleaned, dried and re-installed them. As an experiment for the next runup, the mixture was full rich but left the boost pump off. The engine was performing great with both mags firing within specified parameters. Of course, for take off I used the mixture full rich with the boost pump on and had no issues. I know there are different schools of thought on the mixture leaning ritual in this great community. So I would like to see what should be an optimal mixture/boost pump settings for the runup for IO360 equipped Pre-Js? Thank you, crew!
-
Fuel weep inside of cabin from the right wing
Mooney-Shiner replied to larrynimmo's topic in Modern Mooney Discussion
Don't forget to get 2535 bushings from Lasar, you will need them for the senders' install. -
Surface sheet corrosion treatment
Mooney-Shiner replied to Mooney-Shiner's topic in General Mooney Talk
Doc, thank you for the advise. Do you use scotch brite pads for the dremmel? I don't think I will be able to pop the blistered paint with square pad alone. Any recommendations for the epoxy primer? How do you get touch up paint? Should I have PPG blend the car paint for me? Thank you! -
Surface sheet corrosion treatment
Mooney-Shiner replied to Mooney-Shiner's topic in General Mooney Talk
I like the spot blaster idea! What media did you use? Walnut, Sand or grass bead? -
Surface sheet corrosion treatment
Mooney-Shiner replied to Mooney-Shiner's topic in General Mooney Talk
It is VERY localized areas. Cumulatively , it is Less than 0.05% of aircraft , if that Sent from my iPhone using Tapatalk -
Surface sheet corrosion treatment
Mooney-Shiner replied to Mooney-Shiner's topic in General Mooney Talk
The paint mostly blistering. Sorry for misnom. I meant to say “outside skins” Sent from my iPhone using Tapatalk -
Hello, the highly esteemed forum! I moved my aircraft from Tennessee down to Florida, and the year later comes out the surface corrosion on the top sheets! The price of being in Florida.. How do I treat and prime the fact that the areas? I did the search for corrosion but all I could find was the corrosion X treatment for the insides. Already completed that procedure. I heard something about etching on the bare metal and zinccromate. Can somebody point a newbie in the right way? Much respect to everyone! Sent from my iPhone using Tapatalk
-
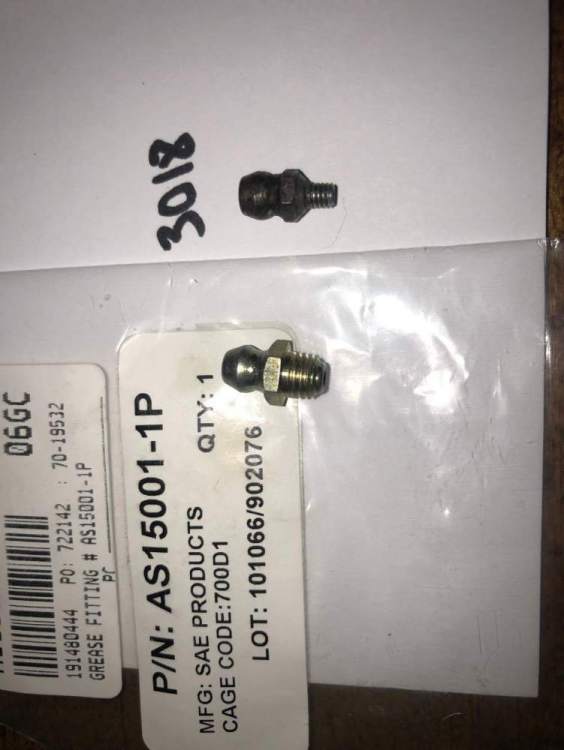
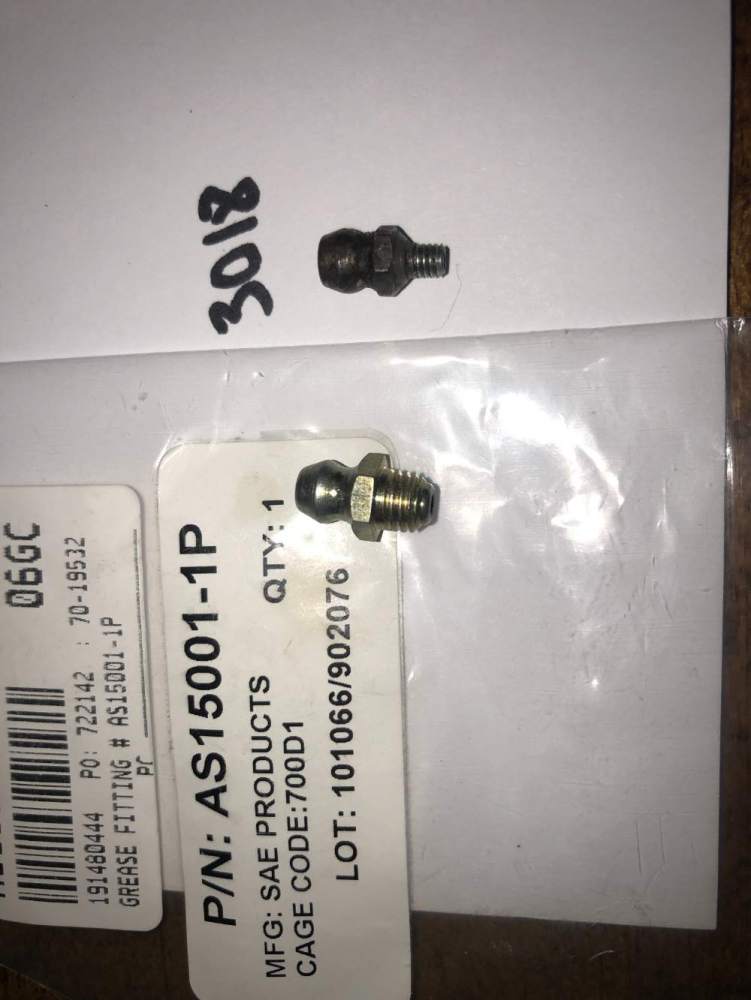
To further highlight the difference between the standard Zerk MS15001-1 grease fitting (majority of the grease fittings on the Mooney) AND "3018" fitting on the FWD and AFT swinging points on the main gear see the attached photo. I just ordered mine from Lock and Lube (see ALEMITE 3018 GREASE FITTING - 6-40 UNF-2A THREADS): https://locknlube.com/products/alemite-3018-grease-fitting-6-40-unf-2a-threads?_pos=1&_sid=b15bed1d7&_ss=r Now I need to figure out how to extract the broken threaded neck of the old 3018 fitting from the FWD swinging point on my 20F. I ordered the micro extractor set on Amazon: https://www.amazon.com/gp/product/B08HRWGTN4/ref=ppx_yo_dt_b_asin_title_o00_s00?ie=UTF8&psc=1 Fingers crossed, I can back the old broken neck out and install the new shinny 3018 in place.