

Mooney-Shiner
-
Posts
299 -
Joined
-
Last visited
Content Type
Profiles
Forums
Blogs
Gallery
Downloads
Events
Store
Everything posted by Mooney-Shiner
-

Wire routing and securing wire inside the wing
Mooney-Shiner replied to Mooney-Shiner's topic in General Mooney Talk
I can. Good idea. BUT I still have to pull the wire another 20" rear of the leading edge wire bundle. So how do I secure it? -
Wire routing and securing wire inside the wing
Mooney-Shiner replied to Mooney-Shiner's topic in General Mooney Talk
I was trying to run the wire on the left wing. My main wire bundle is ran thru the leading edge rib holes. The holes are grommeted, but the bundle is laying on the bottom on the skins between the holes. So I'm trying to prevent the damage to wiring from the vibration -
Wire routing and securing wire inside the wing
Mooney-Shiner replied to Mooney-Shiner's topic in General Mooney Talk
Thank you. This is the size of the wire in question. iPhone for the scale. I guess, I can wrap it with the heat shrink tubbing with spiral wrap and let it lay on the bottom of the skin of the wing to let the wrapping serve as a sacrificial material. I just would rather have a cleaner install where nothing has to be sacrificed.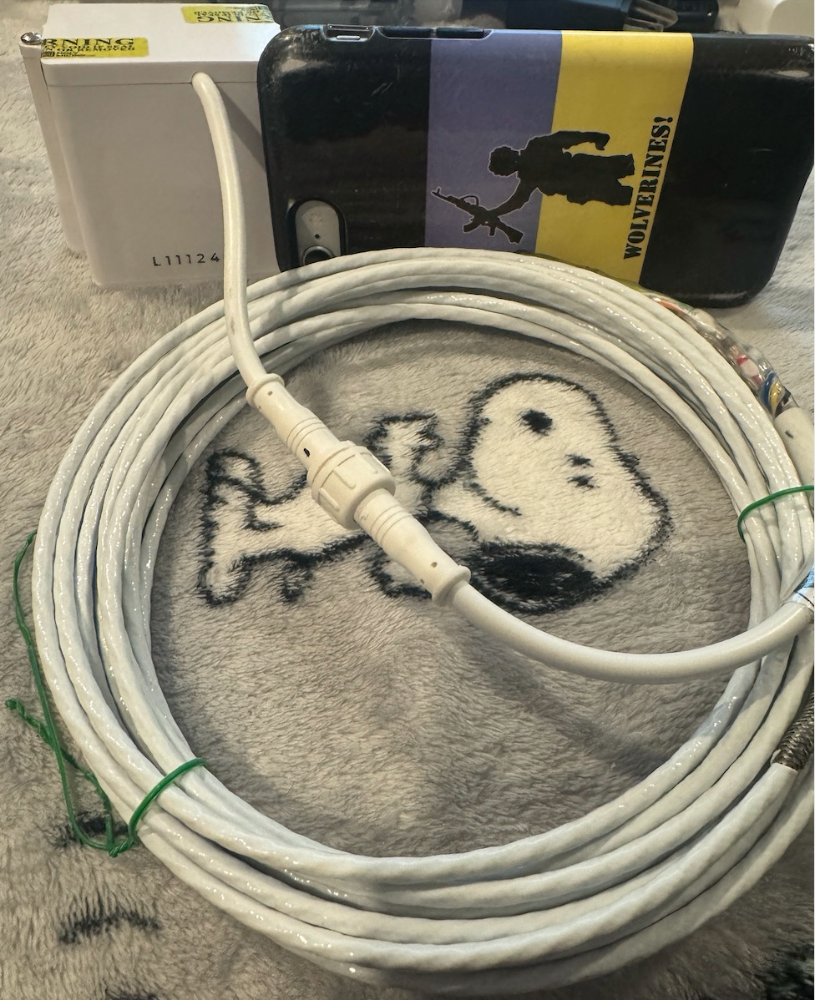
-
Wire routing and securing wire inside the wing
Mooney-Shiner replied to Mooney-Shiner's topic in General Mooney Talk
My new landing assist system is using thick shielded 4 wire, there is no way that it will get into that leading edge bulkhead hole. Plus I have to bring this wire back from the leading edge to just forward of spar to install the LIDAR sensor. -
Wire routing and securing wire inside the wing
Mooney-Shiner replied to Mooney-Shiner's topic in General Mooney Talk
The nav/strobe/pitot heat are ran in the really small bulkhead holes all the way at the leading edge and there isn't much room to run another wire. -
Hello, folks. How do you secure the wire that you are running thru the wing to your cockpit? How do you make sure that this wire will not lay on the inside of the wing and rubs against it? Its seems that there would be a good visual illustration in AC43.13, but no avail. Best I found on the web is this picture, but there is no explanation of the part number for the angle bracket. Also, I'm not sure if I would like to drill holes in my wing bulkheads. I know that I needs to install the caterpillar grommets on the bulkhead walls, but what to do between bulkheads? Thank you!

-
Same thing. Holy is splices to the Gear Down light wire. Also you can tune as to what kind of announcements you are getting and when (go around, climb out).
- 6 replies
-
- 1
-

-
- landing gear warning
- mooney aircraft
- (and 2 more)
-
This one worked on my 67F just fine. I just had to rivet the steel doubler plate behind the door skin because the original aluminum door hole allowed the lock to spin. https://www.lowes.com/pd/Gatehouse-7-8-in-Chrome-Die-Cast-Drawer-and-Cabinet-Lock/3407884
-
Flaps hardware (bolts, nuts, washers)
Mooney-Shiner replied to Mooney-Shiner's topic in Vintage Mooneys (pre-J models)
Excellent! Thank you. I will inspect my upstop bolt. So I'm assuming since Mooney looks down upon using the stainless steel upstop bolt to prevent galvanic corrosion with aluminum hinge, same applies to other flap hinge hardware. I guess I will go with cad-plated hardware. -
Flaps hardware (bolts, nuts, washers)
Mooney-Shiner posted a topic in Vintage Mooneys (pre-J models)
Hello, guys! My 20F lives in the coastal Florida and I noticed that flap hardware is getting rusty. So I decided to shop for the replacement. My IPC calls for AN3-10A bolt, AN365-1032 nut and AN960-10L/10 washers. I'm wondering what are the thoughts on using stainless steel hardware versions that is also available on Aircraft Spruce to get longer life without rusting? https://www.aircraftspruce.com/catalog/pnpages/AN3C-10A.php https://www.aircraftspruce.com/catalog/hapages/an365_2.php?clickkey=12674 -
Yes, it is worn out. So I riveted a steel backing plate to prevent the spinning
-
I just bought this kit on the Sun'n'Fun. I love the concept and will do a report on the install.
-
Read my pirep on Black Max. Bottom line: build your own in a fraction of time /cost
-
Rich, I can see that you are never taking an easy road out
-
Yes, I agree with you. Ben is helpful. However, the system is simply unreliable. It was disheartening to see my inside engine humidity reading at 60% after months of Black Max working. I ended up building a simple desiccant system and getting instant results. Now I need to figure out what to do with two of my Black Max systems in my garage.
-
Solar-driven engine dehumidifier/dryer
Mooney-Shiner replied to Mooney-Shiner's topic in General Mooney Talk
I used an old pelican case to protect it from weather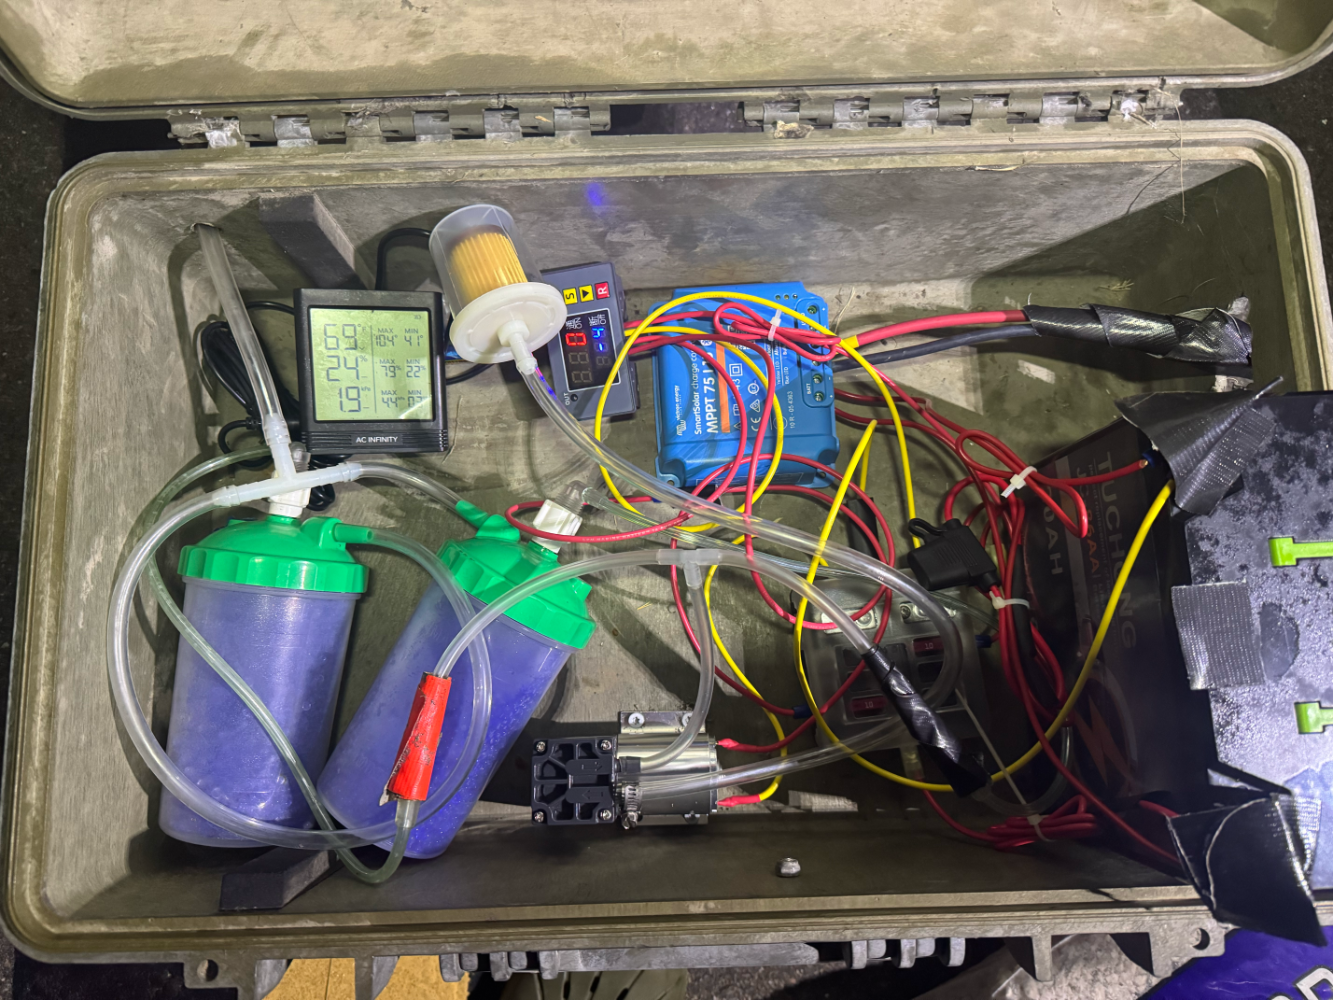
-
Solar-driven engine dehumidifier/dryer
Mooney-Shiner replied to Mooney-Shiner's topic in General Mooney Talk
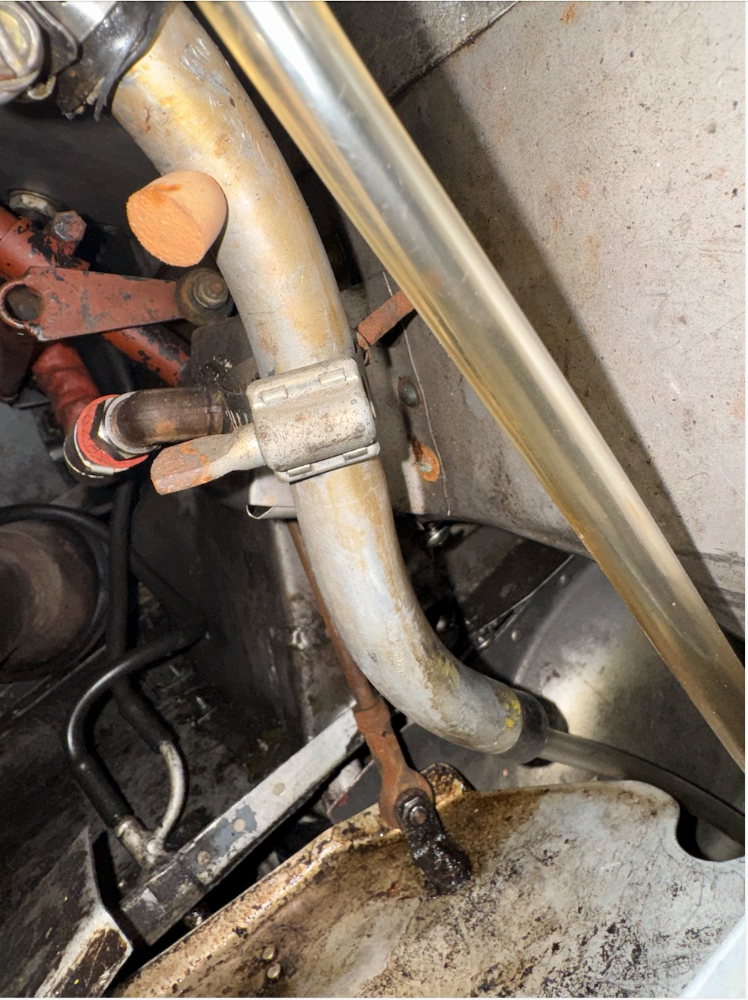
I bought the BlackMax before going on deployment in 2023. Installed the the output into the oil drip stick tube, the humidity reader installed in the breather fitting at the top of the engine (Lyc IO-360). Came back after 7 months to see 60% humidity reading. The device didn't function right due to dead cooling fan. Sent it back to manufacturer in November. The fan had quit and allowed the block to overheat. Manufacturer replaced the thermal element, temp ic and heatsink/fan assy. Received it back and checked the proper flow level according to the manufacturer. The standard is air bubbles forming a "string of pearls" at the 3" depth of 2L water bottle. I was still getting between 50%-60% humidity. In December, I sent it back again to Ohio, but it passed the manufacturer test and maintained sub-20% humidity on their test bench. I installed it back, but still was getting 60% RH in the crankcase. I decided that the culprit is my engine. So I pressurized crankcase with the mattress pump and used soapy water to find any significant leak areas on my IO-360, but none were found. So I figured that the flow was not enough to keep up with humidity inside of my IO-360. I opened the Black Max and increased to max flow on the aquarium pump-looking pump. The RH was finally at 20-30%. A week later I discovered that the pump had quit and no longer pushed the air in my crankcase. I showed it to manufacturer and received the replacement BlackMax (still in the box). Overall, the manufacturer was pretty responsive, but I just don't have any confidence in the Black Max technology. I decided to do an experiment. I took the 27 gal plastic tote. Ran the drying line from BlackMax inside there and installed the probe from the humidity reader. After 24 hours of operation, the humidity was at 60%. In despair, I installed basic make shift desiccant bead dryer (much simpler than one in my original post). To my surprise, within 15 minutes the humidity inside the tote became 15%. Honestly, best you can do is build your own engine dryer where everything is clear and simple. I'm now getting 10-24% humidity in the crankcase. How is that for 10 seconds? -
Solar-driven engine dehumidifier/dryer
Mooney-Shiner replied to Mooney-Shiner's topic in General Mooney Talk
Hopefully, entire engine is the path. But I'm thinking the dry air enters at the oil level (low) and then eventually exits thru the high point of engine breather. Hopefully, the dry air circulates all of the nukes and crannies (maybe even packing thru piston ring gaps?) -
Solar-driven engine dehumidifier/dryer
Mooney-Shiner replied to Mooney-Shiner's topic in General Mooney Talk
Great work on the cost saving with using simple/surplus components! I frankly surprised that more people don't use/build these systems. This kind of threads never get any significant interest. -
Solar-driven engine dehumidifier/dryer
Mooney-Shiner replied to Mooney-Shiner's topic in General Mooney Talk
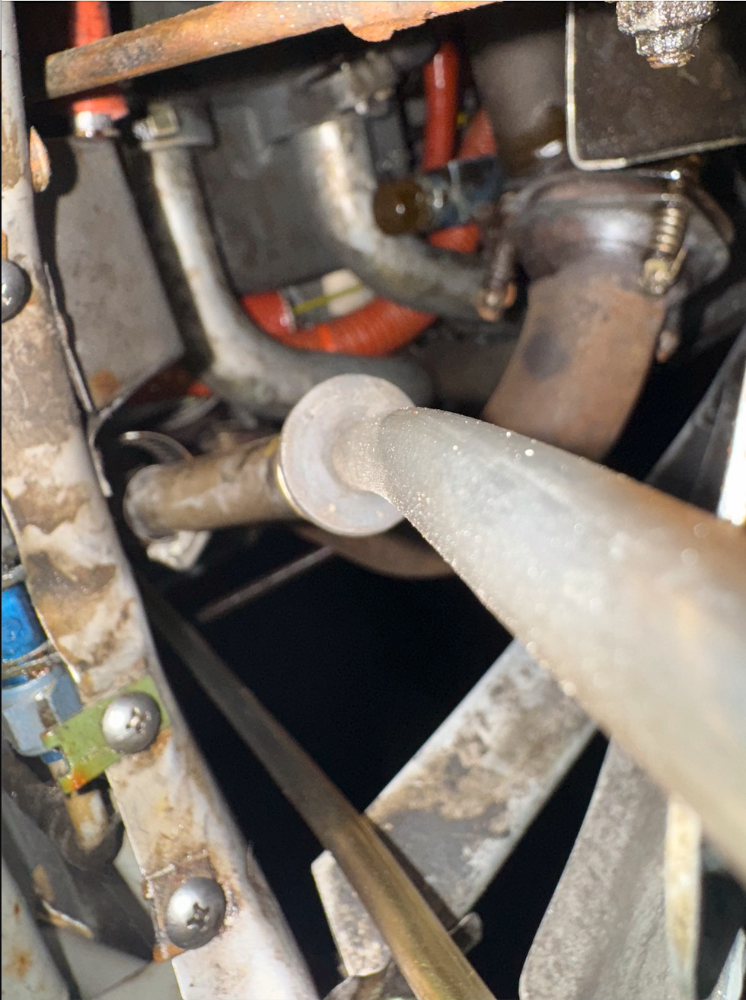
Here is how everything plugs to my engine.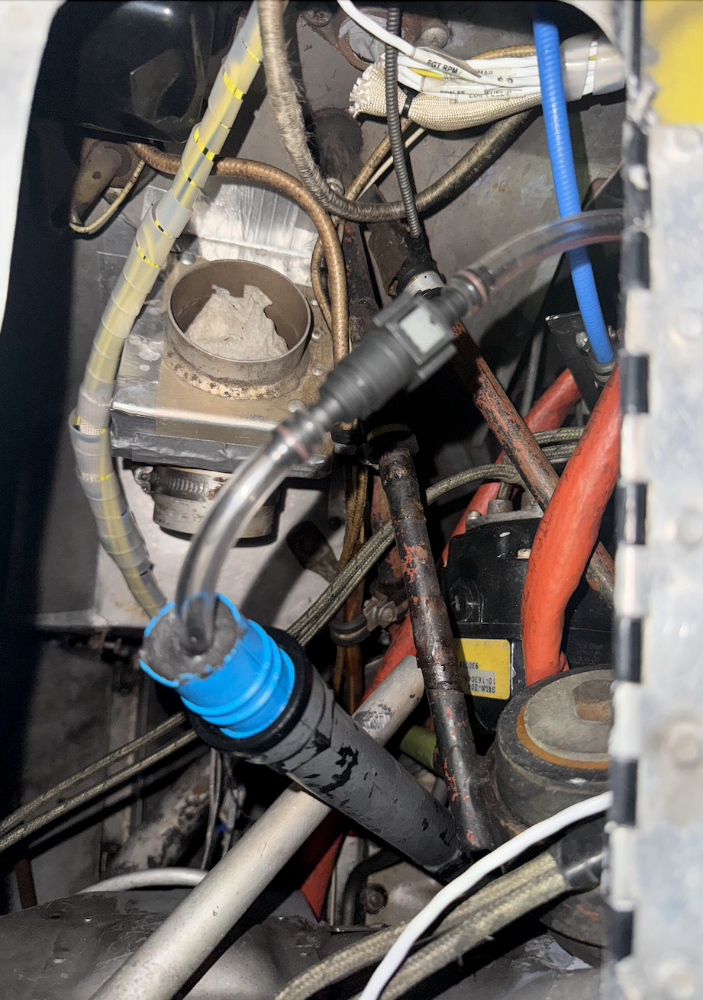
-
Solar-driven engine dehumidifier/dryer
Mooney-Shiner replied to Mooney-Shiner's topic in General Mooney Talk
I used the plug similar to this (I don't remember exact diameter). I drilled the hole in it, and pushed in the tubbing thru it. I plugged the breather tubbing in the lower cowling. I used the earplug to seal the backup hole. I will take the photo next time I visit the plane. https://www.lowes.com/pd/Hillman-0-8125-in-Black-Neoprene-Hole-Plug/3013260 -
Sun n' Fun - Are there good deals?
Mooney-Shiner replied to DC_Brasil's topic in General Mooney Talk
Depends. I saved couple of hundred on JPI900 at SNF -
I know that OP already solved this issue, but for sake of posterity: I used black iron pipe 3/4x18" to lift by the truss. I've never seen it flex. https://www.lowes.com/pd/Southland-Pipe-3-4-in-x-1-1-2-ft-150-PSI-Black-Iron-Pipe/1000227953
-
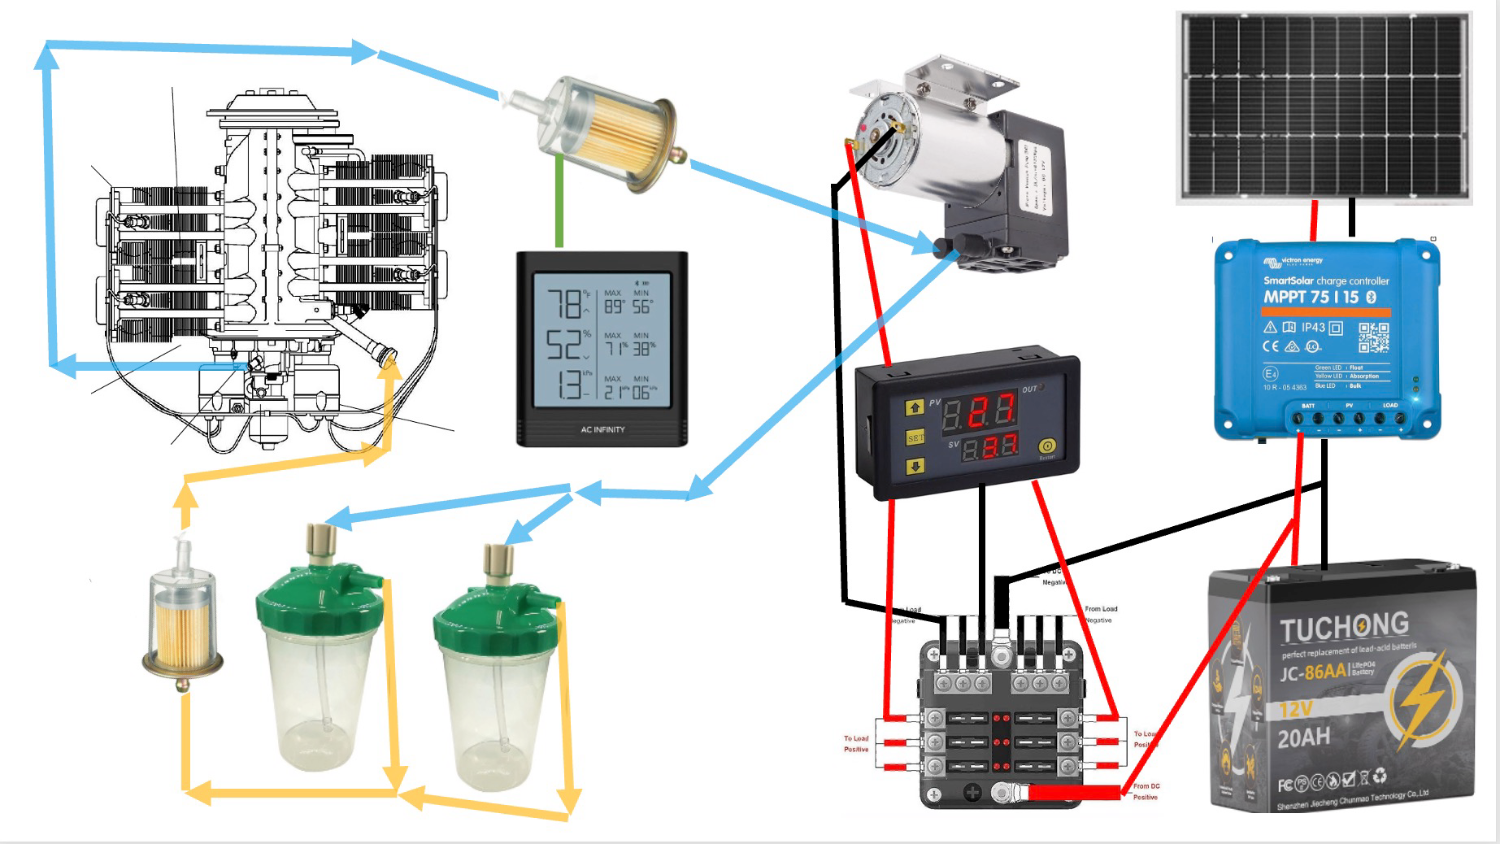
Hey, crew! I finally got a minute to post my PIREP of home-made dehumidifier/dryer system for my IO360. I designed my system to run 15 minutes, shut down for 45 minutes. I found this to be a good work ratio to keep my crankcase dry (25 % relative humidity) here in South Florida. Also I installed the humidity meter probe(green line) in the return moist air line (marked blue line on the sketch). The dry air (orange line) gets pumped thru the oil stick tube, the return moist air (blue line) come back through the engine breather line. List of materials: Fuse box https://www.amazon.com/dp/B08XWQHMZJ?ref=ppx_yo2ov_dt_b_fed_asin_title&th=1 Solar Controller https://www.amazon.com/dp/B075NQQRPD?ref=ppx_yo2ov_dt_b_fed_asin_title Motor https://www.amazon.com/dp/B0D98KH74P?ref=ppx_yo2ov_dt_b_fed_asin_title Humidity meter https://www.amazon.com/dp/B09V1P9921?ref=ppx_yo2ov_dt_b_fed_asin_title&th=1 Bottles https://www.amazon.com/dp/B09446XH8K?ref=ppx_yo2ov_dt_b_fed_asin_title LiFePO4 battery 20AH: https://www.amazon.com/dp/B0CKLQVGG1?ref_=ppx_hzsearch_conn_dt_b_fed_asin_title_10 Solar mounting rack: https://www.ebay.com/itm/126310204673 Solar panel 100W: https://www.ebay.com/itm/124397245729?var=425269527294 Desiccant: https://www.amazon.com/dp/B09TX3DNY5?ref_=ppx_hzsearch_conn_dt_b_fed_asin_title_1&th=1 I hope this helps our community to stay away from those expensive SMOH because of the corrosion damage. Sorry for non-doctrinal schematic, I wanted to make something quick. Please let me know if you have any suggestions, I'm always looking to improve this system. At some point I will also wrote my PIREP on the BlackMax saga which didn't work for me that well.
-
Torn Brittain servo boot
Mooney-Shiner replied to M20E for me's topic in Vintage Mooneys (pre-J models)
I would be interested in several if we are doing this buy again

