MikeOH
-
Posts
5,464 -
Joined
-
Last visited
-
Days Won
34
Content Type
Profiles
Forums
Blogs
Gallery
Downloads
Events
Store
Everything posted by MikeOH
-
@N201MKTurbo I guess that makes sense. The contradiction is that I thought the check was to put the vernatherm in hot water and measure how much it expands. I didn't think it was all that much, hence my concern over the seat material being removed.
-
@Ragsf15e No panel behind the cooler. And, I checked the Mooney IPC and it's NOT required for my serial number F. Other models/SNs have it. Hmm, you might be onto something with the cylinder. I'm not sure but there is a color on #2 (the one that runs hot) that is different than the other three. I can't remember if it is green and the other 3 are blue, or the other way around! Sounds like I have a few things to look at when I go out to the hangar!
-
@N201MKTurbo True. But, should I try again after my A&P just did this? Also, I would think any resurfacing would remove material increasing the distance the vernatherm plunger needs to travel to form a proper seal. There must be some limit as to how much can be removed before that's an issue. Since I don't know the history I'm not sure if the seat has previously been resurfaced...perhaps multiple times?
-
@Chessieretriever My oil consumption is around 1 qt/8-10 hours, so I don't think it's blowby. But, I never thought about measuring crankcase pressure. Thank you for the suggestion!
-
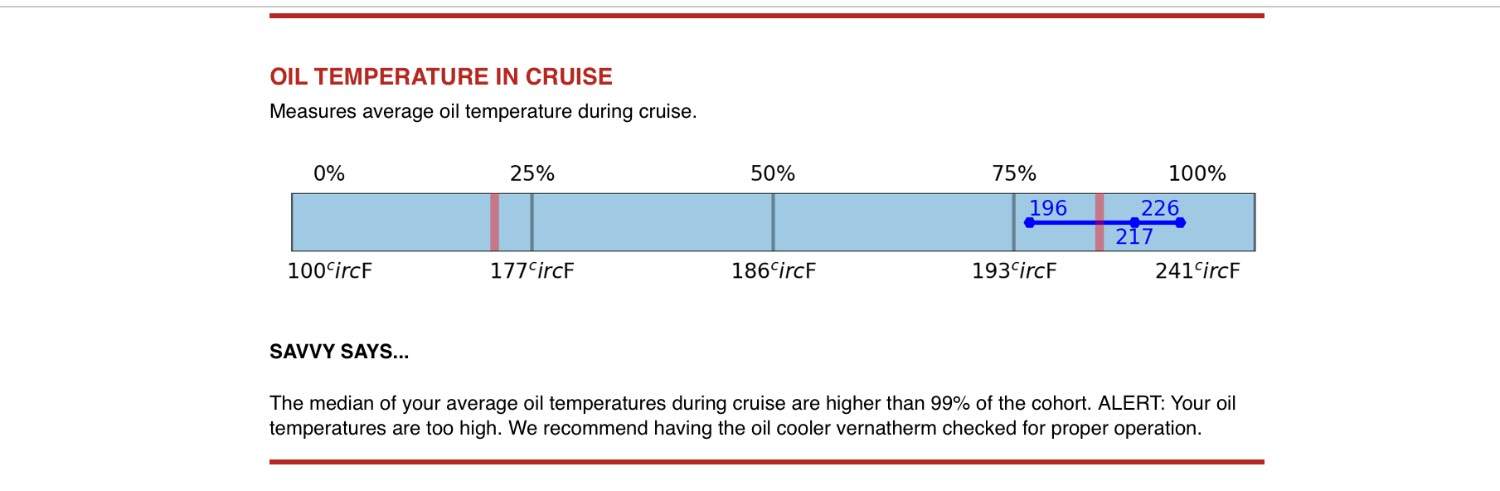
When summer is full on, it runs as high as 230! According to the Savvy cohort data (22,000 flights of 413 M20F/Js) my oil temp is higher than 99%!!!

-
@carusoam Good idea on the GoPro and tell-tales! I was trying to figure out how to determine airflow direction.
-
@Ragsf15e I was at 6500
-
@carusoam I think you've got it 180 off. When cold the valve is off the seat and oil bypasses the cooler. When warm the vernatherm expands and seals against the seat and the oil is forced to route through the cooler. If the seat leaks, then not all oil will go to the cooler. As mentioned in my previous posts, the cooler was overhauled by Pacific Oil Coolers...there was no improvement after OH, nor has it become worse. So, I really don't see how any tubes are blocked.
-
I've never been a fan of bleeding-edge products. I'll let someone else beta test something that my life may depend on, thank you very much.
-
@N201MKTurbo Interesting you bring up the seat....at annual, when I had the vernatherm replaced, my mechanic said the seat was a little rough and he 'cleaned it up'. Not sure how, and given the cost of the tool, I'm wondering if that's where the problem is! That is, maybe he didn't really correct the problem. If I want to replace the seat I need an entire new oil filter adaptor as the vernatherm threads into it, I believe.
-
@Ragsf15e Haven't really noticed a change with cowl flaps, but worth a deliberate test to quantify. Here's my CHTs, oil temp in cruise, and OAT (note close to 80 on the ground, only 63 in cruise):
-
@carusoam Thanks! I had not seen Paul's post. It wasn't clear whether the forward airflow was for all Mooney models, or just those with a dog house. I admit, it is pretty hard to fathom air flowing forward when the cooler is only inches from the back of prop!! If so, however, then perhaps my issue is NOT enough pressure in the lower plenum. As you say, either scenario may be due to poor seals. And, I've always fought high CHT on #2, as well.
-
@M20F No, separate probes; one factory, one for the G3. Perhaps, but the idea that if the pressure in the lower plenum is higher than it should be, it would reduce airflow through the cooler is logical. I'm running out of ideas, so I'm open to just about anything! I am going to check where the hoses attach to the accessory case; a little research has revealed that it's different for the O-360 vs the IO-360. Not sure the accessory case would allow it on my IO-360 but it's easy to check.
-
LOL! Yeah, that's when you know why no one in Arizona buys a car with a black interior Worst high-temp interior experience was years ago when I flew a rental Mooney down to Calexico for business (we had a plant in Mexicali) early in the morning (like 6 am) in the dead of summer. Well, it turns out that was one of the hottest days that summer, 120 in the shade...and I assure you the plane had NOT spent the day on the ramp in any shade! I don't know what the cockpit temp was, but the minute I crawled in I started sweating like I never had. Running into my eyes, dripping on my paper sectional in my lap (it was a long time ago!). I couldn't taxi fast enough and, I swear on all that is Holy, it has been the ONE and ONLY time I skipped a run-up. Gawd, I still remember just how miserable that was
-
@M20F Thanks. Stock cooler location. I suppose it could be the gauge, but I have two: the factory gauge and the G3 Insight. When the G3 is showing near 230, the factory gauge is close to red line. I also had the G3 probe relocated from the front of the engine (read 10 degrees hotter there!) to the same location as the factory gauge. It's really like the cooler just isn't cooling; that's why I want to look at inlet and outlet temps....my gut is telling me there is going to be way less than a 50 degree delta. A loss in delta P across the cooler, as @bfreelove mentioned, would be a very plausible explanation for cooler ineffectiveness.
-

What do you do when you leave your plane on the ramp?
MikeOH replied to Will.iam's topic in General Mooney Talk
My first question to the line guy, or the front desk staff, is, "Where can I park my plane so NOBODY moves it?". That's always worked for me. -
Not exactly tinting, but I have 'static cling' dark plastic sheets cut to fit the windows. When it's hot I just 'stick' 'em on.
-
@bfreelove Thank you! That is the kind of 'out of the box' thinking I was hoping for. I NEVER would have thought of that possibility.
-
Thanks for everyone’s input. Cooler/fins/airflow have been ruled out. Hoses we’re replaced. Vernatherm just replaced with brand new. Temp probe was relocated to factory gauge location. Engine monitor and factory gauge correlate; 220-230 on engine monitor shows a little under redline on factory gauge. Runs those temps in cruise in hot weather. Thanks to @A64Pilot for the delta T info! Is it possible to hook the hoses up incorrectly to the engine? I know there’s a bunch of possible fittings/plugs on the back of the engine.
-
I've fought high oil temps since I bought my F 5 years ago. Always runs at least 200, and more like 220-230 in the summer! As summer is approaching, I'm becoming motivated once again to find the cause. I have had the oil cooler overhauled by Pacific Oil Coolers, replaced the oil hoses to/from the cooler, and at this year's annual I had the vernatherm replaced...nothing has made a difference. I'm beginning to wonder if there is even flow through the cooler, so I'm about to instrument the inlet and outlet fittings with thermocouples. So, my question is how much delta-T should I observe between the oil going in and oil going out?
-
What do you do when you leave your plane on the ramp?
MikeOH replied to Will.iam's topic in General Mooney Talk
Very sorry to hear this. I've been in the lock and cover camp, but I may not have learned my lesson about locking....many years ago (1988) we had a convertible RX-7 and ALWAYS locked it...we woke up one morning to a slit top and missing radio. The radio was cheap compared to the cost of replacing that top!! -
I've been happy with the pink Wash-Wax-All, but I think @KB4 is correct: avoiding scratches is more about technique.
-
I was seconds too late
-
The MAPA site shows April 29 to May 1. Has it been changed to April 22?
-
Unless it’s a true cold start(like 5 hours) I use the Don Maxwell hot start procedure: leave the throttle where it was at shutdown (around 1000rpm) , mixture at ICO, crank and slowly advance mixture. I also find opening the oil door is a great way to vent heat if I’m only gone for an hour, or so .