

Vance Harral
-
Posts
1,403 -
Joined
-
Last visited
-
Days Won
2
Content Type
Profiles
Forums
Blogs
Gallery
Downloads
Media Demo
Events
Everything posted by Vance Harral
-

M20F fuel quantity indication adjustment
Vance Harral replied to Sean S's topic in Vintage Mooneys (pre-J models)
Completely incorrect, please stop propagating this old wives' tale. The certification standards require fuel gauges to be accurate throughout the complete range of the indicator. The myth comes from a misunderstanding of the sub-part dealing with usable vs. unusable fuel. I don't mean to be a jerk about it, but propagation of this OWT is a substantial reason fuel gauges get signed off when they're actually unairworthy. This just further propagates the myth they're less reliable or less important than other critical indicators. I'm sure this drives the professionals absolutely nuts. The OEM fuel gauges in your Mooney and other GA aircraft are designed to be reasonably accurate throughout their range. They need to be, because gauges are the only mechanism that will detect a developing, in-flight fuel system leak. Totalizers and timers are of course excellent safety guards against fuel starvation, but they're meant to supplement the gauges, not replace them. If your gauges are inaccurate, your aircraft isn't in compliance with its type certificate, and it needs maintenance. Kudos to the OP for wanting his fuel gauges to be accurate, and to businesses like CIES for providing technology that improves accuracy and reliability. -
I'm aware they're not the cheapest in town by any stretch. But as far as I know they're the only shop in Colorado that both knows what's involved in patching a wet wing, and are willing and able to do so (at least as of a few years ago). The other options seem to be to fly out of state, or take your chances with a mechanic that lacks the experience to know that "Nah, too much trouble" is a pretty defensible response. Frankly, when you're staring at something in the neighborhood of $10,000 including travel expenses to get a full strip-and-reseal, anything seems cheap.
-
CaptG, are you flying out of KAPA? Arapahoe Aero (http://www.arapahoeaero.com/) is right there on the field. They've done a couple of fuel tank patches for us over the last 13 years. Relatively inexpensive and the patch work has held up well. Patch work isn't a cure-all, and some people say it's only delaying the inevitable full strip/reseal. We've been happy with our decision to have patches done, though, as the tab was under $1000 each time. That's pretty cheap compared to quotes I've seen from name-brand shops that are north of $8000, not including travel expenses. On the other hand, while the patches from Arapahoe Aero are holding up well, we have new seeps on both sides from other areas Arapahoe Aero hasn't (yet) touched. We've been mulling over another patch vs. a full strip and reseal for over a year. In the mean time, we're simply living with it. Both the Mooney service manual and AC43-13 have specific sections on the airworthiness of fuel leaks. They allow for a certain leak rate, you don't have to be 100% leak-free to be airworthy.
-
No integrated audio panel, but it does have a feature that allows you to monitor audio on the standby frequency. This is almost like having an additional listen-only COM radio. I use the feature to start monitoring tower/CTAF early when I'm still talking to approach, or to monitor radio traffic when I'm halfway between two closely-spaced airports.
-
New (lady) member - Considering an M20G
Vance Harral replied to Sophie's topic in Vintage Mooneys (pre-J models)
I'm not sure I'd agree with the sentiment gear disks aren't terribly expensive. Present-day pricing is about $115 each, and you need 4 on each main and 3 on the nose. That's a $1265 hit if you do them all, and that doesn't include labor. We just re-did the main gear pucks on our airplane, and the job actually cost more than our last fuel tank patch, which was more than 5 years ago. I've also noticed the cost of the disks seems to rise at about double the inflation rate. This is the second round of disks for us. The first round was about 10 years ago and the disks were only about $85 apiece back then. The price seems to go up about $5/disk every year. -
New (lady) member - Considering an M20G
Vance Harral replied to Sophie's topic in Vintage Mooneys (pre-J models)
If you're serious about having a partner, recommend you find the partner first and buy the aircraft together, vs. the other way around. In addition to having more resources with which to purchase, there are other compelling reasons. First, the process of choosing a specific aircraft, traveling to see it, inspecting it, agreeing on a price, and deciding how much to immediately invest in upgrades upon purchase, touches all the stress points that tend to make partnerships go bad. If you make it through that process with another person, odds are good you've found a compatible partner. If the relationship goes south while you're looking, you can bail out before anyone invests equity that must be reconciled in a possibly adversarial manner. Second, partnerships work best when all partners feel equally attached to and emotionally invested in the aircraft. The danger in acquiring the aircraft yourself first and finding a partner afterward, is that you'll think of the airplane as "your" baby, that you're merely letting someone else "borrow". That's not healthy for the partnership. I appreciate that you may just want to do one thing at a time, and you're excited about buying an airplane so you want to do that first. Not suggesting any malicious intent. But as a person who has participated in aircraft partnerships, a partnership ad from a person who acquired the aircraft less than a year ago is a bit of a red flag. It gives off a vibe like, "Now that I've chosen the airplane, the tie-down/hangar spot, the upgrades, gotten used to it, and decided exactly how I think it should be operated, wouldn't you like to come share half the cost?" Whether you feel that sentiment yourself or not, it does exist in the community. Therefore, buying first reduces the pool of partners who might be interested. Just my $0.02 on partnerships. Whether you go that route or not, I'm excited for you - enjoy the search! -
how do you remove the overhead vent knobs?
Vance Harral replied to rbridges's topic in Vintage Mooneys (pre-J models)
Thanks. I've looked at their online catalog and did not see them, but I've never actually contacted them to ask directly. Sounds like they do stock them. -
how do you remove the overhead vent knobs?
Vance Harral replied to rbridges's topic in Vintage Mooneys (pre-J models)
While we're on the subject, does anyone have a source for these vents? I removed and patched cracks in ours a few years ago, but they've developed new cracks. And one of them was smashed to smithereens by an errant headset removal. I'd actually like to replace them with something other than plastic, but barring that, I'd take salvage, new stock, or maybe even an owner-produced 3D printed part (anyone have a shapeways link?) -
Remove Brittain heading coupler
Vance Harral replied to TheTurtle's topic in Vintage Mooneys (pre-J models)
You understand the manual correctly, assuming it works like our B5. The CAPTURE setting sets up a 45 degree intercept to a radial you're not yet on. When the VOR or localizer needle comes alive, the unit will turn on to the radial as the needle centers up. Once that's complete, you switch from CAPTURE to TRACK (for enroute navigation) or APP (for an approach). The difference between CAPTURE and APP is different multipliers in the controller circuit. "Aggressiveness", if you will. I expect the APP setting on our B5 and the LOC setting on your unit behave the same way. Regarding altitude hold, what moves the elevator is a pair of vacuum servos attached to the elevator push rod. The "pitch trim" indicator that goes in the cutout indicates how much vacuum is being pulled in one direction or the other. The idea is that if the indicator is consistently on one side or the other of center, you can roll in/out a little elevator trim to help the autopilot. Attached is a picture of our B5, with the pitch trim indicator.
-
I don't have a photo handy, but for what it's worth, our gear have roughly zero clearance there (can see a bit of the paint rubbed off). I've wondered about this too.
-
Just to follow up... when it was time to reinstall the fuel selector, the A&P offered to do it, and I said "be my guest". He didn't drain the tanks, but opted for the quick-draw routine instead. I made sure the airframe was grounded and stood by with a fire extinguisher. I respect the opinion of those who think this is excessive risk, each owner and mechanic must make their own decision. For others reading the thread... the thing that makes this a bear in a Mooney is that the fuel selector is in tight quarters. The nearby structures, the plugs being installed/removed from the lines, and the fuel selector itself, all tend to get in the way of each other.
-
OK, I'll play, but keep in mind I'm just an amateur, not an A&P. 1. Too blurry to be sure. The panel it's near is a fuel tank access panel, which makes me suspect it's a fuel stain. But it would be more common to see that on a screw, or the seam of the panel. That stain is just in the middle of nowhere, so a bit odd. 2. Looks like rust, at least in some places. Light surface corrosion on gear trusses is not a show stopper. When I point out things like this to my long-trusted mechanic, he tends to say things like, "Yeah, that might rust through in another 50 years or so...." 3. Service manual calls for spraying lubricant on all hinges every 100 hours (typically every annual). As the lubricant dries, discolors, and gathers dirt over the years, it tends to stain the hinges and nearby sheet metal a bit. My airplane has the same discoloration on and around hinges. Not a show stopper. 4. I'm guessing that's the connecting rod back on the elevator or rudder, little hard to tell from the photo. If so, there are no grease fittings back there, so doubt it's grease. Might be dried lubricant, might be rust. If the latter, again, light surface corrosion isn't a show stopper. 5. Those look like blind rivets, not screws. They appear to be "working" a little, i.e. loosening up. Working rivets can be drilled out and replaced, but it of course cosmetically messes up the paint. My mechanic doesn't get worked up about the occasional smoking rivet here and there, but different people have different opinions. 6. Worst case scenario would be water and rust behind the panel, caused by lack of attention to Mooney Service Bulletin M20-208B. Or it could just be a stain from a backseat passenger spilling food or a drink. Only way to tell is to perform an M20-208B inspection, but you should be doing that as part of the pre-buy anyway, regardless of whether you see stains or not. 7. Again, looks like blind rivets "working" a little. Not really familiar with speed brakes or how much of a concern this is. 8. Just looks like paint nicks to me. 9. Might be some rust under the bolt in the lower left of the photo. But most of what you're seeing there appears to me to be dried lubricant and dirt, as discussed above. 10. Looks like touch-up paint to me. The trailing edges of control surfaces tend to get paint chips. Not sure why, maybe vibration, lack of bonding at the corner, or both. Sometimes people dab on a little touch-up paint, which usually looks awful. 11. Looks normal to me. Lap joints around compound curves fastened with rivets can buckle a little, even when factory new. Overall, while I appreciate your meticulousness, I'm a little concerned you're missing the forest for the trees. Little specks of rust on replaceable components you can see with a casual glance, or the occasional smoking rivet, are not what cause nightmare scenarios. The places you want to be looking for nightmare corrosion are on the main wing spar and aft stub spar, the steel roll cage structure under the interior panels, and inside the engine.
-
Yeah, I'm really not sure what's going on there or how the airplane was jacked up in that photo. It's from before we bought the airplane, part of a collection of photos the prior owner gave us. Just happened to be a good shot of the inspection panels.
-
The paint nicks and dirt you're seeing on the gear trusses and in the wheel wells are very common. Doesn't necessarily mean they're "OK", but not at all uncommon. The trusses and gear wells in our airplane looked much, much worse the day we bought it. 14 years later, neither the gear nor the wing spars have fallen off. The black streaks running out of those close-out panel rivets look "wet" to me. If so, that may indicate the inside of the wing has been fogged with an anti-corrosion treatment, which is a good thing. Don't confuse "inspection panels" which are designed to be removed for service and inspection with "closeout panels" which are only needed during manufacturing. The latter are typically riveted closed. For the person asking about external inspection panels with round-head screws, our airplane has those. Picture attached below.

-
Foreflight Legal for IFR Navigation?
Vance Harral replied to 201er's topic in Miscellaneous Aviation Talk
Couple of comments to add. First, I think it's important to point out that what's ultimately certified in the certification process is an "installation", not just a "device". I don't know what manufacturer's GPS receiver is installed in a iPad, but let's assume it's the same one in a GTN650 (doubt it, given that that the integrated circuit in the iPad is a combination GPS receiver and 4G integrated circuit, but that's not really germane...) Even if we set aside the difference in software that talks to the GPS receiver, the receiver's behavior and performance depends on the GPS antenna being used and the connection to it, among other things. Panel-mount GPS hardware is connected to an external GPS antenna mounted on the roof of the airplane for best reception, and that entire installation is addressed by the certification process. The iPad's antenna is inside the cabin near a bunch of other RF devices, potentially changing every time you move the iPad. That doesn't mean the iPad doesn't work well, but there's a reason why different pilots in different airplanes have different experiences with reception on portable devices. As another example, I fly with a Stratux portable ADS-B in setup. It works great, but only if I hold the antennas up to cabin window, and move them around depending on where I am. That's not something any reasonable person would "certify". On the other hand, it's important to understand the certification process isn't the gold standard most certification advocates imagine it to be. I have a relative in the certified avionics software business, and when he tells me how the boxes are verified vs. the way I do things in the microprocessor design world, it makes me uneasy. Here's just one of several cringe-worthy stories I've heard from him: [my relative]: I opened a bug because if you press button A followed by button G followed by button C, the whole box locks up and must be power cycled. [responder]: Bug closed, that's an invalid key sequence. [my relative]: Bug re-opened. It's never OK for the box to lock up, regardless of whether the key sequence is "valid". [responder]: Bug closed, no pilot would ever do that. [my relative]: Bug re-opened. You're not a pilot, are you? Ever flown in turbulence, accidentally hit the wrong key? [responder]: Bug closed, that's just not part of our certified test sequence. [my relative]: Sigh. I give up. [DER]: I see you've closed all open bugs, looks good for certification sign-off! Even from a single manufacturer specifically in the aviation business, there are holes in both certified and uncertified flows. Shortly after acquiring a Garmin GPSMAP396, I found a bug in the way the HSI behaves when turning away from the FAF on an approach, as one might do entering a hold or procedure turn. I reported the bug to Garmin and they confirmed the bad behavior. But it was never fixed, and their final response was essentially, "Yeah, it doesn't work the way we meant it to, but you're not really supposed to be using it for reference on approaches even though the software gives FAF-to-MAP guidance". Later, we put a GTN 650 in the airplane, and subsequently received notice of a bug wherin if you configure it with a user-defined field that is a shortcut to a checklist, it can "brick" the unit, requiring a visit to the avionics shop to fix it (see Garmin Service advisory SA1503). You'd think the certification process would have caught this, but nope. No guarantees either way. -
I'm not advocating pulling a cylinder. That would allow you to look at the cam and crank, but is major surgery and yes, the seller would probably object. "Borescoping the engine" typically just means putting the scope in a spark plug hole and looking at the top half of the cylinder, above the piston. With a good scope (even a $40 endoscope off amazon.com), you can see the cylinder walls and the valves. All that said, if the engine was overhauled 3 years ago and has been flown 625 hours since, skipping borescoping altogether is probably not an unreasonable risk. That's good, healthy exercise for the engine, and I agree it's unlikely (though not impossible) to have internal corrosion issues. You could still borescope the cylinders to look for evidence of premature cylinder wall wear and/or exhaust valve problems, though. The procedure is not really invasive or time-consuming. The risk to the seller is just the possibility of a ham-fisted mechanic accidentally dropping a poorly-attached borescope mirror down in the cylinder. That isn't catastrophic, since there are some tricks to retrieve such things, but it could happen. Overall, your call.
-
I don't know the airplane, but nothing on the list you attached looks like a show-stopper to me. Agree with Alex you should further investigate the gear issues, but not sure I'd characterize them as a "big thing". Shims, bearings, and rod ends are straightforward. I'd need to know exactly how much the preload is out of spec before expressing an opinion on that - the factory-prescribed method of measuring preload tension via torque wrench and breaker-arm tools is prone to a lot of measurement variation. If you're going to repair the gear spring attach bracket, I'd consider installing new springs on both sides, which may bring the preload measurements back into spec anyway. I'd also take a close look at the nose gear. The play the shop is proposing to fix with shims and oversize through bolts may in fact require a whole new steering horn (that was the case with our airplane when we started to get nosewheel shimmy). The biggest question I'd have is, what is the complete list of stuff actually inspected on the pre-buy? The attached report shows a bunch of easily fixable items, but doesn't say things like, "Inspected spars and spar caps for corrosion, looks good"; or "removed interior panels to inspect roll cage for corrosion, no issues found"; or "no evidence of decaying tank sealant found in gascolator screen"; or "borescoped all four cylinders, valves and cylinder walls look good". A pre-buy which finds and offers to correct a bunch of minor issues is essentially worthless if the inspection overlooked all the major, expensive stuff. Sure is a good-looking airplane with a nice panel. If the bones are good, seems like a fair deal.
-
Thanks for arranging the group buy, Dan, ordered mine today. Your story inspired me to trade in my "better than nothing" home unit for something really designed to do the job.
-
Several years ago, we replaced the rubber duct that runs between the air intake box and the fuel servo in our M20F. This part is the subject of multiple threads here on MS, involving cost, quality, availability, and the wisdom of repair vs. replacement. We replaced ours because the old one was torn, had been sloppily repaired with RTV, and was coming apart again. Our replacement duct is working fine, but I'm starting this thread to solicit input on what to do with the old one. It's been sitting in a box in the hangar, for no other reason than it seemed like a bad idea at the time to just throw it away. Climate around here is such that it hasn't deteriorated any further that I can tell. Theoretically it could be repaired and held as a backup, especially since there's no urgency for a "quick fix", and a replacement might not be available in the future. But if we really cared about having a hot backup, we could order a new one from LASAR or Mooney or whatever vendor has them in stock today. What say the denizens of MooneySpace: repair or toss? If the former, what's the best, no-apologies repair technique, and is it even worth the trouble?
-
Electric Flaps Troubleshooting
Vance Harral replied to Marauder's topic in Vintage Mooneys (pre-J models)
There are certainly right and wrong ways to use them, including buying ones rated for the heat/light they're exposed to, and using appropriate tension and cutting methods. To be clear, I'm not "anti" zip-tie, just advising reasonable caution, especially in areas you don't see frequently. This is of course true for any method of securing wires, not just zip-ties. For anyone truly interested, AC43-13 Chapter 11 has specific guidance on securing aircraft wiring, see in particular 11-96 (a), (b) and (o); and 11-146. The big no-no is securing wiring to structure without some sort of stand-off. Adel clamps provide that standoff inherently by design, and hence are arguably the gold standard for securing wiring. Some people interpret that guidance as an FAA "rule" prohibiting zip ties in various applications, but I'm not one of them. -
Electric Flaps Troubleshooting
Vance Harral replied to Marauder's topic in Vintage Mooneys (pre-J models)
Pulling a zip tie tight enough to ensure it never moves - especially in a vibration-prone environment - is likely to damage the thing you're securing with the zip tie in the first place. Certainly true of electrical wiring, sometimes true of cables and other structures. -
Electric Flaps Troubleshooting
Vance Harral replied to Marauder's topic in Vintage Mooneys (pre-J models)
The other reason to be careful with zip ties is the serrations that the lock piece clicks into can act as a saw over time, cutting wiring insulation and even metal. I use them in places I can see on a normal preflight or oil change, especially if I can put some electrical tape around the place they're installed. But I'm less prone to use them in places that only get looked at during annual. If you really prefer zip ties, good cutters and care in using them are worth the extra time. Another good trick is to put some heat shrink tubing over the portion of the tie that will be tight against the wire/metal/whatever when it's tight. That buys a little bit of protection against the sawing action. But it requires a good estimate of what the used length will be once everything is pulled tight. -
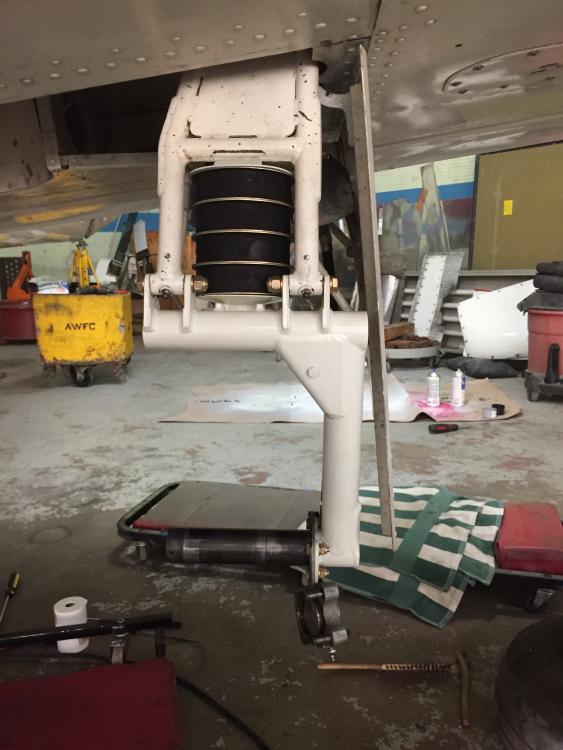
Shock disk tower bolt/bushing/nut
Vance Harral replied to Vance Harral's topic in General Mooney Talk
At the risk of patting myself on the back a little... just downloaded all the photos from the annual to my phone, which allows for a better before/after comparison. As you can see, the landing gear cleanup made a dramatic difference!
-
Harbor Freight High Resolution inspection camera
Vance Harral replied to NotarPilot's topic in General Mooney Talk
Just finished downloading pictures from my phone to my computer and wanted to follow up on this. I did find some pictures taken from the endoscope camera that were 1024x768. While that is not 2 megapixels, it is higher than 640x480, and is in fact the highest resolution selectable waith the cheapie app the directions instruct you to download. I now remember that at 1024x768 resolution, I wasn't able to see an entire valve at once (see attached photos below). Switching to 640x480 effectively "zoomed out" such that the image showed the entire valve. I know, I know... this doesn't make any sense. The resolution of an image and the optical (or digital) zoom are independent variables. But again, I think the cheapie app software is to blame. My guess is it processes the raw data from the camera differently depending on the resolution you choose. I would bet it's trying to be "smart" in a way that's exactly the opposite of smart. In summary, I think what I bought is a pretty decent little endoscope camera, that presently suffers from being used with poor software.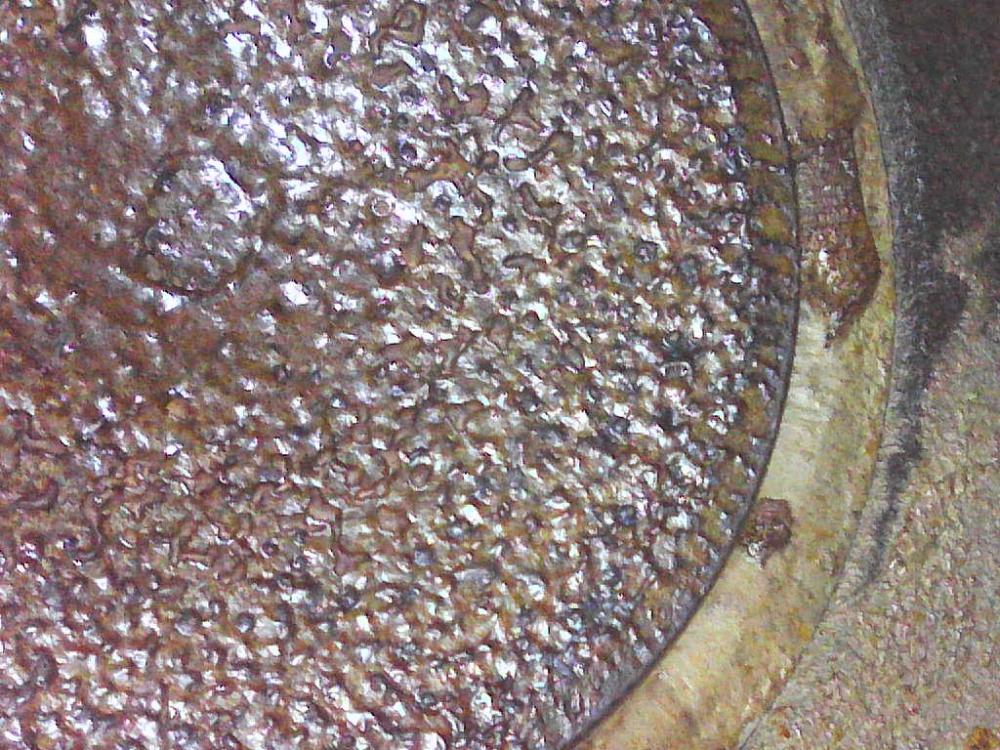

-
Shock disk tower bolt/bushing/nut
Vance Harral replied to Vance Harral's topic in General Mooney Talk
Thanks for the complement, but they look better in the photos than in real life. I didn't actually strip them down to bare metal. I just did a "scuff and shoot", and you can see the old paint texture underneath. I was running low on paint in the rattle cans, and it seemed like a reasonable compromise since almost no one ever sees them up close and personal. Different models may attach the shields a different way, but I didn't have much trouble with mine. They're held on with 10-32 machine screws, through Adel clamps, and into self-locking nuts. The trick is to use safety wire to pull the Adel clamps together, then get the bolt/nut started, then cut and pull out the safety wire before tightening everything up.


