Vance Harral
-
Posts
1,551 -
Joined
-
Last visited
-
Days Won
6
Content Type
Profiles
Forums
Blogs
Gallery
Downloads
Events
Store
Everything posted by Vance Harral
-

What is this stuff in my gascolator?
Vance Harral replied to Vance Harral's topic in General Mooney Talk
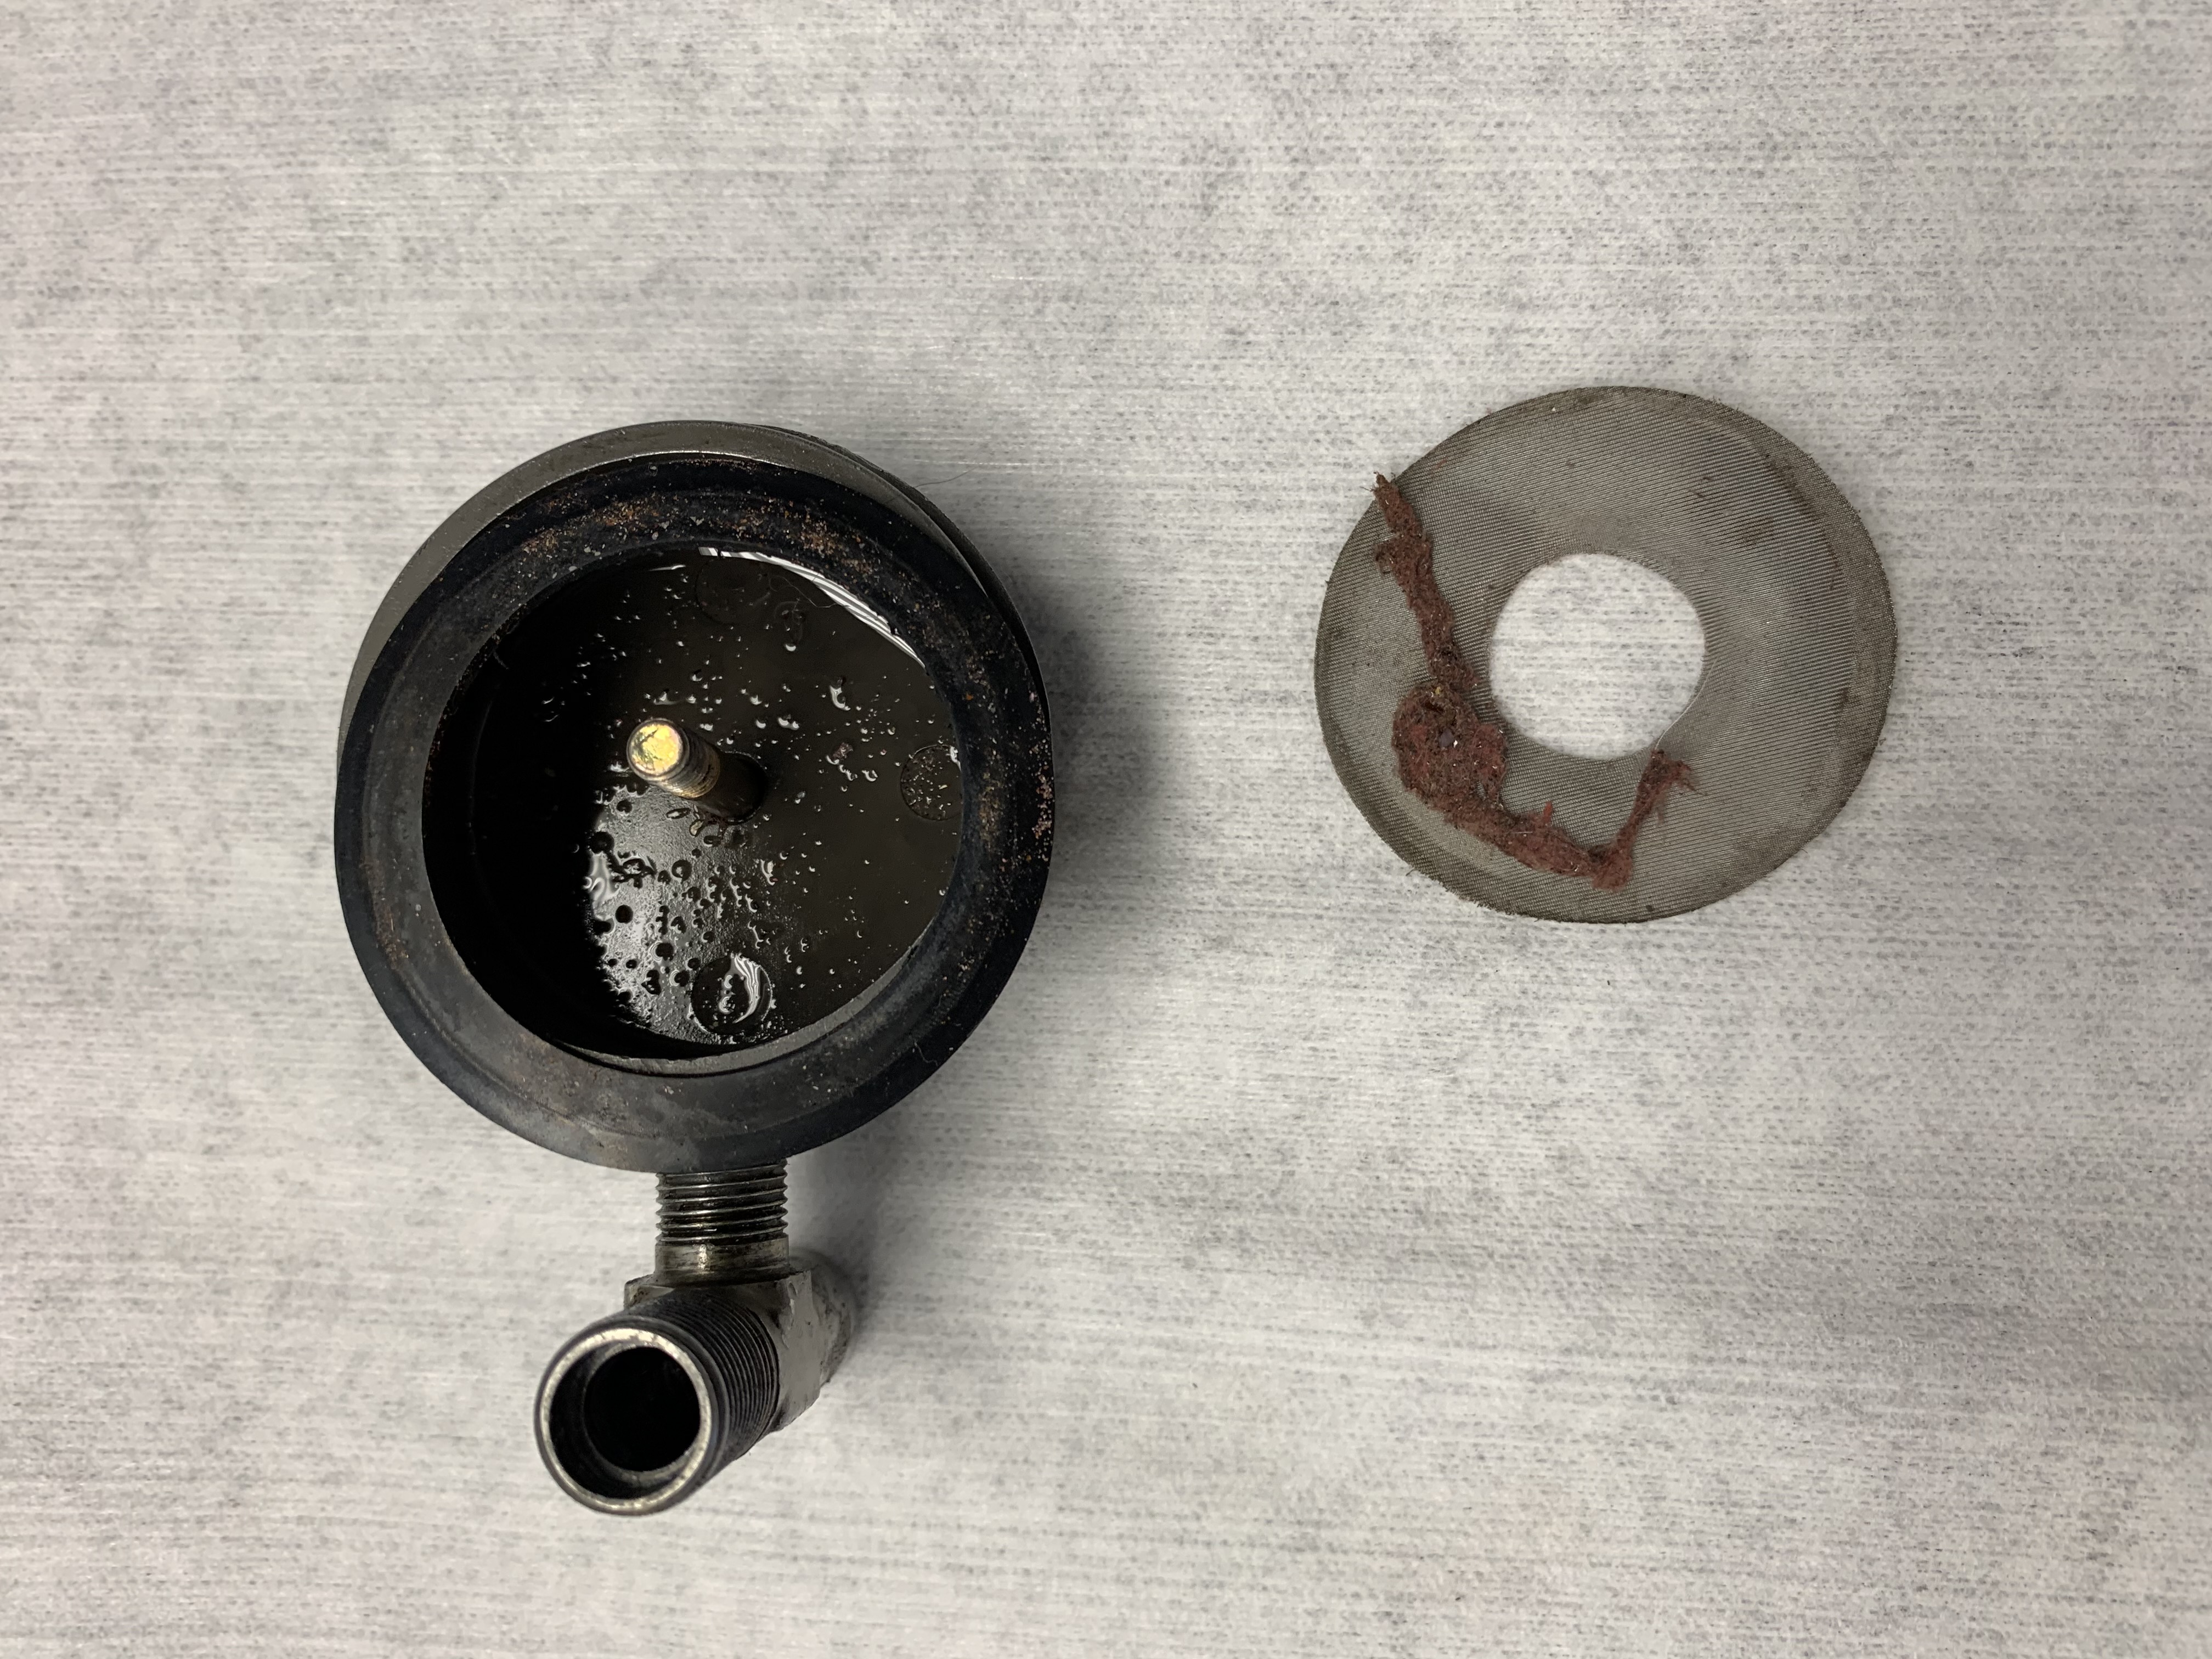
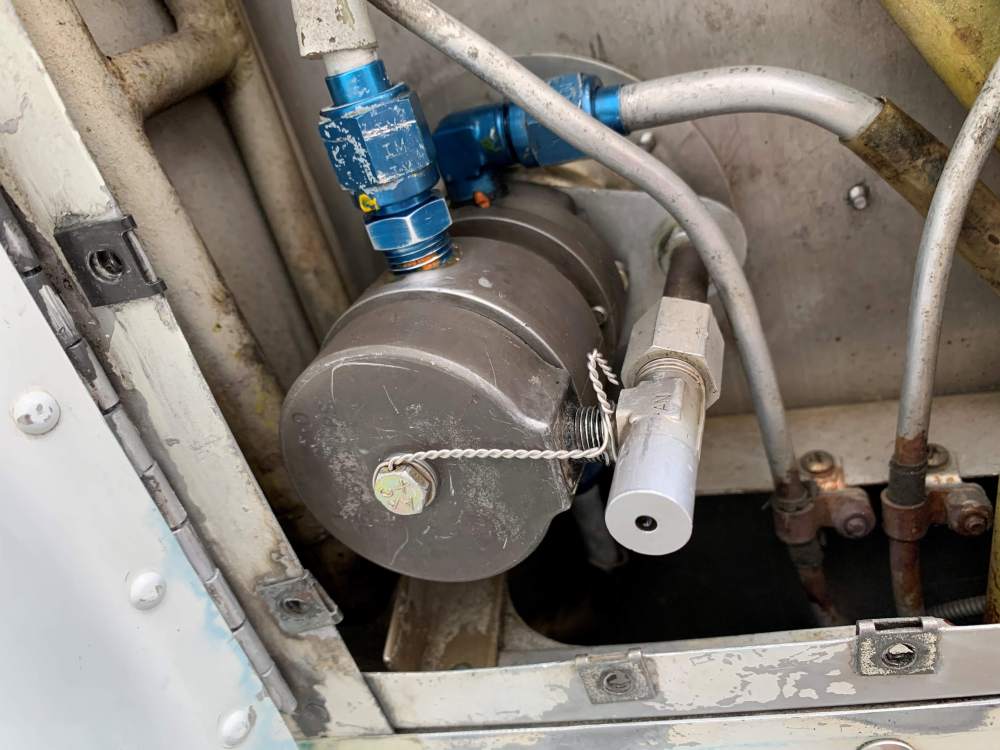
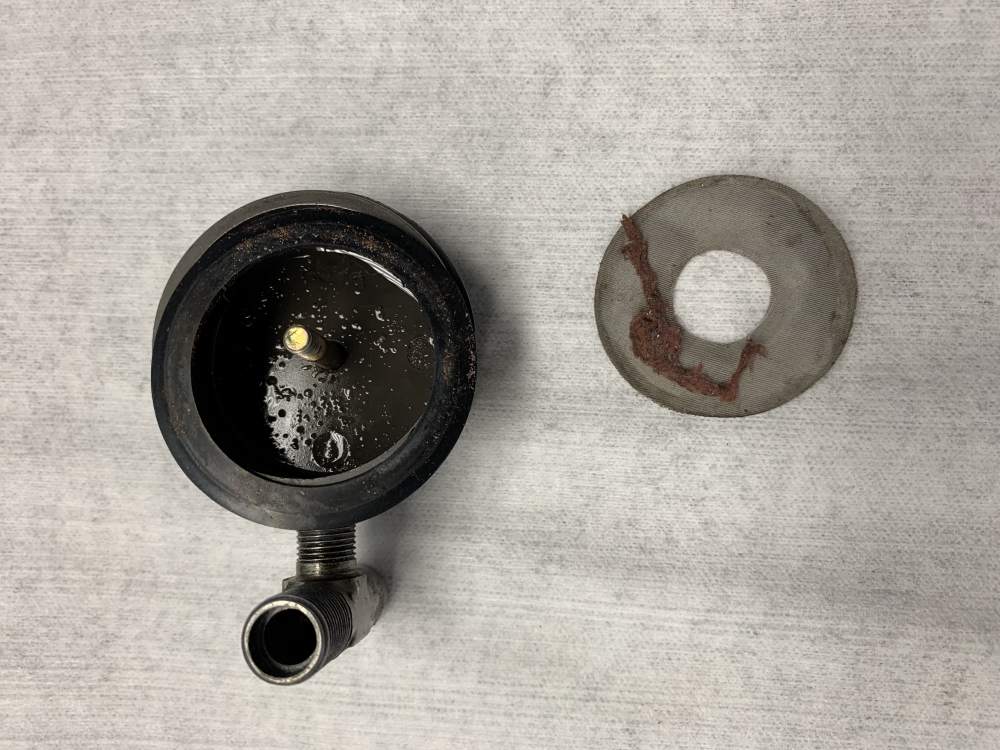
It's certainly possible I misunderstand how the fuel selector works, but I don't think so. Below are a couple of photos of the Dukes fuel selector/gascolator in our airplane. These are taken from underneath the airplane, looking up. The feed lines from the tanks are at the top (i.e. at the "back" of these photos), while the line to the boost pump is at the bottom (the "front" of these photos). The screen is beneath the level of all the supply and feed lines. With the bowl removed, when the fuel selector is moved from OFF to LEFT/RIGHT, fuel drains through the center of the unit, not through the screen. It comes out the four small holes in the center post that you see in the photo, and fills the bowl. It must then flow up through the screen, to exit out the boost pump line, and on to the engine driven pump. The arrangement appears to work like a P-trap on a sink. The gunk was entirely located above the screen (or "behind" the screen relative to these photos). That's the engine side, not the tank side.
-
What is this stuff in my gascolator?
Vance Harral replied to Vance Harral's topic in General Mooney Talk
The idea that it came from a fuel provider is an interesting one. That would be a one-off event, consistent with finding junk in the screen, but none when draining the tanks or pumping through the electric pump. Still, I'm mystified by the fact the material is on the downstream side of the screen, opposite side from the fuel tanks. If the contaminant came from or passed through the fuel tanks, I would have expected to find it on the upstream side of the screen. Might be a good idea to get a look at the pickup screens in the fuel tanks in any case. Any way to do that safely without completely gdraining the tanks? I have a cheap endoscope I can feed down there. I don't mind if doing so winds up killing the endoscope, but I wouldn't want material sloughing off the endoscope to contaminate the fuel or cause other problems. I might try draining some fuel into a bucket and putting the scope in there first as an experiment. -
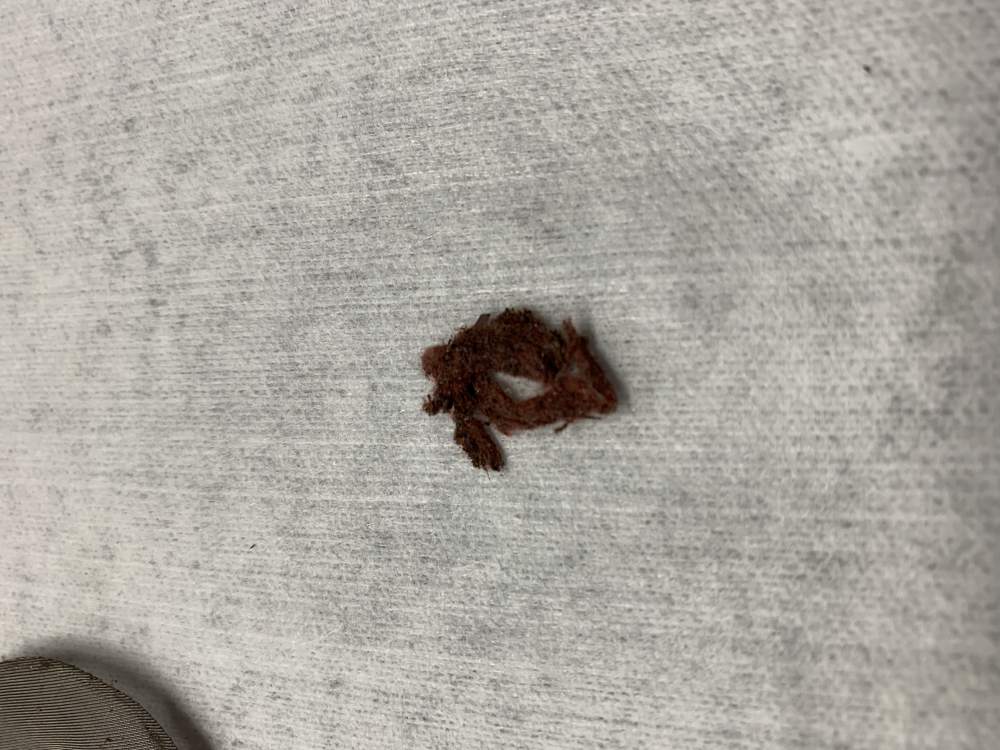
Opened up the gascolator at the annual inspection today and found a significant amount of what I'll call "dryer lint" on the screen. Photos below. Note that the first photo with the material resting on the screen was taken after I'd already run my finger across it, which caused it to roll up into the snake shape shown in the photo. Originally it was evenly caked across the whole screen. The stuff was caked on thick enough to be disconcerting - seemingly enough of it to impede fuel flow, though we haven't seen any fuel pressure or fuel flow issues since the last annual. It's red in color, and looks and feels like cotton fibers. Couple of guys in the shop speculated it's from a fiber washer or gasket, but as far as I know there's nothing like that in the Mooney fuel system. My initial guess was fuzz from a red shop rag, but I don't really think there's a shop rag in the tanks or elsewhere in the fuel system. I'm pretty sure this isn't decaying tank sealant, for two reasons. First, the texture doesn't match what I'd expect of tank sealant. It's not plasticized, rubbery, or gelatinous - again, it's fuzzy like cotton. But more importantly... and here's where it gets weird... all the material was on the engine side of the screen, not the fuel tank side. In other words, it seems like the material is settling into the gascolator from "downstream", opposite the normal direction of fuel flow. I'm not sure how that's possible, but 100% of the material was on the top side of the screen (fuel from the tanks flows through the center of the gascolator to the bottom cup, then up through the screen, thence to the electric fuel pump). Upon discovering the problem, we drained about a half gallon from each tank through the gascolator, and that fuel came out as clear and blue as the pool at a 5-star hotel. Then we cleaned out the gascolator and screen, reassembled, and used the boost pump to run another half gallon through the gascolator and boost pump out of each tank, through the hose that feeds the fuel servo. That too came out nice and clean. So it's a mystery where the stuff came from, and we can't reproduce it. What says the Mooneyspace hive mind? Any and all speculation is welcome.
-
The radios that do the transmitting only have a single mic input (two wires, one for the actual audio and one for the PTT). The behavior of a multi-input system is governed by the audio panel and/or intercom to which the headsets connect. It's possible to set up a system where both mics transmit when any PTT switch is activated. But that would be unusual, because as you said, it's almost always undesirable. I've flown in airplanes with portable intercoms and PTTs which transmit both mics when any PTT switch is pressed, but this is usually an accident of bad hookup/design/PTT understanding. Any panel-mounted setup installed by an avionics shop is going to have independent PTT behavior.
-
Just don't adjust them too far and/or fail to protect them with teflon tape. We tightened up our door linkages many years ago because it seemed like they were mis-rigged (no slop in linkage, they just didn't come together as close as we wanted). Looked good after adjustment. A few months later we realized they were rubbing together in flight and the doors had developed some surface damage at the "lip" where they come together. Just cosmetic, not really an airworthiness issue. But your airplane looks like it has nice paint.
-
Electric Landing Gear Circuit Breaker ('67 M20F)
Vance Harral replied to BWatts's topic in Vintage Mooneys (pre-J models)
Thanks for the clarification. That crank unit is an integrated assembly in the parts manual. It never occurred to me it had internal gearing. -
Electric Landing Gear Circuit Breaker ('67 M20F)
Vance Harral replied to BWatts's topic in Vintage Mooneys (pre-J models)
I'm wondering if there is some difference between the Dukes and ITT actuators here. My understanding is they are of similar design, but 40 cranks in our 1976F would not be anywhere near full transition. We have an ITT actuator. Earlier airplanes had the Dukes actuators. Both actuator types are subject to the AD that requires periodic inspection of the gear train, and I always assumed they were basically the same; but maybe not. -
Electric Landing Gear Circuit Breaker ('67 M20F)
Vance Harral replied to BWatts's topic in Vintage Mooneys (pre-J models)
I'm guessing 4200 RPM is the unloaded speed of the motor, but I don't think it turns anywhere near that fast under load. Your math is about right except there is no gearing between the emergency crank cable and the motor shaft in the M20F vintage of airplanes. The emergency engage just slides the crank cable spline directly into the motor shaft, it's a 1:1 hookup. The motor shaft is geared to the drive mechanism by a worm gear arrangement, which originally had a 20:1 ratio. J model actuators and "upgraded" early-model actuators have 40:1 gears. We've had both in our airplane, so I'm pretty familiar. Prior to the 40:1 upgrade, gear transit time was about 3 seconds, and emergency extension required about 70 cranks from full up to full down. After installing the 40:1 gears, gear transit time is about 6 seconds and emergency extension requires about 140 cranks from full up to full down. Doing the math for 40:1 gears, 6 seconds is 0.1 minutes to make those 140 turns. That's about 1400 RPM at the motor shaft. -
We've had prop governors off the airplane twice in 17 years, both times due to oil leaks from seals in the governor case itself (not the seal between the governor and the engine accessory case). It stands to reason that the seals go after a while, they are not particularly sophisticated. In both cases we asked about IRAN only, but the shops we used (two different ones) stated that there was enough internal wear to warrant a full overhaul. Back in the mid-2000s we just had the Garwin governor overhauled and reinstalled. Got another 10-ish years out of it before it started leaking, and that's what led to the McCauley replacement. You can judge for yourself whether 10 years and about 1000 hours is a typical run, and how to pro-rate the overhaul cost. The thing that shied us away from the PCU5000 was not just that the overhaul was expensive, but that shops were already seeing these units come in for overhaul, enough to comment on the cost of parts. My perception was that the PCU5000 was new enough that it seemed unusual that the shops were already seeing units needing overhauls. That may not be a rational concern, though. There are certainly operators that fly airplanes hundreds of hours per year, and that can rack up thousands of hours on equipment in relatively short times.
-
Faced with exactly the same advice from TrueSpeed a couple of years ago, we went with the McCauley. I don't regret it, necessarily, but I also wouldn't call it a smooth experience. First, the McCauley governor would not fit on our 1976 M20F with Lycoming IO-360-A1A, without grinding away a small portion of the housing of the governor itself. Truespeed had no idea this would happen and they were surprised when I called them about the problem. Since they didn't mention it to you, It appears they either don't remember that we had this problem on the same airplane/engine, or are choosing not to tell you about it. I looked for photos I took at the time, but I am unable to locate them at the moment. If you want to know more, I can get out to the hangar this weekend and take some pictures. The portion of the governor housing that had to be ground away was small, non-structural, and we haven't had any problems with the governor in the two years since. But it just seemed kinda ridiculous to have to take a grinder to a freshly overhauled and painted governor. Truespeed was kind and straightforward in helping us resolve the problem, but they didn't offer us a discount or extended warranty on the overhauled McCauley due to our problem. Second, if you go with the McCauley, make sure you get documentation from Truespeed regarding AD 2020-19-06. The issue is not that Truespeed is going to give your a governor with a bad idler gear, it's just that it's another piece of AD paperwork you'll need to present to anyone verifying AD compliance in the future. Giving up on the Garwin governor seemed like a no-brainer at the time, but if I had it to do all over again, I'd give more consideration to overhauling the Garwin instead of opting for the McCauley. We actually still have the old Garwin core, and we're keeping it around "just in case".
-
I own both Lightspeed Zulus, and a QT halo. I wear the QT for flight instruction in Cessnas, but I use the Zulus in the Mooney, and the occasional other, louder aircraft. For whatever reason, I just can't get enough noise suppression with the QTs for them to be pleasant in louder aircraft. I've tried all the different tips: rubber, silicone, yellow foam. I can hear the radio and intercom fine, and I'm sure they're doing a reasonable job of filtering out the most damaging amplitudes/frequencies. But they are undeniably, unquestionably, poorer at reducing overall ambient noise than any over-the-ear, active ANR headset I've ever worn. I read stories all the time from people who say QTs and/or Clarity Aloft in-the-ears are just as good, or even better, than an over-the-ear ANR. But I simply don't have that experience. It's entirely possible this is just a function of my ear anatomy. One thing I haven't tried yet - but will do so when I get around to it - is custom ear molds for the QTs. I know the developer pooh-poohs them, but several folks I know use them, and it might bridge the gap in performance. The QTs are certainly comfortable, and I want to like them a little more than I actually do.
-
Yoke set screw: to Loctite or not
Vance Harral replied to Vance Harral's topic in General Mooney Talk
The retrofit kit is pretty spendy. We got a quote from Mooney on just the shafts (we can re-use the existing yokes), and it was $1250 a side, or $2500 total. We've been casually on the lookout for a quality used part from salvage ever since, but there are many different types of yoke shaft, and the exact P/N we need is hard to come by. Again, for most of our ownership it seemed simple just to perform the inspection, but I'm feeling less and less like that with every inspection cycle. -
Yoke set screw: to Loctite or not
Vance Harral replied to Vance Harral's topic in General Mooney Talk
We have not. For most of our 15+ years of ownership, it just seemed simpler to perform the inspection than to fight the bureaucracy to legally avoid it. I'm feeling differently about it these days, though. This is a classic example of the preventive-maintenance-induced failure concern: performing this mandatory inspection has unquestionably caused issues and damage, that approach or exceed the risk the inspection itself is supposed to mitigate. -
Yoke set screw: to Loctite or not
Vance Harral replied to Vance Harral's topic in General Mooney Talk
That's a clever idea. One thing I find interesting about the factory-specified set screw is that it's very short compared to the threaded depth of the yoke itself. The "hardware store" solution was a much longer screw that achieved better purchase (though this probably contributed to the "glued in" problem). Using a pair of shorter screws based on the jam nut theory uses the factory-specified part in a manner that seems to meet both the letter and the spirit of the law. Plus, we can try it out right now rather than waiting until the annual. Thanks for the tip! -
Short version: How the !$#&* do you keep yoke set screws from backing out with normal use, while still allowing them to be easily removed for inspection and maintenance? Long version: Our 1976 M20F is a bit of an oddity. During this last year of the F model, the factory started sneaking in some of the M20J components, e.g. our airplane came from the factory with the rams horn yokes and horizontal bolt/vertical set screw arrangement that people generally associate with J and later models. Regrettably, there is no exemption carved out in AD77-17-04 or Mooney SB M20-205B that relieves our oddball airplane from the infamous 500-hour yoke shaft inspection, even though many people believe our particular airplane "should" be exempt by design. So we dutifully pull the yokes off every 500 hours to inspect the shafts, and thus begins a sordid history... About 12 years and 3 inspection intervals ago, the inspection proceeded without incident, but the pilot-side set screw was chronically loose thereafter, resulting in slop in the yoke and requiring frequent re-tightening. The problem wasn't dangerous, because the set screw isn't what holds the yoke onto the shaft - it just takes up the small amount of slop that the primary connecting bolt leaves. But it was annoying. About 6 years and 2 inspection intervals ago, the pilot side set screw stripped out when attempting to remove it, likely because it had been buggered up from all the re-tightening. After much cussing, the screw was removed with an extraction tool. We were unable to procure official AN565-D416-H4 set screws to replace it at the time (factory was in hibernation and none of the usual sources seem to stock this particular flavor of AN565). So for better or worse, hardware-store set screws of appropriate thread size were installed on both sides. Almost as an afterthought, blue Loctite was added to prevent the set screw from loosening. Much satisfaction ensued over the next several years: no loose yokes, no annoyances. You can probably see where this is going... At the most recent inspection a year ago, the mechanic doing the work found the co-pilot side set screw "glued" in place, and attempts to remove it effectively destroyed the screw in-situ. Maybe it was too much Loctite, maybe dissimilar metal corrosion from incorrect hardware, maybe bad luck, or a combination of all three. After much cussing, drilling, and other failed attempts, we all cringed while the mechanic pried the yoke off the shaft with pieces of the set screw still in place, drove out the remaining bits, and cleaned the threads with the correct size tap. Understandably, the mechanic insisted on ordering the correct hardware from Mooney ($$$) for re-installation, and threatened us with our lives if we so much as even considered applying thread locker of any kind. Fair enough, but for the past year, the set screws are back to being chronically loose, now on both sides. We keep a hex driver in the seat pocket and tighten them up basically before every flight, but by the time we land they've backed out enough that the yoke is sloppy again. And after a year of this, I can already tell the hex sockets in the screw heads are starting to soften up, and will strip out soon if not replaced. We have extra stock left over from last year's order, so we'll replace them at this year's annual, but new hardware is clearly not going to resolve the problem of the screws working loose. Hard to say if the threads in the yoke are worn at this point, or the airplane is vibrating more as it ages, or if maybe this just isn't that great of a design in the first place. But I'm looking for solutions. Try blue Loctite again, but sparingly? Some other threadlocker product? Teflon tape? I'd like to set screws to stay tight, but I want to avoid another giant debacle at the next inspection interval. Any and all suggestions appreciated.
-
rebuild (zero time) engine or overhaul the engine?
Vance Harral replied to sekomel's topic in General Mooney Talk
Thanks for the clarification. Do you know if Lycoming has put this in writing somewhere? I'm casually working on a (hopefully) long-term project to spec overhaul choices for our partnership, and would like to accurately represent the factory rebuilt choice. -
rebuild (zero time) engine or overhaul the engine?
Vance Harral replied to sekomel's topic in General Mooney Talk
I'm happy for you and sad for Byron, but the history of two individual engines is not evidence that a factory reman is generally more reliable than an overhaul. That's what makes these decisions difficult, there doesn't seem to be much data other than individual anecdotes. Plenty of folks happy with overhauls and plenty of folks unhappy with factory reman, opposite of your and Byron's experiences. Hard to guess what any particular individual's experience is going to be. -
It looks like you understand that yokes and shafts must be matched together. Not sure if you understand that the length and design of the forward end of the shaft where it attaches to the elevator and aileron linkages has also varied over the years. If you purchase a set of yokes *and shafts* from a J or later model instead of the official Mooney retrofit kit, there is a good chance they will not properly connect to the elevator and aileron linkages in your C model. More info here:
-
Dealer installation required for "ADAHRS variant" (i.e. as an attitude indicator), A&P installation OK for non-ADAHRS variant: https://support.garmin.com/en-US/?faq=zZe6ycoT1q4hi7MbTE7TP9
-
This is the only relevant argument. If you can't/won't provide digital copies of the logs in 2021, about 90% of the potential market (real buyers, not tire kickers) aren't even going to consider your airplane, much less come look at it in person.
-
rebuild (zero time) engine or overhaul the engine?
Vance Harral replied to sekomel's topic in General Mooney Talk
My understanding - based purely on internet lore, not any actual research - is that you have to send your core to the factory in order to purchase a factory reman (so they can use your parts in some future reman). It was also my understanding there is an upcharge from the factory if your core's crank or case is bad on arrival, as they won't be able to re-use it. If that's true, you'll pay extra for a bad crank or case either way, so it's not correct to say that a factory reman is nearly the same price vs. overhaul if you need a new crank and/or case. If that understanding is incorrect, please educate me. I believe the cam is nearly always replaced by reputable overhaul shops, and not particularly expensive in the grand scheme of things. -
rebuild (zero time) engine or overhaul the engine?
Vance Harral replied to sekomel's topic in General Mooney Talk
That's literally the $10,000 question. I don't know of any good statistical data on this, unfortunately. Just anecdotes. Even if you had statistical data, it's hard to argue it would be meaningful. No one here is buying a fleet of engines, and that's the only thing statistical data would really be valid for. -
Sure, I don't disagree with your logic. But the quotes are what they are, possibly just because that's what the market will bear around here. Mainly just cautioning the OP and others reading the thread to get actual "walk-away price" installation quotes to determine the cost difference when making their own decision. If you've got the time and a good relationship with an A&P, and you're handy enough, you can do some/all of the installation yourself. For the DIY club, the points about fewer connectors/mounts/etc. with the GI-275 are certainly attractive.
-
Intermittent low-level noise in intercom
Vance Harral replied to 0TreeLemur's topic in Avionics/Panel Discussion
Sounds like the internal contacts of the switch are worn and/or dirty. You might be able to clean them up by shooting contact cleaner into the internal guts of the switch, but it depends on how "sealed" the switch is. If it's the old Klixon-style switch, I'd suggest carefully removing the plastic cover, spraying some contact cleaner into the switch, and working it back and forth a bunch of times. May not resolve the problem, but it's a cheap and easy thing to try, and very unlikely to cause any additional problems.- 1 reply
-
- 1
-

-
rebuild (zero time) engine or overhaul the engine?
Vance Harral replied to sekomel's topic in General Mooney Talk
I haven't seen any compelling evidence that a factory-rebuilt "zero time" engine is more reliable than a reputable overhaul. A factory rebuilt engine is assembled from a combination of new and used parts. The latter must meet new tolerances, but they're still used (which is arguably a good thing: used parts have survived at least some time in service). So understand that what you get for the extra cost vs. a traditional overhaul from a reputable shop is just the knowledge and expertise of the factory itself in assembling the engine. You can decide for yourself what that's worth, but I'm not sure the folks in the Lycoming shop have anything on well-known, non-factory shops. You certainly don't have to look hard to find stories of issues with factory rebuilds. If that bugs you, you can go factory new instead of factory-rebuilt. No used parts. But now you're looking at roughly twice the cost, and again, it's not clear new parts are actually more reliable than used.