

glenn reynolds
-
Posts
177 -
Joined
-
Last visited
Content Type
Profiles
Forums
Blogs
Gallery
Downloads
Events
Store
Everything posted by glenn reynolds
-
I have been using the blackmax for a year and half. I can add some operational observations: 1) my blackstone oil analysis has not shown a silver bullet success. my iron corrosion levels are higher than blackstone would like, which is of course contrary to what I had hoped for. I have ordered a humidity sensor to allow me to monitor the output of the blackmax to see if the machine is actually drying the air. 2) my mooney ovation runs an io550 which has a combination oil filler and breather. As the breather pipe under the cowling has an ice hole (vent hole in the breather pipe to preclude blockage in the event the breather outlet ices over) I was not able to insert the blackmax dryer tube via the breather tube. The oil filler is the next logical location but has several considerations: To use the oil filler the oil dipstick must be removed, this means there is an increased risk of the engine being run with the oil dipstick removed. in an effort to reduce this risk, I have a firm policy that the dryer tube is inserted into the dipstick or the oil dipstick is inplace and I don't allow ANY deviation, distraction during preflight is a known evil. I have a magnetic stand to hold the dipstick with a towel lined yogurt cup on the inside of the hanger door so the dipstick is on the door or in the engine, no other location. I keep paper towel adjacent to clean the oil from the dehydrator tube and wipe the dipstick clean with. 3) the top of the io550G engine oil filler is the normal oil cap diameter about an 1.5 inches HOWEVER, the breather vent connects to the sidewall of that opening so again this is not the place to have the foam plug of dehydrator tube inserted as I would be pumping air out the engine breather. The oil dipstick hole is MUCH smaller and only about 5/8 inch in diameter. The blackmax comes with two foam plug sizes to go on the end of the dryer tube, a large 1.5 inch and a small 5/8 foam plug. I installed the small plug, used a step stool and flashlight and am able to insert the tube into the oil filler pipe. with practice this can be done without the stool and flashlight but it takes practice as the opening is not tapered. 4) after several months of use, I count myself as very lucky, I was able to observe that part of my foam plug had come off and was left inside the oil filler pipe after I had extracted the tube! this of course could have been a very significant issues to have a wad of foam roaming around the inside of the crankcase looking for an oil channel to clog! I have subsequently ziptied below the foam plug so it can't come off. I was able using a super long set of forcep pliers to extract the erant foam plug but this could be a real issue I call it to your attention as something that I take very seriously.
-
Good information. I tested mine after purchase, but before permanently mounting it and had no difference. I wired it temporarily to the lighter circuit and then pulled and reset the breaker while flying with all the avionics on and functioning including shooting an ILS. I got zero change and so permanently installed them. My mechanic said it would have been simpler to use an oscilloscope, but I don't own one and besides it was more fun flying the test.
-
I have installed four USB adapters, the first two are 1 amp output which is too low for an Ipad. the next two were 2 amp units which the iPad likes. I got them all on Amazon and they are wired in series with my 24 volt cig lighter that way they are fused. they have worked great with no issues. I did use the better quality aviation wire of the correct size so my mechanic was okay with my work. if you put 24 volt in your search engine you should get a couple USB units which will take that input.
-
Engine running rough after service
glenn reynolds replied to glenn reynolds's topic in Modern Mooney Discussion
That is a great way to troubleshoot that. Thank you. I replaced both the two gaskets cyl 2&4 which we disturbed during the mag replacement and then due to what the engine monitor data showed I also replaced the gasket on number one. Frankly I think I may have put pressure on the hose (never unbolted the 1 intake during mag swap) but I cleaned all three faces, installed new gaskets and then used sealant when I reinstalled the three hoses. Test run was perfect. No roughness. Test flight was perfect engine super smooth. Thanks for reading. The plan is tomorrow fly coast to coast. So it’s nice to have the machine in good form. -
I would ask the question of how well does the ice light illuminate the wing at night? you really don't care what the assembly looks like, you care about your ability to see the wing at night in ice conditions. My light lens is not very clear, but it does a fine job of illuminating the wing at night in icing conditions.
-
thanks in advance for your assistance. I flew two weeks ago and found the mag drop in the > 150 range when I did my run up to return home. I ran the engine up and cycled the mixture multiple times and got the mag drop to less than 75 rpm. Flew home but the engine was missing more than I care for. Called mobile mechanic and explained issues. the engine is an io550G with 500 hours since new, with massive plugs. Mechanic told me to change plugs and mags, which I did. on the post service run up, the engine started like a top, but ran rough. the vibration or roughness was much worse at 750 rpm than it was at 1700 rpm. The mag drop is 50 rpm on both mags. No cylinder dropped out cold during mag check. At this point I don't think it is the new plugs. I don't suspect the mags which are zero hours after an overhaul. the mobile mechanic removed two intake pipes to better access the mags and he re-used the gaskets. I'm thinking the number one cylinder has a bad intake gasket based on the engine monitor data dump. I'm not very knowledgeable about reading the data so would some assistance. Flight_ N9624M 2024-07-31 22_49, 0h 8m 24s.pdf https://drive.google.com/file/d/1N4AH8vbgNz7HzE6ocsMg9X1B9STUZ2wn/view?usp=drive_link
-
my vote is take the plane to a shop and have them do the repairs for which they are really good at; then take the plane to the paint shop and they can do what they are really good at. West Coast Wings in Ukiah California is one example of a shop that specializes in sheet metal. Sea Land in Campbell River BC is another. this assumes that the metal work you need is more than just simple stuff. I have not repaired an oxygen fill door, but I do know that the Mooney ovation door hinge is a very specialized bit of repair work and you really want it done by someone who has lots of experience with Mooney door hinges. When shopping for a paint shop I found that the prices were competitive about $23,000 but the waiting list to get in and then the down time to do the paint were the MAJOR differences in the shops. I learned a great deal by visiting four different paint shops, mostly be looking at their facilities and seeing how they approached a paint job.
-
Least Sexy AirVenture Purchase
glenn reynolds replied to Dave Piehler's topic in General Mooney Talk
I got a cabin trash bag that hangs on the back of the seat from the headrest. Keeps the cabin clean and was less than twenty dollars. So when I factor the dollars to miles of use this could be the most cost effective airplane item I own. -
I’d be pretty careful about spending money on this repair. In my experience airplane mufflers are built with thin gauge metal to save weight. So it would be a shame to have this welded up and then find next year you have another leak and so on It might make sense to remove the entire exhaust system and have it inspected by acorn or Knisley or one of the other big name shops that specialize in exhaust systems. Piping which is worn too thin and about to fail is not what you want inside a tightly cowled mooney. A damaged cowling will be very expensive. A leak might have been caused by a backfire in which case there could much more internal damage. Again an excellent reason for a full inspection. I have also found that having the flanges checked for warpage and new exhaust manifold nuts and gaskets are bonus improvements that happen when you pull the exhaust system. It took me about a day to pull mine. I did need to call a couple of shops to get a reasonable turn around time. All the large aviation exhaust shops have patterns and jigs so they can repair any bad sections. I have a list of all the shops I called if you need it.
-
AME WANTED Near Vancouver Canada
glenn reynolds replied to Tyler G's topic in Modern Mooney Discussion
My apologies, my memory got it a little convoluted. there are two divisions: the flight training group and the repair and maintenance division. Here is the link to the repair division https://www.sealandaviation.com/?q=overhaul-aircraft-engines.php -
AME WANTED Near Vancouver Canada
glenn reynolds replied to Tyler G's topic in Modern Mooney Discussion
My recommendation would be airsea in Campbell river. I have had them work on my Mooney ovation and they have more resources than any other shop I have ever used. While they are not Mooney men per say, when you walk through the three hangers and look at the projects they are doing, which include hanging diesel engines on beavers and taking smashed turbine airplanes which arrive in a shipping container with fuselage twist, you will see that they have both the engineering and the fabrication skills. They also do salvage recovery work so their team is not adverse to travel. I can also say that their prices was very fair. Hope this helps. -
What are your thoughts on SavvyMx?
glenn reynolds replied to redbaron1982's topic in General Mooney Talk
I fly cross country a couple times a year and fly to Alaska occasionally and fly the Mooney for business and breakdowns can be a huge issue. I've had a flat tire on a runway at night (Savvy breakdown advisor told me to go to Walmart and buy a car moving dolly and we got the plane off the runway!) Another time I had a gear door broken hinge and need a double check that I could continue the trip with the gear door removed (I was advised to take both sides off so the plane was symmetric) and so the savvy breakdown has been a good value for me. I don't use it for annuals and routine service as I like to do my research about which shops I use so my annuals always come in on time and at the estimate. -
I would not change the material from fiberglass for several reasons, Glass, kevlar and Carbon have all been around about the same amount of time, but carbon is "sexier" but not the right choice in this application, nor is kevlar. This part is made of very light glass cloth. This was done to allow maximum conformability. If you use a heavier weight cloth you will need to vacuum bag to get the right shape etc. you need to be an expert to pull this off in heavier weight cloth. details matter. The carbon can be much harder to work with and again, less easy to find in light weight. Kevlar is for high abrasion application or tensile strength applications but neither of those applications apply here so again, wrong materials. One major mistake is not using RTV when installing the lower half to the upper section (male to female overlap joint). The result will be fretting or vibration which chafes through the glass and puts silica into your oil. you will see this immediately in your oil analysis. the correct application is a finger wide thin film of rtv inside the female section on assembly so it's both airtight and vibration free. don't use too much or it will be too hard to take apart. I would focus less on the "fire" risk of polyester and worry more about the usability issues with novice folks using poly vs epoxy. Epoxy can be more forgiving in a tricky layup or for the inexperienced. The repairs take some care but anybody skilled with quality glass repair can do a nice job. sand and spray paint with high temp silver paint.
-
I broke my leg so I knew I would not be able to fly for nine weeks. the normal humidity in my hanger is 97% so i purchased the black max. Of the two options: desiccant vs refrigerator dryer type (black max type), I did not want to have to dry the desiccant in the kitchen oven every month so black max it is. The machine comes with a choice of two sizes of hose "plugs" to allow you to put the dry air hose in either the oil fill/dipstick port or the crankcase breather. I started with the small plug inserted in the breather. On my Ovation, the breather is a tee fitting off the oil filler/dipstick and terminates above my tailpipe on the pilot side. The issue is that ALL crankcase breathers must have an ice hole. on my io550G this hole is too far up the pipe, past two bends so I couldn't get the dryer air hose and plug past the ice hole. while i considered taping the hole shut when the dryer is installed, 1) the hole is much too hard to reach with the lower cowling installed. 2) the risk of not removing the tape is too much risk. So option two: get a small step platform so you can stand and look down into the oil filler with a flashlight. you will see the tee for the breather (it actually sticks into the oil fill, which explains why you need a really skinny long funnel to make sure you put new oil BELOW the breather tee and not on your foot via the breather!) I am able to stick the smaller dryer hose plug into the actual oil fill which is below the breather connection. So far so good. I'll know in 1,500 hours if my efforts are successful!
-
TKS light flashing on 2000 Bravo
glenn reynolds replied to amekler's topic in Modern Mooney Discussion
It is worth reading the manual very carefully. The pages in my pilot operating handbook had been very poorly photocopied so, very slow reading. I believe there are multiple failures which are all noted by a LED. 1) low pressure: dry membranes, dry panels, broken tubing, broken prop slinger, failing pump. 2) High pressure: clogged TKS filter My system used to take about ten minutes to prime, but after changing my filter $450 it primed this a couple of days ago, in about two minutes or less! I have experienced a broken prop slinger (CAV told me to build an RTV, vibration damping cone on the replacement slinger), Make sure your prop has been dynamically Balanced! I have had a nylon tube in the belly pull off. It seemed that the tubing shrunk so I replaced the section with new and don't forget the super exotic "olives" which only come from CAV. I had a filter clog. Make sure you always run the system every month and prior to a possible ice encounter. Good luck and CAV is very supportive. -
Alt Breaker Pops when Field Turned Off
glenn reynolds replied to Boilermonkey's topic in Modern Mooney Discussion
I had exactly this problem. Advanced aircraft in Troutdale or, a mooney service center explained that I was missing a diode on my alternator. The diode goes between the field terminal and the ground terminal on the alternator. It took about ten minutes to install and came with a diagram showing which end of the diode goes on which terminal. My Alternator has four terminals on the end. One is the output terminal and this has a large diameter wire and this is the output from the alternator. The second terminal is ground and this has a braided ground strap which runs to my engine case. The third terminal has a small diameter wire which is the field circuit. my field circuit has a couple amp circuit breaker which is what popped on shutdown. The diode gets installed between the field terminal and the ground terminal (which is of course the same as installing it directly to ground only much closer). The diode that Advanced Aircraft Services (503-465-2298) mailed me had terminals crimped on both ends and had been heat shrink wrapped so it was a really well done piece. Luke told me that he ordered a couple so he would have them in stock. Thus said, I don't actually know the diode rating as it was sleeved in heat shrink. They sent the diode in an envelope so you can get it super quick. I have the diagram at the hanger (in log book) so I can add a picture of that here after my next therapy season with the airplane. -
I'm considering replacing my O2 bottle with the smaller O2 when it comes due next year. That would mean I have already lost 25 in the nose and then about 15 in the tail for a decent weight loss
-
I just had my 4 blade balanced and the engine is now silky smooth. Even my wife noticed how smooth the plane now runs. The part that gets me is the three blade prop I replaced had been dynamically balanced as well, so I wasn't expecting that much of an improvement. All the comments about faster response and landing braking are true. I now handle my prop control much more gently than I ever did before. I had a mechanic friend advise me that he has seen composite blades chipped by careless actions in hangers associated with maintenance so he insists that when I drop the plane off for service I leave it with blade covers to protect the blades. I made my blade covers from closed cell foam floor pads and so far so good,
-
Oil Consumption - is this normal?
glenn reynolds replied to Red Leader's topic in Modern Mooney Discussion
I suggest that you purchase a six pack of oil sample kits Prepaid - from blackstone lab. the kits will be in your name with your n number on the paperwork. I simply put the kit on the pilot seat on top of the plane key in the airplane when I drop it off. The kits come with a prepaid mailer and since you purchased them, blackstone already has your email address to send the report to. there are several oil analysis companies and it's hard for mechanics to stock sample kits from each of the vendors and then fill out the paperwork and get it to the post office etc. I keep both filters and oil and sample kits in my hanger, I fly for work and so having made calls to confirm availability, I often have oil changes done while I'm on the road. -
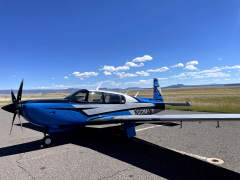
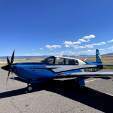
From the album: N9624M
-
N9624M
Images added to a gallery album owned by glenn reynolds in West Coast Mooney Club's Planes We Fly
its a 1995 Ovation with TKS and an owner who does way too much left seat time -
-
M20R Gear Rigging to fully retract nose gear
glenn reynolds replied to Ed de C.'s topic in Modern Mooney Discussion
My ovation is also FIKA and for sure that eats about eight knots of the book speed. However I REALLY like TKS so no complaints. I also had a part time mooney mechanic who thought he was supposed to use the older style torque tool on the nose gear and that was wrong. I learned the hard way that one of my door panel rods was adjusted TOO tight! yes it sucked up nice, but it eventually broke the hinge. I disconnected the rod, swung the gear, then tried to fit rod and door and found it an inch too short. I really believe in doing this at a shop like dmax or wilmar -
I had a damaged gear door (it had been rigged wrong, too tight actuating rod, broke the hinge). the field shop removed the damaged door and the corresponding other wing door to keep the plane symmetric and I flew while the door was being repaired. I'm not allowed to say how I know, but DO NOT fly with just one door removed!
-
West Coast Mooney Fly-in Sat, May 27, 2023
glenn reynolds replied to Skyland's topic in West Coast Mooney Club
I put it on my calendar -
Don, I don’t believe my model m20r serial -37 has a timer. Could I buy a timer from you. 24 volts
- Show previous comments 5 more
-
Sounds great
-
Glenn Reynolds
179 West Point avenue
half moon bay, ca 94019
209 603 5206
-

Glenn,
I haven't forgotten about you. I Just got back in the country late Saturday night.
I am having to get some parts to work on your timer. I hope you are not in a hurry.
Don


