

cctsurf
-
Posts
585 -
Joined
-
Last visited
Content Type
Profiles
Forums
Blogs
Gallery
Downloads
Events
Store
Everything posted by cctsurf
-

Oil cooler relocation with dog house
cctsurf replied to vik's topic in Vintage Mooneys (pre-J models)
How I wish I could use these on my plane... I really want Sabremech's cowl, but I haven't seen much from that recently. At the same time, I've got a replacement set that would fit mine, but I'm missing a couple of components... Need to either source them or build them. I really don't love the long battery cables. I've got them in my Cherokee. I also think I would have weight and balance problems...but I haven't studied that carefully. As of right now, I'm happy with where I am. It's flying and annualed for the first time in 3 years after an extensive list of repairs and upgrades. -
Oil cooler relocation with dog house
cctsurf replied to vik's topic in Vintage Mooneys (pre-J models)
The oil cooler in its original position is known to have the airflow flow backward through it in certain regimens of flight.. The original cowlings and pressure cowlings on our old birds are -quite- inefficient. I've always wished I could move it on my C, but the battery box is in the way. -
Hot air dump valve closed when carb heat is on?
cctsurf replied to M20 Ogler's topic in Vintage Mooneys (pre-J models)
Two things: To direct the hot air only into the carb when carb heat is called for (and not just allow it to be dumped overboard), and so that the extremely hot air has somewhere to go when the carb heat is off. I believe the earliest models of the carb heat system didn't have the dump at all. And If I recall correctly, there is a service bulletin that called for modification so that they didn't melt things or make other problems. I believe the forced air also pushed the hot air into the carb even if it was turned off without the dump valve. -
With regard to the plug gapping, that is one of the suggestions made to me by SureFly as I attempted to troubleshoot my installation. "Gap the plugs wider...no wider... as wide as possible..." I forget the actual number suggested, but I went somewhat less than their suggestion, but still much wider than the standard plug gap, I believe 0.025". I do have to wonder, where did you get the desire to gap plugs that wide? It certainly isn't in the installation manual. I do agree with you @jamesm, I can't understand the "used with the origin SoS system and original left mag" comment. The SoS system does not have a use with the Surefly system. I can't imagine that the OP and his A&P connected the SureFly to the SoS "p-lead"... My Maggie harness was perfect, so I can't suggest any problems with it, but others have suggested that mislabeled wires happen. I would carefully check the firing order in the surefly installation manual against the wires. It's a long shot, but worth it.
-
HELP! S-Tec 30 POH Supplements and STC Info Needed
cctsurf replied to Anzaldi01's topic in Vintage Mooneys (pre-J models)
I know this is an utterly useless post in regard to your aim to acquire STC and POH Supplements, and I wish I could help you. I am mulling over the options for auto pilots for my '62 C model and am curious about getting a S-Tec system installed and especially the STC transferred to it. I suppose you are essentially working outside of the STC process, because you are getting field approval. But I would be curious about any light you could shed on it. Perhaps a I could get one of the more modern autopilots approved in my early model mooney for which it hasn't been approved by field approval... (I personally would offer my C model as a test bed for anyone who wants to get an autopilot approved for the early models... ) -
I agree with @Ragsf15e, get in touch with SureFly's support. They helped me through my initial problems. Mine were harness related, so it appears that you have covered that issue with the Maggie harness. One of the first areas we addressed with Surefly support with my issue was power delivery. Where did you install the tap for your power? With an E model, your battery is almost certainly behind the luggage compartment. Did you go back there for your connection? The closer to the battery the better. The supplied power wire is too short to get to the battery box. What kind of connections did you make along the way? Are you sure they are solid against the rhythmic assault our planes and their components undergo? Power jumping around can apparently give this problem. Especially if the power gets above ~32v sometimes (I forget the correct number but somewhere up there) the Surefly will shut off in protection mode and restart, causing late firing, Your E model should be 12v... so the high voltage --shouldn't-- be a problem...but might be worth a check. But the other side is low voltage dropouts...could also be a symptom of a bad regulator...maybe a bad diode on an alternator would push the voltages to above the cutout threshold... @kortopates just made an excellent point. Checking for split timing doesn't make any sense with the surefly. It is a point of contention in my upkeep of the system. I really like to hear the buzzers and have the lights turn on together when I time magnetos. There is no way to do that with a surefly next to a old style mag. Are you certain that you didn't time it to 25btdc and it's trying to fire @ 50btdc? As always, check your timing marks, too. But make certain that the light is turning off at the 0 deg mark, not the 25btdc mark. Hope that's helpful. I love mine. I had to put it on standard timing at this recent annual due to the engine running a little hot, but I love how there is virtually no mag drop on the surefly. I'm confident that you can get it to work for you!
-
Left Main Wheel Rubbing Wheel Well When Retracted
cctsurf replied to cctsurf's topic in Vintage Mooneys (pre-J models)
The thicker side of the collar is already down. We will be shimming to within specs, but even what we have there should not change the geometry enough for this difference. We gained a little clearance by switching wheels (one tire has a more rounded profile that doesn't rub on the way in), but I don't want to be relying on tire profile. Thanks! -
Left Main Wheel Rubbing Wheel Well When Retracted
cctsurf replied to cctsurf's topic in Vintage Mooneys (pre-J models)
Thank you for the help! The difficulty I see with the shims at the back is that it would push the gear even more forward. I don't think the collar is installed incorrectly on the stack. What else can I do to move the wheel up and back? -
Left Main Wheel Rubbing Wheel Well When Retracted
cctsurf replied to cctsurf's topic in Vintage Mooneys (pre-J models)
Here are the promised pictures: Right side, I can put my fingers between the wheel and the wing. Left side rubs on the way through and doesn't easily turn in the well. And here's a video of the gear leg jumping forward. 20210824_103123.mp4
-
Left Main Wheel Rubbing Wheel Well When Retracted
cctsurf replied to cctsurf's topic in Vintage Mooneys (pre-J models)
Well... More fun. As the gear is compressed as the plane is set on it, the whole leg jumps forward. @M20Doc Do you know what the solution is? -
Thermos Style Gas Cap (1963 M20 D/C)
cctsurf replied to Dan Stewart's topic in Vintage Mooneys (pre-J models)
I would be happy to send the originals to you if they would be helpful... They shrunk so that they don't seal neck of the tank, so I am not certain they would be. -
Left Main Wheel Rubbing Wheel Well When Retracted
cctsurf replied to cctsurf's topic in Vintage Mooneys (pre-J models)
Sadly, I didn't think to take pictures today. I will attempt to post some tomorrow when we work on it. The Collars are in the same orientation. I believe the rubber shock absorbers were replaced by Wilmar when the tanks were sealed, so I suspect that they are installed correctly... =) I also believe they were the last ones to significantly work on the gear. The Tires are different. One is an Air Hawk, I forget what the other one is, and I couldn't tell you what tubes are in them. They are inflated to 30psi. But, as I say, they do the same thing when switched side for side, so I don't think it is the wheels. This seems to be a recent development because there isn't significant wear on the paint in the wheel well. There haven't even been even recent hard landings that I remember. -
I'm in annual right now and we have come upon what seems to be a head scratcher. It seems that my Left Main gear wheel is rubbing in the wheel well when it is retracted. It is rubbing on the forward side and on the bottom. What seems interesting is that the stacks of rubber "shock absorbers" are within a 16th of an inch of each other in height. It is not tire size, when the tires are switched the problem remains with the gear. It is not the upper gear, those clearances seem identical. I'm of the opinion that if we flip the collar on top of the rubber stack, it should take care of itself, but it still leaves the question what geometry is off? If there is geometry off, it would seem to be that it would be shorter and pushed back, not forward and down... Thanks!
-
Thermos Style Gas Cap (1963 M20 D/C)
cctsurf replied to Dan Stewart's topic in Vintage Mooneys (pre-J models)
I know that this is an older thread, but I thought this would be of assistance to those in the future with this question: I just had the experience where the caps would no longer seal on my '62. I ordered the 2 1/8" caps from McMaster-Carr. https://www.mcmaster.com/catalog/127/2221/ , P/N 2598K55 I ordered the zinc plated steel ones because I had no intention of using the metal bits. Upon arrival, I was quite concerned because they seemed significantly thicker than the originals. However, back to work... I was able to unscrew both caps and install the new seals quite easily. The 2 1/8" caps just slide into the fill holes in my tanks. Seals like a dream! -
Sounds like you and I are running very similar engine setups. I have the powerflow, surefly, and superior cylinders on a c model. A little carb heat may help your CHT distribution immensely. Since I have had my jpi installed, as I just crack the carb heat, I can watch the difference between the chts drop to almost nothing. Normally, my cylinder 3 is quite warm of the others. If you look at the flight data I attached, around 30 minutes after startup, I finally set my mixture and open the carb heat a little. Notice the brown line, cht 3, actually falls below the others and the temps just around 380 for the flight, with a little messing around because I was messing around. I push as far LOP as I can to keep those temps cool... Like Mike says in his leaning webinar, lean to roughness and then bring it back 'till it's smooth. I can lean -WAY- more with that 4 deg C of carb heat than I can without it. Hope that helps.

-
Abandoned wires cables antenna
cctsurf replied to M20 Ogler's topic in Vintage Mooneys (pre-J models)
I put my disconnected wire strewn airplane on a diet recently and removed wires galore... and gained 0.2 lbs of useful load. But at least I know that the wires that exist are in use. -
ADS-B Upgrade: My old Transponder needs repair
cctsurf replied to cctsurf's topic in Avionics/Panel Discussion
I'm curious how the GDL-82 is less intrusive than the tailbeacon? The tailbeacon replaces a light, the GDL requires being wired in-line with the transponder antenna, and the installation of a gps antenna... Am I missing something? Thanks! -
ADS-B Upgrade: My old Transponder needs repair
cctsurf replied to cctsurf's topic in Avionics/Panel Discussion
Yeah, I definitely am not in the market for the gnx 375... Looks beautiful, but I don't have 1/4 of the value of the plane to spend right now. I like the integrated fact of the gtx 335w...but that involves adding a gps antenna to the fuselage. I can see that the 327 (or honestly, any modern, used transponder--seems to have to be mode-c, not mode-s) with a sky/tailbeacon would minimize installation work... I really need to find an avionics shop that will work with me on installation. I could do all of this under oversight with NO problem... (I'm an electrical engineer with a lot of experience as a technician). -
ADS-B Upgrade: My old Transponder needs repair
cctsurf replied to cctsurf's topic in Avionics/Panel Discussion
I guess that's what I was trying to say. I was thinking to do it once and be done with it. That is why I was hoping for the tailbeaconx: A fairly minimially invasive install and no need to place a gps antenna on the top of the airframe (and figure out how to rearrange the current antenna farm). I was essentially looking for suggestions of possible integrated systems. There used to be a L3 or Lynx solution I was interested in, but I don't see that for sale any more. I didn't really consider the used market. Perhaps there are more skybeacons or tailbeacons than I imagined, which I could use as a temporary solution. Thanks! -
My old Narco AT150 is giving me issues. I really don't want to throw good money after old avionics. But as with everything in aviation, maybe the best solution isn't as simple as replacement. I have really no desire to upgrade to ADS-B. I usually don't need to fly in rule airspace (though the 10,000 foot ceiling is a bit irksome). I had been hoping to wait for the tailbeaconX when they become available, but they don't seem to be forthcoming. Any ideas when those will be available? I haven't been comfortable with the add-on systems like the Uavionix Tailbeacon or Skybeacon or the Garmin GDL-82, relying on my VERY questionable transponder, even if fixed. What about other solutions? I like the idea of something stand-alone. I don't have any installed WAAS sources...I don't fly IFR so I don't need an elaborate in-panel solution. Call me a CB, but I just want to be able to fly.
-
Front Baffle Seal Thickness w/ Doghouse M20C
cctsurf replied to TCUDustoff's topic in Vintage Mooneys (pre-J models)
Agreed that there are seals (and I should think about getting a set from you), however, I don't think these are what is being discussed. As far as I can tell, the original poster was talking about the seal around the front edge of the doghouse, where it meets the cowl. Part # 11 in the attached image. It was fairly hard rubber and mine was rotten from its 60 years on the plane. Non-fiberglass seal doesn't seem to cut it. As @cliffy said above, I appreciate your work and assistance for the Mooney Community, @GEE-BEE AEROPRODUCTS. I highly suggest that we in the Mooneyspace community realize the work that you have done for the community and purchase your products. At the same time, it can hurt your reputation to get into a argument because there was a misunderstanding of the part in question. Do you have a solution for that part? Is there a better solution than 1/8" fiberglass reinforced baffle seal? Thanks!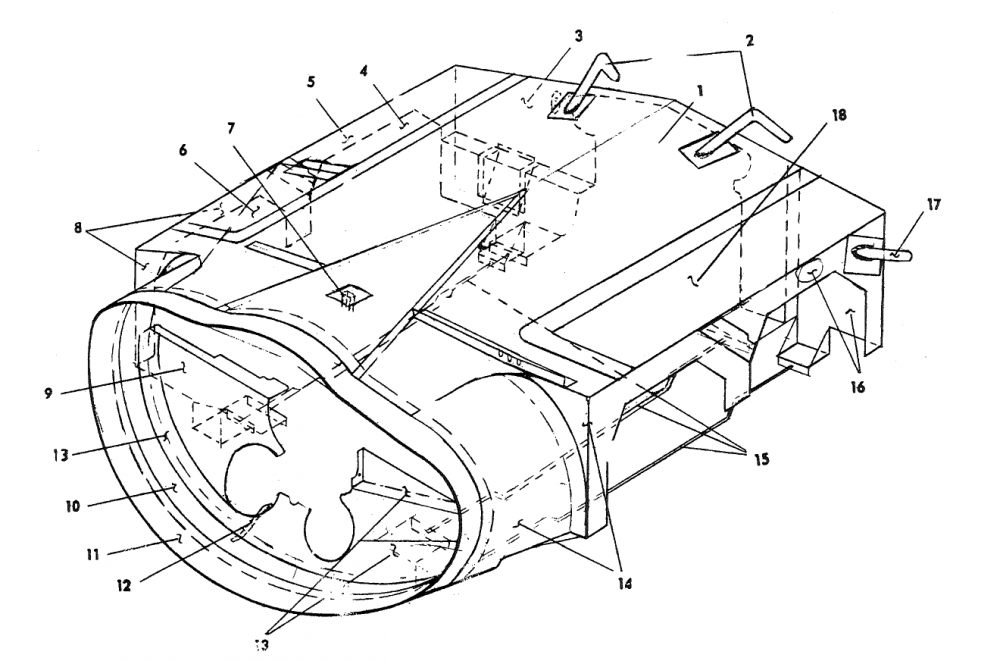
-
I'll PM you.
-
Is that the tach sender (that attaches to the rpm cable mount on the back of the engine) on which the tach and manifold pressure gauges are propped up? Is that what you are calling "Manifold Pressure and Tach components"? I'd give you $225 for the tach, wire, and sender, if you have them. And, it is a beautiful panel you have built!
-
Having had both tach and map gauges fail on me before, and alternator issues as well, I like having a backup... I don't need all the other gauges to fly and especially land, but when I didn't have a working tach or map gauge I was pretty uncomfortable. I honestly hadn't thought of splitting them and using a different cylinder for the original map gauge... Duh. Used a different one for the SureFly ignition I installed at the same time. I feel like I'm running out of cylinders to tap for MAP, I'll only have one cylinder left... I don't have any plans for that one...yet.
-
So, Now my dilemma... I have installed an edm-900, but I have also retained my original manifold pressure gauge. The manifold pressure on the edm is jumping around and would apparently appreciate a snubber, but I also feel like I should have provided a weep hole for the mechanical gauge...


