

pkellercfii
-
Posts
43 -
Joined
-
Last visited
Recent Profile Visitors
2,212 profile views


pkellercfii's Achievements
")


-
$400 last fall. That was for FOUR altimeters (Aspen 2000 system + L-3 ESI 500 backup PFD + OEM mechanical altimeter), plus everything else that goes with transponder and IFR checks. Shops have varied on how they treat my multiple altimeters. Some charge more for multiple altimeters, so don’t. Last year’s shop didn’t charge extra for multiple altimeters. Per the FARs, all altimeters must be checked for the IFR checks, although so far that’s just meant that the shops have to record the readings from all altimeters. One guess as to which altimeter was most accurate… —Paul Keller
-
Observed oil temp difference based on probe location
pkellercfii replied to shawnd's topic in General Mooney Talk
I used to get uptight about my TSIO-360 engine oil temps being too low at around 160-170 F. After hearing at an IA renewal seminar that peak oil temps will typically reach ~50 F above the supply temperature for NA engines and ~75 F above supply temp for turbos, I’m not concerned about 160-170 F oil supply temps anymore. In fact, that IA renewal seminar makes it sound like Continental’s vernatherm spec of 170 F for the TSIO-360-MB is about right. —Paul Keller -
Observed oil temp difference based on probe location
pkellercfii replied to shawnd's topic in General Mooney Talk
I made the switch from a JPI EDM 800 to an EDM 900 for my TSIO-360-MB just over a year ago. With my case as well, that changed the location of the oil temp probe from the supplemental position in the crankcase nose to the engine type certificated location at the base of the oil cooler. I'd say that my average measured oil temps haven't changed much as a result of the probe location change, but I do see much faster variation in oil temperature from the new location. That observation is pretty much entirely the result of inspecting the logged engine data after flights. Your reported oil temp of around 160 F with OAT around 60 F sounds is very similar to what I'm seeing. On a recent flight from PGD to my home base of TTA, just after top of climb over S. Florida in January I was seeing an oil temp just over 160 F with the OAT at 50 F. The OAT fell to around 15 F near the end of that flight, resulting in the oil temp dropping to around 140 F or less. I can't provide any advice regarding the Garmin EIS. I've never dealt with any Garmin EIS. Keep in mind that the engine service manual specifies that the vernatherm is supposed to close completely at oil temps between 168 and 172 degrees F, so we really shouldn't be seeing oil temps very much higher than 170 F from certified primary oil temp instruments on TSIO-360-MBs. The highest oil temp I recall seeing from my EDM-900 was about 195 F, just after landing on a hot summer day. --Paul Keller -
I completed the installation of a JPI EDM 900 in my Mooney about 15 months ago. Had one problem with the oil temp probe at initial installation. JPI was very prompt about shipping a free replacement oil temp probe. That resolved the issue. No problems since after ~100 hours TIS. I’m very happy with the JPI, and would highly recommend it to others. —Paul Keller
-
Went through this with the TSIO-360-MB which powers my 252 about 15 years ago. That was a field rebuild by Western Skyways, which included new Continental cylinders. Have to agree with the advice to follow the manufacturer's recommendation/requirements(?) for break in. One exception: Fuel and induction system adjustments prior to the first flight. Given that the TSIO-360-MB is a Continental engine with Continental's continuous flow fuel injection system, the engine fuel & induction systems most likely won't be adjusted properly for your aircraft right out of the box. Continental probably recommends adjusting everything to their specs before flying it. Putting a lot of lower power ground run time on any new, newly overhauled, remanned or rebuilt engine isn't a very good idea. My then-IA and I had an interesting discussion about how much ground adjustment to do prior to the first flight. The compromise we arrived at was to do just a few ground runs just to get the takeoff fuel flow at or above service manual specs. We simply worked from the Mooney OEM Hoskins fuel flow gauge without connecting any test equipment. That worked very, very well. A point made my then-IA, which was very correct, is that for the first few flights, a lot of things are going to change as the piston rings seat themselves. As a result, spending a lot of time, and ground run time, adjusting the engine prior to the first flight is probably mostly a waste of time at best, and possibly detrimental to proper break in at worst. My hangar elf was mighty busy making an adjustment or two after every one of my first few flights after the rebuild. Ihad the rings very well seated after about 10 hours flying time, and at that point dumped the break in mineral oil and changed to standard AD oil after those 10 hours were completed. I also changed & cut the oil filter at that point and found just a single fleck of what looked like aluminum in the filter media. It looked like the CHTs and engine oil temperature had largely stabilized after about 2-3 hours flying time. For the break flights themselves, I used a power setting of 28"/2500 RPM with the mixture full rich for the first two or three flights and 2-3 hours. As delivered, the engine had a problem with the idle fuel pressure being set too low. That resulted in the engine running lean at part throttle, so that the full rich mixture at 28"/2500 RPM only gave 40-50F ROP. 28"/2500 RPM ROP is just under 75% power for the TSIO-360-MB. The GAMI GAMInjector flight manual supplement suggests 125 F or more ROP for 70-75% power. That's probably good advice, given that the GAMI flight manual supplement is good advice for operating any piston AC engine, with or without GAMInjectors. After the first 2-3 hours, I varied the power setting between 65-75% power for the next seven or eight hours. That was IAW Western Skyways' recommendations. Your instructions from Continental might be different. Suggest reading what they give you carefully. --Paul Keller
-
Oxygen bottle replacement
pkellercfii replied to PprophetBirdman's topic in Modern Mooney Discussion
+1 on no need to overhaul the regulator when replacing the bottle. If the regulator is working properly, just install it on the new bottle, and reinstall in A/C. I replaced my 115 cf kevlar bottle in 2023, replacing a 115 cf Kevlar bottle which had turned into flower pots, and simply transferred the regulator. —Paul -
I’ve occasionally had this problem with my TSIO-360-MB as well. Fully agree with the advice to check whether either the oil supply or scavenge valve is leaking by. Sorry to say, but, this could also be just operator error. Turbocharged engines don’t like being idled at very low RPM. Mine doesn’t like idling at less than 1000 RPM. If I idle it at less than 1000 RPM just before shutdown, I get greeted by a mess similar to what you’ve illustrated here at the next flight. Another possibility is that the scavenge line has come loose and is leaking somewhere between the turbo and the scavenge pump in the starter adapter. If that happens, the scavenge line will leak air INTO the scavenge line, interfering with the turbo oil scavenging, and resulting in a turbo oil leak. I’ve had that problem at the connection between the scavenge line and the starter adapter. I fixed that with a ~$2.00 seal from Spruce. Don’t have the part # or link for it handy. I’m away from home & my laptop which has that info. Warning: Overhauling a turbo because it’s leaking oil is the wrong thing to do. According to an IA renewal instructor at OSH, the shaft seals in a turbo are intended to keep the exhaust out of the oil, not vice-versa. If your turbo is high time, such as more than 1000, then, maybe, yes, overhaul it since high time turbos have some rather non-benign failure modes, to put it mildly. Don’t overhaul it just for an oil leak. BTDT, fortunately Western Skyways footed the bill for that worthless op. —Paul Keller
-
I've observed this issue as well, albeit not as severely, with the TSIO-360-MB which powers my Mooney, which is pretty much a non-Encore factory vanilla 252. The highest oil consumption I've ever observed was about a quart in a relatively short flight of about an hour. The oil simply disappears, not being left on the belly, and not visibly coming out of the exhaust or anywhere else. The issue began when the engine was around 500 hours SMOH. It's now just beyond 1100 hours SMOH, and hasn't worsened, in spite of my doing nothing about it, other than keeping an eye on it. I have to observe that my oil operational practice is different from yours. Given that five quarts of oil is the minimum specified for dispatch in the POH, I rarely have much more than six quarts of oil in the oil pan. My current average oil consumption is around one quart every 10 hours. I've discussed this issue with my current IA, and his thinking is that the issue with oil disappearing is that it's probably due to valve guide issues. Unfortunately, that's a relatively common problem with Continental engines with Continental cylinders. My cylinders are Continentals, which were new with the major overhaul, which was under my ownership. Unfortunately as well, doing much of anything about valve guides involves pulling cylinders, which, yes, is expensive, invasive and risky. That's why I've chosen to simply watch and wait and spend the money on adding a quart of oil every ten hours or so. Worse, knowing which cylinder(s) have bad valve guides is also difficult to determine. My IA and I have a few hunches based on borescopy views. The valves with bad guides might be the valves observed leaking oil into the cylinders. Pulling the valve covers to look for valve guide blow-by might also be helpful. I am skeptical of turbo oil leakage being the source of any significant oil loss. After majoring my engine, I had problems with turbo oil leakage for the first few years after the overhaul. I figured out that that leakage was due to a leak between the oil scavenging line fitting and the starter adapter. If that interface leaks, it will leak air into the system, and not oil out. That will interfere with the effectiveness of the oil scavenging from the turbo, resulting in the turbo leaking excess oil out. I fixed the issue with a del seal between the scavenging hose fitting and the starter adapter. Del seals are available here. Hope this helps. Paul Keller
-
Had Western Skyways overhaul—rebuild, really, my TSIO-360-MB ~14 years ago. I’ve been happy with it. More details available upon request, as they say. Back then, and probably still currently, WS overhauled to new limits, thus their overhauls are more correctly referred to as rebuilds. Read their terms carefully. In the meantime, Aviation Consumer has published two engine overhaul customer satisfaction surveys. In both surveys, factory engines, all of new, remans and factory overhauls were ranked near the bottom in customer satisfaction. As discussed, be aware of current lead times. —Paul Keller
-
I guess you understand that you're late to the party in responding to the turbo V-band AD of June 2023. If you want to play it straight & legal, the usual parts sources, including Air Power, Aircraft Spruce and Boeing, formerly Aviall, are the places to go for a replacement V-band. Last I heard, no one has any stock, and it's just a matter of getting in line with an order, and they'll get back to you when your order comes up. Sorry, but don't expect to get your hands on a new turbo V-band anytime soon. I placed an order with Air Power for a replacement V-band in June 2023, very soon after the AD came out, and received it this March (2024). It's now happily installed. That replacement was ~$800, and, I'd suggest, worth it, since the old welded Continental V-band has been superceded by a much heavier riveted V-band. My reading of the AD is that that should terminate compliance with the AD. If anyone is interested in the new part #, I'd be happy to look it up & share. Someone here on Mooneyspace, forgot the author & thread, posted the Continental parts supercedure on this, so I'm 99%+ certain that the new part# is the legal replacement. I haven't been able to figure out Continental's parts supercedure list. --Paul Keller
-
I’ve had an NGT-9000 in my K model since 2017, and am generally happy with it. I’m not aware of any software issues with it. I have dual GTN-650s in my panel as well, and believe that I could display the NGT-9000’s traffic on either unit, but that’s not the way I use the NGT. I primarily display traffic on an iPad and the NGT itself, and, secondarily, on the MFD of dual Aspens. The one relatively rare problem I’ve had with the NGT has been Wi-Fi disconnects. This has been reported & discussed over on Beechtalk. A possible thought on the Wi-Fi disconnects on Beechtalk is that that problem may be an NGT/Apple IOS interface issue, since Android users connecting Android devices to NGTs are reporting no problems. The report over on Beechtalk is that the NGT’s wi-fi unit is separate from the NGT itself. —Paul Keller
-
How long should a Concord RG35a last?
pkellercfii replied to Speed Merchant's topic in Modern Mooney Discussion
I got over seven years from my first Concord before I euthanized it. By that time, its loaded voltage had fallen slightly, although it could still start the engine, which is what I care about from the battery in my dual alternator K model. I’m currently at ~4.5 years on my second Concord, and it’s going strong. Both batteries have been generally kept on BatteryMinders when at home in the hangar. —Paul Keller ’89K@TTA -
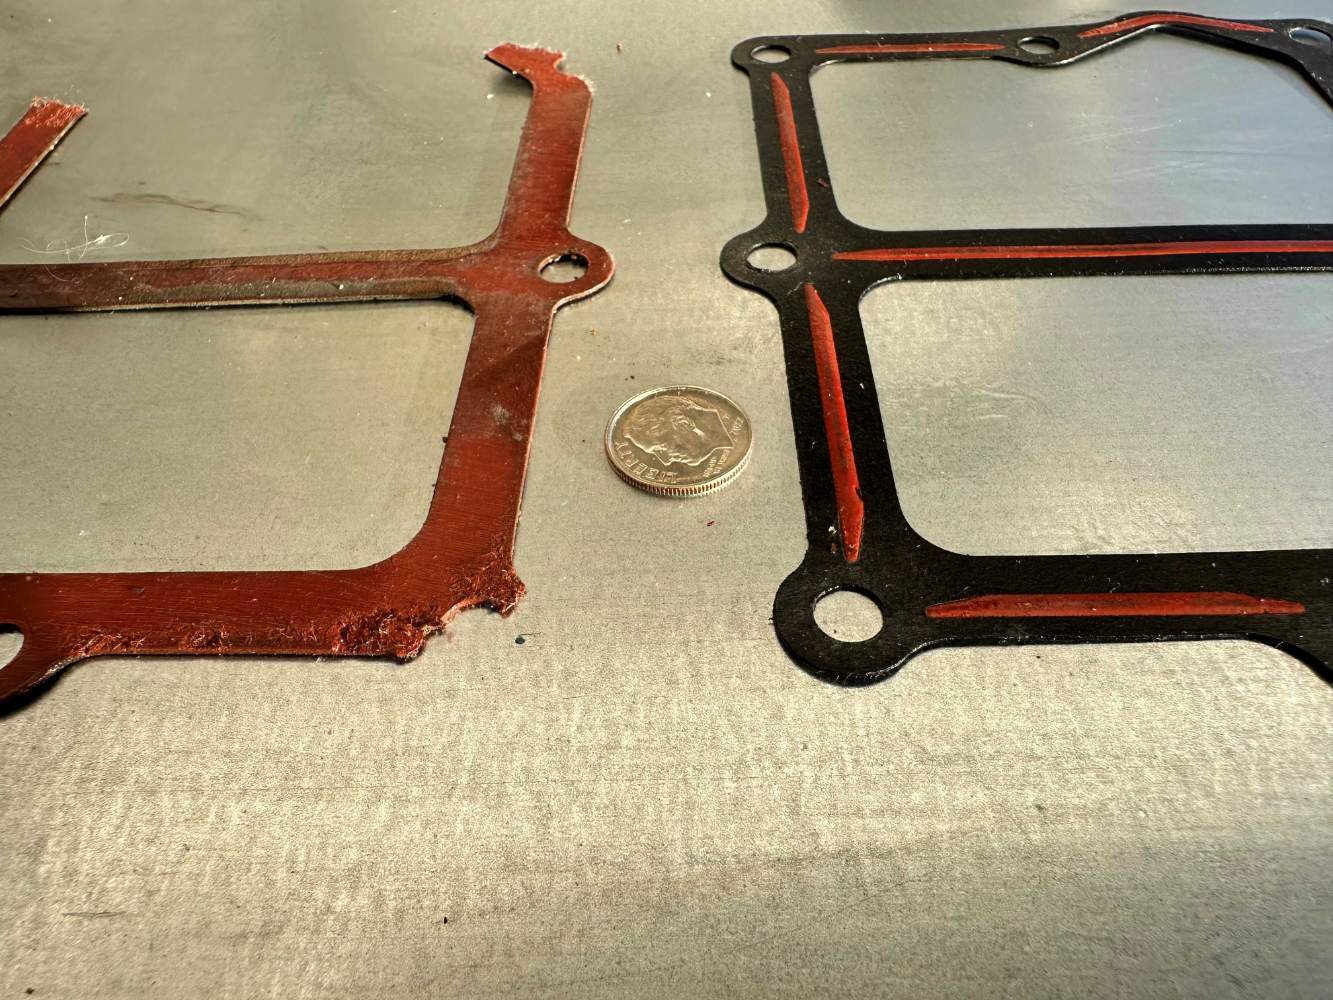
As discussed in the engine monitors board, here, I spent last summer doing an owner-assisted annual which featured replacement of an old JPI EDM-800 with an EDM-900. After we thought we were done & ready to fly, in performing the post-maintenance engine runs we ran into a nasty oil leak from the base of the oil cooler. The oil cooler had been removed during this annual to facilitate the replacement of the OEM oil temperature sender with the JPI oil temperature probe. It turned out that the oil leak was the result of a change to the oil cooler gasket. That change took place sometime between when the engine was overhauled, in 2009-2010, and now. Continental made the gasket thinner. In the attached picture, the old gasket, the all-red, slightly torn up gasket on the left, is shown alongside a new gasket, and a dime for size & thickness reference. For most of the oil cooler attachment screws, the thinner gasket isn't a problem. Eight of the nine screw holes which secure the oil cooler to the engine crankcase are through holes with no bottoms for the oil cooler screws to bottom out on. The middle bottom screw hole, though, is different--it does have a bottom. As a result, the machine screw at that location was bottoming out in the hole, rather than on the oil cooler's base attachment flange. That created our oil leak. Our solution was to replace the single thin washer called for in the Continental IPC with two thick washers. That still left about seven or eight threads in the screw engaged in the crankcase fitting that the oil cooler is attached to. It also corrected the oil leak problem. Nasty "gocha" which someone pulling any bolt-on, gasketed oil cooler might want to know about. --Paul Keller 89K @ KTTA
-
- 2
-

-

-
It’s a pain, but I’ve told by what should be a knowledgeable source, Greg Lehman at Advanced Aircraft Services at KTTD, that the trick is to remove the #2 alternator and the left mag, and then you can get the #1 alt out fairly easily. —Paul Keller
-
Your shop both didn’t follow the Mooney service manual (MSM) procedure for weighing the aircraft & determining the resultant CG, and even for the lazy shortcut they took for finding the CG, they used the wrong arm distances. If I take your wheel weights & combine them with my airframe undercarriage distance measurements, then, using the proper MSM procedure for determining CG, I get 40.86” for your empty CG. That’s still mighty far forward, but, for some typical W&B cases I ran, still within the envelope. My Mooney is an ‘89 252, and so not much different from a 231. The undercarriage distance measurements shouldn’t vary much between airframes. You need to find an A&P who will at least recalculate your empty CG correctly. Decide for yourself if you want reuse the weights measured by a shop where the personnel apparently flunked out of elementary school and thus can’t read a service manual. The procedure for determining empty CG from the individual wheel weights & undercarriage distances is on p. 8-00-01 of the M20K service manual. —Paul Keller