Z W
-
Posts
720 -
Joined
-
Last visited
-
Days Won
5
Content Type
Profiles
Forums
Blogs
Gallery
Downloads
Media Demo
Events
Everything posted by Z W
-
I'm not jlunseth, but I re-did my checklist this year and am pretty happy with how it turned out. I copied it from a corporate pilot's checklist that he made for a Cessna 441, so I can't take all the credit. Printed it front-and-back and laminated it. Two copies in the plane - one for the pilot and one for the copilot. My goal was to use it to fly more like a professional commercial pilot, and to be able to have my co-pilot read it to me like a commercial two-pilot crew. With a new panel and autopilot in the plane, updating the checklist was really necessary. In particular I've found the "Before Taxi" section is really great for making sure my flight director, altitude / heading bugs, autopilot mode, etc. are how I want them before leaving the ramp, so I'm not fiddling with all of that at the end of the runway, or getting in a hurry and taking off without it all set. Would love any suggestions on what it's missing or how it could be better. PDF attached, Word version here (can't upload to Mooneyspace): https://1drv.ms/w/s!AjJPoJhv9yifmoFH22Jlj0A2ncinjQ?e=0vCmrO Note - downloading the Word version seems necessary to preserve the dual column layout. It opens weird in my web browser, at least, but opens fine if I re-download it to my computer. Checklist - M20K - v1 - 11.10.2022.pdf
-
Yes. I don't lean that much for taxi. I've heard it taught as well. I find it too easy to give it a little too much throttle while trying to taxi uphill and stall the engine, which doesn't inspire confidence in passengers and can disrupt ground traffic flow. So I leave it rich enough for that not to happen, about 1.5 inches out. It's enough that I've never fouled a plug, and I go full rich before every takeoff and go-around. And I'm enrichening the mixture in the pattern to get there, from my cruise mixture setting. It's probably still too lean to make full takeoff power, if I had to guess. And verifying fuel flow when you start the takeoff roll is always a good idea too. But setting your engine up to stall as some kind of a reminder to enrichen the mixture for takeoff doesn't sit right with me. I prefer a checklist and good muscle memory.
-
I do exactly what jlunseth does - stay lean for landing to avoid the full rich at idle "burble", but then enrichen back to ground taxi setting prior to taxi. If you don't add a little mixture back in, depending on how lean you were, you can kill the engine when you add throttle to taxi. In fact, I will sometimes enrichen back to the taxi mixture setting in the pattern - just leaned out about an inch and a half. That's a good setting for both landing and taxi. Takeoff and go-around are always mixture -> prop -> throttle. You should be leaned to taxi to the runway, and don't want to takeoff leaned (turbo engines only). So just make it part of your muscle memory. Also a 231 engine here, but maybe this will help you with a technique for your Acclaim.
-
Sounds like a very cost-effective plan. Love the GNC355's capability for the price. I would look hard at repairing the autopilot while you're in there, or biting the bullet and installing a GFC500. A functioning autopilot is really a safety requirement for single-pilot IFR. You want it connected to the 355 for GPS/LPV approaches with glideslope. Instead of an EDM 830, why not a Garmin GI275 set up for EIS? Everything else you're installing is Garmin and I'm sure it connects nicely to the 355. I'm sure you've also considered the GI275 instead of G5's for your attitude indicator and HSI. If not, you should. As far as I know, the GI275 is pretty much an updated replacement for the G5 in almost all installations at this point. Note - I have a G5 and it's a great little unit, but it was installed in 2019, before the GI275 was around. I second the comment that ADSB is great and worth installing via a GTX345 or similar, but I guess if you don't have it in Canada, maybe that's money wasted.
-
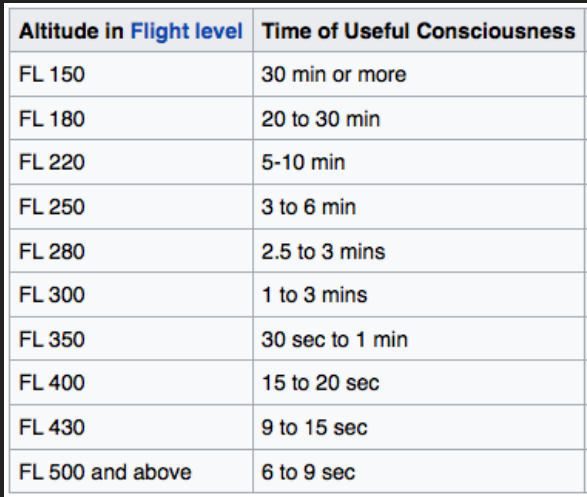
It works great. I land feeling more refreshed after a flight on oxygen than after a flight in a pressurized cabin, where the cabin altitude might be 8k or more. Hardest part is keeping the O2 tank full - it empties out faster than you'd like, and not all shops can service your O2. Some have setups to refill in their own hangar, and adding an O2D2 oxygen delivery system is another popular option. You may look into some boom-style headset-mounted cannulas. There are different varieties out there, such as from Mountain High. They make using the O2 much more comfortable compared to having to run the tubes under your headset and across your face. I don't know why you'd stop at 14k after you've climbed that high, but staying under 18k keeps you in a space where your time of useful consciousness is reasonable if you have an O2 delivery problem, so that's what I do. The only real difference between 14k and 17k is the amount of head or tail wind, and your true airspeed, which improves as you go up. I'm usually either at 7-10k fighting a headwind, or 16-17k riding a tailwind, both to maximize the benefits of a turbocharged plane. Unless clouds, terrain, or icing / freeze levels force me higher or lower. With your Acclaim horsepower you'll climb up a lot faster than I can, so getting up there is easy. Happy flying.
-
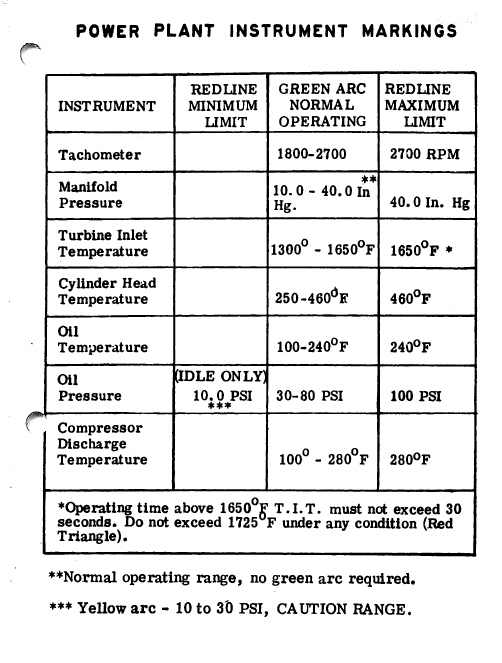
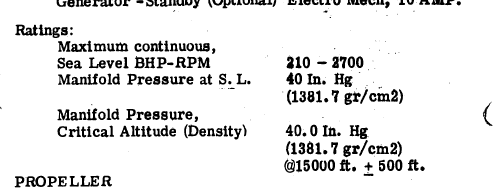
I believe the 231 had different required instrumentation than the 252. At a minimum, it had a CDT gauge as required equipment, which the 252 engine does not use. In our 262 conversion, this resulted in a requirement that CDT be displayed on the G500TXi, even though we don't have a functioning CDT gauge, according to the avionics shop. I've always wondered if that's really a requirement, results in wasted space in the display for a gauge that just sits at zero. From the 231 POH:
-
It's a fair enough point. I'll look into re-routing the O2 line away from the electrical wires, probably easily done, and I appreciate the thoughts. You also could skip zip tying it at all and just plug and unplug the hose every time and run the hose across your lap. But my goal in tying it up out of the way was to protect the hose as much as convenience. With them strewn all over the cockpit they're always in danger of getting kinked, stuck under a seat rail, unplugged, etc.
-
Wait until you find out what they let any untrained kid fill up the wings with... Just kidding around. I grew up using an oxygen/acetylene torch to melt holes in steel in an average garage. There are risks involved, and they should be considered and treated appropriately. They may not be for everyone. Your experience may vary. If you don't already have a fire extinguisher easily accessible in your garage and in your hangar, it's a good idea for lots of reasons, this included.
-
That's a nice looking setup. I'm not quite understanding how you have your connectors in the headliner. I thought about trying to mount the unit on the ceiling but couldn't find a great way to connect from there to the ship's oxygen system without dropping the headliner and running it behind, which was more of a project than I wanted for now. I also thought about drilling holes and running the tube behind the panels. Might still do that, but wanted to test it out before doing anything more permanent. And I was concerned with rubbing on the oxygen line where it went through the holes. Would need grommets or something.
-
Never had an IA comment on it, and at least two have worked on the plane since install. I almost didn't post it, because I figured someone would be along to tell me it's illegal and will cause my plane to explode, somehow, but I'm pretty sure it's fine. See any problems?
-
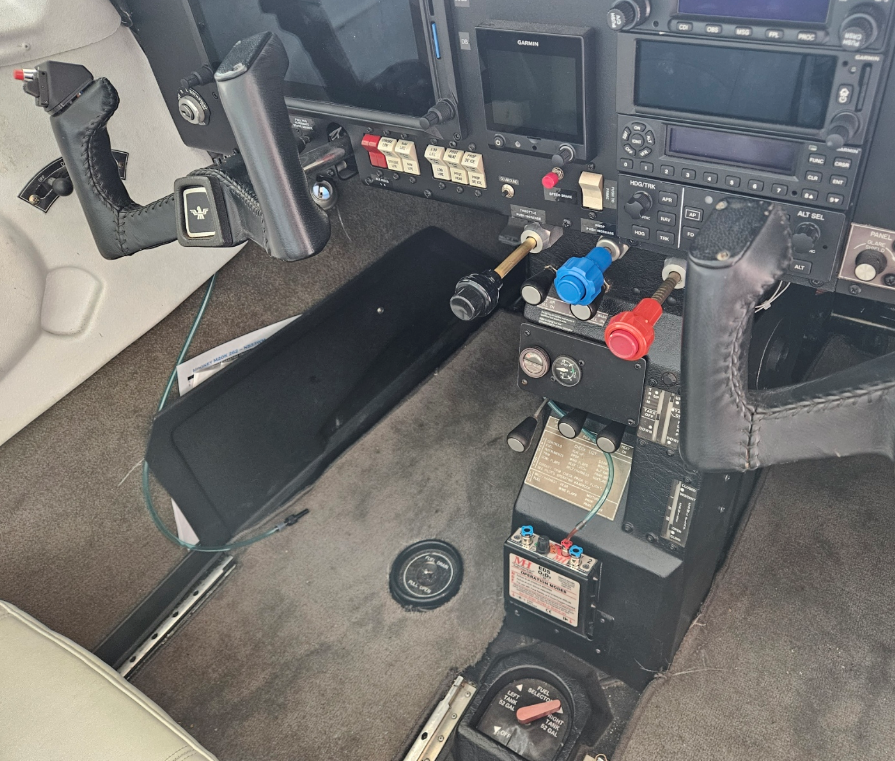
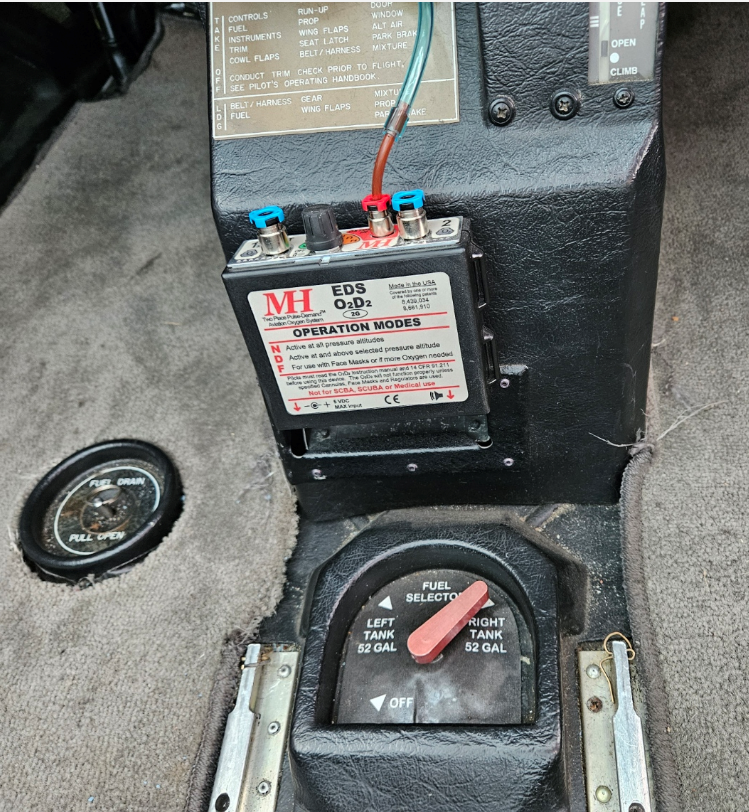
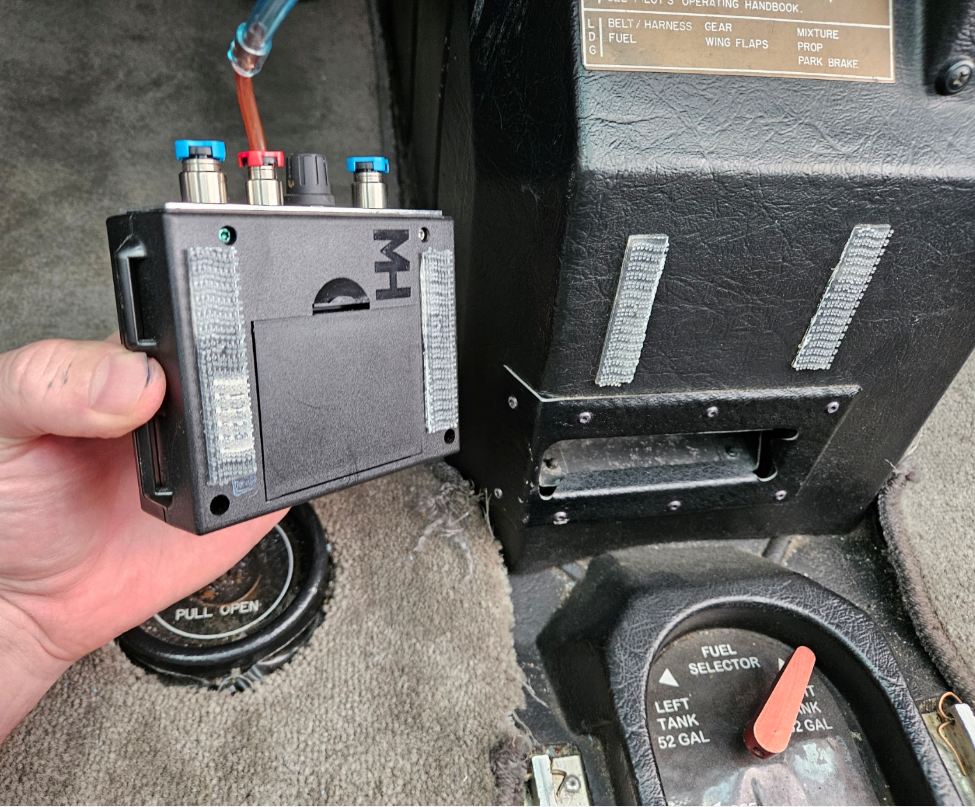
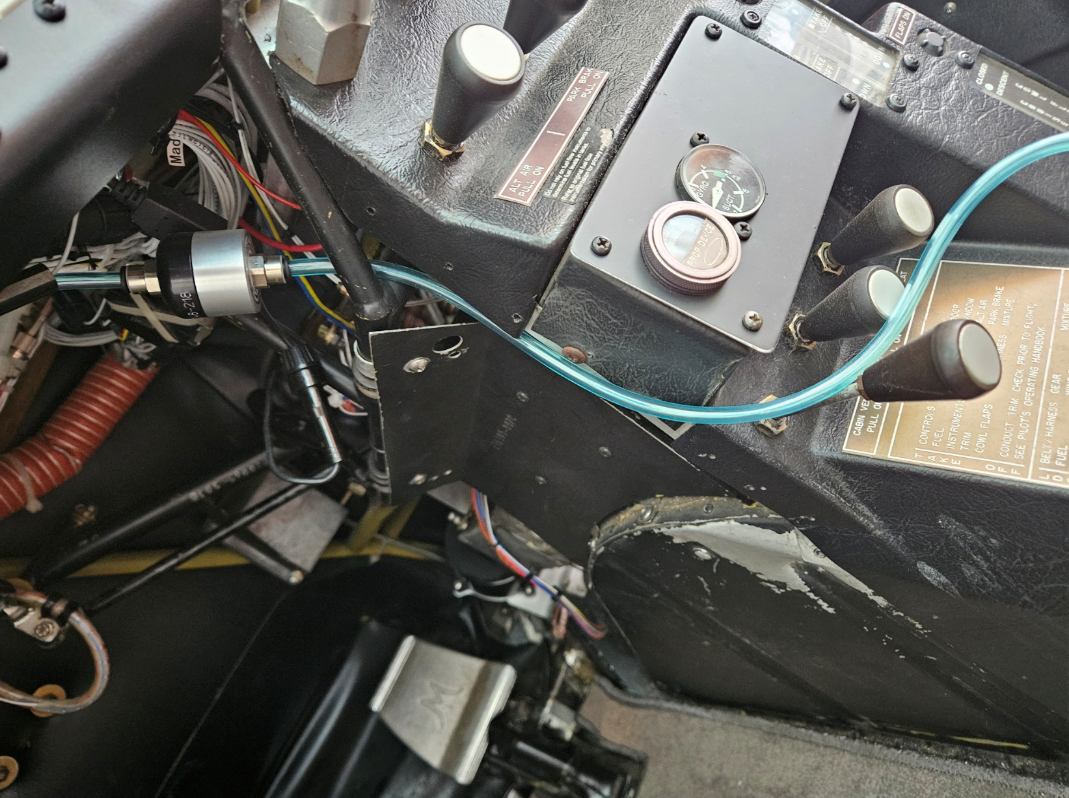
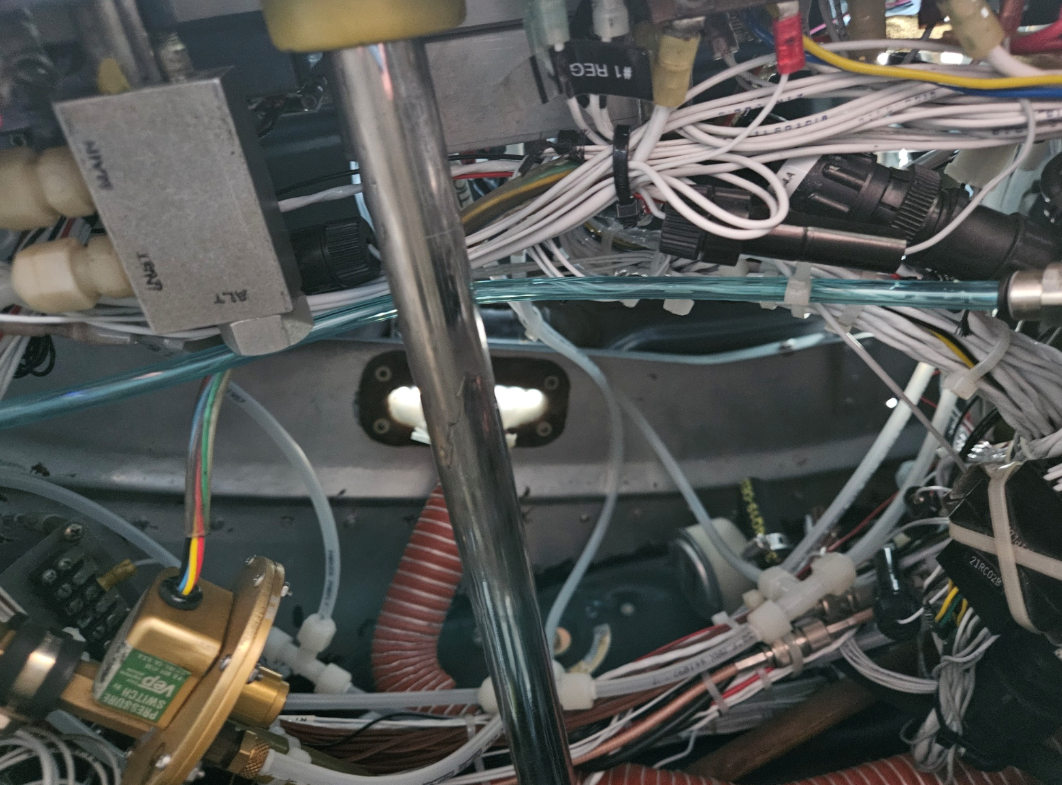
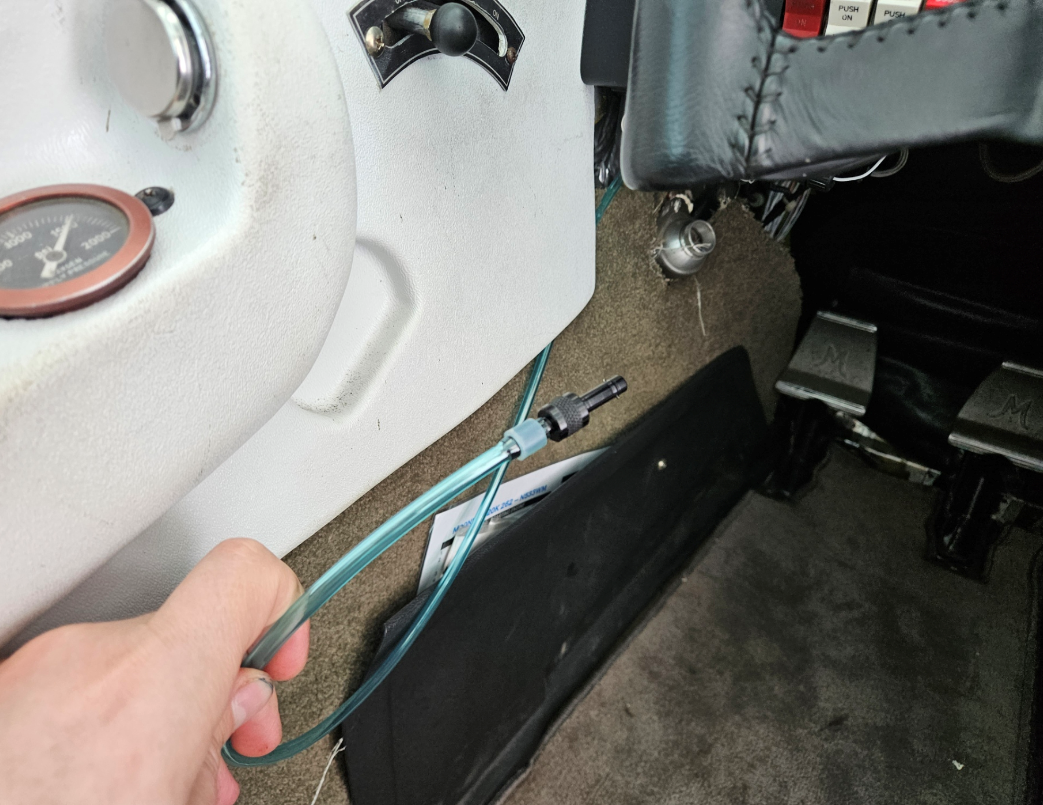
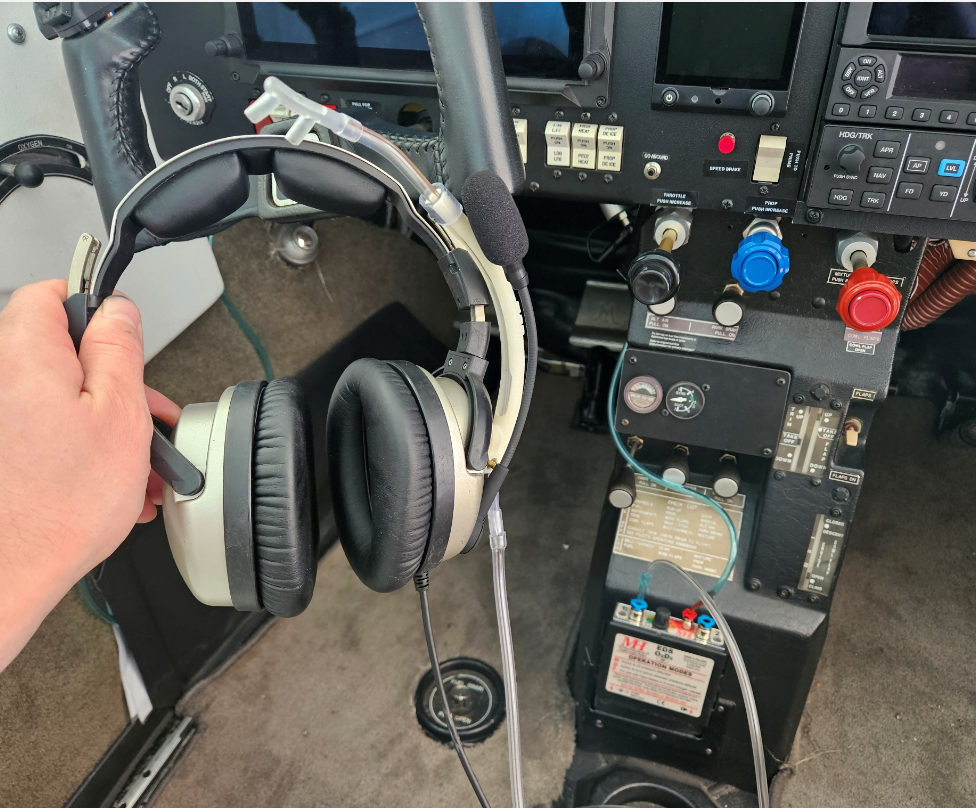
I had thought about adding one of these units for years, but kept putting it off, due in part to not wanting yet another gadget or gizmo cluttering up the cockpit. I could not find any pictures of one installed in a Mooney and didn't think there was a really good way to do it. I finally bought one this year and have flown with it for probably 25 hours and wish I'd done it years ago. The install was actually very easy and so I thought I'd put some pictures up here of what I did: I mounted the unit here, using the velcro strips it comes with. The line you see running into it is the oxygen supply line from the ship's bottle, and the blue circles are where you plug in the lines that go to your cannulas or mask. It's reasonably out-of-the way here, although you do have to be a little careful not to kick it with your feet getting in and out. I've only knocked it off the velcro once. The velcro mount is surprisingly strong/stable, it was some kind of 3M product. We'll see how it does over time, but so far so good. A closer view: Velcro pic, with bonus dirty fingernails (I was cleaning the plane): I routed the supply lines up under the dashboard in front of the pilot's footwell and attached them to the various wires/tubing up under there with zip ties. This pic shows the required in-line pressure reducer that comes with the O2D2, which tucked away nicely up there and is not visible unless you stick your head under the panel: Note - the tube is secured up high and is not rubbing on the yoke, although it kind of looks like it in this photo. It comes out the other side next to the on-board O2 plug: And it stores away nicely like this when not in use: I had planned to figure out a way to get it wired into the ship's power system, but honestly, it's been trouble-free like this and I haven't had to change the batteries at all yet, and doubt I will bother. I added boom cannulas from Mountain High that plug in like this: For the PIREP, I love this setup. You just plug in the O2, turn it on, and flip down the boom cannula, and you're good to go. Before this, we had Oxymizer reduced flow cannulas, and even those used far, far more O2 than the O2D2 system with its metered puffs. A tank lasts probably 4x longer, at least. I'm about $1,600.00 into this, so not cheap, but after it's saved me about 12 oxygen fillups, it will have paid for itself, and that includes three boom cannulas that are about $100 apiece. I also added an oxygen transfill setup in the hangar (and wrote another thread recently on that) so between the two, it's a lot invested, but now I can use O2 on every flight for almost free. But better than the cost, is the convenience. Before, I would try to ration each O2 bottle just to avoid the hassle of having to get it refilled. Now, it lasts long enough for that not to be a factor. And the nice short hose and boom cannula is no problem in the cockpit, compared to the 5+ feet of coiled up, messy O2 hose that had to be put on before your headset, and was always uncomfortable on your face. Big quality of life improvement. Pretty big safety improvement too. It beeps an audible alert if you or your passenger aren't getting their air, and it's much more noticeable if you miss a "puff", which adds confidence when flying high. With the shorter hose and cleaner cannula, there's fewer ways for it to get kinked up or disconnected, and if you do, it's right in front of you and easy to reach. I've started using the O2 anywhere above about 5k feet, which is every flight if I can manage it. Pairs really well with the turbo and lets me use it to its full capabilities. It's not quite a pressurized cockpit but I think it's close to the next best thing, and maybe even better as far as your personal O2 levels go. I land feeling refreshed and pumped up like I've been sitting at an oxygen bar for a few hours, instead of mildly hypoxic and fatigued. So there's my experience. I hope you all may find it useful in designing your own setup if you decide to go this route. Happy flying.

-
Yeah, I honestly don't remember what I paid for the bottle. It could have been $250-$300.
-
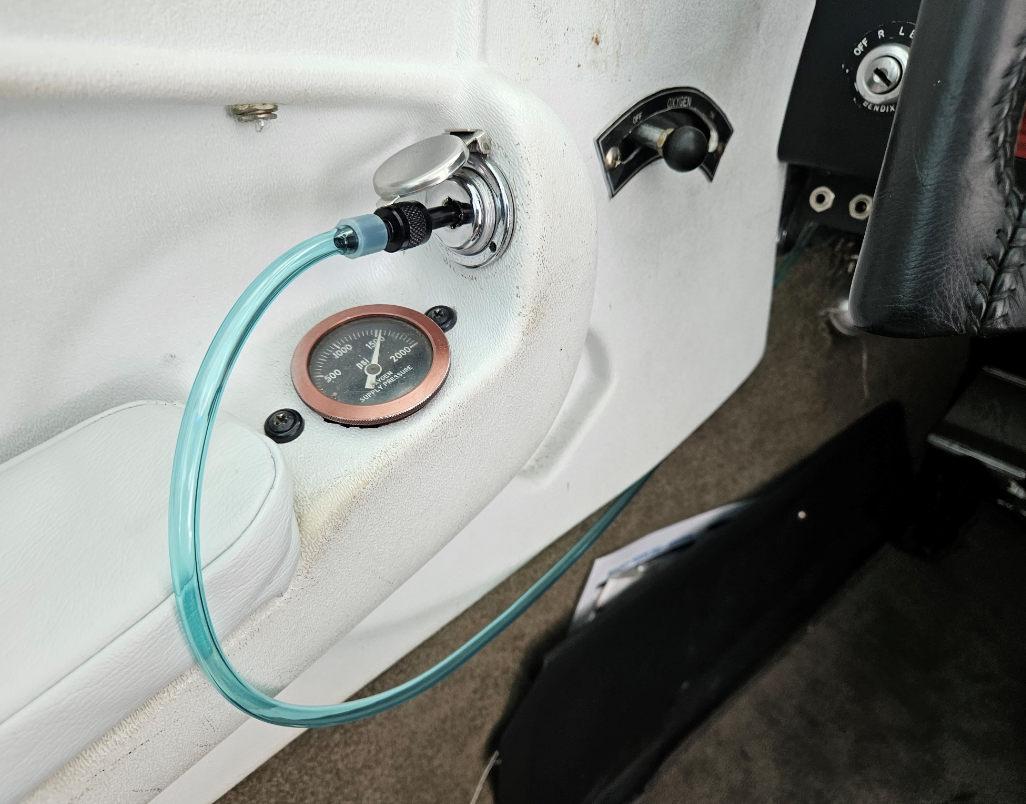
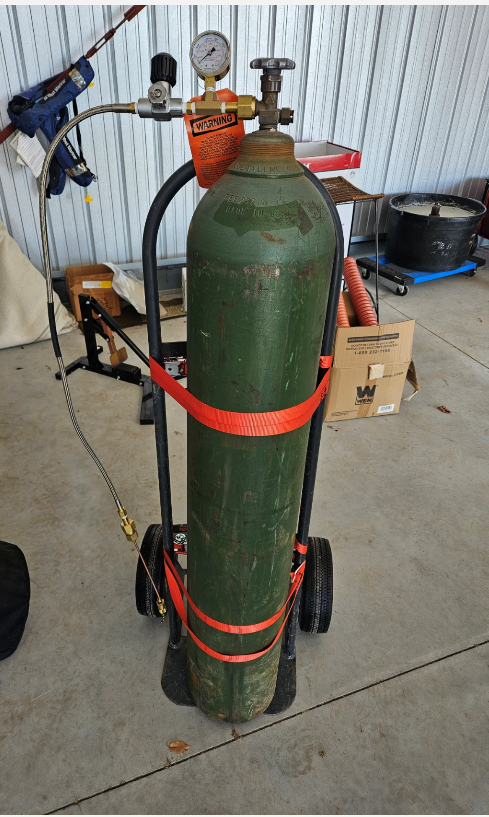
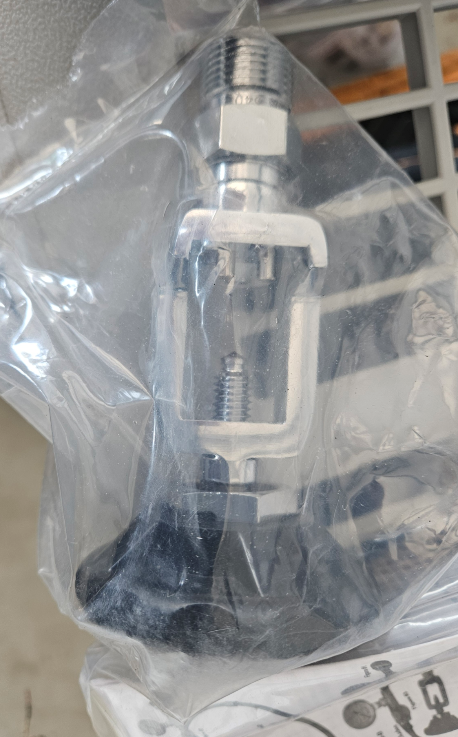
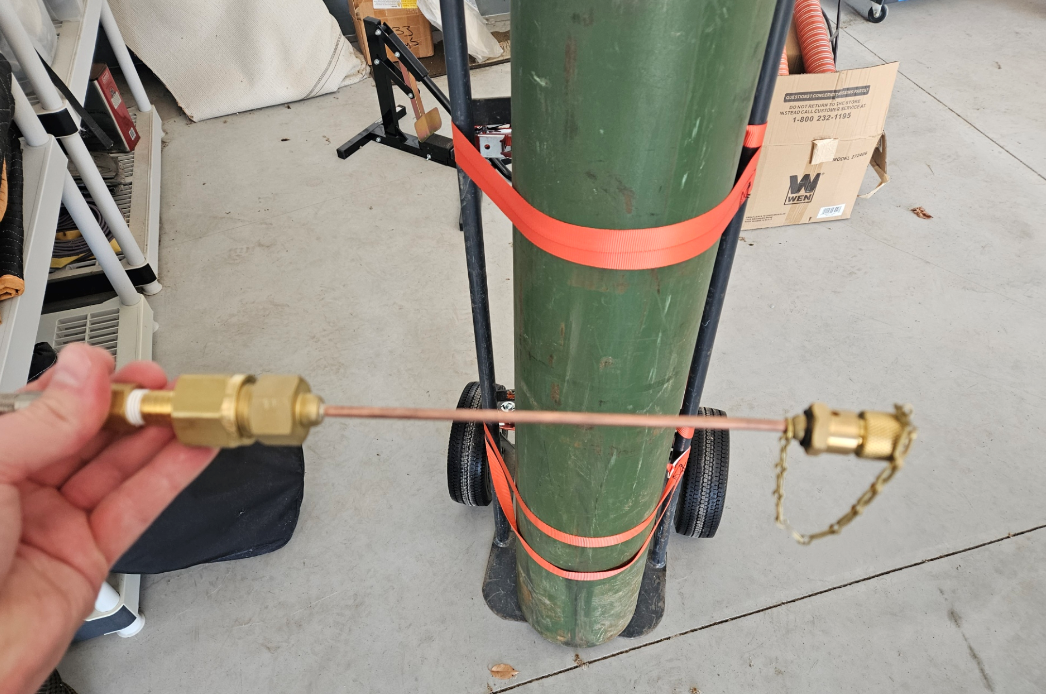
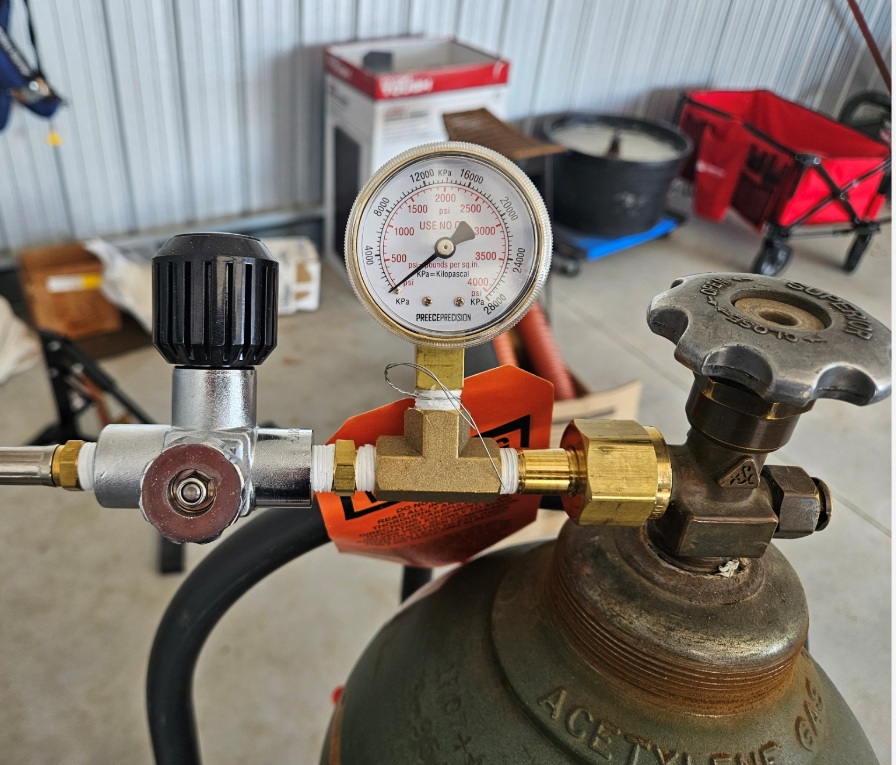
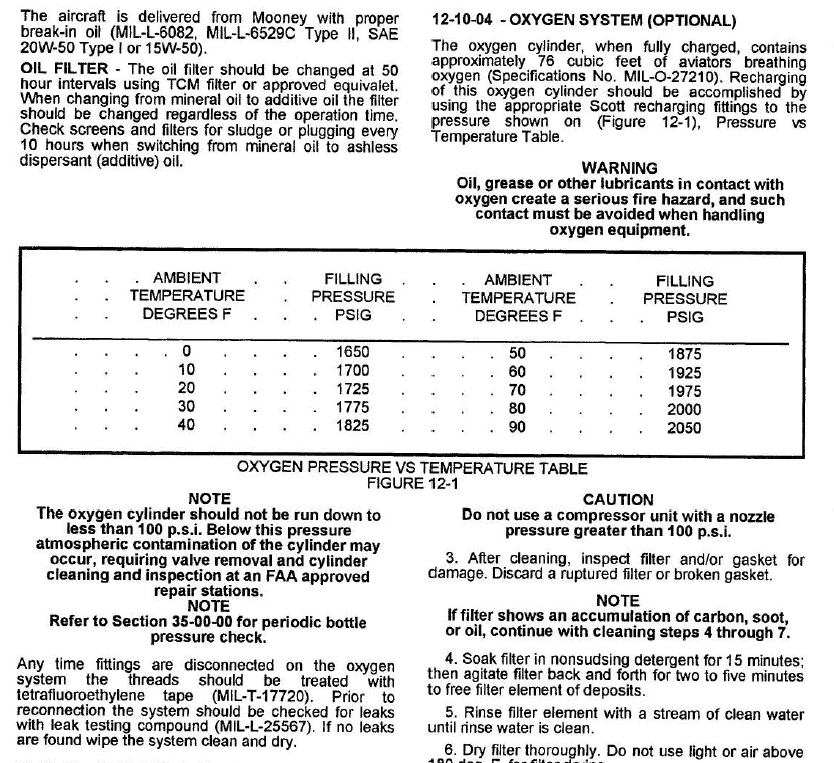
@JoshK asked if I would post some pics of this in another thread, so here it is. Background - I wanted to be able to fill the M20K's oxygen system in our hangar. The goal was not so much cost savings as convenience and the ability to be sure to have a full oxygen tank for every flight if I want it. I often found myself flying at lower altitudes to stay off oxygen just because, for example, it would be at 1/2 full and I wanted to save it for the flight home in case I needed to top weather. At the same time, I wouldn't want to pay $100+ to have it filled while there's still 1/2 of a tank of oxygen left. I also noticed I felt much better after flying with oxygen even at 9k or 10k feet and wanted to use oxygen more. I got an O2D2 system that helps a lot, but filling in the hangar was the next step. Here's what I did: The 2-wheel cart and straps I already had sitting around in my garage. The oxygen tank came from my local AirGas supplier, where I already had an account to support my welding and homebrewing habits. I don't still have the receipt but I think it was around $120.00, which included buying the tank. Refills will be about $25.00. I purchased the oxygen transfill hose on Amazon for $115.00: https://www.amazon.com/gp/product/B09GL4YN3G/ref=ppx_yo_dt_b_search_asin_title?ie=UTF8&psc=1 It's designed to fill portable bottles and comes with this attachment for that, which I have not used because I don't have any: It has CGA 540 fittings on both ends, which will fit the oxygen bottle, but not your plane. You will need a CGA-540 to 9/16-18 Scott adapter. I got mine here from Mountain High for $182.00: https://www.mhoxygen.com/product/ta-916-s-transfiller-adapter/ The fill process is spelled out in the Mooney maintenance manual and is very easy. You connect the hose to the fill port in the plane. Open the oxygen bottle and transfill hose connections: (note- the bottle says "Acetylene Gas Co." on it, as the manufacturer of the bottle. This is in fact oxygen and not acetylene). Then you open the oxygen valve by pushing the knob forward in the plane, and the pressure will equalize. There are charts in the Mooney service manual that provide pressure limits: This bottle came from AirGas with I think 2500 or 3000 PSI in it. However, it only charged the onboard system to about 1600 before they equalized, on a 90+ degree day. It seems the risk of over-pressurizing the system is very low. I had someone sit in the plane and watch the gauge by the pilot's seat while I stood ready at the bottle to shut it off when we got to the right pressure, but it stopped beforehand. Bonus - my local shop never filled our tank past 1250 PSI. I'm happy to be able to actually get close to a full tank. I'm not sure how many charges we'll get out of this bottle. I had just about gotten it down to where it needed another recharge before the plane went for annual, and the onboard bottle was timed out, so we got a new one and they topped it up for us in the shop. I will probably add a second transfill bottle to the setup. Some do that so that you have one that you use to charge it up halfway, then you top it up with your higher-pressure bottle, and you can rotate them out that way. A caution - I've worked with oxygen before. If you haven't, do your homework and be safe, it's an extremely flammable gas that can self-ignite in the presence of oil. You never want oil on these fittings and need to be careful in a greasy workshop and keep your hands clean. Also stay away from open flames. I'm happy with how this turned out and would do it again. I hope some of you might find it useful.
-
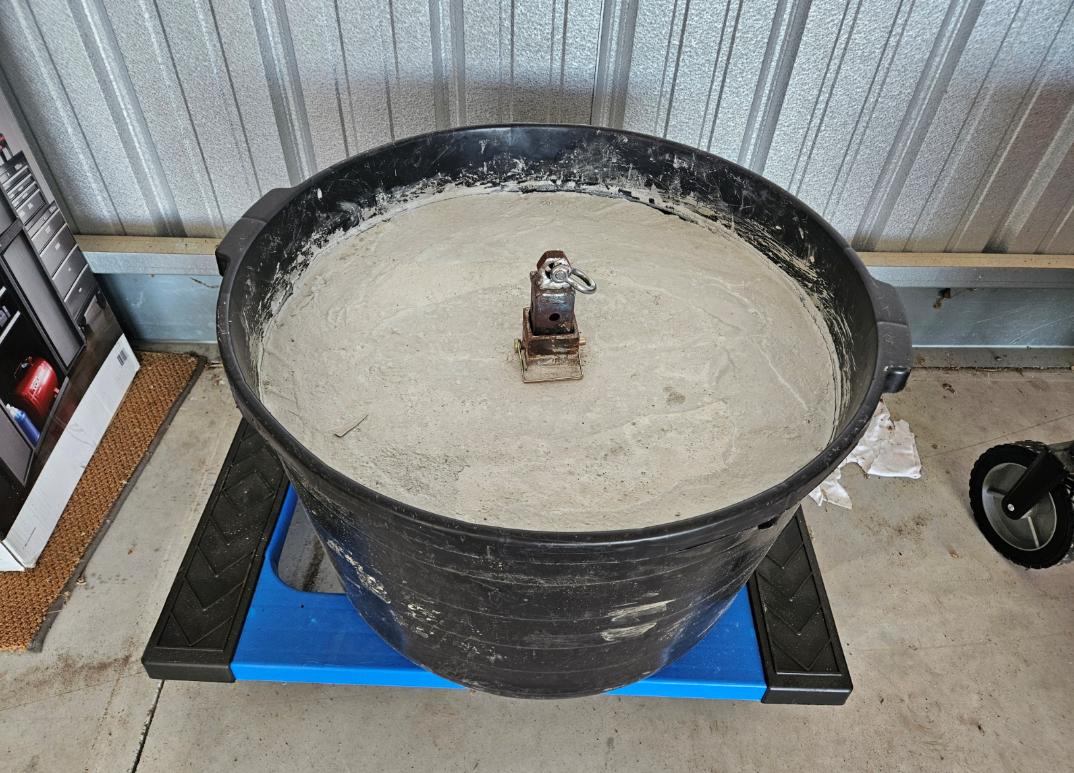
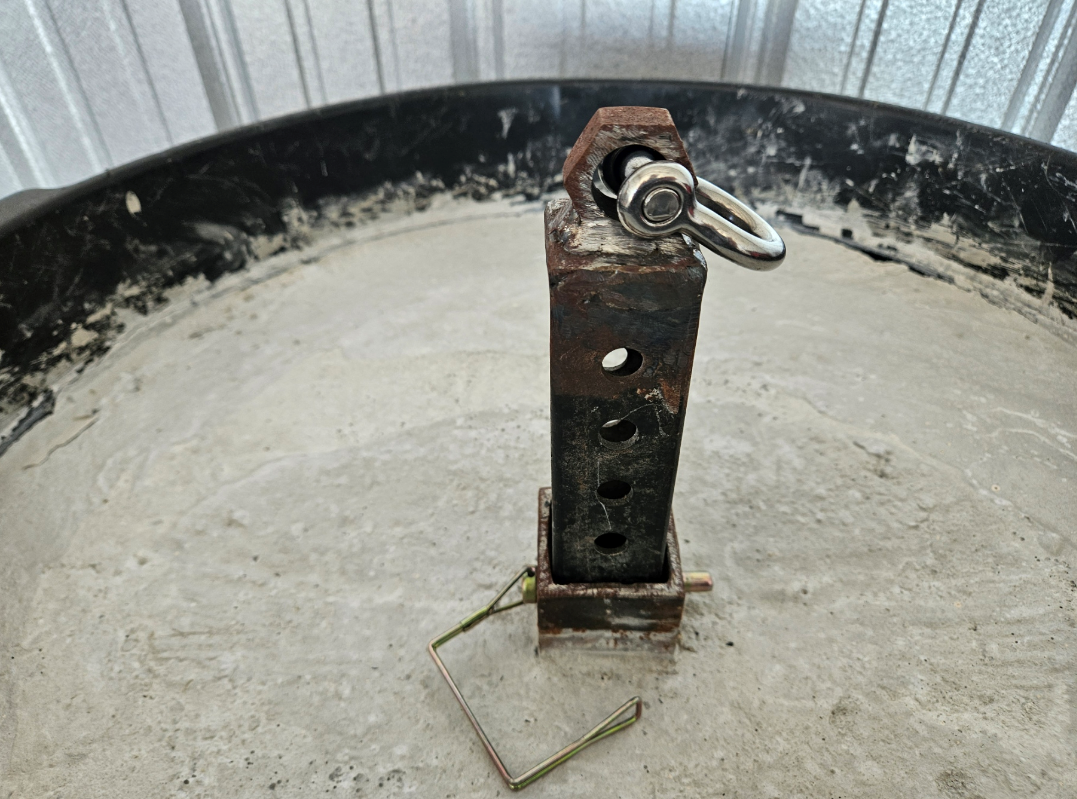
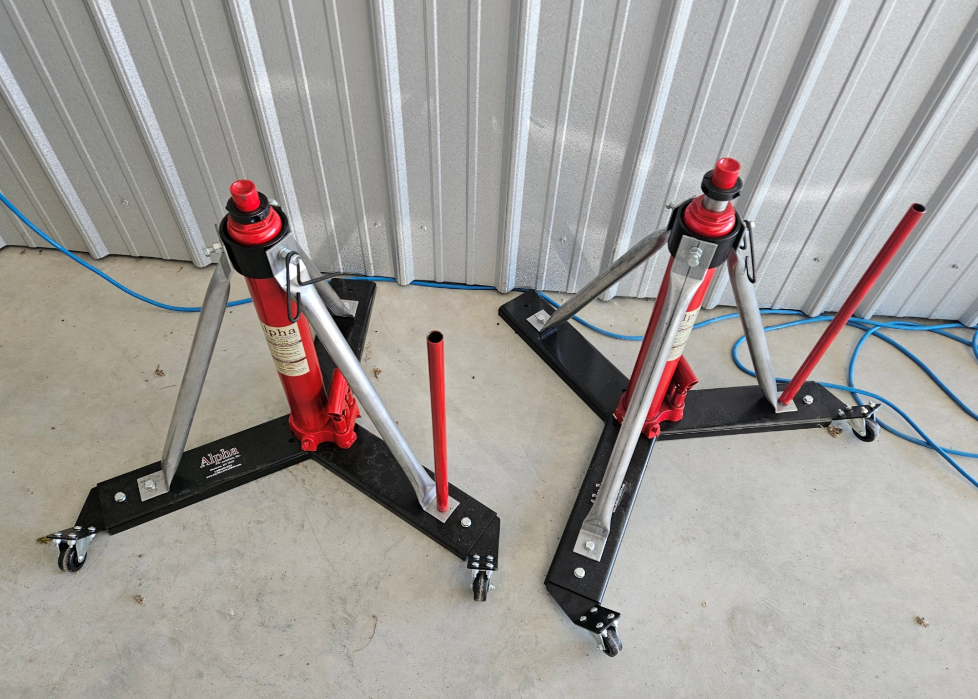
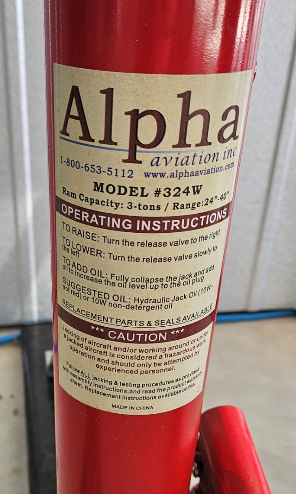
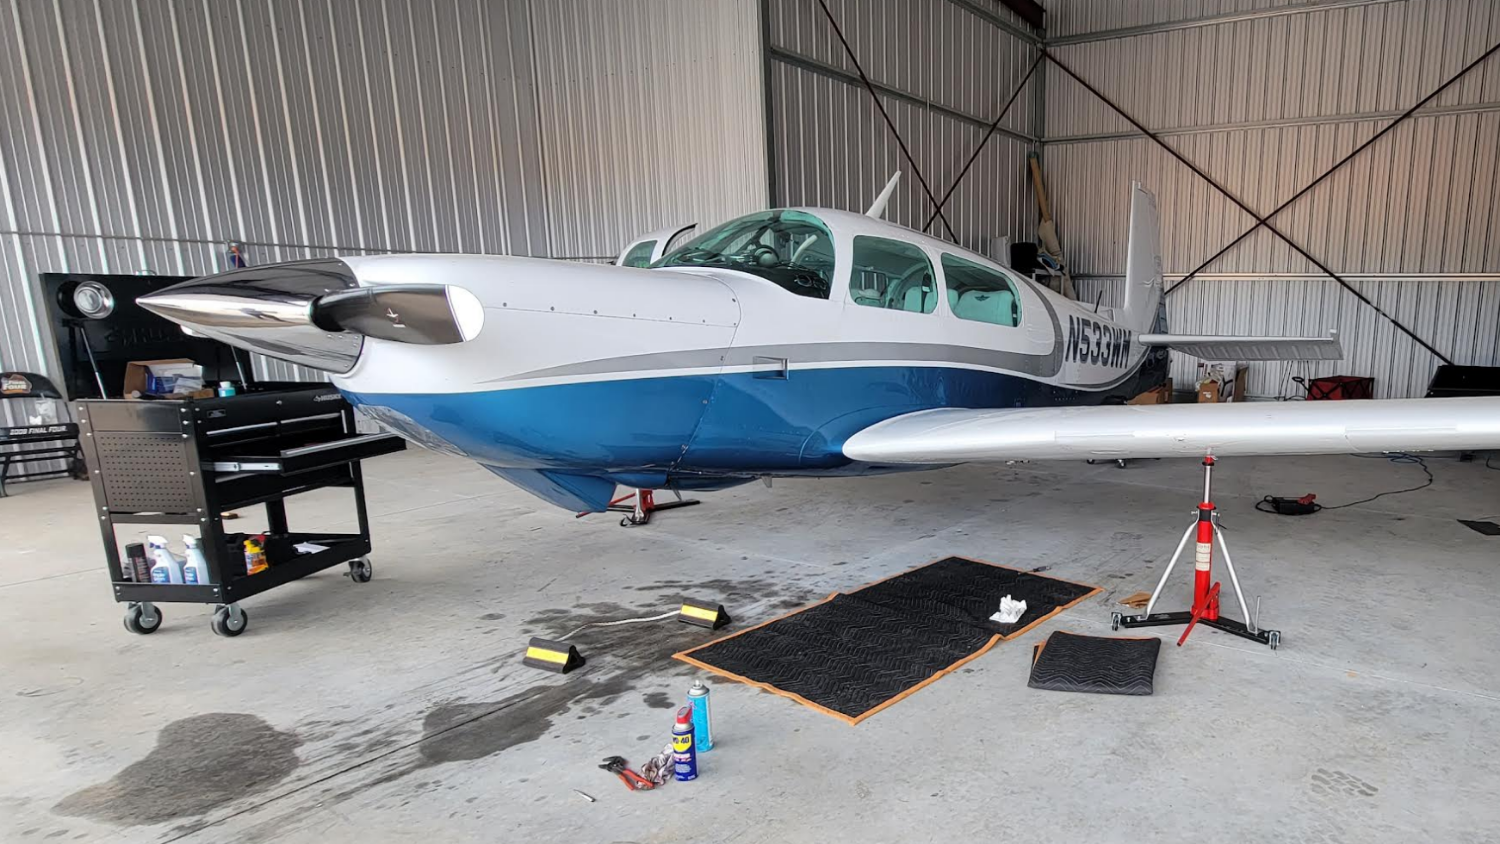
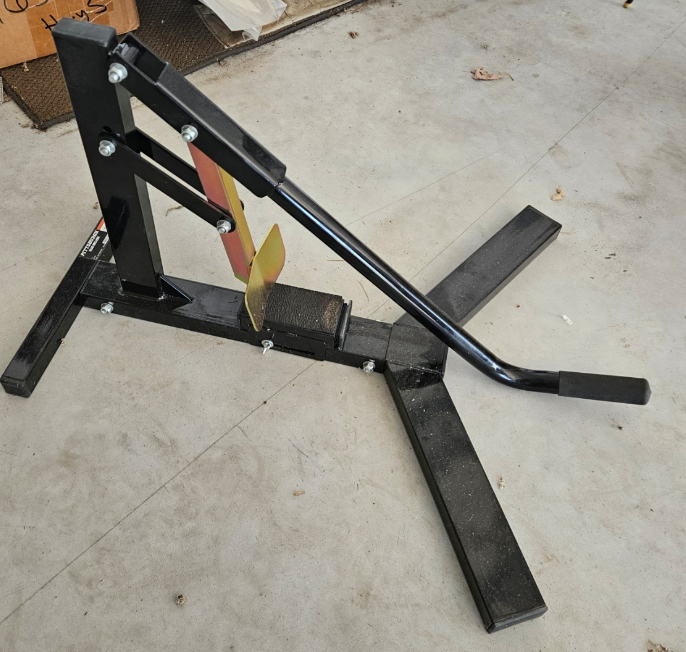
I set out this year to equip my hangar with the tools necessary to change a tire on the Mooney. It turned out pretty good so I thought I'd share what we did. I looked for tail stands available for purchase. None really seemed like a good option. We rent the hangar from the city, so drilling into their concrete to add a floor anchor was not something I wanted to do, and I wanted the tail stand to keep the tail from going up or down for ideal stability. Not looking to re-start any debates here on tying down the tail vs. lifting from the front. I'm fortunate to have a very smart and talented guy who works for me that's good at making things. I showed him a picture I'd seen on Mooneyspace, and asked if he could make one of those. He said sure. This is what he came up with: It's a large plastic tub and furniture moving dolly, both from Menards. He welded a T on the large piece of square tubing (no pics of that unfortunately) and set it in about 350lbs of bagged concrete. The smaller square tube has a number of holes drilled in it, and large nut welded on top. You can adjust the height by removing the pin at the bottom and raising or lowering the smaller square tube: T The shackle goes through the tail tie-down. It actually fits in the position shown in the first pic, so the stand is capable of going much taller than necessary for a Mooney. Once connected it's very secure, and the tail can't move hardly at all, either up or down. It rolls easily on the floor. It turned out very well and was probably less than $250.00 in materials. On to the jacks. I considered trying to make some, given the cost. I've seen designs posted here. I wanted a mechanical failsafe on them. I ultimately decided I was not really qualified to engineer a set I would trust not to fail and really damage some expensive equipment or hurt someone. To each their own. It was surprisingly hard to figure out what the options were to buy jacks that fit a Mooney. Most are too tall. We need the shortest ones made. After doing a lot of looking and comparing specs, I ended up ordering a set of these Model 324 Alpha Jacks from Aircraft Spruce for $858.00: https://www.aircraftspruce.com/catalog/topages/alphaJacks.php They fit perfectly and work great, and have a locking collar to mechanically hold them in place for extended periods of time. Very sturdy laterally. And they were half the price or less of some of the more professional options that were out there. Since I only plan to use these a few times per year at most, I went with the less expensive option. I'd buy them again. You don't need to also order the "wheel kit" that Spruce sells, by the way. Wheels are included. I ordered wheel kits initially and they called and asked if I really wanted them, luckily, and took the kits off the order. They show as "special order" on the website, but I got them in like a week. Mooneys look great with the gear up on jacks, like they're going 100 MPH sitting still: The setup is very stable for climbing in and out to swing the gear. Finally, if you're going to change a tire, you need a bead breaker. "Aviation" ones are very expensive. Picked this guy up from Harbor Freight for $93.16 shipped, and it works great on Mooney tires: https://www.harborfreight.com/bead-breaker-58769.html Pro tip - break both sides of the tire's beads before splitting and disassembling the wheel. Otherwise you'll probably have to bolt it back together to break the 2nd bead. All in all, it was a solid investment that will let us perform basic maintenance easier and on our schedule in the future. I hope someone else here might find it useful.
-
My TSIO-360 will read 1 quart higher before take-off than after landing / while hot. Very reliable. It's just a quart of oil up in the engine that takes quite a while to drain back down into the pan. E.G. 7 quarts before first flight of the day will read 6 if you check it at the fuel stop. I usually let it get down to 6.5 cold, then fill to 7.5. It holds 8 pretty well. After oil changes, however, it will drop 2 quarts after the first flight. Meaning I fill to 8, fly for a few hours, and it will drop to 6. Let it sit, it will settle a little under 7. I plan to add another quart before the next flight at that point, or pretty soon thereafter. The engine burns a quart maybe every 6-7 hours. I don't know where the extra oil goes after the oil change. Probably the filter and its lines? But since you noticed this after an oil change, I thought I'd share. I would be curious if you top it up and fly it for an hour if the problem repeats again.
-
You're right though, here it is in the Continental Installation and Operation manual for the TSIO-360-LB:


-
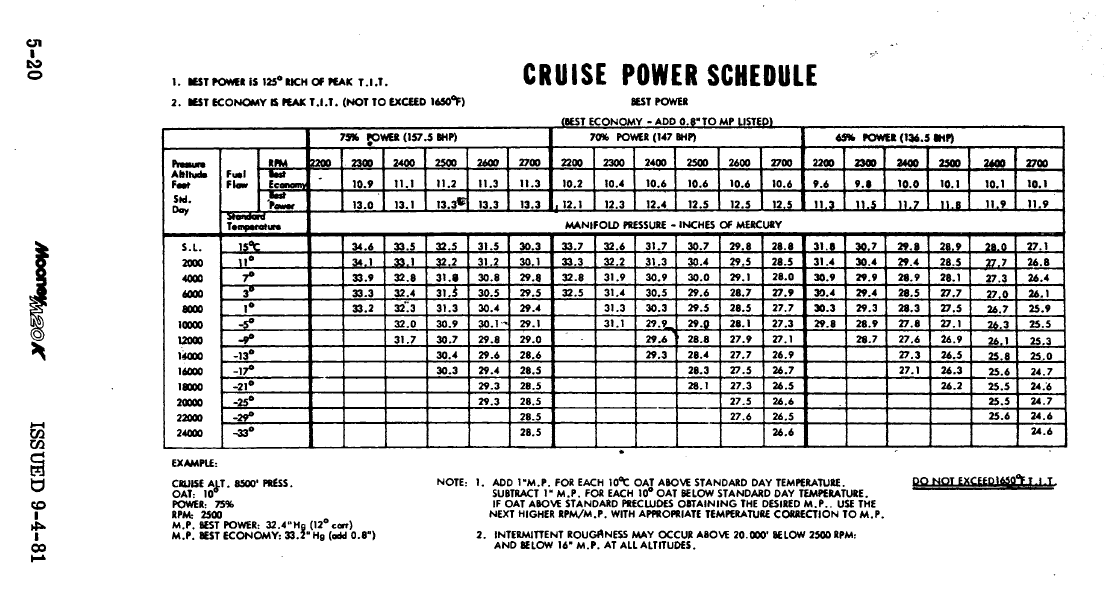
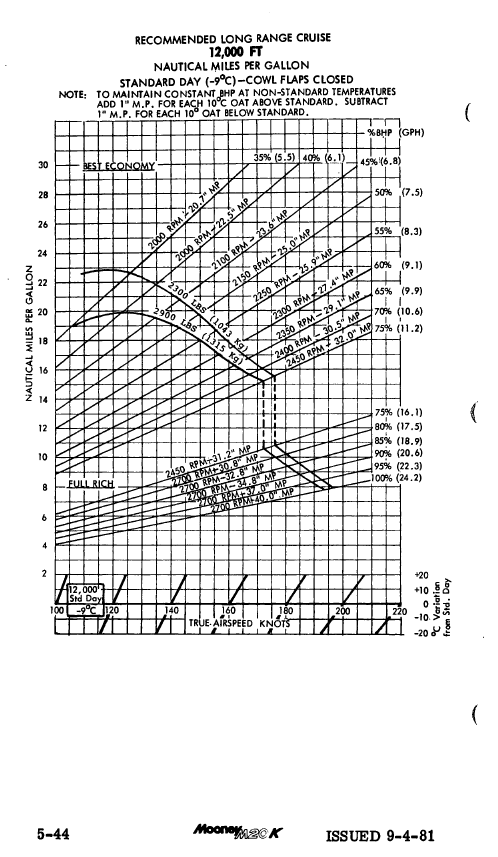
That's interesting. The POH I have, which was written for a TSIO-360-GB(4), does not contain that information, as best I can tell. All it has are these "Cruise Power Schedules" that seem to imply you can cruise at any RPM from 2200 to 2700.
-
That's a bit of an odd power setting to get to 65%. The POH charts suggest you should be at 2350 RPM and 29.1" MP, 9.9 GPH (below). Personally, to get that flow, I find the engine is happier at 2500 RPM, 26" MP, and leaned to just under 10 GPH. Crack the cowl flaps as required to stay under 380 CHT which is very easy at the 65% setting. You'll get about 130 KIAS at that setting, and cruse 145-170 KTAS or so, depending on altitude. I've tried close to your setting as a recommended LOP cruise power setting. It's generally suggested online as 2500 RPM, 32" MP, and lean to 10-11 GPH (about a gallon higher than you're using). Never seen MP drop, but my engine has a noticeable intermittent stumble or burble you can feel in your feet, so I don't fly like that, even though the temperatures are good. I think you're just running too lean for your power setting, resulting in loss of turbo pressure. How many degrees lean of peak TIT are you when the power cuts out?
-
It would be very easy to keep a standard mask or cannula handy and if the O2D2 has any problems, just unplug its air tube and plug the standard cannula or mask into the outlet next to your elbow and put it on. Not a big deal in the teens but I would want something like that at FL240 for sure. And probably also a tube or two of Boost oxygen: https://www.amazon.com/Boost-Oxygen-Supplemental-All-Natural-Respiratory/dp/B094DY136X/ref=sr_1_6?keywords=Boost%2BOxygen&qid=1693743175&sr=8-6&th=1 Next time I'm at the hangar I'll take some pics of the O2D2 and oxygen transfill setups. There have been plenty of others posted here over the years but may as well add to the knowledge bank, and I'm pretty happy with how both turned out.
-
I use a Mountain High oxygen boom, paired with one of their O2D2 systems. Works great. Added a transfill setup in the hangar this year to have the option to fill the tank myself and always have O2. Should have done that years ago. My preferred altitudes are 15-17k. High enough for all the benefits of the turbo (speed, smooth air, above most weather, no traffic, no ATC restrictions, terrain clearance, glide distance for an engine failure), but plenty of useful time of consciousness if you or a passenger has an oxygen delivery problem. No need for a mask, and no requirement to be IFR, although I often am. This is the only real reason I don't go higher, except maybe for a short bit to cross the Rockies: In reality, seems like I get to the high teen altitudes about 1/3 of the time. Headwinds. Clouds. Flight too short to climb that high. On headwind flights, I'll climb until I'm out of the bumps, then stay as low as I can stand to minimize the headwind. I try to get up to at least 7k. Below 10k, once you're used to being higher, it feels like there's something wrong with the plane because you're going so slow and because the ground looks so close. Nice article, @Pinecone. I'm with you. They can pry the turbo from my cold, dead hands.
-
It's been a rough couple of years to be a piston aircraft owner. Parts and labor are both hard to come by when your plane needs something. Put the plane in for annual in 2022 and didn't get it back in the air for 6 months. Just got it out of annual for 2023. Took 8 weeks. Not the shop's fault. They fixed a lot of things, and there was quite a bit of waiting on parts. Had to go straight from there to the avionics shop for an autopilot servo. Got one of the bad early GFC500 ones, apparently. I've been reminding myself lately this is not the norm. Been flying for over 10 years and the last two have been the worst in the maintenance and parts department by far. It will get better. Sorry to hear you've had a bad introduction to airplane ownership. Hope it gets better for you too.
-
I have never flown a Rocket or a big engine long tail, so I have no idea. Just sharing my experience in a M20K 231 with a TSIO-360-MB installed via STC. I would probably experiment with different power settings and use the ones that result in lowest temperatures using modern engine instrumentation. As far as I know, most now agree that high heat is bad for engines, and the cooler you can keep things, the better. I believe some of the early recommendations from the 80's to decrease power for the climb were based on the idea of "reducing engine wear," "taking it easy on the engine," and "fuel efficiency", and that many of those ideas have been disproven. Remember these machines left the factory in the 80's with an analog single probe CHT gauge and no fuel flow meter. They were also designed to just replace a cylinder after it gets fried. But it's also airframe dependent. New or worn out baffling could change how your engine responds. I don't know what cowl flaps your Rocket has. My 262 has the infinitely adjustable ones controlled by an electric motor that were installed as part of the STC. 231's with different cowl flaps might do better at different power settings. Some do believe that RPM = wear, and that lowering RPM increases engine life. The idea is that the fewer revolutions the crankshaft makes, the less all the parts inside rub on each other. That makes sense to me. But in my plane, reducing RPM to 2500 for the climb results in significantly higher internal temperatures, so I usually do not do it.
-
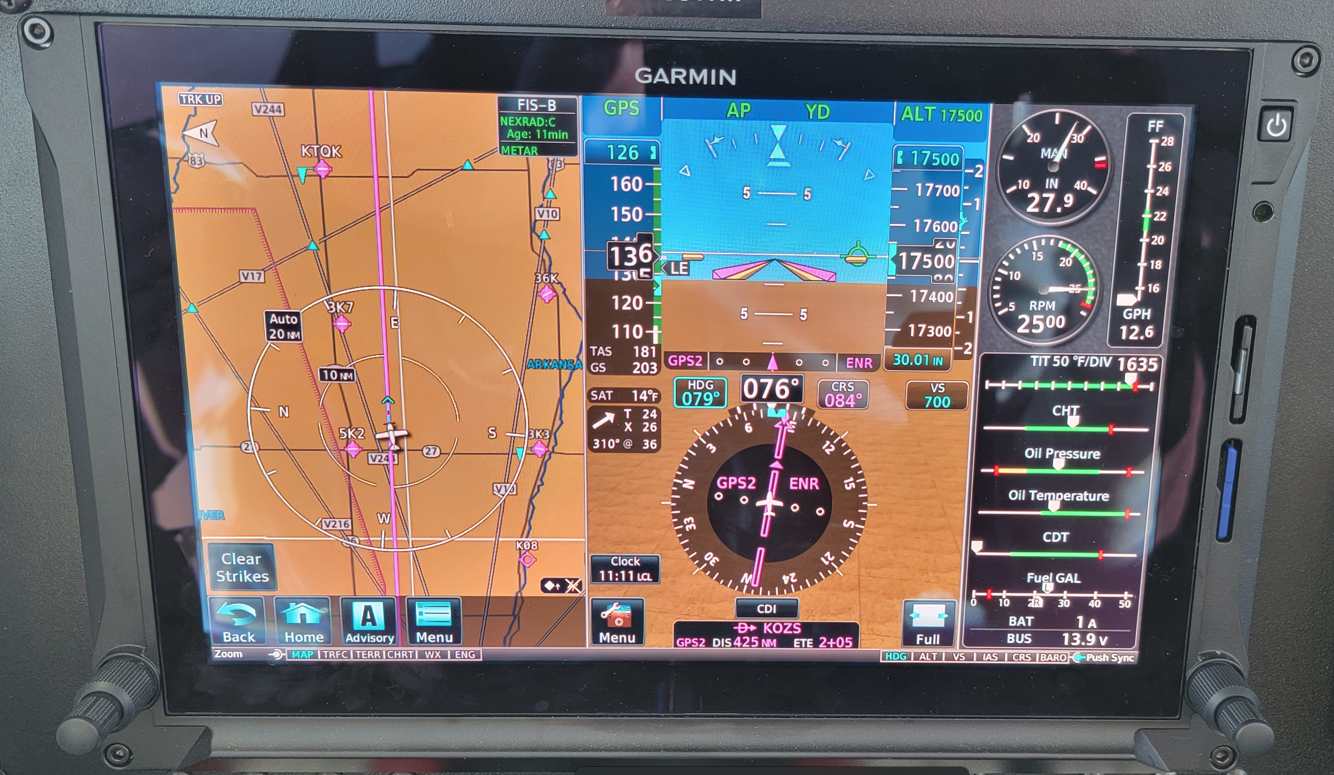
I flew for long time with an old JPI 930. It developed some issues, so we swapped it for a G500Txi. All the readings changed significantly. Kept the stock RPM and MP gauges and it disagrees a lot more with them than the old JPI did. Still don't know which unit was more accurate, but on average, my true airspeed is lower if I trust the settings on the G500Txi and keep it within the limits we've been talking about than it used to be on the same settings with the JPI. All within a few inches or degrees, but enough to make me wonder how much good we all do trying to fine tune these engines.
-
I just meant maximum manifold pressure according to your POH. I believe with your setup, that requires you to set power at takeoff, and then slowly advance the throttle as you climb to maintain your maximum rated manifold pressure, as it will naturally decrease with altitude. Later models with the TSIO-360-MB and TSIO-360-SB got a fully automatic wastegate, which is what I fly, and we do in fact go throttle full forward to the firewall, and the wastegate holds it at 36" of MP all the way up. Maybe some modified TSIO-360-LB and TSIO-360-GB's are the same, I'm not sure. But the idea is to maintain maximum manifold pressure for best takeoff and climb performance. Never overboost your engine if it's one that's capable of doing that. Some pilots used to (and some still do) advocate a "cruise climb" power setting where they reduce power to something like 32" and 2500 RPM, and then pitch for 500 FPM in the climb. In my plane, that results in 1) higher CHTs due to increased angle of attack, decreased fuel flow, and decreased air flow, 2) longer climbs to altitude, 3) increased total fuel burn for the trip due to lost efficiency, and 4) higher overall trip times due to it taking forever to get to altitude. So while I started out flying that way, I no longer do. Full power and full rich mixture to top of climb, then reduce power and lean for cruise. If I'm at cruise altitude and have to go up say 2-3 thousand feet for some reason, I might use that cruise climb setting just to avoid drastic changes. It will quickly spike your CHT's if you watch it. If a larger altitude change than that is required I will go back to full power, full rich mixture, and cowl flaps open to help keep the engine cool and minimize the time in the climb. You can regain all that stored energy in the descent. Never lean in the climb, and never lean for takeoff. That's a naturally aspirated thing. Your turbo is always pushing full air, and so you always need full mixture. If you lean in those conditions, you will spike your temperatures, at best, and not be making full power, or even cause your engine to shutoff, at worst.
-
CHTs below 380. Easy to maintain even in climb if you climb full power and about 120 KIAS. Plenty of air and fuel to cool the cylinders. If one creeps up, I have an alert set in the panel at 380, and just level off for a moment. Climbs in the teens on warm days do sometimes result in temperatures creeping up towards 400. Open and close the cowl flaps as required to maintain CHTs under 380 in cruise. My plane's TIT runs hotter than most seem to post here, and it does not run smooth LOP. I keep it under 1625 TIT, as close to 1600 as I can get, which varies with ambient temperatures. Usually flying 27-28 MP, 2500 RPM, 12-13 GPH. Gives me 135-140 KIAS, which is 150-185 KTAS, depending on altitude. Somehow that's always 5-10 knots slower and 2 GPH higher than all the other posters with the same engines and airframes but I think the internet adds 10 knots and subtracts 2 GPH. Your experience may vary. Keep in mind also some are using the old factory TIT and CHT gauges, some are using modern glass panels and sensors of different varieties, and some are more sensitive to feeling or noticing LOP "roughness" than others. I think we each pick our own comfort zone and hope for the best.