
Vance Harral
-
Posts
1,551 -
Joined
-
Last visited
-
Days Won
6
2 Followers


Recent Profile Visitors
7,642 profile views


Vance Harral's Achievements
")


-
I am surprised, and fairly bothered, that initial results indicate our community is experiencing substantial powerplant failures at about the same rate as electrical and vacuum system failures. That is not what I was expecting, and not at all what I hope is true.
-
 This is a good point. With regard to the shop that installed the audio panel, that single-conductor shielded wire to the speaker may be a case of, "we re-used the factory-installed cable even though it's not correct for this audio panel 'cuz it sorta works"; as opposed to, "we don't know what we're doing and installed the wrong kind of wire".
 -
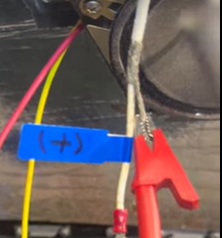
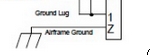
I think you meant to say the speaker is not supposed to be energized when only the Master is turned on. The fact you see different resistance readings on your meter with the master on vs. off tells us that something in that circuit actually is energized when the Master is on, and that's a clue about the problem. Looking more closely at your video this morning, the thing you have connected to with your alligator clip near the speaker appears to be shield material, not a signal wire, as others have mentioned. Here's a screen capture: Your red alligator clip is connected to braided shield material here. Shielded cable comes in different flavors. The flavor you want for audio has two insulated signal wires in the innermost layer, and a braid of shielding mesh around the two signal wires. In the photo above, you appear to have the single-conductor flavor, which has only one signal wire in the center, and a braid of shielding around it. It looks to me like someone who did not understand audio wiring has wired your speaker incorrectly, with multiple problems. First, they are trying to use the shield material as signal low, which is not appropriate - either they don't understand how this works, or they didn't have any two-conductor shielded cable and hacked it; and (2) they have connected that shielding material to airframe ground instead of (or in addition to) the audio ground of your audio panel. Note that this incorrect wiring can "work" if there is not much electrical noise in the system, and the amplitude of the audio signal sent to the speaker is high. You might actually hear some audio through it if you turn the speaker volume way up, which is maybe what happened in the shop when this was installed. But it is not correctly wired. If you look at the wiring diagram, all the paired audio signals have a dotted-line ring around the signal wires. That ring is the shielding material. Here's a screen shot of the shield coming off the speaker (which is adjacent to and tied to the shield wire of the Pilot Phone group, that's why there are two rings here): In other words, there are three connections for every audio group: two are the audio (+) and (-) signals, the third is the shield. If you look at the connection dot coming off the shield, it traces to Pin 1 of the audio panel in your wiring diagram. Again, Pin 1 is audio ground, not airframe ground. Airframe ground is represented by the three-pronged fork at Pin Z. Note that they are not connected to each other: People who don't know what they're doing sometimes think "ground is ground", and wind up inadvertently or deliberately shorting audio and airframe ground together. It appears to me that's what has been done in your airplane, given that you can measure low resistance between the (-) terminal of the speaker and your airframe. Again, this can sorta "work", but it usually injects all kinds of noise into your audio, and in the worst case dampens the audio signal to effectively zero. In summary, based on what you've shown us here, I think you need to replace the wire that runs from the audio panel to the speaker. Throw away the one-conductor shielded cable, and replace it with two-conductor shielded cable, with the two conductor wires connected to pins W and 22, and the shield connected to pin 1.

-
You can't use a multi-meter to measure the resistance of components in a circuit with the circuit energized, as you are doing in the video when you got 27 ohms. Multi-meters measure resistance by passing a small current between the terminals you are measuring across, and observing the voltage drop. If some external source is already driving current through the same circuit, the multimeter is not going to read correctly. The 1 ohm measurement you got after you turned off the master switch is the "more correct" resistance measurement. The reason I put "more correct" in quotes is that when you put your multimeter leads across speaker low and the frame terminal of that port on the panel, you are measuring the total resistance through all paths between those two terminals. It is tempting to assume the only path between the terminals is the speaker ground wire you're tracing, but there are possibly other paths caused by inadvertent shorts. The bottom line is, frustratingly, a multi-meter isn't really that great of a tool for determining connectivity of the components in an electrical system. They can do a good job of telling you when two things which are supposed to be disconnected are actually shorted, but they can't do a very good job of telling you that two things which are supposed to be connected are actually well connected without also being shorted to something else.
-
Visually. It was on our checklist to verify at pickup. Painfully obvious with just a flashlight and inspection mirror, given that one of the tanks was empty upon arrival. As I said, this was not the only, or the worst problem with the work. Caveat emptor: owners should always make and execute a checklist when picking up an aircraft after major maintenance.
-
It was not the famous Wet-Wingolgists, but I'm not going to discuss it further here, for fear of being blackballed on potential warranty service as a result of public complaint. I realize this will frustrate the community and accept it may make you think less of me, but it's what we agreed to in our partnership. All I'll say publicly is caveat emptor, and note that the clogged drain holes were far from the only, or the worst problem. If anyone here is actively working on scheduling a fuel tank strip and reseal, you can PM me for details. But that's the best I can offer.
-
This has not been my experience. Agree that maximizing descent rate is the goal. In the airplanes in which I've practiced emergency descents, it is not possible to peg the VSI in the clean configuration at Vno. It might be possible at Vne, but I choose not to do this as the air is rarely smooth during the training exercises. In contrast, it is easy to peg the VSI with gear and flaps out at airspeeds below Vfe/Vle, particularly while employing a max-rudder slip. My data points are from Cessna 152/172/182, Piper PA-28, Mooney M20F and older. I also fly a BE-76 Duchess whose emergency descent procedure explicitly requires extending the landing gear. I don't have emergency descent experience in other aircraft, including long-body Mooneys. I can easily believe this is an airframe-specific thing, happy to hear from others. I don't know the Vle value for the M20M and later models, but I vaguely recall it was pretty high. Some aircraft have very high Vle speeds up to Vno/Vne, and I can't image it makes any sense to keep the gear up in these airplanes during an emergency descent.
-
Excellent summary. I'm skeptical about using high airspeed to "blow the fire out", even for an engine fire, given the physics of combustion in the presence of plentiful oxygen. I'm sure there are cases where it works, though, and some POH/AFMs specifically prescribe doing so. But I think you want to analyze the details as best as you can in a stressful situation. e.g. high airspeed is not going to "blow out" a cabin fire driven by a burning LiPo battery, better to go straight to technique #2. Unless the POH/AFM specifically prohibits it, I demonstrate emergency descents to my students at idle power, 45+ degrees of bank, all drag devices deployed (gear, flaps, etc), and a full-rudder slip, at the maximum airspeed which doesn't exceed gear and flap limits. Every piston airplane I've done this in pegs the VSI at 2000+ fpm, which is a significantly higher descent rate than I can achieve with any other configuration/technique. As we demonstrate/practice this technique, I explain to the student that if the airplane were actually on fire, there's a good chance I would elect to exceed the gear and/or flap airspeed limits; but that it's a gut feel personal choice, because we just don't know how much margin is built into the limits or what the effect of a failure would be on controllability.
-
At the risk of beating a dead horse... Over 40 posts in this thread about how we're going to deal with the specific, unlikely case of a LiPo battery fire. But not a single follow up on emergency descent technique, which is important in any kind of fire, and in some other emergency situations as well. Pilots - including me - are generally terrible at risk management. We invest disproportionate time, money, and energy into the things that are least likely to kill us, while generally ignoring the things that are most likely. It's just the nature of humans, I guess.
-
I'll put in another data point for "normal", though it does always bother me a little. We bought our airplane in 2004, with original sealant (1976) plus a sealant repair from the prior owner. Over the course of the next 20 years, we essentially never took a fuel sample that didn't have a small amount of reddish debris, which I always assumed was deteriorating fuel tank sealant. Spoke with several mechanics many times about it. All were unconcerned, due to the three filters between the tanks and the engine. The pics above show the coarse pickup screen filters in the fuel tanks, which would definitely let the debris through. However, the fuel selector screen and the fuel servo screen are very fine and will not let this size particle through. Over the years we would find occasional bits of debris in the fuel selector screen when cleaned at annual, but not much, and I eventually decided most of the debris in the tanks must sit below the tank pickups in the unusable portion of the fuel, and not slosh up high enough to get pulled into the fuel lines. What few bits did never made it past the fuel selector screen, as I never saw any of that stuff in the fuel servo finger screen. We had the tanks stripped and resealed in January. Ironically, we're still getting a bit of debris in our samples, but we know where it's coming from. The shop that did the reseal work slopped sealant in the rib drain holes, just like you're not supposed to (see AD 85-24-03), and we made them hand-drill out every hole. This resulted in little bits of sealant debris in the tanks that could not be 100% cleaned out even with best effort, so we've been enduring a slow, decreasing number of bits showing up in the fuel samples. Anyway, both with the deteriorating tank sealant prior to the reseal, and the small bits of detritus after, we've been getting this stuff in our fuel samples for 25 years with nary an engine hiccup.
-
Whatever solution you choose for the theoretical fire itself, make sure your preparation includes practicing emergency descents to off-airport landings. The concern is not just how to best contain a fire, but also how fast you can be on the ground if you can't. Just my opinion, but much of the talk I see on internet forums about emergency scenarios focuses too much on gizmos, and not enough on flying technique. An hour or two of practicing emergency descents - by yourself or even with a CFI - is a lot cheaper than a $1000 burn bag; and just as likely to save your bacon on a bad day.
-
Ly-Con options on IO-360-A1A Overhaul
Vance Harral replied to Vance Harral's topic in Vintage Mooneys (pre-J models)
Thanks for the opinions so far, much appreciated. Our quote shows about $2200 for all coating options, but you can break them out: $725 for DLC rocker shafts, $460 for DLC piston pins, and $997 for "special coatings on pistons, valves, and springs" (may or may not be DLC). DLC-coated lifters are actually included with the base price, which probably means they don't have any other kind in inventory. These are not large costs in the grand scheme of things, my hesitancy just stems from the fact that the tech still seems new in aircraft engines (I understand it's been used elsewhere for longer), and I've yet to see any A/B comparison data. It seems there is just an assumption that DLC must be worth it because "it's obvious", or "the technology is amazing", etc. I've worked my whole life in tech and have become unreasonably jaded about these sort of qualitative claims without any quantitative data. I feel like for every, "this technology is amazing" story, I know of a counterexample like Mobil 1 synthetic oil, GAMI 100LL, etc. But I don't mean to be overly cynical - the advocacy for DLC coatings are appreciated. 5-8hp from porting/polishing sounds plausible. That's about a 3% horsepower increase, which gives about 1% speed improvement and about a 2% climb improvement, Juice not worth the squeeze for us, I think. But the smoothness argument is interesting. I've never been in any 4-cylinder airplane which didn't feel like a rattle trap compared to 6-cylinder flavors, but maybe I just haven't been in one that's well balanced. The painted/alodined cylinders certainly look cool. I'm not aware of issues with the original paint flaking, can someone elaborate? Yes, but this dramatically increases downtime, which we've decided is a factor for us and we've decided is worth the extra cost and the (vague) risk. I'm aware of the issues with crankshafts from the 1990s, but so many components are replaced even when you send in your own engine that it seems like a crapshoot either way. -
Ly-Con options on IO-360-A1A Overhaul
Vance Harral replied to Vance Harral's topic in Vintage Mooneys (pre-J models)
Because they cost more and we're not yet convinced they do anything specifically helpful for our use case. Willing to be convinced they're worth it, though, at least in resale value. I'm aware DLC technology has been developed for decades, but the earliest mention I can find of its use in Lycoming engines is 2021, just a few years ago. Not very comforting from a, "we didn't realize they would cause such-and-such problem" perspective. Again, the current engine has delivered good service (with regular use in a dry climate) for 35 years. so it's not like short-life cam spalling in Lycomings is inevitable. If you're convinced DLC lifters are worth it, make a case - I'm all ears. But I need something stronger than, "they seem to help". -
Ly-Con options on IO-360-A1A Overhaul
Vance Harral replied to Vance Harral's topic in Vintage Mooneys (pre-J models)
We're not overhauling just because of the oil leaks, the very long calendar time in service is also a factor (35 years!) But specifically regarding oil, a better question would be where it's not leaking oil. This engine leaks oil from at least the crankcase seam, the oil pan, a couple of case half through bolts, one rocker cover, several pushrod tubes, every cylinder head drainback tube, the crankshaft main seal, and the prop governor seal on the accessory case. Every one of the known leaks has been previously addressed with the least invasive fix (generally replacing seals that are easily accessible and tightening bolts/clamps for those that are not) - in some cases multiple times - but all have returned. Although total oil consumption is nominal, it now blows oil from so many places during normal operations that it's essentially impossible to identify every leak, even with all the usual tricks: baby powder, fluorescent dye, etc. More importantly, even if we knew all the sources, truly fixing all of them would require a degree of engine and exhaust system disassembly that would be very likely to create other, more severe maintenance-induced failures, the repair of which would be money down the drain vs. an inevitable overhaul. Believe me, I'm the first to advocate for overhaul on condition rather than calendar time or time in service. But everything has it's practical and emotional limit. -
Our partnership voted this week to order an overhaul exchange IO-360-A1A from Ly-Con (lead time is currently advertised as 8 months, though we're fully prepared for it to be much longer). The current engine is actually running fine - good compressions, oil analysis, and borescope. But it leaks an embarrassing amount of oil from various nooks and crannies, the long lead times on engines change the "run it till it breaks" logic a bit, and after almost 35 years and 2600 hours we just feel like it's time. The purpose of this thread is to pick the brains of the well-educated folks here about options Ly-Con offers on an IO-360 overhaul. The floor is open for opinions on: FACTORY NEW LYCOMING CYLINDERS: We're inclined to do this, but even if we weren't, I don't actually think it's an "option". It's my understanding that at this time and for the foreseeable future, there is a dearth of donor angle-valve cylinders, such that you're going to need new ones unless you actually send in your own engine and wait months/years for the shop to overhaul the cylinders you send. PORT FLOW & BALANCE CYLINDERS: We understand the premise, but speculate the result is a tiny horsepower difference that is only meaningful if you're trying to win a race. STRIP PAINT FROM CYLINDERS, PAINT BARRELS BLACK, ALODINE HEADS FOR IMPROVED COOLING: Undoubtedly looks sharp on delivery, but we're very skeptical it makes any difference in cooling, and worry how the appearance will hold up over time. SPECIAL COATINGS ON PISTONS, VALVES, AND SPRINGS, DLC COATED ROCKER SHAFTS AND PISTON PINS: these are relatively inexpensive options that seem likely to reduce the risk of corrosion and wear. But the airplane lives in a dry climate, and the last engine has lasted decades without them. It's unclear to us if these "new" coatings have been around long enough in aircraft piston engines to feel confident they don't have some not-yet-discovered vulnerability that makes the cure worse than the disease. LY-CON CRANKCASE O-RING MODIFICATION STC SE001954SE: this STC modifies the crankcase halves to machine a groove which holds a sealant ring at assembly, rather than using the traditional silk thread. It's the most interesting option to us, and the subject of much discussion. We're all about anything that reduces oil leaks, having been irritated by them for decades, and this method seems to require less in the way of "magic hands" to get right. But this is a one-way modification, you can't go back to silk thread once it's done. It's unclear what sealant material goes in the groove and how well it holds up over time vs. a theoretically-perfect silk thread job. We also wonder what the implications are if one needs future engine work that requires the crankcase to be split, by a shop that's not Ly-Con. If anyone here has direct experience with any of these options, I'd love to hear about it. In the spirit of Mooneyspace, rampant speculation is also welcome, of course.

