Guitarmaster
-
Posts
1,663 -
Joined
-
Last visited
-
Days Won
10
Content Type
Profiles
Forums
Blogs
Gallery
Downloads
Events
Store
Everything posted by Guitarmaster
-
For the modified cowling and the different spinner, I find myself with the old style spinner and back plate for sale. Problem is, I really don't have any idea what this would be worth so I decided to go to the best resource on the web, Mooneyspace. It is complete and ready to install. Any idea what it's worth? Thanks! Sent from my XT1585 using Tapatalk
-

Sabremech Cowling Mod Testing (Ongoing)
Guitarmaster replied to Guitarmaster's topic in Vintage Mooneys (pre-J models)
I believe so. -
Sabremech Cowling Mod Testing (Ongoing)
Guitarmaster replied to Guitarmaster's topic in Vintage Mooneys (pre-J models)
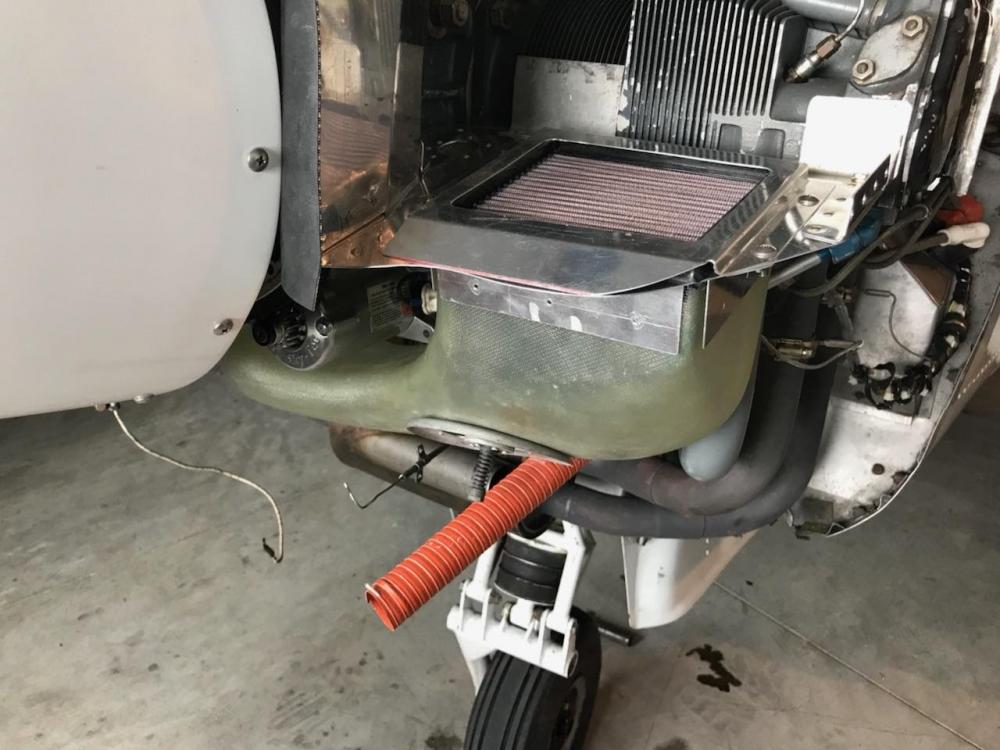
It's actually a K&N filter. P/N 33-2060. -
Sabremech Cowling Mod Testing (Ongoing)
Guitarmaster replied to Guitarmaster's topic in Vintage Mooneys (pre-J models)
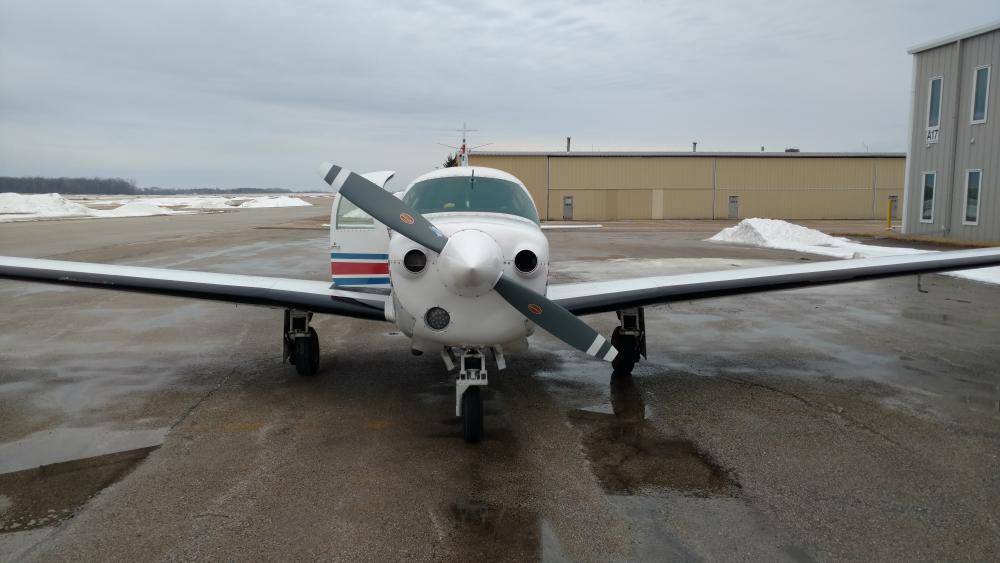
Riley and I went flying yesterday with the new induction system and the louvered bottom panel. The induction system is great! There is very little restriction now. I am seeing only 0.6 - 0.7 inHg difference between ambient pressure and WOT on take-off. Previous, I was seeing a delta around 1.2 inHg on take-off. I think that is about as perfect as it gets for a NA airplane. At altitude, the MP seems to be ~ 0.5 inHg different (lower) than my previous flights with RamAir open. The conclusion is, with the new intake, the RamAir would create a negligible difference; at best, maybe 0.5 inHg difference. That makes it unnecessary in my book. With the removal of the RamAir, came a very clean installation under the hood (I will have pictures later) and it cleaned up the front nicely (see attached pic). A side-effect of the intake is that my engine idles very smoothly! Before, it would run like a big-block Chevy at idle when warm. That problem is long gone! The fact that the induction boot was ripped probably had something to do with that. Regardless, the engine loves the smooth intake air. As those that have followed this thread for a while know, we are seeing increased CHT's with the removal of the third cowl flap. We really wanted to keep it gone because it makes such a clean installation. Unfortunately, the latest test data indicates a simple louvered panel is not going to cut it. David will be reinstalling the third cowl flap shortly and we will have results after that. So the tweeking (not twerking) continues......
-
Agreed! Owning and maintaining an airplane 10 years ago would be much more difficult and expensive than it is today! Sent from my XT1585 using Tapatalk
-
It's always nice to find a Smoking Gun, even if it may not be the only one. Sent from my XT1585 using Tapatalk
-
Impulse coupling Maybe? Or do you have shower of Sparks? Sent from my XT1585 using Tapatalk
-
I love my insight strike finder! I don't know how much they are new, mine came with my airplane. I am going to send mine in to get the old plasma display change to the LED. Sent from my XT1585 using Tapatalk
-
Sabremech Cowling Mod Testing (Ongoing)
Guitarmaster replied to Guitarmaster's topic in Vintage Mooneys (pre-J models)
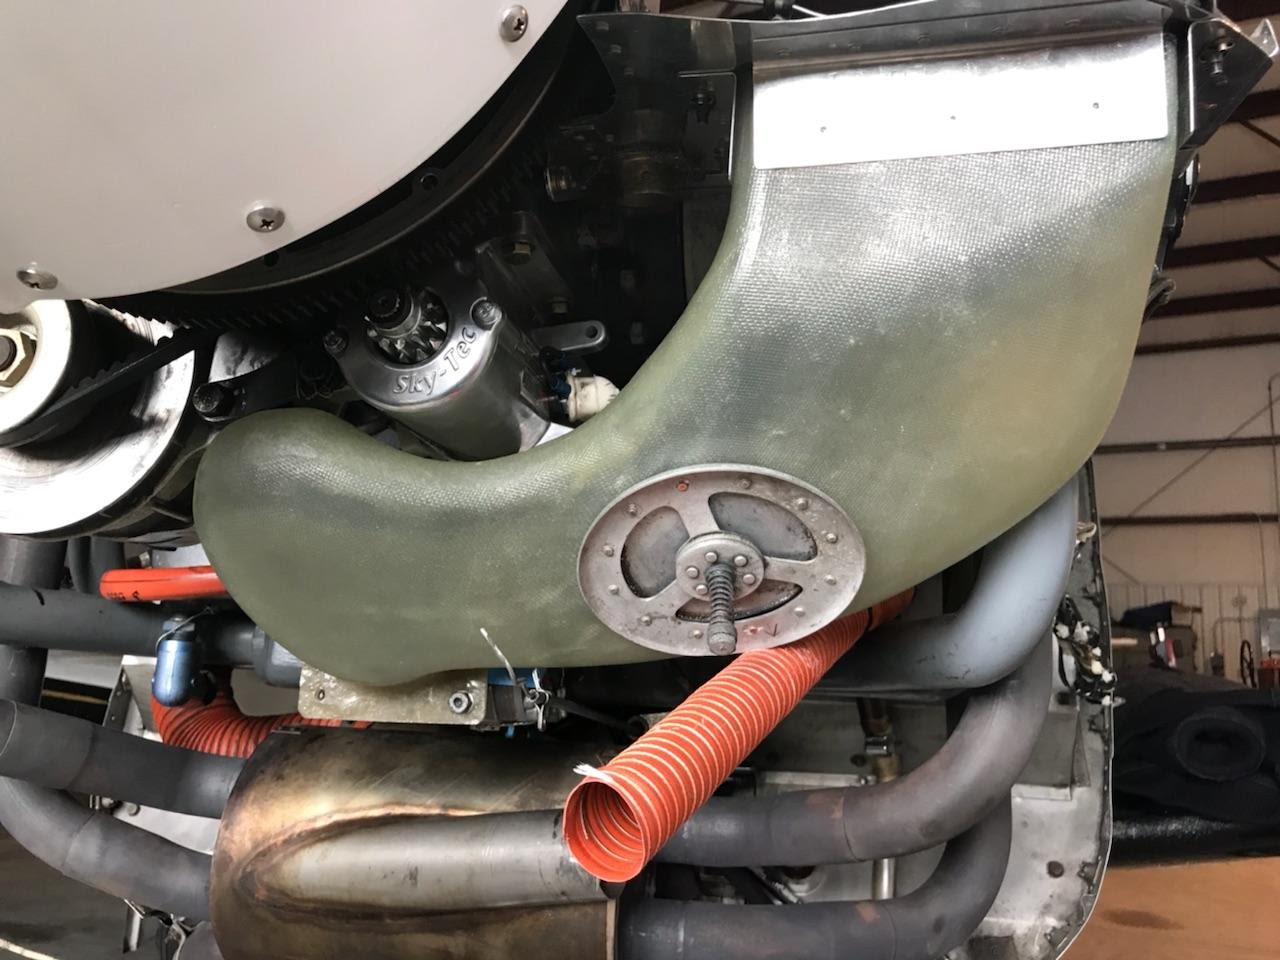
Just a quick update before I am off to work. It's getting close. The alternate air fits very nicely in the new intake. David and I were collectively holding our breath that it would fit with no problems. David is finishing up the baffling and I am hoping to get her back after Wednesday (stupid work getting in the way again). I am excited to see how the new intake performs! David is louvering the bottom panel as a first step to solve increased temperatures. I will post the results of the endeavor. Keeping fingers crossed for a large decrease! That's it for now.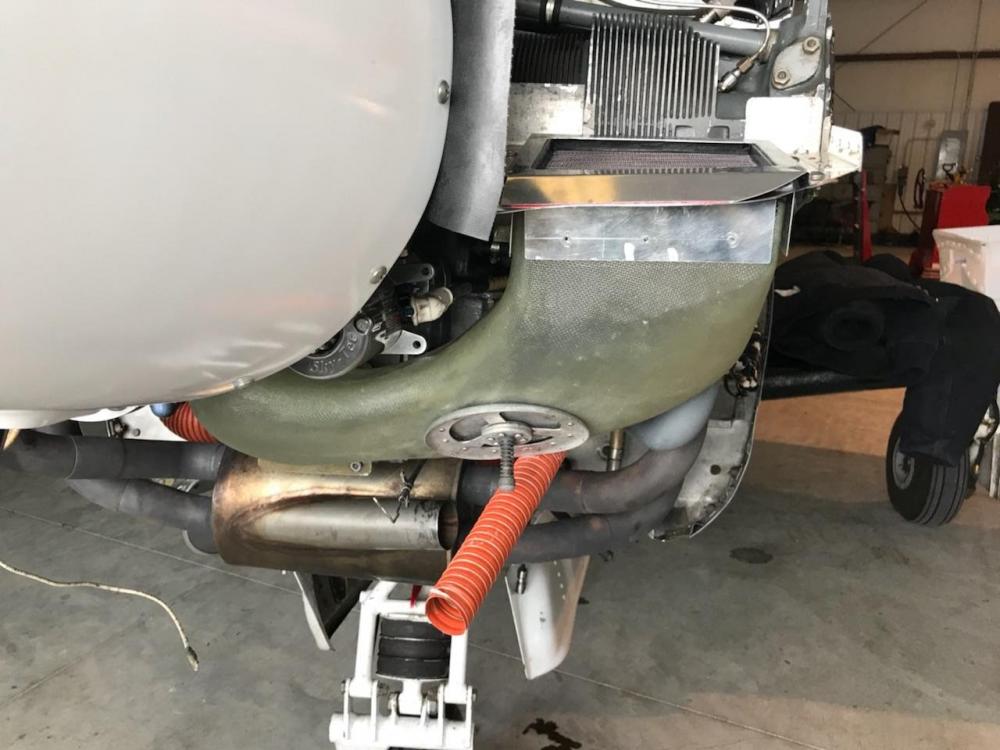

-
Yep. Super easy job! Sent from my XT1585 using Tapatalk
-
Sabremech Cowling Mod Testing (Ongoing)
Guitarmaster replied to Guitarmaster's topic in Vintage Mooneys (pre-J models)
There hasn't been much to update lately. Riley is getting her new intake installed and then some modification to the lower cowling to see if we can solve the temperature issue. David is hoping to have it done by the end of the week. Sent from my XT1585 using Tapatalk -
Just out for some Chili. That's us in the Mooney. [emoji3] Sent from my XT1585 using Tapatalk
-
Dan, your accident has touched lives all around the world! As for myself? As soon as I read your story on Mooney space, I ran out and got a highly sensitive electronic CO detector. It resides next to the trim indicator in my f model. I cannot thank you enough for sharing your experience! Sent from my XT1585 using Tapatalk
-
M20C Panel Redo: EGT rotary switch too BIG.
Guitarmaster replied to 0TreeLemur's topic in Avionics/Panel Discussion
Good move! You're gonna love it! Sent from my XT1585 using Tapatalk -
M20C Panel Redo: EGT rotary switch too BIG.
Guitarmaster replied to 0TreeLemur's topic in Avionics/Panel Discussion
If I remember right, you have to remove the little power boxes on the resistive senders when you use the magnetic ones. There should be no need to send it back to JPI. The only parameters that you cannot set are what's in your Poh. JPI sets all of your poh parameters, but you can adjust different alarms and your fuel tanks you calibrate. Sent from my XT1585 using Tapatalk -
M20C Panel Redo: EGT rotary switch too BIG.
Guitarmaster replied to 0TreeLemur's topic in Avionics/Panel Discussion
It does use the existing fuel sensors, however it's only as accurate as your sending units are. It will also use the CIES senders. @Marauder had these installed and found them to be highly accurate. At some point I want to replace my stock fuel senders with these! Sent from my XT1585 using Tapatalk -
M20C Panel Redo: EGT rotary switch too BIG.
Guitarmaster replied to 0TreeLemur's topic in Avionics/Panel Discussion
The -900 came with MP, RPM, Fuel levels, oil temp, oil pressure, FP, FF, Volts and Amps, OAT, CHT, EGT and a host of other features. It comes with Remote Alarm Light to be installed if the display is to far from the flight instruments. There is an available Remote Alarm Display that will display WHAT is wrong, not just a light to get your attention. As others have said, when you feel a strange vibration or something seems a little off, it's nice to be able to pull the data and see if anything is amiss. I have an "F" with an IO360 so no carb temp for me. I believe it can be added if you want. I liked the fact that I could replace ALL of my primary instruments. It really cleaned up the panel. The problem with the CGR-30P I ran into was it didn't have enough inputs to cover all the primary instruments and I would have needed the 30C as an add-on making the EI offering unacceptable. I LOVE the -900! Hope this helps! As far as cost, I picked mine up at KOSH for $2795. It took me and my IA about 45 hours to install. It's not hard, but it's alot of wire pulling and connecting. P.S. I upload all my data to Savvy. So far, I (they) caught a bad plug on #4. It also showed my how far off my stock tach was. I was only achieving 2550RPM. It now turns 2700. BIG difference on takeoff!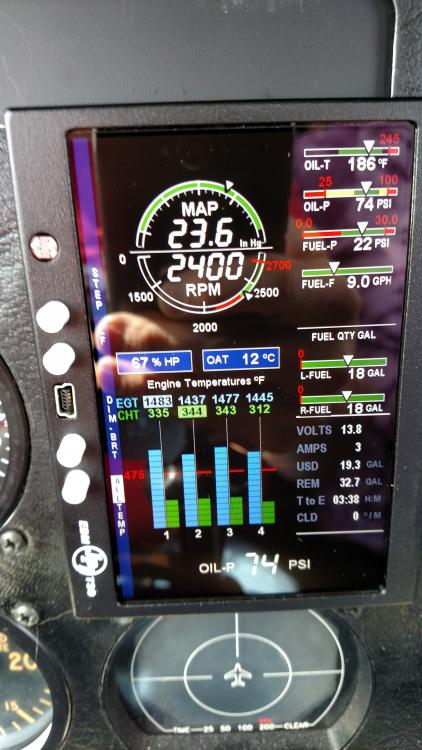
-
M20C Panel Redo: EGT rotary switch too BIG.
Guitarmaster replied to 0TreeLemur's topic in Avionics/Panel Discussion
Definitely lose the switch. Even a used engine monitor would be better than what you have. I installed an EDM 900 and removed all the primary engine gauges a couple of years ago. This was probably the single best decision I made with the airplane! Since you have the airplane apart already, it's the perfect time! Unfortunately, perfect time and perfect finances never align. Your wallet might sting for a short time, but you will never regret installing a digital engine monitor! Sent from my XT1585 using Tapatalk -
Sabremech Cowling Mod Testing (Ongoing)
Guitarmaster replied to Guitarmaster's topic in Vintage Mooneys (pre-J models)
A very interesting article for sure. I was amazed when I first learned how much drag ( in the 1958 MIT video) a round shape produced! -
Sabremech Cowling Mod Testing (Ongoing)
Guitarmaster replied to Guitarmaster's topic in Vintage Mooneys (pre-J models)
That is one of the ideas being entertained. -
Sabremech Cowling Mod Testing (Ongoing)
Guitarmaster replied to Guitarmaster's topic in Vintage Mooneys (pre-J models)
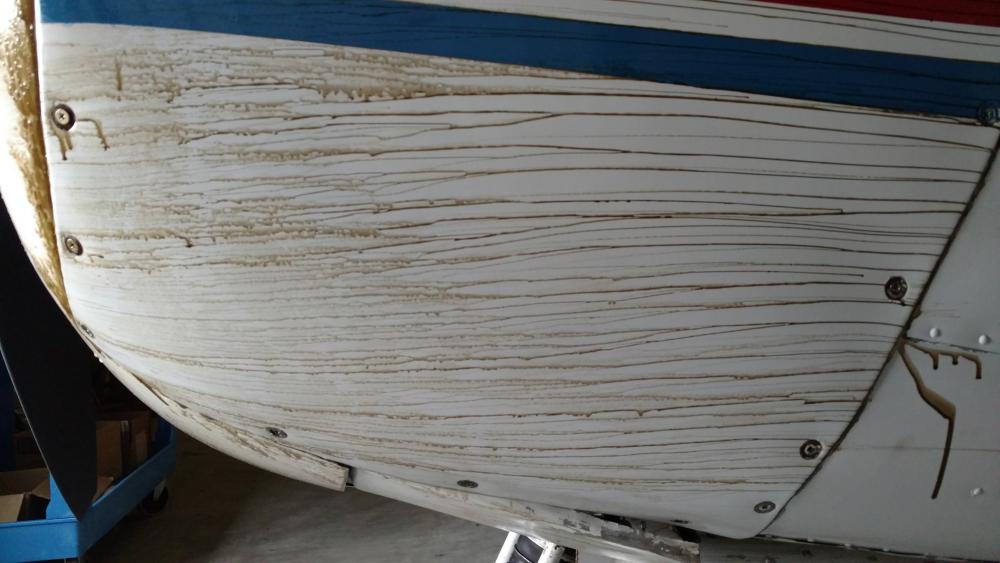
Yes, the thin streaks is the fast air. No streaks is stagnant air; which is what is occurring over the cowl flaps. You can see just a little bit of oil streak toward the outside. Since I have lots of time to think while cruising across the country at five miles up, I considered the possibility VGs in front of the cowl flaps or possibly sealing the gap at the hinge. -
Sabremech Cowling Mod Testing (Ongoing)
Guitarmaster replied to Guitarmaster's topic in Vintage Mooneys (pre-J models)
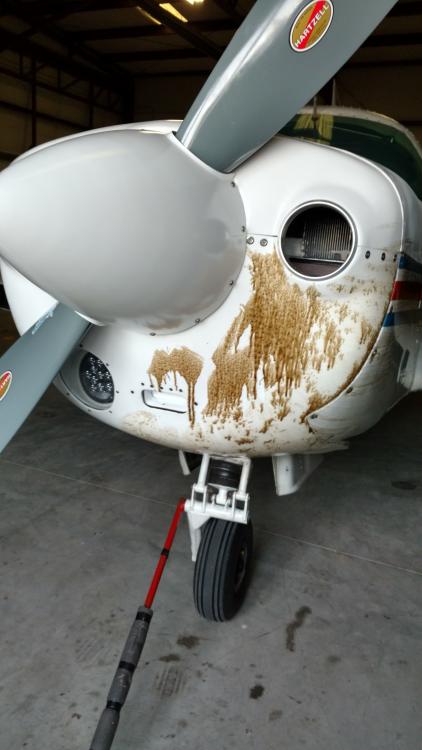
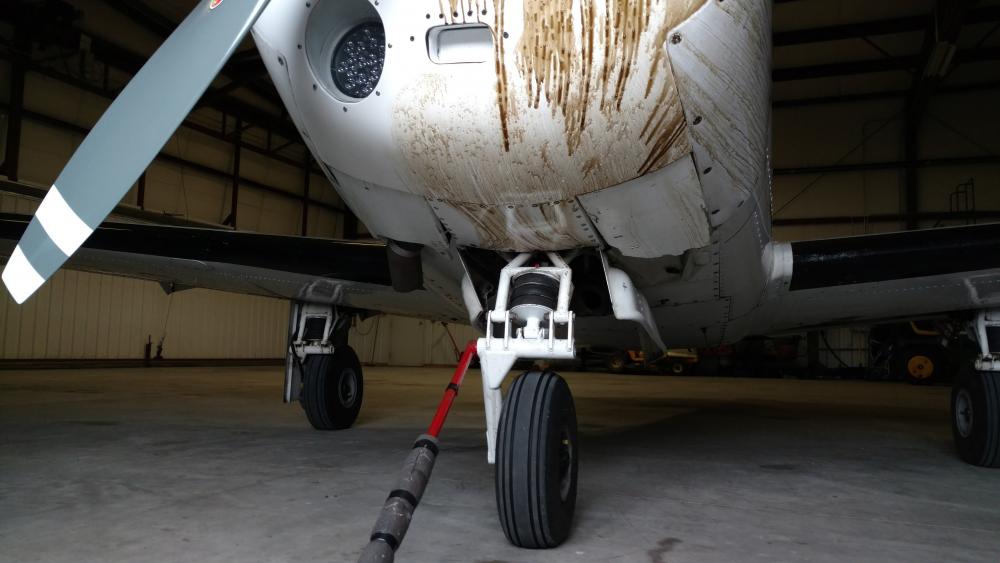
There hasn't been much to update as of late, but I did want to share this. As most of you know, we are using my plane as the "test bed" for the injected models. Of course, the nature of experimentation involves theories and testing. One of the things we did was to remove the third cowl flap. David wanted to see if it made any difference in CHTs. Well, it did; to the tune of about 35 degrees warmer. This was not a huge surprise. I have a friend that races airplanes so I picked his brain about cooling and drag. He suggested I put some "indicating fluid" on the cowl and fly it. This would give a good visual indication of the high. low and stagnant pressure areas. He assured me I would be surprised by the results. I did exactly that. The results were enlightening! I haven't had good luck inserting pictures in the middle of the post, but I'll try again. Here is the key for interpreting the pictures: thin streaks = fast moving, low pressure air. Sloppy (runny) streaks are slower moving air with higher pressure. No streaks or pooled = stagnant air. The first picture is right before flight The next picture is just after landing. Cruise was 140KIAS. Notice the thin, well defined streaks on the lower part. Fast moving, low pressure air as opposed to the sloppy lines toward the top front. Next, the plane had been sitting for about 30 minutes in the following picture, but it really shows where the high and low pressure areas are on the front of the cowl. The original location of the oil cooler appears to sit right in the middle of where the high and low pressure area separate. It also shows the drag being produced where the cheek cowl meets the rest of the cowling. In addition, the Ram-air is barely catching the high-pressure area. By far the most intriguing and telling of the pictures are from below the cowl. Notice the relatively fast moving air between the cowl flaps. This was where the removed third cowl flap used to reside and will again. Now look at the cowl flaps. There is very little fluid on either one. Granted, I only dabbed fluid on the left and center, but still they are almost completely clean indicating stagnant/separated air. Without fast-moving air over the cowl flaps, there is no ability to draw a vacuum. This explains the paltry 10 degree difference between the cowl flaps open and closed. David has some good ideas as to what he is going to put into action using the above information. I am excited for the results!! P.S. I am secretly hoping to be able to remove the movable cowl flaps altogether in the future.... P.P.S. I feel truly blessed to be part of this process. The tinkering has been a blast, but most of all, I am thankful for the friendship that has developed from this endeavor! (of course I haven't received David's bill yet )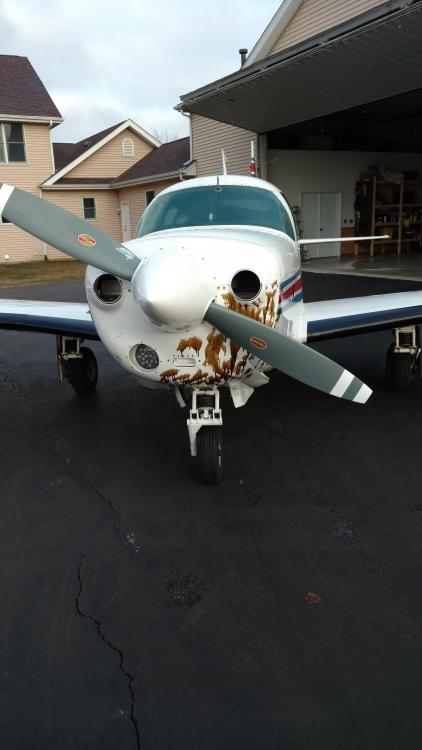
-
Here are a couple pics Sent from my XT1585 using Tapatalk
-
Just installed a 149NL on my F. No clearance issues. Works great! Love the starter! Sent from my XT1585 using Tapatalk
-
Do you drain the tanks completely, or do you just bring it down to unusable fuel? Sent from my XT1585 using Tapatalk