

1980Mooney
-
Posts
3,516 -
Joined
-
Last visited
-
Days Won
7
Content Type
Profiles
Forums
Blogs
Gallery
Downloads
Events
Store
Everything posted by 1980Mooney
-
Also - those long trim strips on each side (covers along both front and rear panel on pilot side) were originally held in by springy steel clips. The holes on the ABS may have enlarged or the clips may have broken over 35-40 years. Past shops or owners may have improperly put some glue or contact cement behind them in order to keep them attached. If yours are loose, I found that Velcro works well and makes for easy removal. Same with the arm rests if they are loose
-
Here are a couple more topics with pictures that show interior panel repair - one is an F but essentially the same as yours. The others address the window "beading" - the strip that you say is silver on yours. You can't really over tighten the screws. The ABS panel deforms to match the aluminum tabs behind the flimsy ABS panel. The beading has probably shrunk from sun and heat. The link to the beading - Window Beading (vantageassoc.com) - the wide part goes on the back side - as you curve it around the window corners you may need to make a couple cuts on the back side so the it can make the radius. If it is warm enough it may stretch. The Kick panels that move an inch when pressed are because the hole in the kick panel is worn out. Some just start using larger diameter screws. I suppose you could build it up with epoxy and redrill - But I glued a Tinnerman nut behind the panel for strength. Every panel will need its own "TLC". It is more like art.... Regarding the DME coax, you said it is laying in the belly. It sounds like you need to remove the belly panel and reconnect it. I don't understand what you mean about the coax behind the side panels unless it is damaged by a screw in the side and needs to be replaced.
-
Here is a pic of the windlace replacement.
-
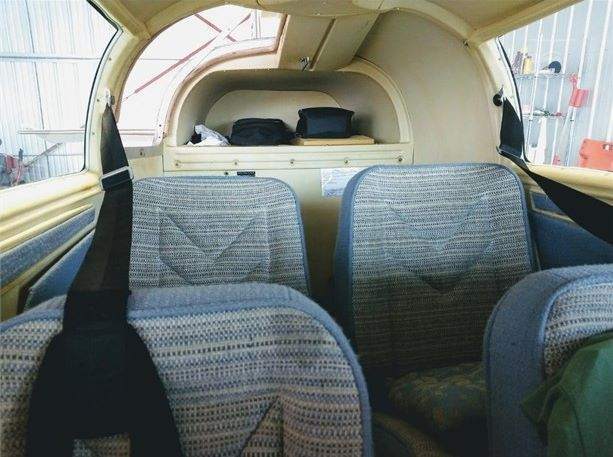
First of all - This is not a project that can be done in a weekend. The more you get into it the more you will find to do. If I am not mistaken posted below are pics of your plane interior (1985 M20J) from the Aircraft.com advertisement in 2021 when you purchased it. It is similar to mine except you have individual rear seats. The panels are cheap "Royalite" ABS. Over 40 years of sun and heat it gets brittle. If yours was hangared and up north its entire life it might be in better shape than a plane sitting in the sun down south. As @Elias says, you can expect to inflict damage as you remove the panels - bending will crack or break them. I know from experience because I have removed and reinstalled mine so many times that I can't recall. You have lots of good suggestions here. But what are your intentions as @Elias wondered? Do you plan on just fixing cracks? There are other topics on the choice of adhesives. Personally, I have always used 5 minute epoxy and some fiber glass fabric on the back of the panels but others have their favorites - that is a whole different discussion. Do you plan to paint all the pieces? Have you looked at the insulation? - I assume SB 208 was done SBM20-208B.pdf (mooney.com) You may find new corrosion on the tubulars depending on when 208 was done and how well they treated everything You may find old insulation in the hat rack or in the ceiling panel that you want to replace The windlace around the door and backage door looks worn - do you plan to replace? That is a bitch of a job with even more smaller screws and the only time to do it is when the entire interior is out. Just a thought before you launch into this - Winter is the worst time to do this. The ABS is less forgiving in cold weather (i.e. will crack easier), even in Houston. Paint dries slower. Glue/epoxy sets slower As @LANCECASPER said take lots of pictures first both before starting and each step of the way As @Hank says bag and label separately by panel or section everything that you remove/dissemble. Remove the glare shield Remove the front seats Remove the rear seats (yours are different than mine so I don't know the procedure) Remove the shoulder harnesses - ( don't lose the spacers or washers - keep the belts separated) Remove the hatrack face - then pull out the base. The curved top in the hat rack is a problem because the piece with the coat rack hook is in the way (it covers the air ducts I recall that I had to curve the center top down more in order for it to clear the duct cover. Remove the long leather covered strips on both sides. On the pilot side remove and bag all the screws Pull up the leather covered armrest - there is a hidden screw under the armrest (that goes into an aluminum bracket) that will prevent you from pulling the panel out. There is an "H" shaped spacer between and holding the front pilot side panel and the rear pilot side panel You will need to remove the screws in the rear panel in order to allow you to bend it forward a bit so that the front panel lose from the H channel - if not you may crack both panels - originally it was flexible enough to twist but not likely now. The screws that go through both panels where they overlap and through the long lower panel are longer and thicker Over 40 years owners/shops may have mixed up or replaced them with longer sharply pointed screws Be extremely careful with long sharp screws on the side panels - avionics cabling may be run and strapped along the tubulars I had an avionics shop do some work where they removed the pilot side panels and during re-installation of the side panel, they drove a long screw right into a cable. Also over 40 years, screws going through the overlaping ABS panels or lower panel that used to bite, may have wallowed out the back panel hole and lost their bite. I have glued Tinnerman nuts on the back the last panel in order to get a strong bite on the screws. The copilot side panels are similar. The door panels are pretty easy. If you have headset jacks in the rear panels be careful when removing the panel and disconnecting the jacks. After you take out the side panels, you will find a white U shape channel around each window opening Over time it may have shrunk some and gotten pretty hard Remove the U channel if painting the side panels (referred to as "beading" in next post/links) Keep track of which channel goes to which window opening. - with time they only want to fit the one they came off The channel gives some strength to the ABS panel framing the window - when it is removed it is easier to crack the ABS frame. You can put new U channel on if you want - I did it once - now I just push the old channel back on after making a repair to the ABS panel. The headliner panels are almost a 2 person job. The problem, as @RoundTwo pointed out, is that only a few screws hold them up. If you disconnect the front screws, and not the rear screws simultaneously (on either headliner section), the weight of the headliner will bend it down and may crack/break the two connections still attached. I have used some long cardboard bent in an L or sticks to prop up one side while working on the other when working alone. Before removing the front headliner you have to remove the panel with the air flow selector (4 screws but you have to disassemble the airflow selector switch) As the front headliner comes down you need to disconnect the headliner lights, the speaker and the Sonalerts (may be as many as 4 alerts) You also have to remove the two front duct connectors. DON'T LET THE HEADLINERS FALL OR YOU WILL RIP OUT DUCT AND WIRING The rear has lights and two duct connectors. The luggage area panels also come out - side and headliner with one exception. That panel around the ducts where the coat rack hook is, will bend down but not come off. It appears to be riveted to the fuselage skin on the pilot side - I could not remove it. I had to paint it in place masking off the rest of the interior and making a "spray booth tent" around it. Reinstallation is a reverse of the process. Tip - get a narrow awl to help align holes during re-assembly. The headliner holes are a real bitch to align while you are balancing everything in the air. AFTER THE HEADLINERS ARE BACK IN PLACE, TEST THE LIGHTS, SPEAKER AND SONALERTS AND AIR SELECTOR BEFORE REINSTALLING THE SIDE PANELS I predict, that if you start this job and only work on weekends and maybe a few nights, plan to have your plane down for a month. You may find corrosion on the tubulars that needs attention. You may want to do something more to your insulation. You will break things - especially the plastic - requiring more gluing and repainting. @RoundTwo - how long did it take you? Here is a video and a couple MS posts with pics that may help. Some of the posts include discussion of panel upgrades but they have a lot of pics of the interior out. Good luck.

-
Thanks. That’s great to know that there are other options now. I see from the late 2013 announcement (below) that it was certified slightly after my Aspen install (unfortunately) @T. Peterson Looks like it costs about $3000 https://aspenavionics.com/news/aspens-ea100-digital-autopilot-interface-approved-to-replace-century-attitu https://sarasotaavionics.com/avionics/ea100
-
This powerpoint sums it up pretty well in layman's terms. https://www.sdmunicipalleague.org/vertical/Sites/{2540DC39-A742-459F-8CAF-7839ECF21E89}/uploads/Bryan_Johnson-Airports_Reversionary_Rights.pdf
-
I think @T. Peterson previously said he has a Century 41 autopilot. I don't think you can drive it from the Aspens. I have the same set up but with twin Aspens. My shop had to retain the vacuum AI on the installation. Sounds to me like it is a problem with the instrument overhaul shop.
-
Good point. It is hard to tell who one is buying from. So GM sells parts direct ....competing with dealers....and then dealers set up websites that look like "GM Diret".....competing with GM's direct parts sales. I wonder if GM retaliates against the dealer behind "Gmpartsdirect"?! Shop GM Genuine Parts & ACDelco Parts for GMC Vehicles Shop GM Genuine Parts & ACDelco Parts for Chevrolet Vehicles
-
Actually they do….Direct….No Dealer - no middleman. You have the option of having the parts delivered to your home or a dealer if you want. https://www.freep.com/story/money/cars/general-motors/2022/01/18/gm-parts-sale-online/6562278001/ https://www.caranddriver.com/news/a38819559/gm-maintenance-repair-parts-online-selling/# https://www.gmpartsdirect.com
-
Help me understand my Mooney's electrical system
1980Mooney replied to AlexLev's topic in Vintage Mooneys (pre-J models)
Don’t forget the effect of temperature. @AlexLev ‘s profile shows Buffalo, NY. Although Buffalo is a warm 53 deg F. today, the average low temperatures are usually closer to mid 20’s deg F in January. The lead acid battery loses about 20% of its capacity at that temperature. Also cold weather needs a lower charging rate in order to avoid battery damage . Charging will warm the battery (and I don’t know where the battery in a G is located - if it’s like a C it wil get engine heat) -
@Kerrville This salvage fuselage may still have what you need. https://azairsalvage.com/product/1978-mooney-m20j-3538-9-aftt-lycoming-io-360-a3b6d-776-smoh-project-aircraft/
-
Flying a plane 1,000 miles away for an interior and having it down for 15 months is crazy. I bet there are not a lot here that can afford to pay all their fixed costs on their plane for nearly a year and a half only to have it sit. You can't let your hangar lease go - with waitlists in almost all airports you likely can't get it back if you do. You need your hull ("expensive") insurance if something were to happen to it sitting - flood, tornado, fire, etc (remember all the Mooney PFM M20L's flooded when Hurricane Charley hit Mod Works in 2004?). Your plane will be out of Annual - you may need to hire a distant A&P for an "out of state Annual"(i.e. potentially $$$) or else ferry it - but timing may not match up with the installer delay vs an A&P Annual schedule. Your plane may have even more idle downtime waiting. Your Instrument currency lapses. And if the down timing falls on your BFR then you need to rent a plane. And for those who can afford it, they likely don't want to and don't want a solution with a plane grounded for so long.
-
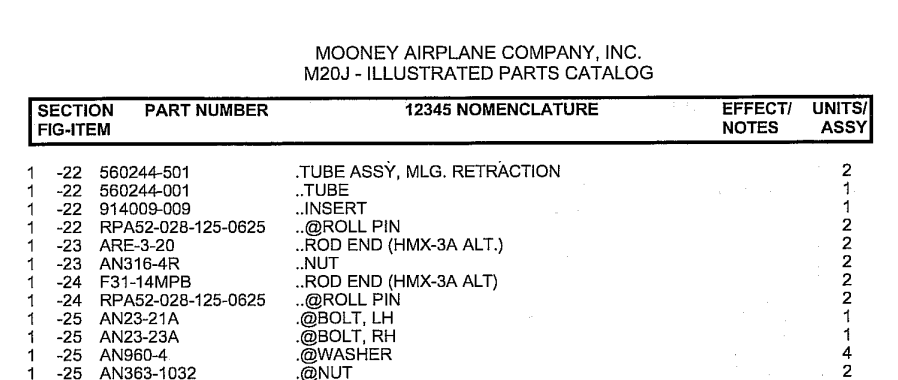
I am confused by the part numbers mentioned here and on page three. I think the control rods that are bent are 550244-501 That is the entire rod with rod ends on each end (including parts ARE-3-20 and F31-14MPB) As Skip said there are "2" complete rods for the MLG If you just want the tube without the rod ends it is part 560244-001 There is "1" tube within each complete entire rod `The salvage yards get them confused and use then interchangeably. Here is a BAS ad for the part number that is just the rod (out of stock -sorry) but you can see that it has the rod ends. They call it 560244-001 https://baspartsales.com/560244-001-mooney-m20k-landing-gear-retract-rod-assembly/
-
Remember that he has an early J with the Dukes actuator. I have no experience with it and don’t know if it differs from the Eaton.
-
Note in the "Bent Push Pull Rods" Dec 15 2022 topic, that he used straight edges to check the rods without disassembly. When you buy a Mooney, there can always be delays in parts. Luckily there is a lot of scrap parts. The factory does make parts....slowly. And as @KSMooniac said a good A&P can repair a lot of parts. I have owned a Mooney through bankruptcies and shutdowns. The biggest delay I ever had was waiting on Rocket Engineering to repair my engine mount frame (unique to the Missile conversion). Nowdays engine overhauls are taking longer than waiting for parts from Mooney.
-
Here is another video showing the micro (stop) switches in action. It has an Eaton actuator but the principle is the same.
-
A clean “oh crap I completely forgot “ gear up generally does not tear up the rods, turnbuckles or actuator. It is the remembering and dropping the gear(partially extended)just as you touchdown, the porpoising nose gear collapse, the side skid collapse, and the improper gear rigging/weld crack collapse that tears up and bends everything in the landing gear system.
-
once you get it up on jacks here is a video for reference
-
-
Only one of the 2 MLG tubes is bent? Everything is linked together. If it bent (buckled) because the Dukes actuator over- extended (due to lack of microswitch stop) then everything was overextended. Every tube should be checked for straightness. And turnbuckles for any On the other hand perhaps the one tube had some residual damage from the original gear up and it was the first to bend. check out this post
-
Also I have always found KNR- Inc., a Mooney specific shop out of Evanston, WY, to be a great online resource. They have a "Shop Talk" section that is very knowledgeable and pragmatic. Everyone has their favorite - my 2 cents. ShopTalk Index (knr-inc.com) Regarding Mooney specific pre-buy 200404 Caveat Emptor, Caveat Vendor (pre-buy) (knr-inc.com) 201712 Pre-buy Part 1 (knr-inc.com) 201801 Pre-buy Part 2 (knr-inc.com)
-
Look - I agree with your point. Anyone buying a plane should look at the Serial Number to avoid confusion. Advertisements and owner statements can be misleading. Also if you search a plane by Serial Number you may find that the N-Number changed along the way.
-
Also you may have already seen some of theses From one of our MS'ers @201er Also Emergency Gear Swing by @201er
-
Uh - Eric above raised doubt "If somebody says they have a 76 J model, I wonder whether they really mean an early J or an actual 76F that has essentially been converted." THERE IS NO DOUBT.
-
Since you have narrowed your interest to a M20J POH Service Manual Wiring Diagrams (safe to open) mooney.free.fr/Manuels M20J/M20J/Mooney Service Manuel M20J Vol. 2 of 2.pdf Parts

