Mooney-Shiner
-
Posts
315 -
Joined
-
Last visited
Content Type
Profiles
Forums
Blogs
Gallery
Downloads
Events
Store
Everything posted by Mooney-Shiner
-

Torn Brittain servo boot
Mooney-Shiner replied to M20E for me's topic in Vintage Mooneys (pre-J models)
Unless we can use "owner produced" justification to say that the new item is a group buy that is "similar" to the diaphragm on vac- servo? The install will be completed with owner punching a center hole for the chain bolt. I got your POC from Kevin and will shoot you a txt this morning. -
What is the part number of sigma tek vacuum switch? Can't see the last numbers on the photo
-
Torn Brittain servo boot
Mooney-Shiner replied to M20E for me's topic in Vintage Mooneys (pre-J models)
Yes, I called him. He was awesome, but not sure about the material and blueprint info. -
Torn Brittain servo boot
Mooney-Shiner replied to M20E for me's topic in Vintage Mooneys (pre-J models)
Do you know what material did they use? I can see it says "nitrile," but wondering if it was specific kind of nitrile? Do you have blueprint of the items? I'm about making a custom order as well. -
Leveling aircraft solely by nosewheel ?
Mooney-Shiner replied to Airways's topic in Modern Mooney Discussion
Perfect! I will look the weighing procedure in the SMM. From SMM:

-
Leveling aircraft solely by nosewheel ?
Mooney-Shiner replied to Airways's topic in Modern Mooney Discussion
Bringing this thread from the dead because also planning on calibrating my new CIES fuel senders. How do you know when the airplane is leveled? Do I need to put a construction level inside the cabin floor to know that I'm leveled?
-
Torn Brittain servo boot
Mooney-Shiner replied to M20E for me's topic in Vintage Mooneys (pre-J models)
Hopefully, we can get more people! -
Tank reseal. How much sealer to buy
Mooney-Shiner replied to Thackett's topic in General Mooney Talk
To prevent the new sealant from clogging the drain holes on the sump. -
Torn Brittain servo boot
Mooney-Shiner replied to M20E for me's topic in Vintage Mooneys (pre-J models)
Anyone wants to get another order going? I think we can figure out how to do a group buy of 80% complete boots that look just like Brittain, leaving room for the owner to do another 20%(cutting a top hole for example). This way it will be legal "owner produced part." I'm sure we could order them at $20 a boot if the order will be big enough. -
I'm pretty sure that we could have get enough folks to commit to get to $2K min. Or order it from overseas and make it even cheaper.
-
Some day, we will figure out how to do a group buy of 80% complete boots that look just like Brittain, leaving room for the owner to do another 20%(cutting a hole for example). This way it will be legal "owner produced part." I'm sure we could order them at $20 a boot if the order will be big enough.
-
Thank you! It seems that all of the shieldings are to be grounded at the panel. Does anyone have a photo what this grounding should look like? Is there a bus to ground everything?
-
The Seatbelt Saga - Shoulder Harness Edition
Mooney-Shiner replied to TheAv8r's topic in Vintage Mooneys (pre-J models)
Thank you for all the useful information on the thread. I’m doing a dry fit right now without the trim. But I’m not sure if I like how the bolt and nut is rubbing against the window. What would you guys recommend?
-
Vance, thank you for such an in-depth explanation. I tracked down the speaker issue, and it turned out to be an accidentally disconnected spade connector on the speaker. After reconnecting it, the speaker works exactly as it did before. To answer your points: the shielding on the wire is used on the LO side of the speaker and is tied into the panel/frame ground, while the main conductor is used as the HI lead running straight back to the audio panel. Even though this setup has technically been working, it’s clearly not the correct way to wire it, so I’ll need to redo the speaker wiring properly. Thank you for catching that. What type of wire would you recommend for the rewire? And thanks again to you and everyone here for the phenomenal support.
-
Sorry, I should have been more specific. The speaker is completely silent and not working right now. I have pretty good continuity for the High side, but very high resistance(with Master on) on the Low side. I also measured the Low side to the Low side pin return pin on the tray, but I noticed that the Low side pin is connected to the frame (AKA ground). The resistance between the tray Low pin and the ground is 0.8 Ohm (acceptable). The speaker is not energized when only Master is turned on. It is energized when Avionics switch is turned on, which turns on the Radio/AudioPanel/GPS/etc. But the AudioPanel Speaker Low side pin is connected to the same ground (airframe) that Master uses. Here is the pinout for the Audio :
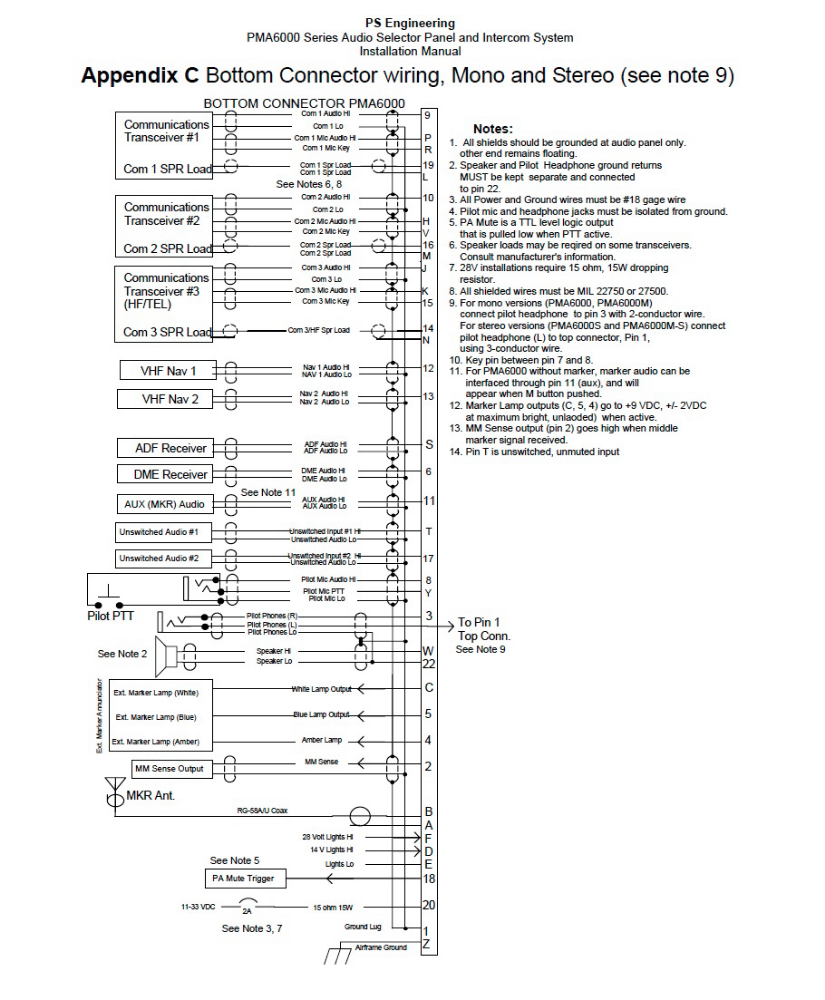
-
Hey, fellows, I'm trying to understand my electrical gremlins to get my speaker to work right. I was testing electric continuity from tray pin to the speaker wire. Good continuity on Speaker HI side (+) and high resistance on the Speaker LO (-) side. I started measuring and shot this video. Any help is appreciated.
-
How much for the belly strobe? Mine still working, but I thought about getting a spare one just in case.
-
Unable to make maximum RPM a few hours post overhaul...
Mooney-Shiner replied to Tito22's topic in Modern Mooney Discussion
Thats pretty cool. For whatever reason, My 67F POH doesn't have sea level performance table. It starts at 2500 MSL. -
Vintage Mooney and Brittain parts.
Mooney-Shiner replied to Igor_U's topic in Avionics / Parts Classifieds
I wonder if there is a way to install Accutrack II device on my 67F that has Brittain wing leveler vac system and TC100EVS Autopilot Gyro? Any videos on that? -
Hi, everyone! Does anyone know if there are patterns available for cutting and sewing wing and tail covers for our Mooneys? I’d rather not try to reinvent the wheel by starting completely from scratch if there are templates or designs already out there. Thank you!
-
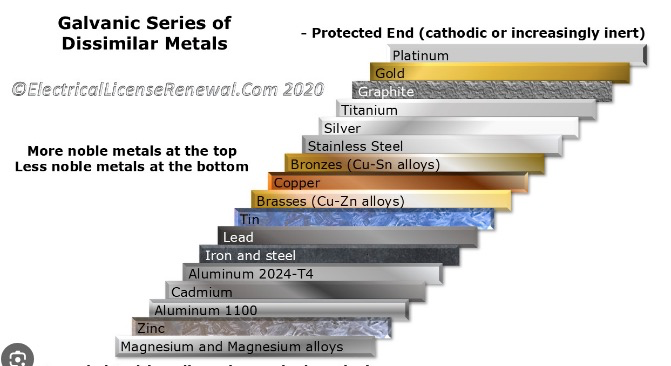
Just bringing this thread back from the dead: Since I’ve been based at a coastal Florida airport (beautiful spot, but hot and humid) with my Mooney since 2020, I made a habit of replacing corroded or worn fasteners with stainless steel ones. The line for hangars are decade long and I'm on the outside tiedown. But the more I’ve read on this, the more I realize that cadmium-plated screws are actually less noble than stainless and closer to aluminum on the galvanic scale. Counterintuitive as it seems, that means cad-plated screws can promote less corrosion than stainless when installed in aluminum. Sure enough, I started noticing filiform corrosion forming around my fuel tank access panel after swapping the original screws for stainless steel ones. Does anyone have an experience with this?

-
Hartzell H1 Prop Governor and IO360A1A
Mooney-Shiner replied to Mooney-Shiner's topic in Vintage Mooneys (pre-J models)
For the sake of posterity, I've got a reply from Hartzell with the IPC for the H-1 governor. Looks like Hartzell 2024 IPC calls for B1104, AKA MS9144-01.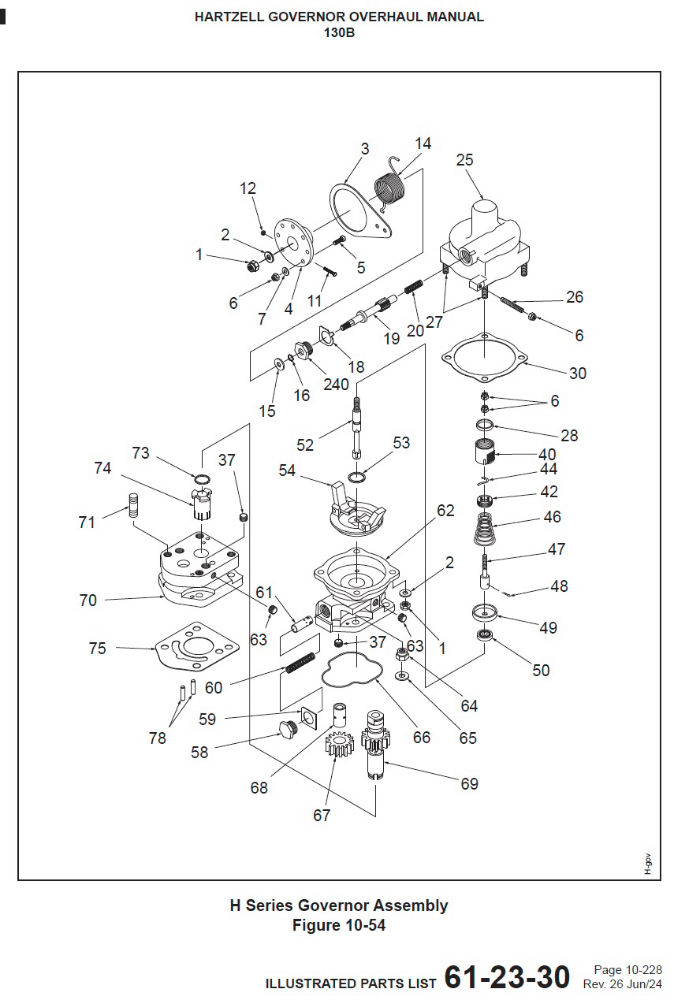


-
Hartzell H1 Prop Governor and IO360A1A
Mooney-Shiner replied to Mooney-Shiner's topic in Vintage Mooneys (pre-J models)
Thank you. Luckily, I'm not dual mag. Just regular A1A with two split mags. -
Hartzell H1 Prop Governor and IO360A1A
Mooney-Shiner replied to Mooney-Shiner's topic in Vintage Mooneys (pre-J models)
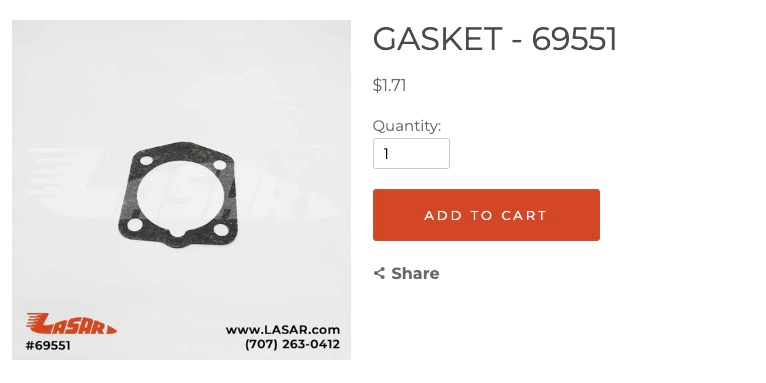
Thank you for all of the great help, guys. We will re-install the proper hardware on it. Also based on the discussion above the proper gasket from the governor to the adapter is 72053 or NOT MS9144-01 or NOT 69551 type (IO-360 IPC is confusing on this)?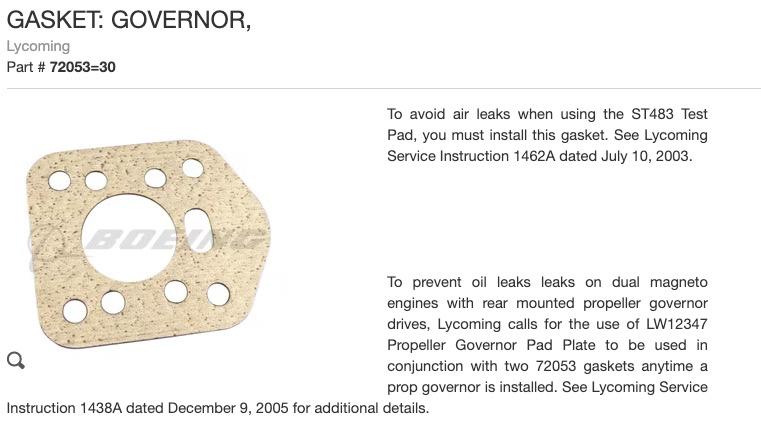


-
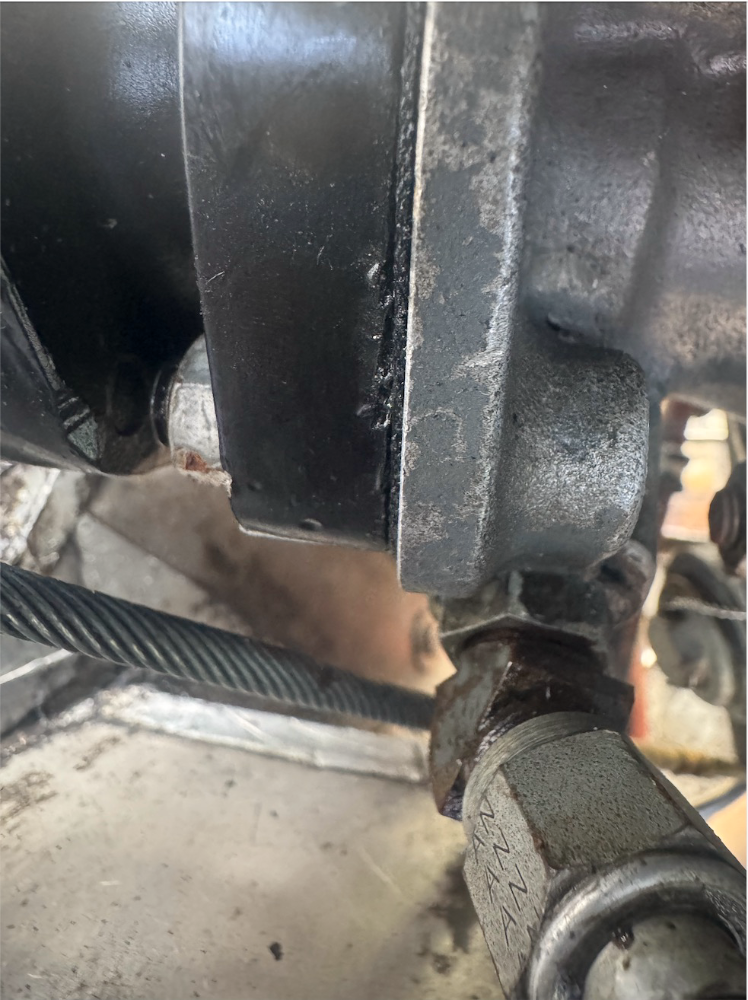
Hartzell H1 Prop Governor and IO360A1A
Mooney-Shiner replied to Mooney-Shiner's topic in Vintage Mooneys (pre-J models)
Another view of my governor mating surface. We are planning to attach the gopro and do the ground run to see where is the leak. After that, we will likely rebed the governor with new set of washers and nuts.