FlyBoyM20J
-
Posts
184 -
Joined
-
Last visited
Content Type
Profiles
Forums
Blogs
Gallery
Downloads
Events
Store
Everything posted by FlyBoyM20J
-
I'm just curious....has anyone added either a heated prop or alcohol windshield to an otherwise vanilla J? I fly in the Northeast US a lot and sometimes I wish I had a FIKI plane with TKS and everything but I have also talked with pilots who have decades of flying in these conditions who prioritize windshield and prop above leading edges. It seems like I could probably find a shop that has an STC for both of these mods but searching hasn't turned up anything. Cliff
-
What was the ballpark price? I'm dying to get mine properly painted but I want to gamble on the stock market a bit to fund it...need a target...expecting $15k to $18k at this point. So, $20k... Cliff
-
There are a lot of planes based at KELM that end in CG. Corning Glass?
-
Glare shield lighting - only a resistor?
FlyBoyM20J replied to NicoN's topic in Modern Mooney Discussion
And the rheostat (perhaps with aid of a series resistor I didn't see) protects the transistor base from over-current. It never goes to 0 ohms - at least not in my J. More like 10, so the transistor base current is limited to a max of about 1.5 amps and remains below the datasheet limit of 7A for the snazzy RCA 2N3055. Circuits are fun. Cliff -
Glare shield lighting - only a resistor?
FlyBoyM20J replied to NicoN's topic in Modern Mooney Discussion
Good question! The C/B is there to allow a central location to disable the system. Like all other systems in the plane. But why the fuse, as well? The fuse is there to protect the transistor which is rated for something like 7A (some will be more like 10A or more; depends on the exact transistor). 5A is the rating for the fuse and the C/B is rated for 10A, so if there is a short in the load and the rheostat is turned all the way up (so, transistor is in saturation and passing current as required by load), then the fuse is the only thing that keeps the transistor from passing current potentially beyond its limits. Interesting side note: the transistor is itself a current-limiting device provided it is not supplied with too much base current (that is, not turned up all the way in this particular circuit). That means that if you don't ever run the transistor to saturation, it will output less than 5A regardless of the load. And in this circumstance, even a short in the panel lighting circuit will not blow the fuse or trip the C/B. Oh, and to your second point: in my 1982 J, the transistors are mounted to the rear of the dimmer unit. Cliff -
Glare shield lighting - only a resistor?
FlyBoyM20J replied to NicoN's topic in Modern Mooney Discussion
I had another look at the dimmer unit on my J. The transistors are 2N3055, which are definitely NPN power transistors. Here they are on Mouser for a little under $6. Cliff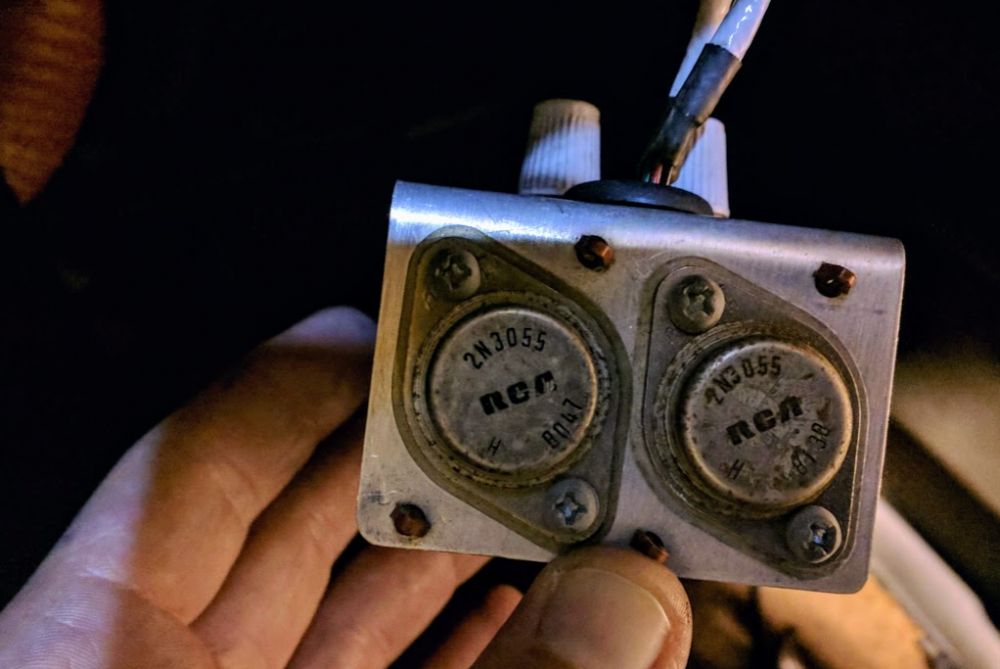
-
My J doesn't even have a vacuum gauge and I'd like one. All I have are the high/low warning lights. Has anyone found a suitable model to add to a J panel? Cliff
-
Glare shield lighting - only a resistor?
FlyBoyM20J replied to NicoN's topic in Modern Mooney Discussion
You're right, Skip. I was looking at this backwards. Basic forward-biased emitter follower configuration. Cliff -
Glare shield lighting - only a resistor?
FlyBoyM20J replied to NicoN's topic in Modern Mooney Discussion
Many here will be able to tell you the exact serial number at which Mooney added the transistors, but I can't remember off the top of my head. I know that it was prior to my 1982 J by a year or two. Older ones than that had only the rheostat to dissipate current, as per your sch. EDIT: I'm wrong...per Skip, the transistors are over next to CB on right in this drawing. Cliff -
Glare shield lighting - only a resistor?
FlyBoyM20J replied to NicoN's topic in Modern Mooney Discussion
Yeah, I've read that too, but the drawing is a classic PNP circuit if you swap C and E. PNPs conduct as Vbe goes negative which would be the case if the top of the transistors (labeled as C, but I believe should be E) is at +12V and the base is being pulled down from 12. I can't see a way to make the schematic work for an NPN. Cliff -
Glare shield lighting - only a resistor?
FlyBoyM20J replied to NicoN's topic in Modern Mooney Discussion
Yep, here's the sticker on the bottom of the dimmer unit in my 82 J. But the PNP transistors are drawn incorrectly. They have collector and emitter reversed, so the load is connected between collector and ground. EDIT: I'm wrong...Skip is correct below when he points out that this is a valid schematic for an NPN emitter-follower configuration. Cliff
-
I have a tried-and-true way of ensuring a new drill bit is dull. Just grab one that was specified for wood/plastic and try drilling some steel for a few seconds. I have a few of those in my drill case for purposes such as this...I promise I made them dull on purpose. But I also read all the advice about using a step drill for this, so right now, my plan is to use a very small dulled bit for a pilot hole and a step drill for expanding and counter-sink...with a block of wood below. Now...if USPS would only deliver the lens...
-
Yep...I ordered one on Monday. Priority Mail should have delivered it to my office today...no luck. Hoping for tomorrow. Any suggestions on how to get the plane in the air safely without this exact part in case it doesn't arrive? I'd like to be able to fly home or to a shop as a fallback to waiting for parts to show up. Cliff
-
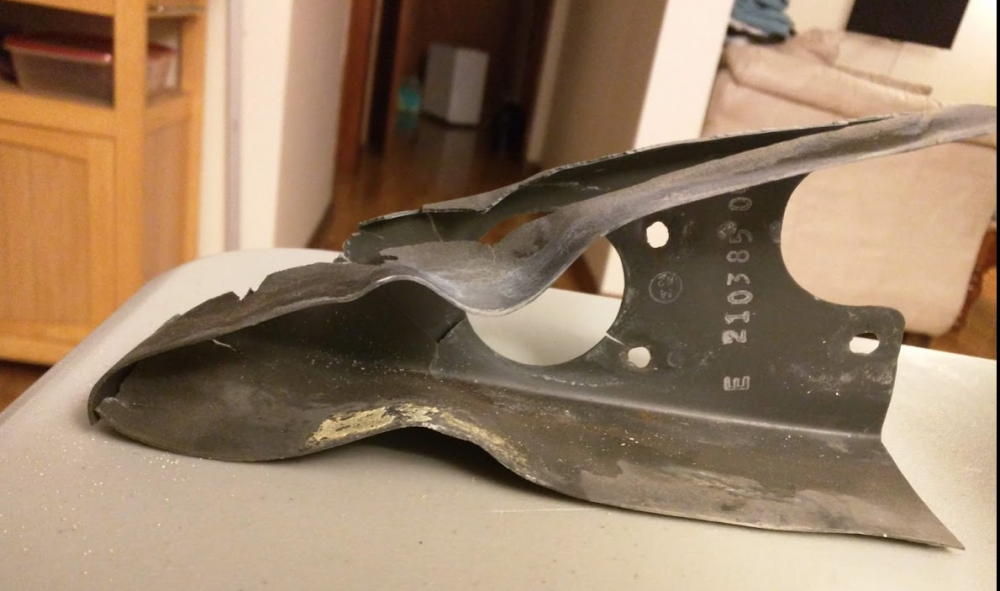
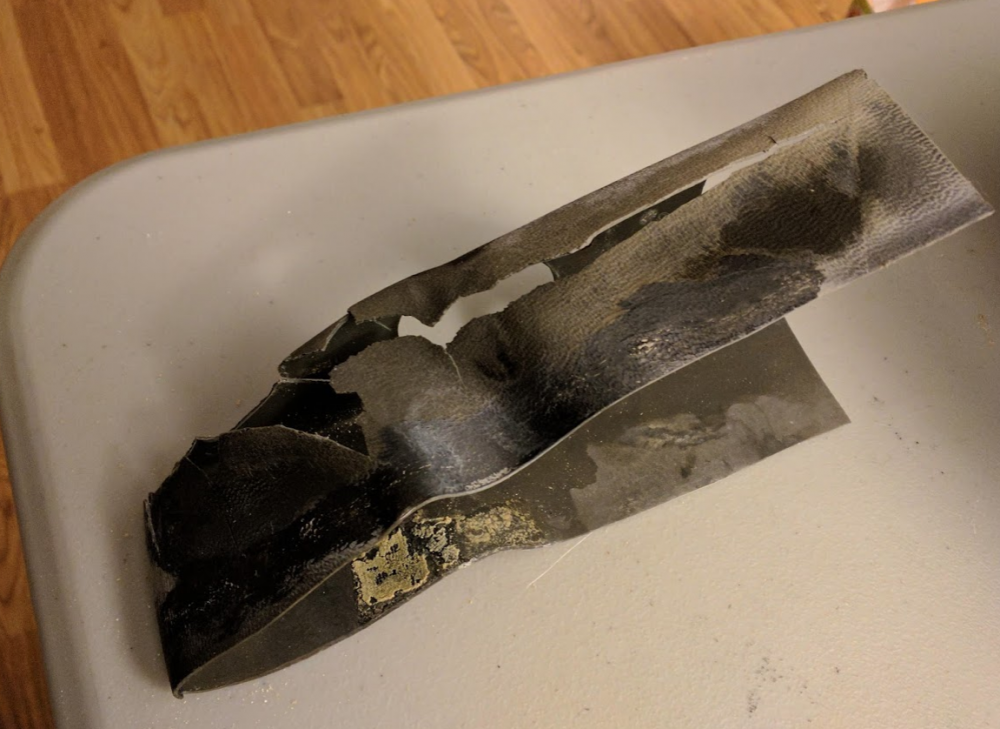
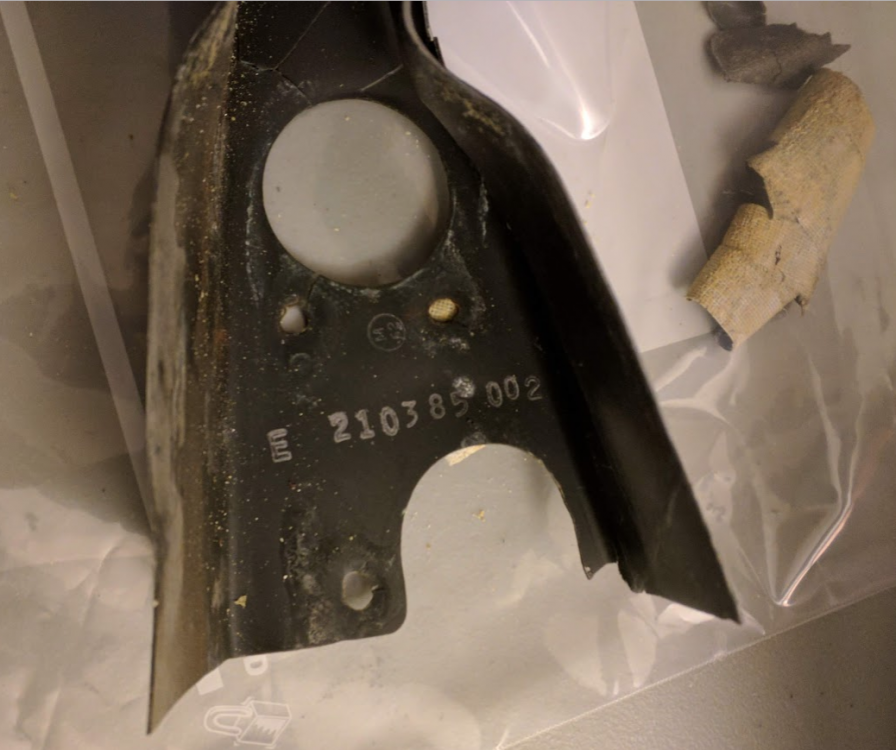
The PN is 210385-002. I found a MS thread on this when I Googled that part number. If anyone has one and wants to sell, I'd appreciate it. Otherwise, I guess now that Mooney is back at their phones, I'd better give them a call. Cliff
-
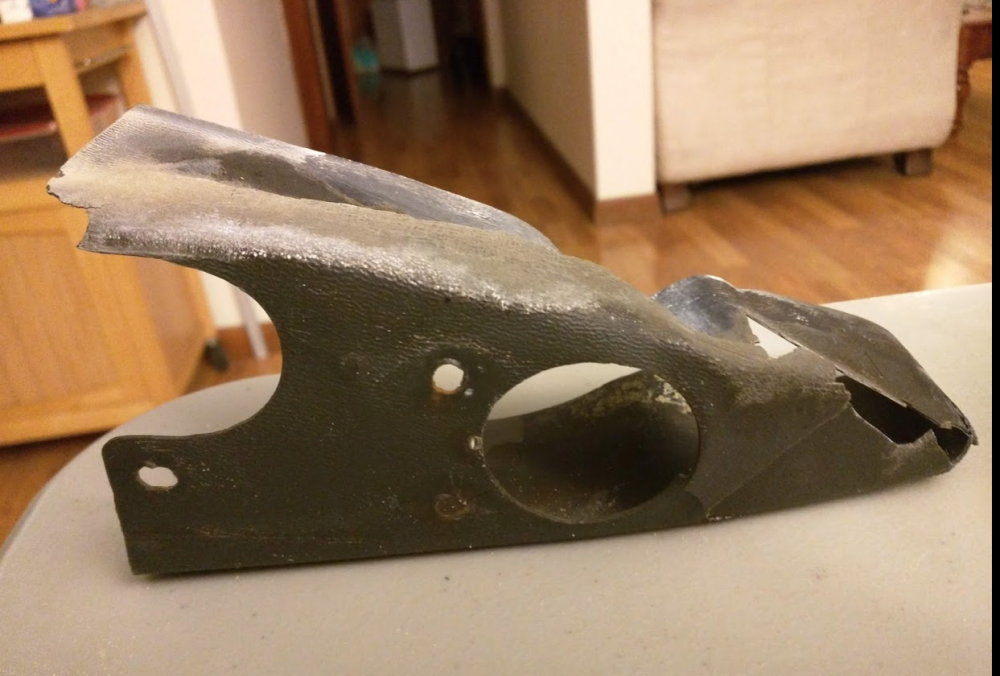
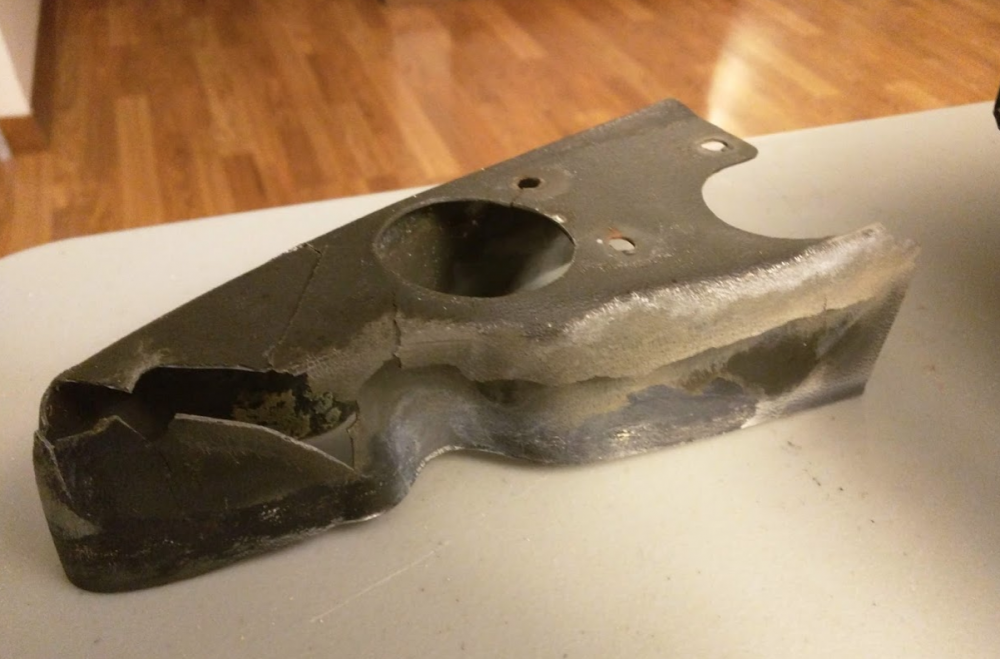
I'm now looking for one of these...mine was deformed from heat and worn out before it fractured so it's not really worth fixing and re-installing long-term. I have enough of the missing pieces to make it structurally sound so it might go back in for the winter. But it needs to be replaced.
-
I'd like the option, yes, thanks. Cliff
-
Not sure what you mean, but I see on my CC record for this that it's $163 including shipping. I can imagine the black thermoformed piece is one-of-a-kind much like the fiberglass fairing itself. In my case, it looks like the broken parts were pushed inside the piece, so I think that repair is feasible.
-
Update: I just got off the phone with LASAR and their cost for a single lens is $148. They're shipping one to me right now...should have it before the end of the week. Cliff
-
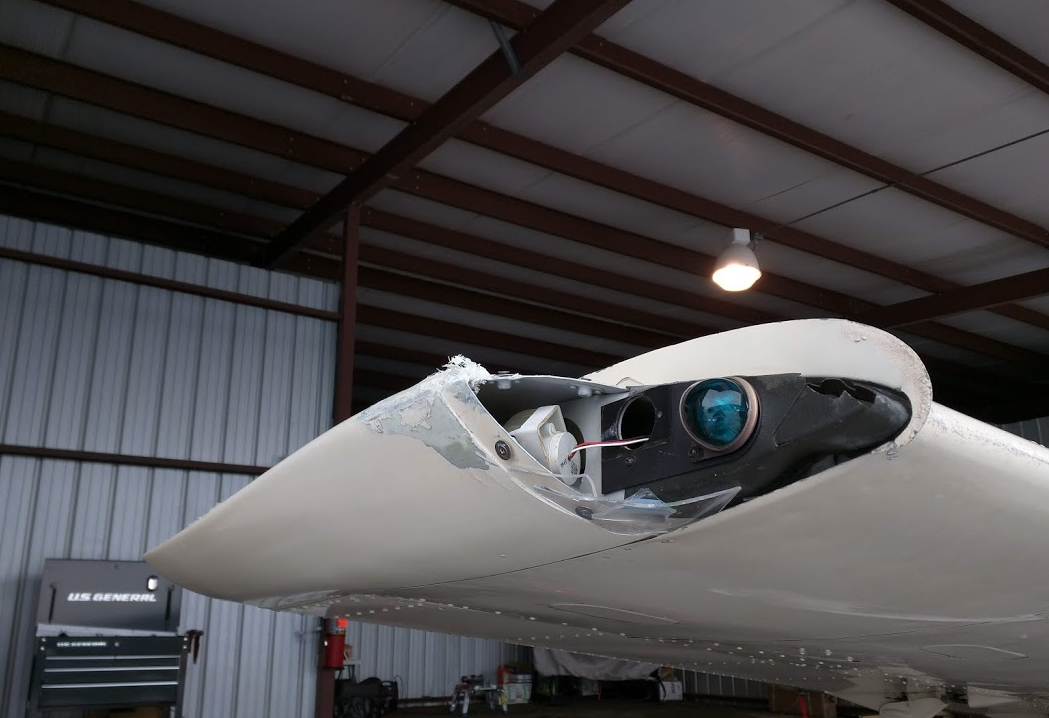
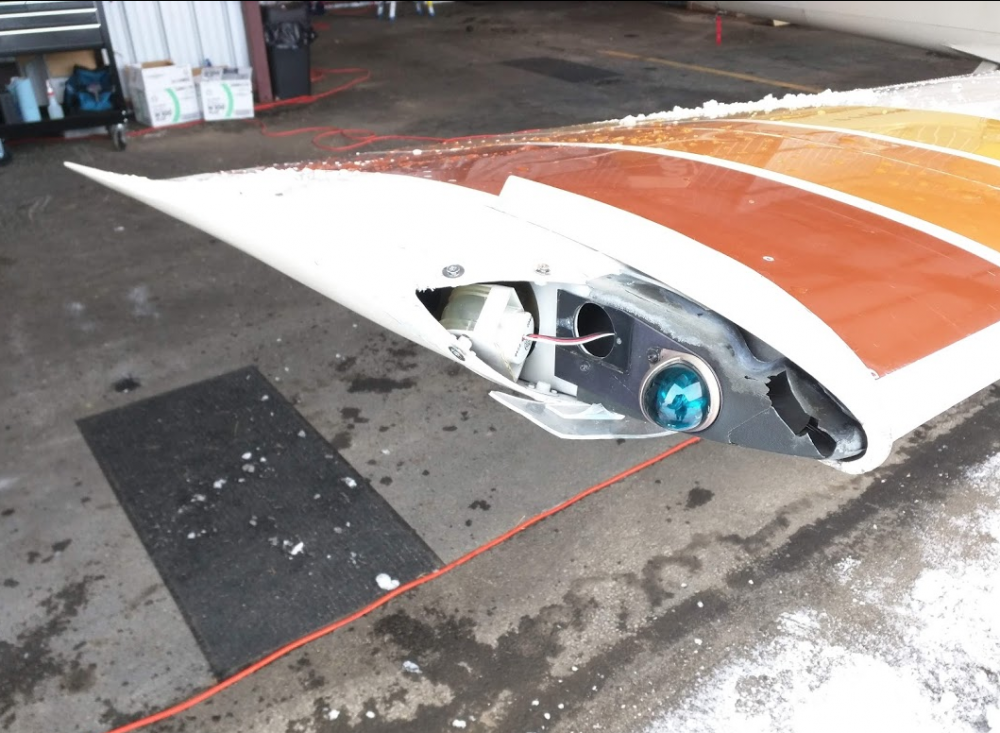
I'm not sure I want to make an insurance call on something 1 AMU-ish like this. The strobe was fine and still mounted to the black thermoformed part after the initial impact...until I tried to unstick the plane myself with the tow bar (and crampons for traction). The poor plane slid back against the hangar door over the ice and gently snapped the strobe off at the mounting points. I think it can be remounted without issue. Yes, some of the fiberglass looks chafed. I want it to be 100% solid and operational...and after that...as good as the rest of the paint job which is asking for attention. If I could get it safely to a shop that would do the whole thing nicely, I'd go for that but I believe I'll need to get it operational and a lens in place just to fly anywhere. Cliff
-
I also found this...says "little to no trimming" but it appears that it requires drilling (makes sense). Anyone ever try these? https://www.knots2u.net/wing-tip-lenses-mooney-m20j-thru-m20s-mooney-part-210384-001-210384-001-gla2494/ EDIT: looking at the price and part number, this would appear to be a Great Lakes Aero part.
-
Thanks...and yeah, this was my normal commute flight and I had just done a sweet touchdown in some challenging winds. I was thinking how nice it was that I could let the prop pull me over the snow and ice. Didn't think what might happen if some of that wind caught me between the rows of hangars. Now I need to figure out how to handle this if it happens again sometime. Cliff
-
Is this the same PN as the stock lens prior to the STC'd fairing install? Thanks again, Skip! Cliff BTW, I found the other thread here...
-
Windy day in the NE and ice on the ramp. A gust of wind shifted my J sideways over the ice and the starboard wing fairing hit a closed hangar door. Any suggestions on who I should contact to get another lens?

-
Good to know...I'm sure that will be helpful at assembly time. Thanks again!
-
Perfect, thanks! I'm going to get the new hoses and FF transducer, fittings, firesleeve, etc. first so that I can get the transducer secured near the sump and as far from the C4 riser as possible. Then I should have the clearance to add this heat shield. Cliff