

Hradec
-
Posts
143 -
Joined
-
Last visited
-
Days Won
2
Content Type
Profiles
Forums
Blogs
Gallery
Downloads
Events
Store
Everything posted by Hradec
-
Prop hub eddy current inspection on airport in midwest
Hradec replied to Hradec's topic in Vintage Mooneys (pre-J models)
Thanks -
Prop hub eddy current inspection on airport in midwest
Hradec replied to Hradec's topic in Vintage Mooneys (pre-J models)
Thanks -
I am needing a prop hub eddy current inspection. My aircraft is based at KLOT Lewis University airport in Romeville Illinois. Willing to fly it to the inspection, preferably within a couple hrs flying distance. Any recent inspections accommodation ppl listed near me? Thanks Glenn 1964 m20e
-
I learned a lot in my 6 yr project. Im an A&P IA. Not retired and I don't think I'm dead yet. After rigging my flight controls with travel boards. I decided to help rig a plane that had been through 2 owners and at least a decade of annuals, flew slow and needed a heavy foot on the rudder at cruise. Logbook showed many adjustments. Apparently I'm the only one that jacked the plane, leveled it and used the travelboards. Obviously this had nrver been done before. Ailerons were horribly off. Plane gained 6 knots and flew straighter. Be careful who you trust to work on your plane. The only thing that makes some one po professional is they charge you for the mess they cause.. same goes for landing gear. It takes time, knowledge, tools and patience to do it right. After my 6 yr wing off project, only needed to adjust the prop governor after the test flight.
-
The entire system needs to be checked also an worn out up and down lock that the top of the handle locks into. Make sure its not worn out. What I was trying to express with my post, check the whole system don't put on a bandaid that masks other problems
-
Having gone through my entire gear several months ago myself. There is a lot going on in the landing gear system and lots of clearances to balance. read the manual look at the parts diagram. get a set of Jacks and the mooney tools and torque wrench to measure the downlock break over. I believe the manual has you disconnect some rods and has you check for binding in each of the gear. this is a good time to lube because you can move each gear by hand. find all the grease fittings. lube all the rod ends. make sure nothing is excessively worn. you should do all this before making any adjustments. check the adjustment with break over tools and torque wrench. when you start making adjustments everything changes ( torque, how far gear retracts and door closing) The gear is ingenious and once you understand it it is beautiful in its simplicity. If there is excessive effort, something is wrong. the tubes are thin they might have some corrosion. you are asking for trouble if you have to muscle the gear. I found that maintaining momentum of the gear handle and the proper airspeed for gear operation also helps a lot. A correctly lubed and adjusted gear should give years of trouble free ops once you sort it out correctly
-
How much?
-
Engine doghouse #4 tinnerman speednut
Hradec replied to Hradec's topic in Vintage Mooneys (pre-J models)
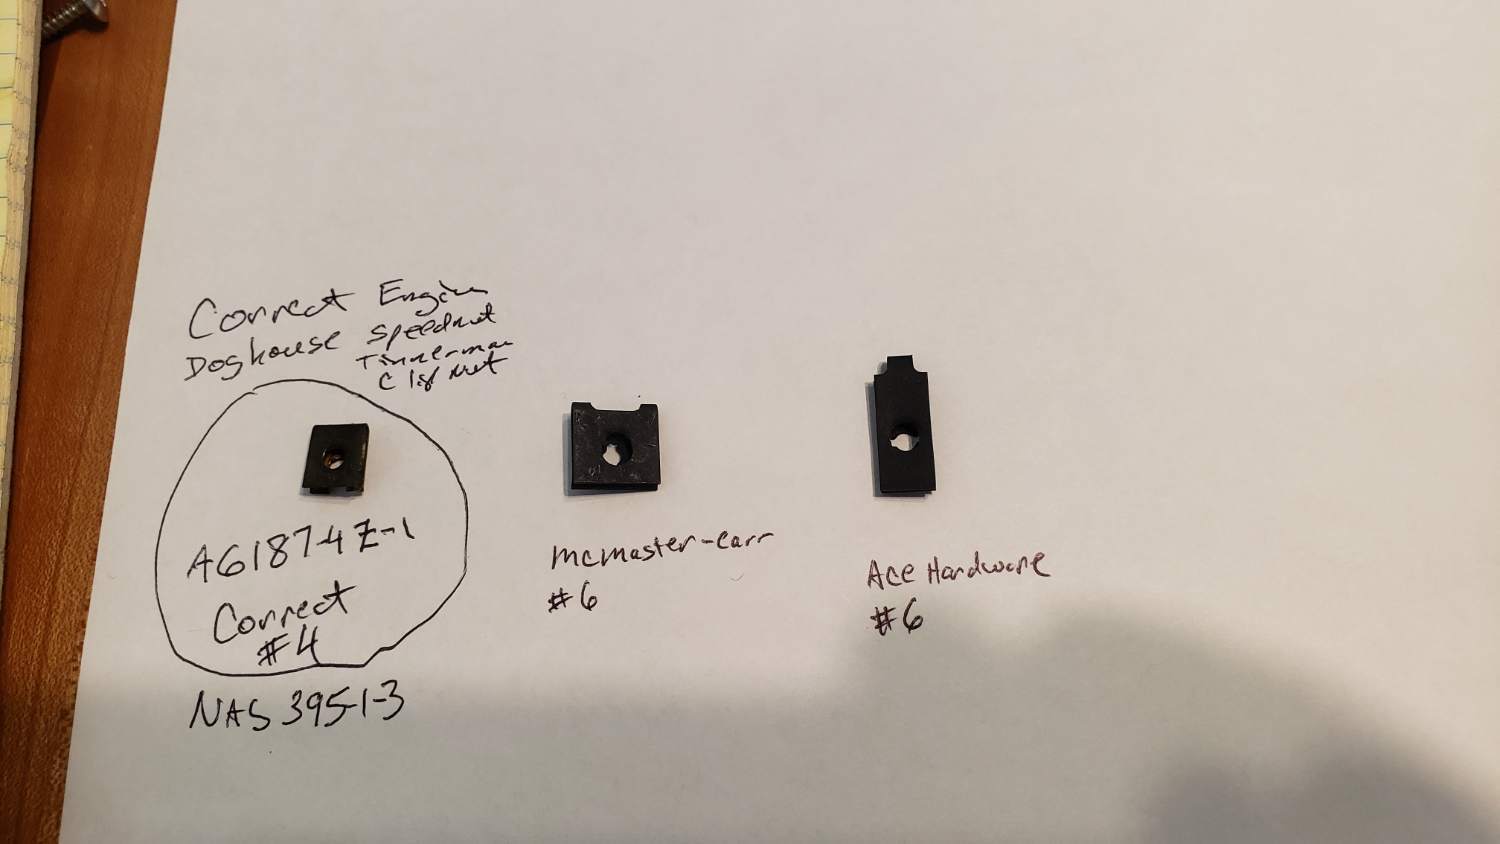
Just a follow up. Spencer aircraft did send me the correct small tinnermans for the doghouse. A6187-4z-1. Doghouse is back together! Thanks Glenn -
On my whole airplane ham-fisted mechanics or owner substituted machine screws with sheet metals screws #4 with #8 and eventually #10. Its so easy to rivet in a nutplate or change a tinnerman. As my nearly 6 yr project winds down I really want to make the baffling and cowling correct so its easier to take apart and put together for regular maintenance. Thanks for the help, Glenn
-
I looked through all the parts manuals And I couldn't find the screw sizes for the side cowls, lower cowl why the bumped out firewall area, top wowl training edge. 2 panels that cover the avionics area below windshield. Most of of the screws go into tinnerman speednuts. My guess they are #8 could they be #6 or even #10. Thank you for your help. Glenn 1964 M20e #311
-
Engine doghouse #4 tinnerman speednut
Hradec replied to Hradec's topic in Vintage Mooneys (pre-J models)
Do you by any chance have the part number I ordered some from mcmaster carr and they were wrong -
Engine doghouse #4 tinnerman speednut
Hradec replied to Hradec's topic in Vintage Mooneys (pre-J models)
I ordered these yesterday. I will see what shows up. Thanks -
As my project is winding down I am putting together the doghouse. I can't find the correct original tinnerman speed/clip nuts. I have several missing and the rest are damaged. Manual calls out A6187-4z-1 aka NAS395-1-3 The original ones are very small and slim marked with a T-4z. Anybody come up with something that works well. I don't mind going up to #6. On the picture, the left one is the one that I suspect is original and correct. The middle and the right are the closest ones I could find. Thanks Glenn
-
You can either cut down a longer used tube if it is one of your shorter tubes that are damaged. I may have got the material spec from frank Crawford at mooney I'm not sure. I checked the places I order from and did not see it in my history. If I find it I will let you know. Search mooneyspace there may be some more info out there. If I recall ID of the tube is machined to a larger id just at the end fir the bushing and ujoint
-
If you can't find a tube. I've heard of hangar elves buying tubing. Cut to length and carefully drill to match the old ujoints. Pleny of parts in the bkneyards but a lot have the same damage
-
Willing to buy ram air boot at premium
Hradec replied to Hradec's topic in Vintage Mooneys (pre-J models)
Andrei, Thank you for selling me your boot to keep my project moving forward. It was really nice to meet you and your neighbors at your airport. Your airport will be one of my first destinations after I get my test flight and complex training completed. You've got a good looking M20E Thank you, Glenn Bukac -
My big 64 m20e project will be wrapping up with a text flight in June or July. The only thing holding it up is my 600115-005 ram air boot with a 35 week lead time. I didn't realize my boot was in such bad shape. Maybe if someone has a new one sitting in the hangar on the shelf and is not needed at this time. I am willing to make it worth your while so you can order another one and still have some money left over. I know its one of those parts that are difficult. Thank for your consideration Sincerely Glenn 1964 m20e Villa Park, Illinois
-
71E: Alternator upgrade question
Hradec replied to varlajo's topic in Vintage Mooneys (pre-J models)
One of my friends at the airport one an alternator from plane power. They ended up giving me the certificate for the conversion kit. Plain power sent me an alternator for my 1964 m20e. What part numbers did you install and could you send me pictures of your install? Thanks -
my long term project is moving along nicely. was time to fill the tanks and test the electric pump. throw the switch and just a clunk. it worked 5 yrs ago before my project started. I quickly talked to some friends and checked the forum. Aero Motors in wisconsin is the place. I woke up crazy early this morning removed the pump and drove over 2 hrs to Aero Motors. Was definitely worth the trip. I turned over my tired hunk of junk and was given a pump that looked like new with all their updates. They knew I was the Curious inquisitive type with a lot of questions so they took me through the shop and showed me the insides of a pump and their improvements. Everything except one particular seal is made in-house in the shop. They even wind their own armatures! I'm the type that likes to shop made in USA. I was thoroughly impressed. my pump happen to be $550 for the exchange. My project continues forward with a minimal delay, will be installing the pump tomorrow. Glenn 1964 m20e Aft stub spar and upper left spar cap change. might be ready to fly towards the end of the year or beginning of next year
- 10 replies
-
- 12
-

-
1964 m20e doghouse front baffle seal and felt
Hradec replied to Hradec's topic in Vintage Mooneys (pre-J models)
Looks great, Thanks -
Hi, almost have the flight controls rigged. getting ready to work on firewall fwd. I have a 64 m20e with the doghouse. I need the front baffle baffle seal. It must be original. It is stapled in it. From reading it needs to be stiffer than conventional al baffle seals. Any good source? The felt seals on the front and back of the engine are pretty rough too. Any source for them? Thanks Glenn
-
fabric pattern for pushpull tube ratsocks6
Hradec replied to Hradec's topic in Vintage Mooneys (pre-J models)
thank you, they look great. just a question do they attach on the gear well side or in board? have a pic with them installed? thanks Glenn -
fabric pattern for pushpull tube ratsocks6
Hradec replied to Hradec's topic in Vintage Mooneys (pre-J models)
Is there a preferred fabric? Something airproof to prevent carbon monoxide or are we just keeping dirt and mice out? Thanks Glenn -
Hi, I have a niece that is studying fashion and just bought a sewing machine. She is itching to use it. It occurred to me she could make me some rat socks as well as the tube boot on top of the nose gear well in the cockpit. does anyone have a pattern for these that they could share. there was nothing left of them at the beginning of my restoration to copy. Thanks Glenn
-
Stuck Fuel Tank Access Covers
Hradec replied to Zippy_Bird's topic in Vintage Mooneys (pre-J models)
I didnt want to mention heat gun, but that's exactly what I used. but my tanks were vented a very long time and there was to danger of fire or explosion. heat gun was definitely helpful along with phenolic and plastic scrapers. thin putty knives.
