
JimK
-
Posts
17 -
Joined
-
Last visited
JimK's Achievements
")


-
Anyone come up with a resolution to this problem yet? I agree with Bob5151F. My O3 MAP is reading erratic (+\-2”) during the climb, then nearly rock solid for cruise, then erratic again on descent. I’ve swapped out the transducer, cleaned connectors, checked all line connections and pulled on all sorts of wires to check for intermittent connections. None of that pointed to a fix for the problem and now that makes sense to me. It wouldn’t be any of those things if the problem is almost exclusively in climb and descent. It must be triggered by changing atmospheric pressure (climb/descent) but somehow linked to a G1000/GEA71 software glitch. However, I have all the most current software and have talked with Garmin. They gave me some things to try but none worked. still looking for a fix!
-
I sent the following email to Precise Flight asking for their help: My equipment: Airplane Mooney M20R S/N 29-0490 P/N 010S0059-73 Rev C, Serial #984455 right hand cartridge. P/N 010S0059-74 Rev C, Serial #984456 left hand cartridge. These two cartridges look identical except for the location of the drain tube. Malfunction: When activated with the button on the yoke the-74 only deploys about ¾” and stays there while the -73 fully deploys. A few seconds later both retract very quickly indicating that the system has automatically removed power from both. Note: Initially this malfunction was intermittent (sometimes the above malfunction existed, sometimes both fully deployed like they are supposed to). Just recently this malfunction exists all the time now. Troubleshooting: First step: I thoroughly cleaning both sides of all connectors; Three connectors on the Asymmetric Logic Control (ALC) and one connector on each wing cartridge. Malfunction still exists. Next step: Swapped the -73 & -74. Malfunction still exists. Next step: Swapped connectors on the ALC, left to right and right to left. Malfunction still exists. Next step: I borrowed a known-good -73 cartridge off of a friend’s airplane of the same model. I tried all six combinations and found the following: 1. My -73 on the right, my -74 on the left. Original configuration, malfunction exists. 2. My -74 on the right, my -73 on the left. Malfunction exists. 3. His -73 on the right, my -74 on the left. Functions normally. 4. His -73 on the left, my -74 on the right. Functions normally. 5. His -73 on the right, my -73 on the left. Malfunction exists. 6. His -73 on the left, my -73 on the right. Malfunction exists. These results led me to believe something is malfunctioning in my -73. Also, I think it verifies that my -74 is good since it works as designed when mating it with a perfectly functioning -73. I’ll fill y’all in on the final result when I get word back from Precise Flight.
-
For those of you who work on your own airplane but don't always have someone present to help you remove and reinstall the lower cowl, here is a YouTube video which shows how to do it without chipping paint or scratching the spinner. This jack makes it safe and efficient and it's easy/cheap to build.
- 25 replies
-
- 16
-

-

-
When I first got wing jacks for my Ovation I jacked it and left it overnight with gear down. When I returned the next day both jacks were down and one of them had leaked oil all over the hanger floor. Since then I block the jacks to prevent lowering. Another good reason to block the jacks is that one could leak down causing a gross mismatch in height and a possibility of the airplane slipping off of the jacks.
-
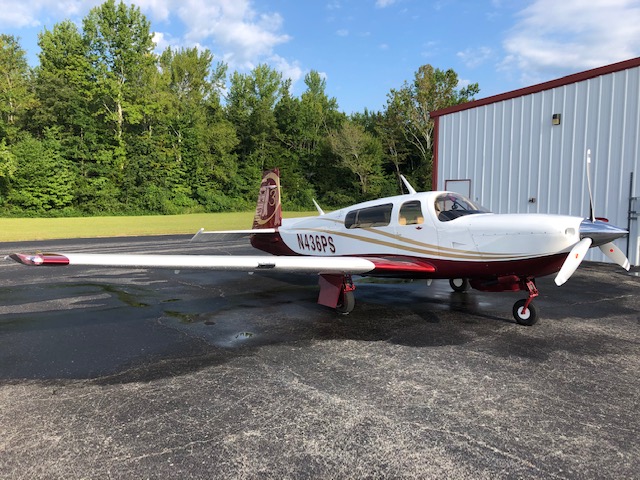
I just flew N436PS, a 2008 3GX Ovation from KMHK to KJWN a few weeks ago at 15K. I was able to get slightly over 60% power (based on the 310hp tables), LOP, 13.5gph, WOT, 2,600RPM and 183kts TAS.
-
My panel and glareshield dimmers were not working when I bought my Ovation 3 when I bought the airplane. I disassembled the control box (mounted on the aft side of he aft blackhead of he baggage compartment) that others have talked about. I found that someone had installed one of the voltage regulators backwards which allowed the pins to short out against the heatsink and that burned out one of the resistors on the circuit board. I replaced the voltage regulators and resistor and it works fine now. I have another post on Modern Mooney which shows a pic of the components.
-
Anyone know where the roll servo is located? 80 M20K. Thanks
JimK replied to willerjim273's topic in Modern Mooney Discussion
This may not be helpful since you have a K Model but, on an Ovation 3, the roll servo is below the instrument panel in the center console just below he engine controls. -
M20S Replacing Rheostat Box with Dimmers - Wiring Question
JimK replied to Darrolio's topic in Modern Mooney Discussion
My glare shield and instrument lights didn’t work on my Ovation 3 when I bought it. I took the dimmer box apart and found two things wrong. 1. Someone had installed one of the large voltage regulator transistors backwards which caused the pins to short out against the clearance holes in the heatsink. 2. When it was powered up the shorted pins caused the transistor and a resistor to burn up. I replaced the those components and the lights work fine now. I had to order more components than I needed so I have some if anyone else finds that their box has the same problem.
-
Batteryminder Y connector permanent connection?
JimK replied to r0ckst4r's topic in Modern Mooney Discussion
I agree with Fritz1. I have a similar setup with an RTA-2415 accessory connection cord hard-wired to each of my two Concord batteries on my Ovation 3. Both of the Battery Minder SAE plugs on these connectors are zip tied to the mounting bracket behind the oxygen service door. It is a very convenient setup because I just open the oxygen service door, pull out the two connectors a few inches and connect them to the 210-AY multi battery connector which I leave connected to my Battery Minder charger. This setup keeps the two batteries isolated from each other and makes it quick and easy to connect the charger after a flight. -
There is lots of good info here which is provided by some sharp people but please allow me to add my two cents from personal experience. I started studying the system after one of my speed brakes would not deploy at the end of a long cross country. When I learned that annual lubrication is recommended I first tried to take the easy way out by extending the speed brakes on my Ovation 3 so I could reach the gear to lubricate it. That’s when I realized that I could only access about 90 degrees of the gear and none of the worm drive. Then it occurred to me that the gear only rotates about 90 degrees during deployment so the grease I applied May never come in contact with the worm drive. Also his method would not remove the contaminated old grease which is exposed to the environment. That’s when I knew I would have to remove and disassemble the speed brakes in order to do he job right. I still don’t believe it is necessary to do this every year but the following YouTube video shows how I cleaned, lubricated and inspected my Precise Flight Speed Brakes. Once I did this maintenance the speed brakes worked great.
-
The 310hp STC is one part of what makes an Ovation 3. There may be other differences too but, at a minimum, the Ovation 3's are 2007 or later, have and Ovation 3 paint job + decals, have a GFC 700 autopilot built into a GDU1042 MFD with a Go Around function and the 310hp STC. Most, if not all, also have the 102 gal usable fuel. In other words, I think it would be disingenuous to call it an Ovation 3 just because it has 310hp even though many self-serving or uninformed brokers do it.
-
New way to think about shock disc maintenance - The best way to maintain shock discs (donuts) is to keep them from compressing in the first place. I have an Ovation 3GX so my discs are very highly loaded in compression which should result in their rapid, permanent deterioration but I’ve never replaced my discs. Like your airplanes, mine sits in the hanger 99% of the hours in a year based on 100 hours/yr flight time. The discs only deteriorate due to compression while the compression force is applied. So I made a pair of wing jacks using long ram hydraulic jacks from Harbor Freight and I jack my Ovation main gear off of the floor after every flight (only takes 5 extra minutes while I am putting my airplane away). I’ve never had to replace my shock discs and the gap between the top of the tower and the collars is still 0.2-0.3 under the 0.85 max. PS: For $800 you can buy real aircraft jacks from Alpha Aviation so you don’t have to make them. That’s still much cheaper than buying new shock discs!
-
Update per Buddy's request - I've been flying for a couple of months now with the Plexiglass access panel and the Mylar removed from the back of the insulation over the panel. I always get a consistent, strong signal to my iPad from the GTX345R. Never has failed to pair when I start the airplane and never has disconnected in flight.
-
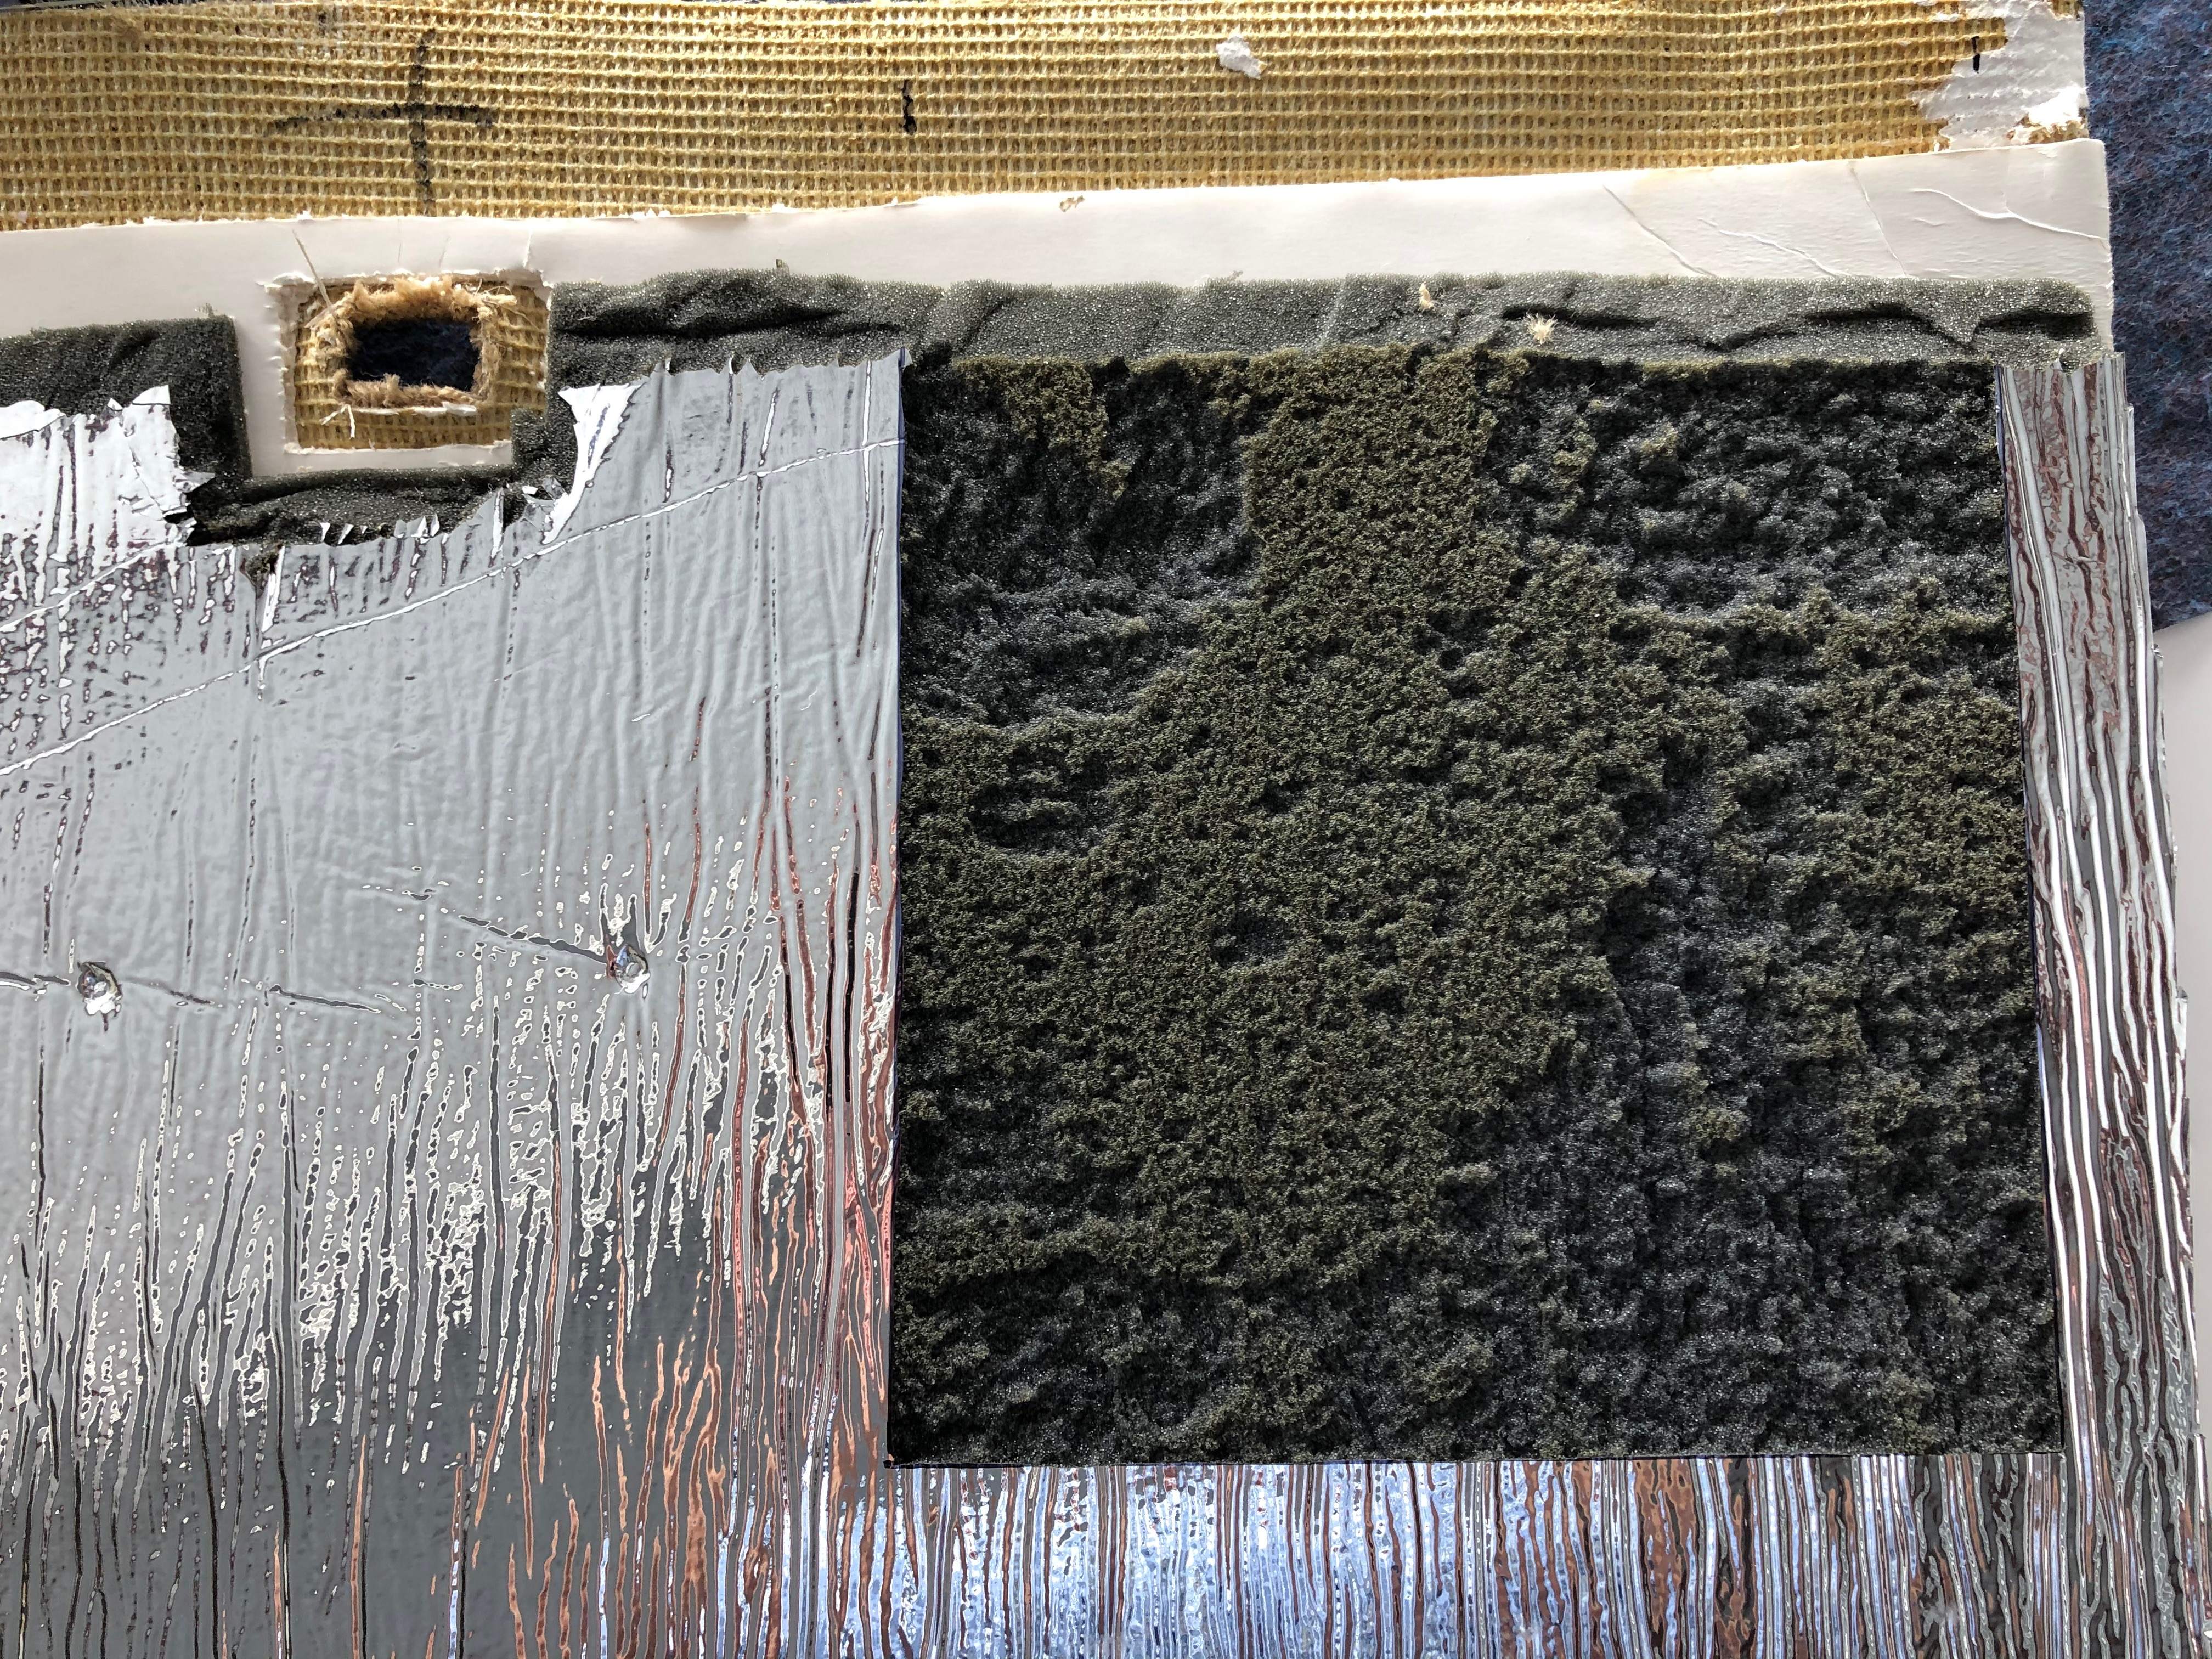
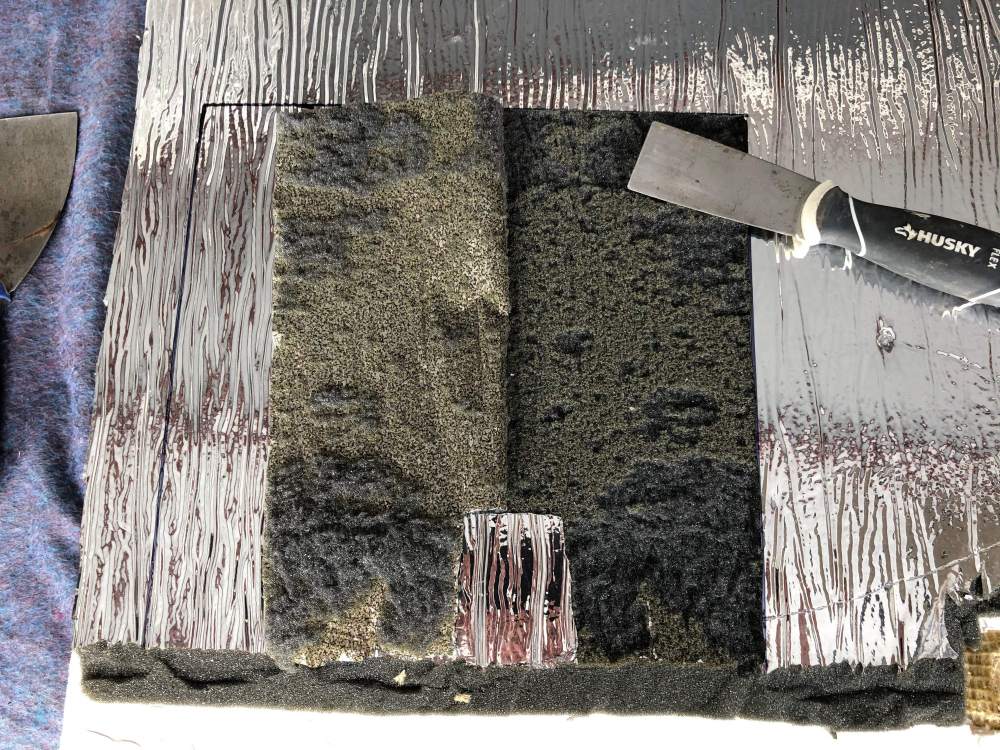
Here is what worked for me to fix the poor GTX345R bluetooth signal in the cockpit when the 345 is mounted behind the baggage compartment. It involves two steps but resulted in excellent reception and I can now get all the FIS-B weather products as well as TIS-B traffic on my iPad which is mounted to the yoke in my Ovation 3GX. Also, I didn't have to add an antenna or reposition my transponder like some forum participants have recommended. Step 1: Replacing the aluminum oxygen bottle access panel in the aft bulkhead of the baggage compartment with a plastic one (thanks to someone else on this forum for suggesting that) improved my bluetooth signal to the point where I could at least pair my iPad to the GTX345R but the signal was not good enough to stay connected all time nor good enough to receive all that ADS-B had to offer. Step 2: Remove the mylar covering on the aft side of the baggage compartment carpeted panel only in the area where it mates to the new plastic panel installed in step 1. I cut through the mylar covering with a razor blade only about 1/16" deep into the foam insulation. I used a putty knife to constantly separate the foam from the mylar, while I was removing the mylar, in order to leave as much of the foam insulation intact as possible. Be ready for some work. The mylar is really stuck well to the foam. Please see the attached pics .


-
Thanks for the info Alex. I hope Jose' didn't just leave to avoid pushback and then continue doing unauthorized modifications to his airplane. I was a Boeing structures engineer for 30 years and I certainly wouldn't do what he suggested with that rudder pedal extension or any other part on my airplane without having the structural analysis to back it up. Have a good day.