

NicoN
-
Posts
291 -
Joined
-
Last visited
Content Type
Profiles
Forums
Blogs
Gallery
Downloads
Events
Store
Everything posted by NicoN
-
I use the High boost pump method for starting our TSI360-GB. It works perfect and the engine never quit or stumbled after a cold start. This works perfectly, with the fuel selector in left or right position. A few weeks ago, I decided to leave the fuel slector in OFF-position overnight. The next day, with the same method, the engine starts after 2 half turns, and after few seconds stumbles for a moment. With a little throttle I can avoid dying, then everything is fine. My first supect was water in the fuel strainer, but it also happens with carefully draining both wings and the fuel strainer. And - of course - I already forgot to bring the fuel selector out of the OFF-position. Then the engine quits definetely after 3-4 seconds !!!! Is there any explanation for this behaviour? I want just avoid overseeing something. Its always the same: L or R position - no stumbling; OFF - stumbling after I night in the hangar or somewhere else.
-
Did you test the high voltage power supply? AFAIK, the power supply gets its 12V from a red shielded wire. The shield is grounded and the whole case is grounded to your airframe. The yellow wire is for syncing left and right strobe. So, without the yellow wire both sides should fire but not in sync. The tail strobe does not have the yellow wire. You can also test on the high voltage side. Between red and black should be ~350+ V. Be careful with tests!!!! The high voltage stays for 20' after switching off in case your strobe did not fire. Did you test your power supply with a known good strobe?
-
Lots of information and not easy tp understand. I will think about all your thoughts
-
Okay, thnak you! Normally I try to keep MAP constant. These days I had seen the effect, that TIT was going up rapidly. I pulled back MAP and enriched, that cured the situation. You do it by only enriching?
-
Yes, it's a 231 with the GB engine. Thank you for clarification. So, no WOT, even not with more leaner mixture. Hope, I can on time cross-check those numbers! Let me continue with another question: Is there a specific descending technique after cruising ? Let's say I was cruising for 2h in F100 with 28"/2500RPM/8.5-9gph and 50° dLOP. At the moment, I compensate only for the increasing MAP to stay at 27-28" and keep the rest constant. Is there anything better? Of course, by reaching my lower altitude, e.g. for pattern, then I push in the mixture to be on the rich side as soon as I have to increase the power.
-
Okay, thank you. Is flyinig LOP still okay in FL150-170? Or is it mandatory to stay on the ROP side for cooling?
-
May I come back to this pretty old thread ? Recently I was playing around a bit while being at 9000ft. Already at LOP for several minutes, I started pushing the throttle in while leaving the mixture unchanged. Indeed, my EGTs temperatures decreased by giving more throttle. I guess, I can bring my engine (TSIO360-GB) to quit by simply advancing the throttle. But, is it possible or does it make sense to fly LOP with throttle wide-open and controlling power with the mixture lever? I have seen pilots flying their NA engines with throttle wide-open. Thanky you!
-
My co-owner recently flew FL160 with our M20K (GB-ENgine). He complained that the engine does not produce 100% HP at this altitude and expected full power until at least FL170. Also, it was difficult to keep the CHTs under control. He reported, he had to use full rich, cowl flaps half open. According to EDM830, as usual #2 cylinder was hottest with 386F, EGTs between 1290 and 1380, TIT ~1430. FF ~18.7 Speed is not available at the moment, GPS-Alt was roughly 17000ft. Is this normal? I have no experience with those altitudes.
-
We have an old-fashioned Century 21 A/P which is still working fine. But we do not habe a A/P disconnect button. My question is if it is possible to wire such a button. I found the POH for this particular A/P but not an installation manual or wiring scheme. Does someone has this information ?
-
Okay, it is done and working flawlessly. But the process of changing the control cable and adjusting is a little tricky and some planning may save you lots of time. So, let me share my experiences with the community. Changing the control cable: - the new part came from Mooney, but is made by McFarlane. SO, you may save some money getting the part from there - plan 3hours + with 2 persons working - take a lot of photos from the cowl flap mechanism in both end positions and between from both sides! The scissor mechanism is rocket science. It may save you time and avoid mistakes - I pushed a piece of tightrope into the outer bowden cable before removing the old cable as a guide wire for the new one. - Make sure the cable stays clear from the flight controls! Rigging the cowl flap: The scissor mechanism locks the cowl flap in closed and open position. The trailing position is something in between. It is a rotating bar with lever arms on both sides left and right. What you need: - new cotter pins - some shims may be needed to reduce play I made the mistake to simply "copy" the rigging from photos according to the old cable. That did not work. It turned out, that in closed position of the cowl flap handle the lever arm on left side stopped in a close to 11-12 o'clock position (viewed from the left side). together with play it failed to keep the cowl flap closed. The lever arm MUST reach a clear over-center position ( 1 o'clock position). I recommend that the lever/bar reaches the mechanical stop with a little travel on the control cable left. The problem is, that the major part of the rigging has to be done withe the lower cowling removed. In case of failure you have to remove the lower cowling again. I recommend to do it the following way: 1. the firewall-side threaded end of the outer bowden-cable should be adjusted to have most of the threads ABOVE the #5 angle. WIth your own extra long arms, short fingers, short wrench and a lot of talent you may do corrections later on without removing the lower cowling. 2. The next thing to adjust is the threaded bar with the 2 holes for the scissor arms in it. Don't gforget a hex nut before you screw the bar onto the control cable thread! Check your photos for correct positioning. 3. Turn the control bar to the closed position mechanical stop and the control cable also to the closed position. 4. check the scissor arm which goes to the far-end hole of the bar before inserting the bolt 5. It is now hanging more or less near the hole in the bar. 6. Adjust the length of the bar by turning to bring the distal hole LOWER than the hole in the hanging scissor arm. 7. insert the bolts and secure them with cotter pins. Additional shims may help to reduce play. I needed 3 iterations of the procedure. After the first attempt, the cowl flap did not stay closed. After the second, the cowl flap stayed closed, but only if I managed to close it below 125kts. Now it is easy to handle and can be closed at any speed without much force. IMG_2157.MOV IMG_2158.MOV IMG_2159.MOV
-
Okay, I learnt a lot. I was not in rain for a longer time to see bubbles - or was concentrating on other things. New O-rings are on the list already My first suspect to check is whether holes in the ribs are blocked with sealant. On my M20K the wing side gauge keeps moving up after closing the gas nozzle. May be normal or indicating a lower than normal fuel dissipation in the tank compartments.
-
You may try to reach the lowest bus "bar" without removing the CB-panel. I did not try this. But removinge the CB-panel was far more work than expected. The Avionics Master itself powers only a solenoid-
-
Thank you for your answer. @ #2: Yes, of course we had tanke re-sealing about 3 years ago. And yes, after this procedure, the left fuel gauge indicated max. 18 gals. This was corrected last year and works now flawlessly. @ #6: I suppose, those holes should not be necessary as there must be a separate vent line. Right? Otherwise the effect of the flabber vent should be void. BTW: WHat's the purpose of that flabber valve? I am not sure, but I think we don't have any holes in the filler neck
-
According to POH and the filler caps my M20K (25-0378) has 72gals usable fuel. I also know , that Mooney defines "full" with the tanks filled to the trap door valve. Typically, we fill our tanks to 25gals each indicating from the wing side gauges. Doing this, I get in flight an indication of something between "18" and "27". Yesterday , I had 2 findings, that raise several questions: 1. I ran the left tank down to indicating "9". Back to the fuel station, the wing side gauge showed exact "15". Hmm. That my be explained by the form of the tank - correct ? I also learned from earlier experiments, that it takes a long time of flying where the fuel gauge needle nearly does not move before the low fuel triggers. AGain, I know be have a more or less linear indicating with irregular shaped tanks. 2. Filling the tanks to the max is not easy, as the filling system tends to switch off when the fuel level reaches the gas pump nozzle. You have to pull it back and continue slowly and manually control the nozzle. But then the trap door valve closes and it gets even more difficult. So, I help myself by keeping the trap valve open with a short piece of wood. Nevertheless, even filling the tanks up to the absolute maximum, the wing side gauges never reach the "6". Is this also the experience from the communitiy? If it is true, that fuel level to the valve means 36gals, thus indicating about 32 on the gauge, then I can add at least 4gals each side. Without correct indication and of course ignoring the expansion space. But I have never run a tank dry from some known point. Also the wing side gauge nature is linear, while the tanks are not. 3. Yesterday the left tanl was filled to the max indicating the something about 34. The RH tank started at 25 indication, I added about 5 gallons, the indication was shortly above 30 and the fuel level already far above the trap door valve! Is this an effect of air trapping? I did not wait for a longer time to check whether the fuel level disappears. Thank you and excuse my bad nglish
-
Our 1980 M20K has a Century 21 A/P with a DG installed. Seems to be that INstrument: 52D54 The Horizon above it is definitvely lighted, but the DG is dark. I found a wire near the DG which is hooked to the instrument lighting, But I do not find a connection diagram for this DG. May be, the DG has simply no lighting. I am not sure. Nobody of my co-owners has it seen with working light, but they are asking for repair. Has somebody an idea on the wiring and technical details ?
-
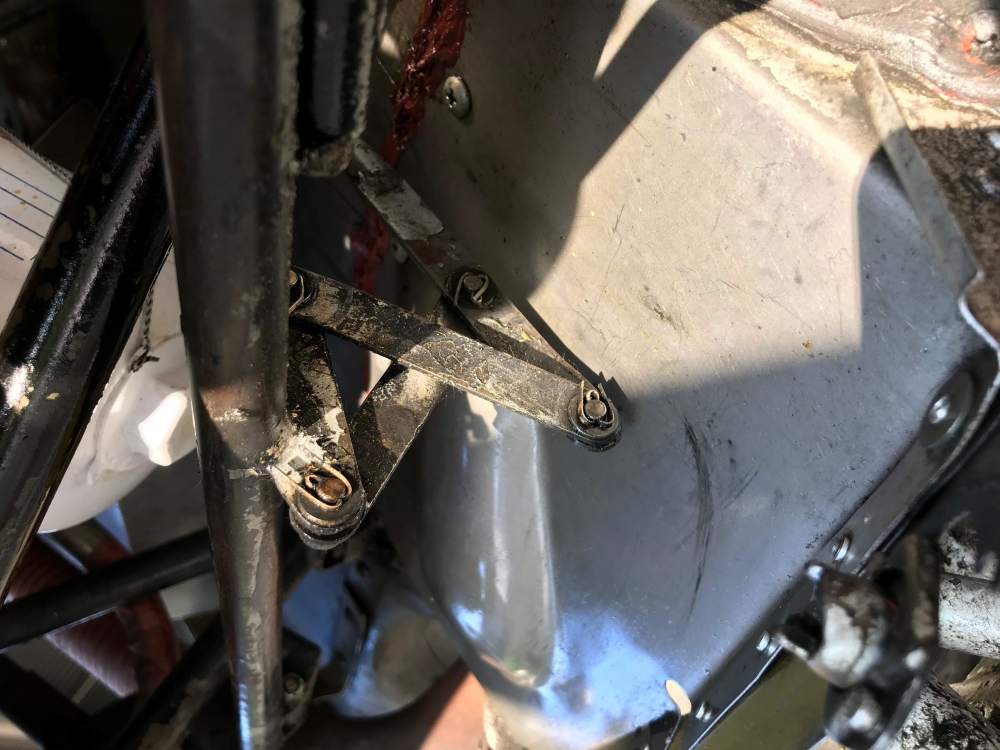
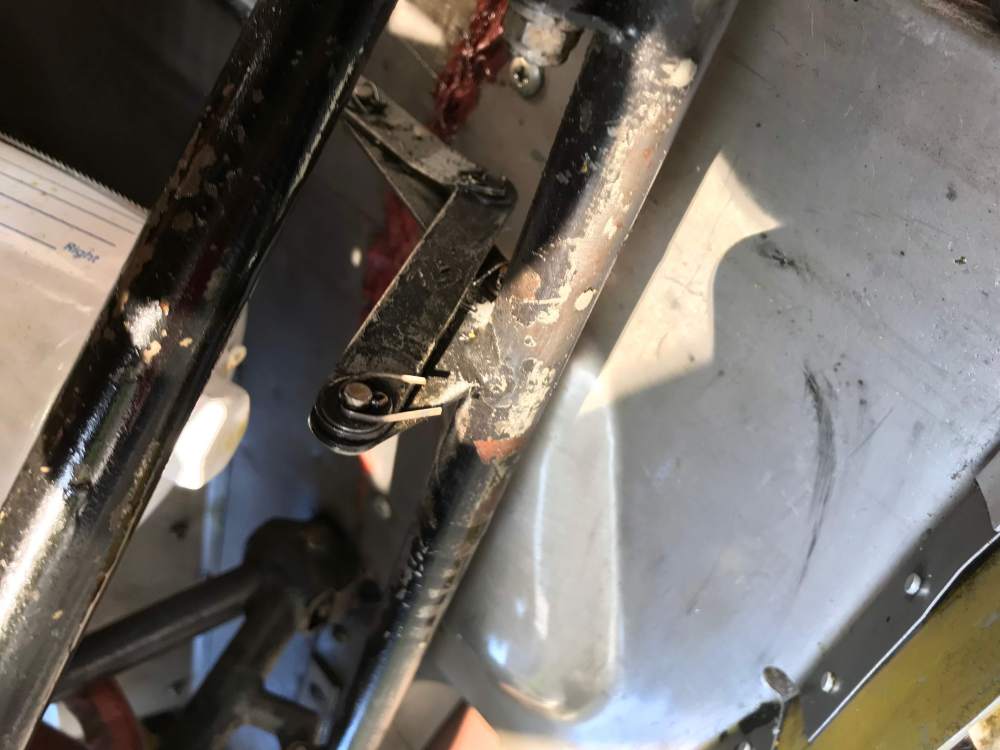
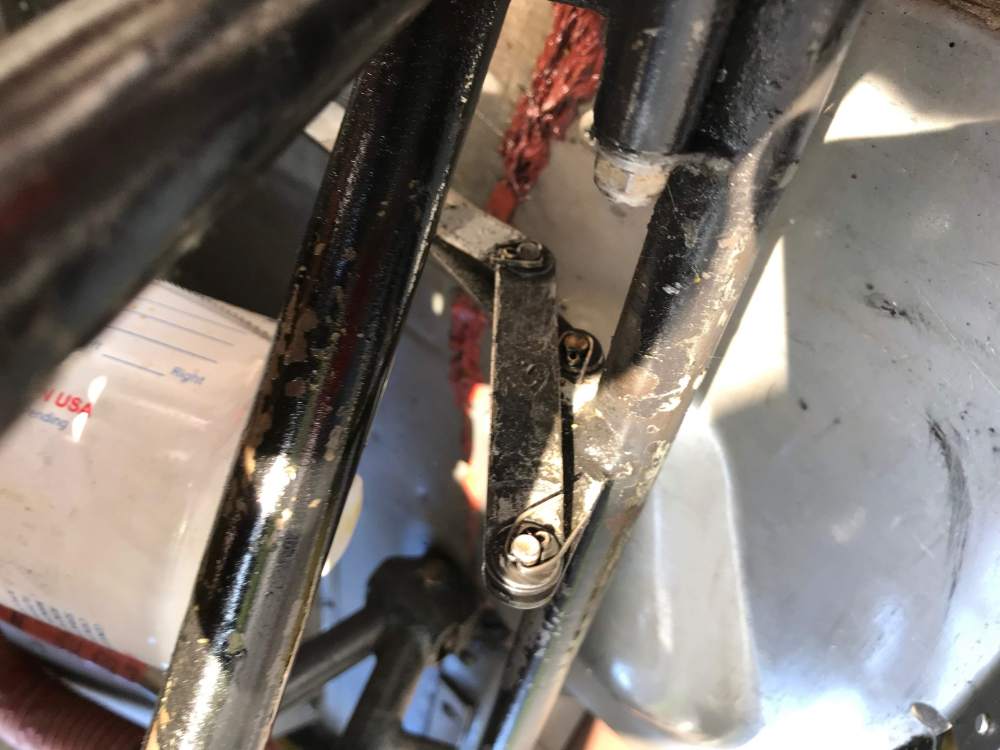
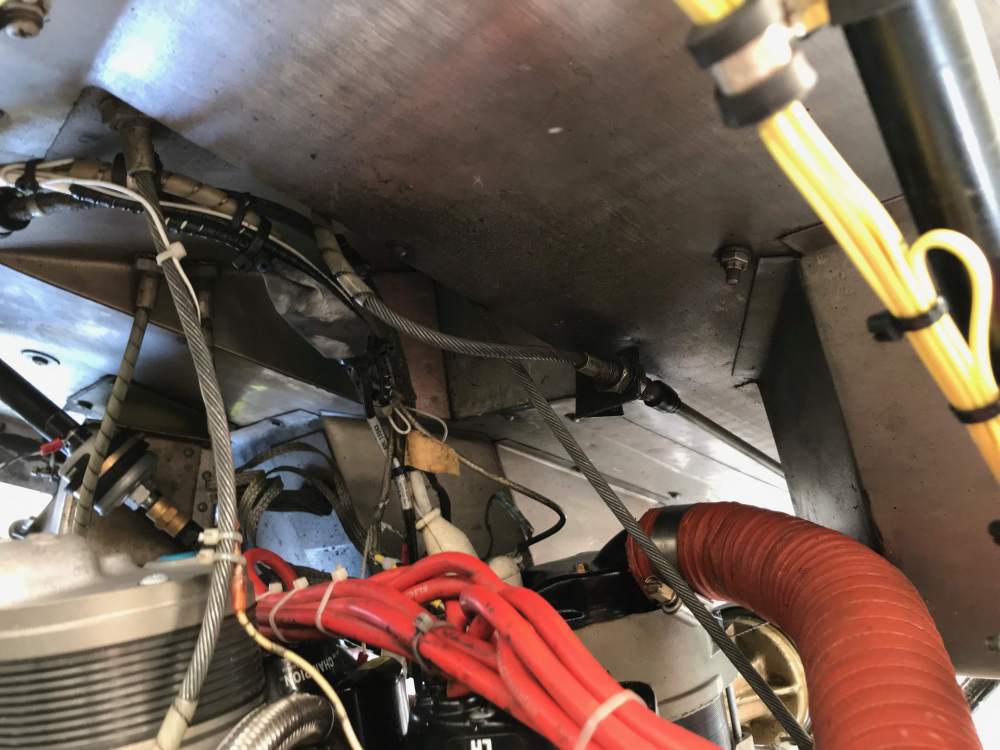
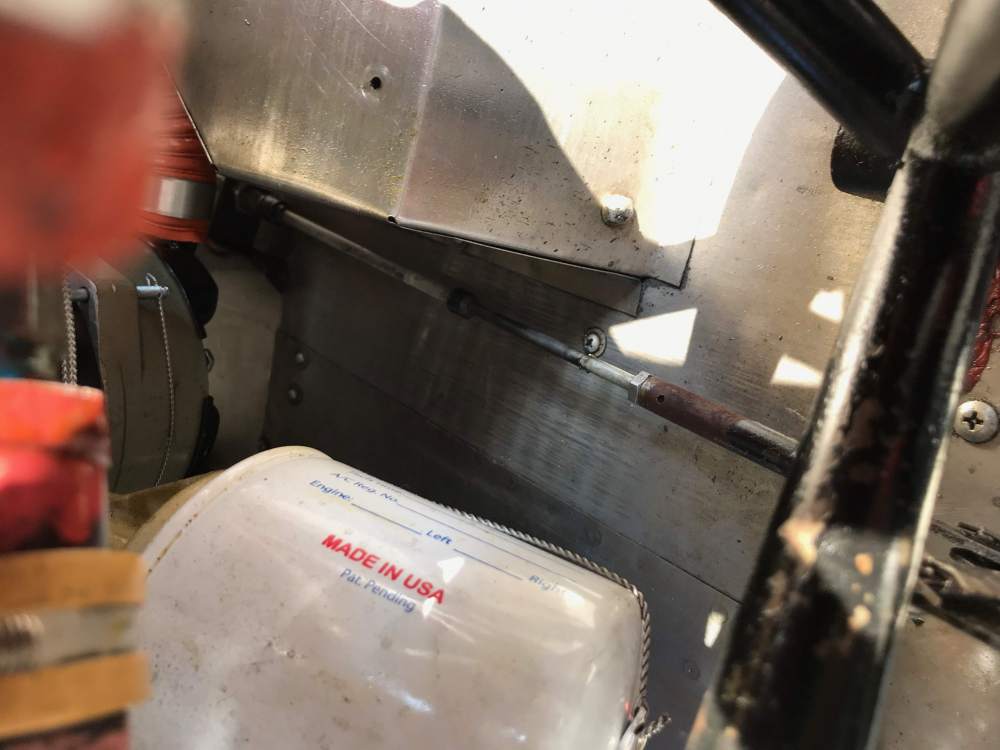
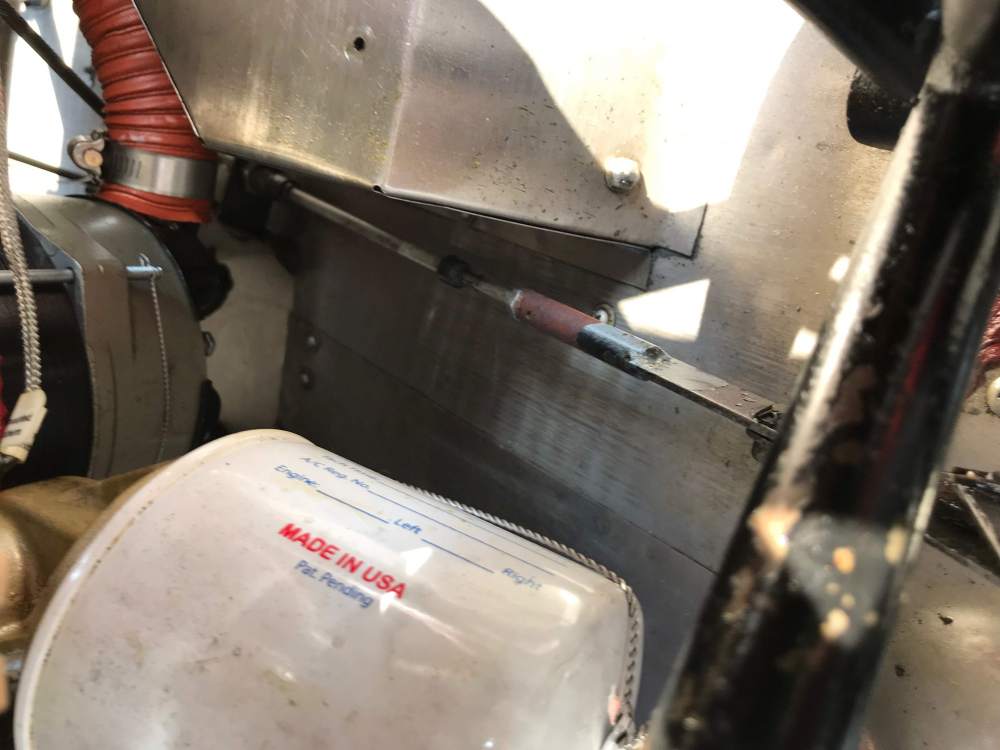
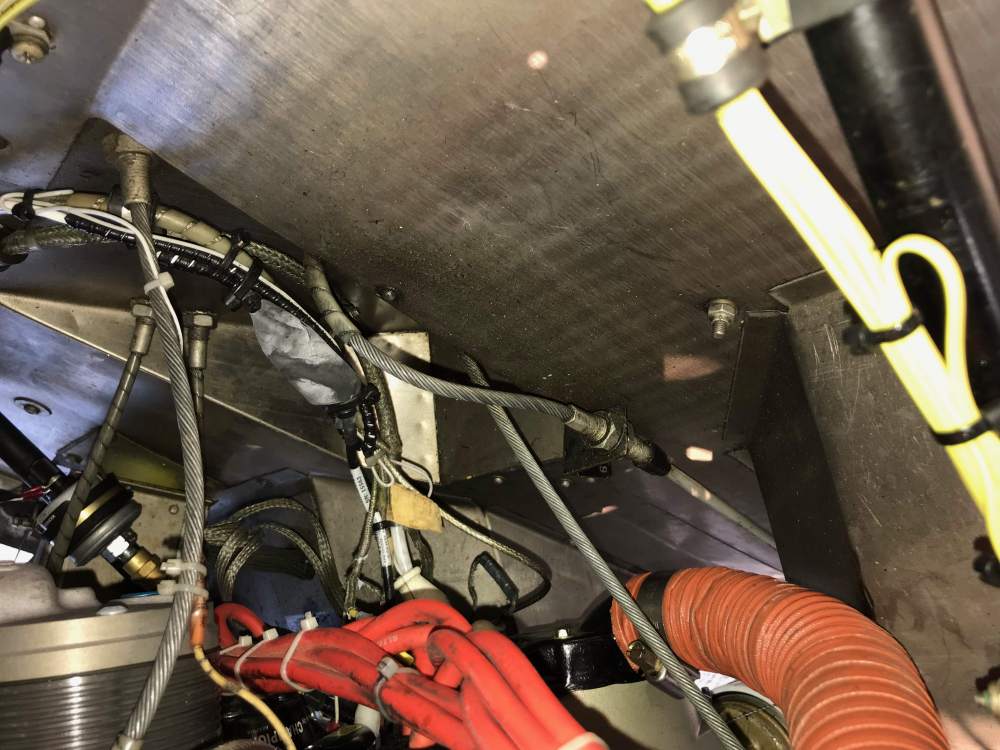
What is this part (cowling, lower part at engine mount)
NicoN replied to NicoN's topic in Modern Mooney Discussion
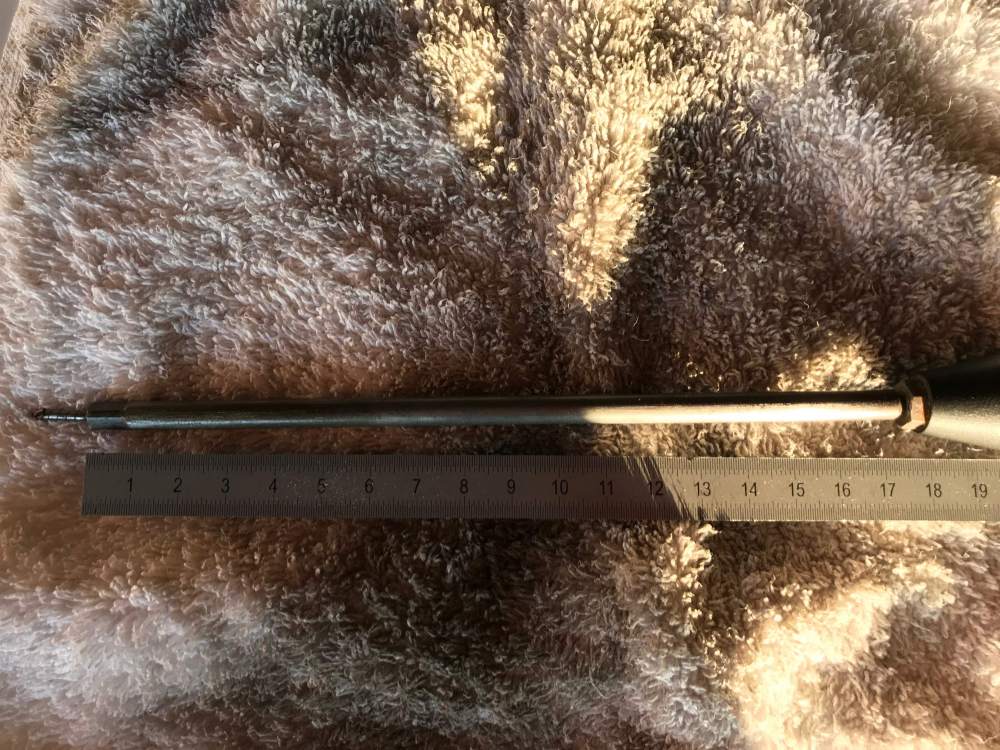
Okay. Found it. But what is the correct size? Aircraftspruce has it as -14, -24,-36,- 42. I did not measure it. At LASAR they have -14 (sold out) and -30 I guess, the last number has something to do with the size. ANy idea? -
The maintenance now forgot the third time over 1 year period to replace the part in the pictures attached. pictures show the RH side, LH is teared off about half the height. I suppose it sheared off at the metal inlay. There are 2 of them located on the under side of a engine mount traverse. In the backgorund you can see the enbgine oil reservoir. The part looks like a kind of Quick-release lock, but we dont have holes or according parts in the lower cowling half. I also did not find this in the maintenance manual. Any ideas ?


-
@carusoam: Yes, I started a topic long time ago. I am a bit confused at the moment: From one point, CDT seems to be an airworthinenss-item.Nevertheless, no-one noticed it or took care. on the other hand, the service manual say, CDT is not critical unless you go high and with high power. Hmm - what now ? The factory sensor does not do anythinig. We have a EDM830 with nearly all sensors installed, except - yes, CDT-option! To install it is still on the list, together with the alarm light for the EDM. But this still makes the 830 not a legal replacement for the factory gauges. So, I was happy to find, I have a working instrument with a simple sensor which is easy to replace. Some people diagnosed the CDT/TIT-Instrument is being damaged.
-
Since ages our CDT-Indication does not work. These days, I removed the sensor from the cable to the combined-instrument. At least, the indicator seems to be fine. The hand goes to maximum deflection with the contacts shorted and is zero with the contacts open. With a potentiometer I can reach any position. From this, I would think it is a NTC-type sensor The sensor has unlimited resistence. Of course that is in cold condition. I do not see a short between one of the cables and the sensor housing. Looking for a replacement, I have seen that this particular sensor is sold out at LASAR. By mail we gort the information (not from Mooney), that CDT, TIT and EGT have the same sensors. Indeed, at LASAR they all start with A002*, but the CDT-sensor is named A002-CDT, while a TIT/EGT-sesonsor is named A002C-30. Also our sensors look different. EGT/TIT has metal skins on the cables while CDT is only white plastic. Also, the expexted temperatures differ pretty much to be the same sensor type for all. Does someone have more information or an alternative source for this sensor?
-
Seems to be right. I corrected the thread at the #5 angle. Now it is better, but the arm still does only come close to the 12 position but not further; I think I have to screw out #6 a few turns
-
Recently, we had a damage to the control cable for the cowling flap (M20K/1980). Now, we have a new one and the cowl flap moves easy. But, we have now another problem: The cowl flap does not stay in the closed position while in the air. It automatically returns to the intermediate/trainling position. The open position is fine. The rpair manual simply says something about an overcenter position. In closed position (control rod all in), the arm where the connecting rods are stays in a "11 o' clock" position. I can manually push it then a little further using my hand (on ground). From my point of view there are 3 possible point of adjustment: 1. the connecting rod from the scissors to the cowl flaps.AFAIK they only can control how far the cowl flaps close in the closed position. Longer rod means, that the cowl flap stays more open. The overcenter position should not be affected (only with too short rods). 2. on the cowling end of the cable there is a threaded rod screwed on the cable. On the old cbale it was all in. Turning it anti-clockwise should bring the arm a little more to the 12 o'clock position or more. 3. The housing of the cable has also an adjustable thread on the cowling side.Does the positioon has any influence on the arms psoition? I am not sure if it does. In case it should have the same result as #2 (4. The pedestal side of the cable has a thread, tooo. But it should not have any influence on the scissors near the cowling) Any hints fro the rii´gging? Especially welcome is an idea how to avoid removing the lower cowling Nico
-
A few weeks ago I started a Topic about the cowl flap hard to operate. The cowl flap could be closed only with lots of Hand power- Now we have found the Problem: The bowden cable (inner wire) is sheared off about half of an Inch before the handle. Now the question is, how to Change the inner wire and especially how it is fixed at the handle. The handle is a Kind of round thing with a square part right where the wire starts. The inner wire is available at aircraftspruce, I think. Or do we Need to Exchange the whole cable including the outer pipe and handle? Thank you for your help!
-
M20K. Possible to convert to powered cowl-Flap?
NicoN replied to NicoN's topic in Modern Mooney Discussion
On ground opening and closing the cowl flap seems for me as easy as ever. Thank you for your ideas. -
Our 1980 M20K cowl flap was always hard to control. It needed a good portion of muscle power to close them. Recently, we fine-tuned the baffles. As a result oil temperature decreased and also #2 CHT decreased a little. But, as a side-effect handling the cowl-flap is now even harder than before. Moving from open to the first position is more or less the same, but closing to the second position needs a lot of power. One of my co-owners tends to kick it to the close-position with his right foot! Definitevely not the right way! NOw, one of my colleagues is suggesting to install the electrical cowl flap (drive?). Is that possible? Is there a mod available? Or is simply a fine-tuning on the cowl flap possible to reduce the force needed?
-
OAT-indicator shows wrong temperature ....
NicoN replied to NicoN's topic in Modern Mooney Discussion
Okay, the EDM830 seems fine. The OAT is/was indcated as 6°C, and all CHTs and EGTs were in the low fourties Fahrenheit, which should be close to the 6° OAT. Indeed, the factory OAT seems to be far out of calibration.


