

William Munney
-
Posts
194 -
Joined
-
Last visited
-
Days Won
2
Content Type
Profiles
Forums
Blogs
Gallery
Downloads
Events
Store
Everything posted by William Munney
-
New Ovation Interior—DIY
William Munney replied to William Munney's topic in Modern Mooney Discussion
Ha ha. That’s what I was afraid of. I was totally thinking I’m about 50% done. My glareshield was recently redone. Good there. Only replacing insulation that looks ratty. Crossing my fingers for the install. -
New Ovation Interior—DIY
William Munney replied to William Munney's topic in Modern Mooney Discussion
All. Do we have a consensus on burn certification requirements? I know ultra leather is certified. My understanding for the seat foam, and leather and carpet is that it has to have the burn testing results from the manufacturers…….not that has to meet a particular standard other than being flash and burn resistant.. Is this correct? And, that these results should be kept with the aircraft maintenance records. My understanding is that any material can be lab tested for these as well? I don’t want to spend time and money building a flying tinderbox, violate a regulation, or affect the eventual resale of the airplane. Thanks again. -
New Ovation Interior—DIY
William Munney replied to William Munney's topic in Modern Mooney Discussion
Thank you. My preference was to drop it somewhere and pick it up completed. I would say I was forced into it by some of the interior refurbishment companies current prices and/ or requiring me to disassemble and reassemble the interior or pay someone to do it. I also had the fuel leak problem to take care of so I would say a few things came together to push me down the DIY path. Patience is definitely required. And lots of pictures, notes and labeled baggies too. Otherwise, it’s easier than I thought. So far. The front seats are 4 bolts. The rear ones pull out. The carpet is tear out. The lower carpet side panels have a lot of small screws. The ultra-leather side panels only have a few screws but electronics at each seat position you have to work around. The center console has 4 tiny screws. I’ll cover that in ultraleather or spray paint it. (It’s painted plastic now) The seat frames get repainted as well. It’s all at the interior shop now. Time estimate is 6-7 weeks but only because they can’t get to it for 4 weeks. I’m confident in their abilities judging by the cars they had in there. Hot rods, classics, collectors etc. Also, I need probably a full day scraping glue and vacuuming and replacing insulation and sound proofing. Not looking forward to that but it’s one time and done. It’s not done yet so I don’t want to get overconfident. Ha ha But, so far……so good. -
New Ovation Interior—DIY
William Munney replied to William Munney's topic in Modern Mooney Discussion
Thank you! Tell me about that. My understanding is that the materials just have to be tested……and that no particular rating is required? -
Tanis Cabin/ Avionics Pre-Heater?
William Munney replied to William Munney's topic in Modern Mooney Discussion
I am in the upper Midwest. So, the avionics might see temps as low as -25F. It is my belief only that a warmer, drier cabin is better for the avionics. I am going from previous experience with other electronics and other electronics in airplanes…….NOT on any advice from Garmin. I’m going to contact them though and see what they say. Mine has a custom thermostat. It does not get hot to the touch and keeps the cabin between 40-46f. You could also plug it in a few hours before you fly but my idea was to keep the cabin out of the harsh harsh cold. -
That sounds easier than building a new one. Afterwards……sand and paint?
-
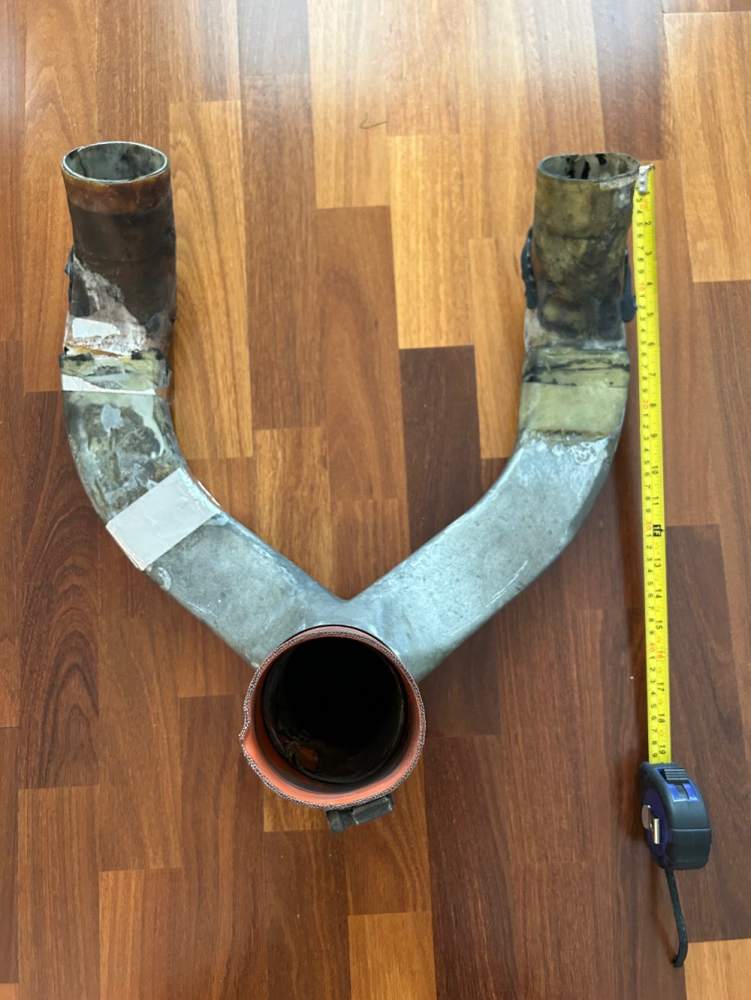
This assembly is a flimsy factory fiberglass piece that takes outside air and feeds into the IO550 intake plenum. I think the Ovation has as somewhat sophisticated tuned induction setup for an intake plenum which you can see on the top of Scott’s Ovation engine in this thread. However…….the part in question looks like it came off of some trashed out vacuum cleaner. It just looks terrible in an otherwise sharp engine bay…….and i don’t want any chips or former repairs flaking off into my new engine. Over the years, any mishandling or over tightening of the hose clamps will crack or chip this piece.
-
WOW. Nice! That’s what I’m looking for. Very sharp.
-
OK. Looking at that now.
-
VERY helpful. Thanks fellows! I’ll reach out to Brian Kendrick tomorrow! I’m also going to try to make one out of the existing part. Carbon Fiber or Kevlar. Exact part of better materials. I’ll have to read the “owner supplied parts” reg again. If i can’t do it well or it’s not allowed…….I still have my original functioning part. I’ll check with the Mooney service Center too.
-
New Ovation Interior—DIY
William Munney replied to William Munney's topic in Modern Mooney Discussion
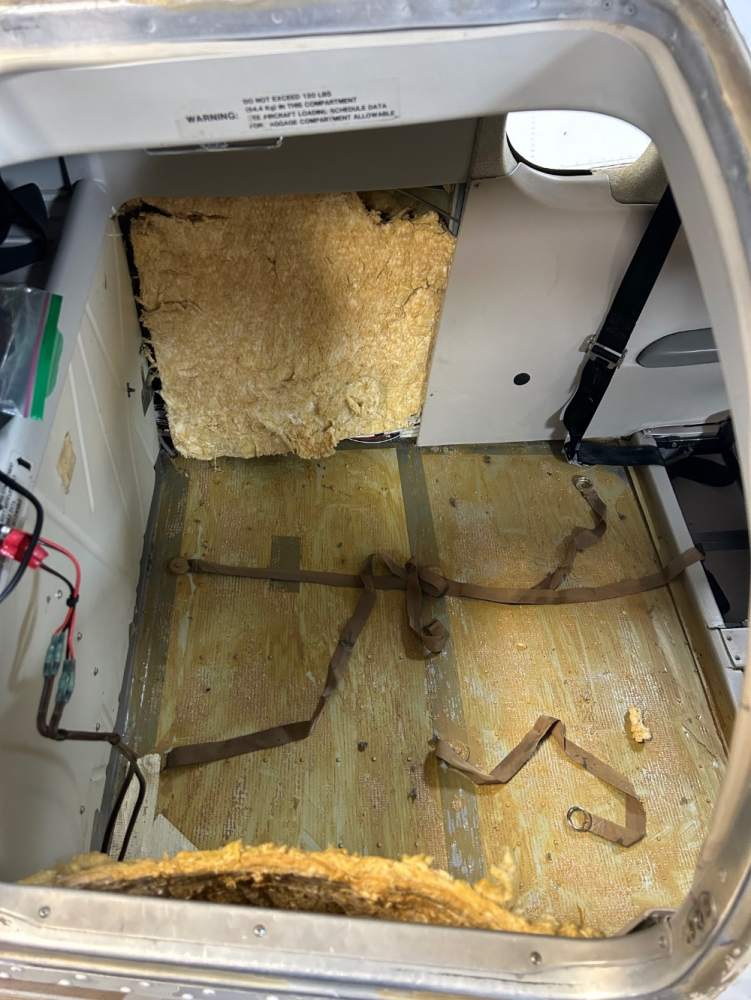
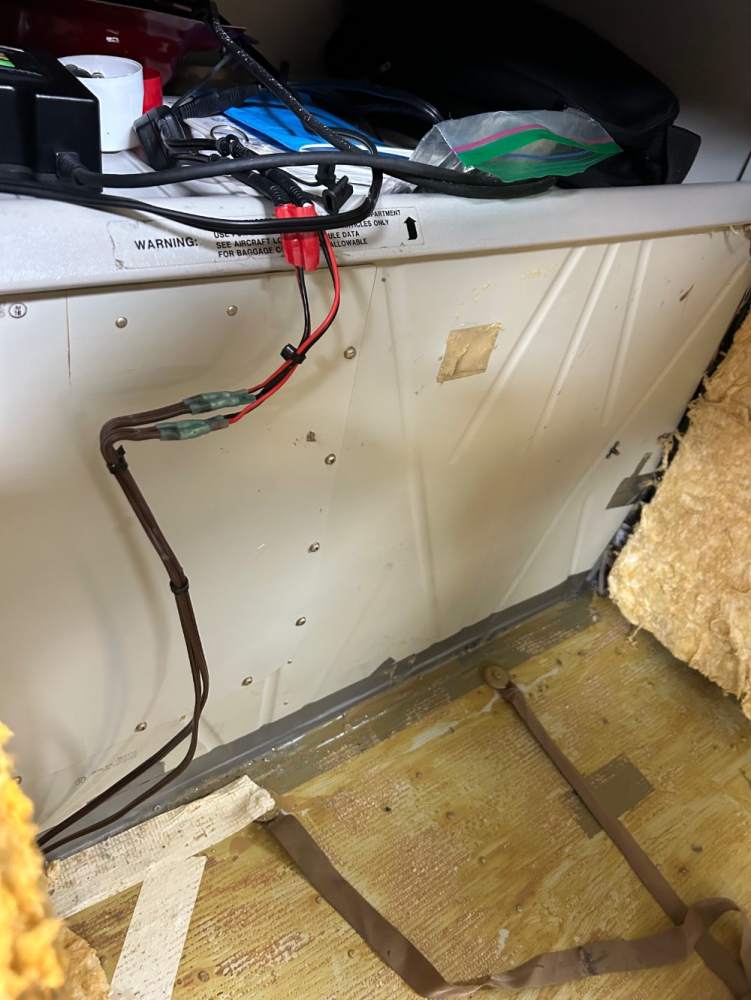
The feeling i got so far in taking my plane apart is that these are each hand made one-offs despite being factory “certified” aircraft. I may look at the places you mentioned but the options i am exploring elsewhere are nearly unlimited in color and textures and almost any shop will use the carpet you took out as templates for the new stuff and you are guaranteed a perfect fit then as well. They are aware of the paper required to satisfy the CFR’s. Yep. A TON of glue in there. I’m taking it all out. And the fuel stains too. Ha ha. Covering the plastic center console surrounding the trim wheel in Ultraleather. You should have seen the crap under there. I may adjust my useful load upwards 5 lbs for all the crap they left in the airplane during construction……..and dust bunnies. -
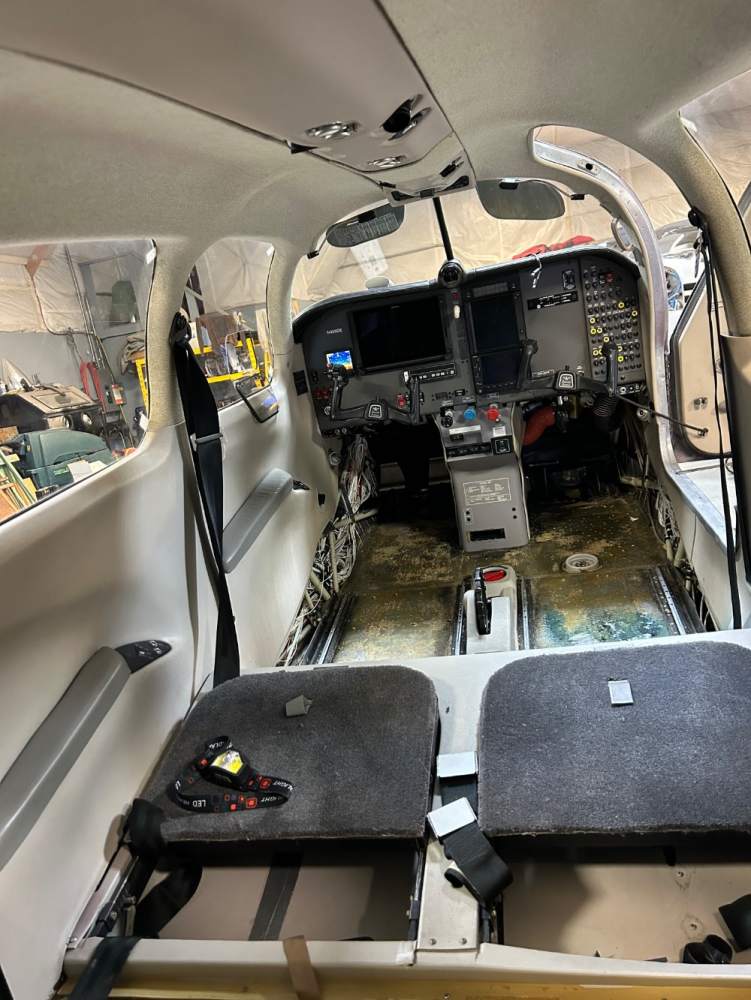
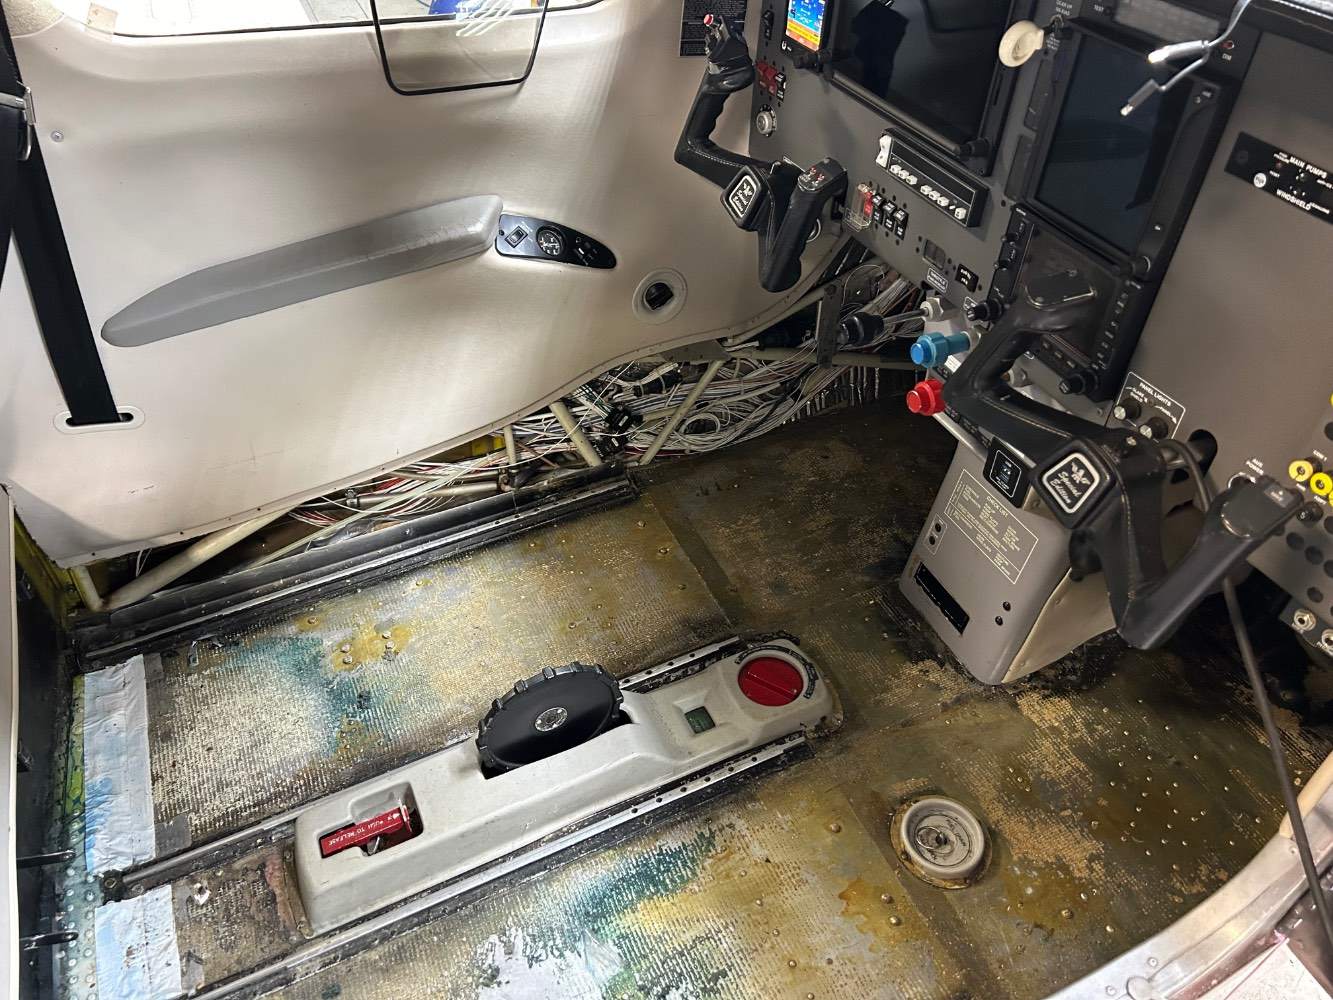
I have begun, earlier than i had planned, to refurbish the interior of my 1996 M20R Ovation. By GA standards, the interior was not bad at all but it’s almost 28 years old. I have been somewhat forced into the project because i smelled fuel in the cabin……..and, sure enough, the carpets were damp in spots and the floor beneath had some blue stains. Paul Beck will do the full fuel tank strip and reseal this year and i will have it patched until then. I am waiting for a factory new IO550, the prop and governor overhaul and the exhaust overhaul. Almost finished with the Whelen LED light conversion. It gets new wingtip and taxi/ landing light lenses, new gear shock discs and new tires and tubes too. So, to rip out the carpets to investigate the fuel smell problem I had to take out the seats and unscrew some side panels…….and, well, in for a penny….in for a pound so I just kept going. The carpet was original factory and i have to say i am bit disappointed by all the manufacturing shavings, paper and screws and rivets under the carpet. It’s going to be a full day to scrape all the adhesive and vacuum all the crap from the nooks in the interior. I was all set to send my entire airplane or the interior off somewhere but I just think the pricing at a few of the popular interior shops is ridiculous…… and now it seems that some of them wants you to do disassembly, crate it, ship it, wait for it, then reassemble it for very little price break. I am OUT of that option. You absolutely can do it yourself AND source it locally. The interior is mostly very easy….if awkward, to take apart. Seats first. Now you have some room to operate. Then loosen the side panels and tear out the carpet. I will do the side panels later but they have few screws in them. The real challenge, in my opinion, is taking out the electronics in the side panels….and keeping them labeled and organized. Same with the overhead panel in the Ovation. There is cabin air, electrical and lighting, and O2 up there to keep organized. Go slowly. Take a ton of pictures. Take notes. Label screws and other fasteners etc…. The lower, carpeted portion of the side panels is held in by tiny screws of various sizes…willy nilly pattern. I will replace them with stainless sheet metal screws of standard size. Today, I visited some custom interior shops in the area. Big and small. Most of them have done a ton of boat and car work and even aircraft so they are familiar. I am having the seats and carpet done currently and will do the ultra leather side panels later with some 28v led cabin lighting. So far, I estimate i can do as good a job as any out there for half the price or less. It will not be nearly as convenient as the one stop shop but less money out of my wallet and pretty satisfying as well. Choose your materials, choose your colors, take control of the price. The seats in my airplane are simple cushions in the back and the front seats are small and simple. 4 Headrests. Honest shops will charge accordingly. Gougers will hear “airplane” and triple their estimates. I got that a few places and passed. All do custom stitching and embroidery. Below is the aircraft interior sans seats and carpet and the side panels loosely attached. I don’t think it took even 2 hours to do. Clean up and scraping and vacuuming is next. I’m going to install new insulation and some sound proofing as well before i button everything together. Thanks for reading.
-
Tanis Cabin/ Avionics Pre-Heater?
William Munney replied to William Munney's topic in Modern Mooney Discussion
So far, so good with the Hornet 45. Sitting in the airplane on its own for about a month. A noticeable difference . Keeping $$$ of avionics from deep freezing. -
Yes. This. How do i know this is correct? Because I tore out my carpet when i smelled the sweet odor of 100LL and found blue stains everywhere. Paul Beck is sealing my tanks this year but now i have to patch it to get my by. Leaks anywhere from wingtip to root will follow the spar towards the root where the carpet evidently wicks it into the cabin. Nice. I hear there are only Mooneys currently leaking fuel and those that will leak fuel. I think that sucks but you may only deal with it once every 20 years or so. Don’t burn in your airplane, take care of it now. The blue stains will lead the way.
-
Where would i even find a new one? Mine is VERY ratty. I am redoing the entire firewall forward and its looks like I stole a piece off a junk vacuum cleaner for my new IO550. I am also considering making a new one using the old part as a mold under “owner supplied parts”. Maybe use Carbon Fiber or Kevlar.
-
Recognition Lights (This is how it done)
William Munney replied to GeeBee's topic in Modern Mooney Discussion
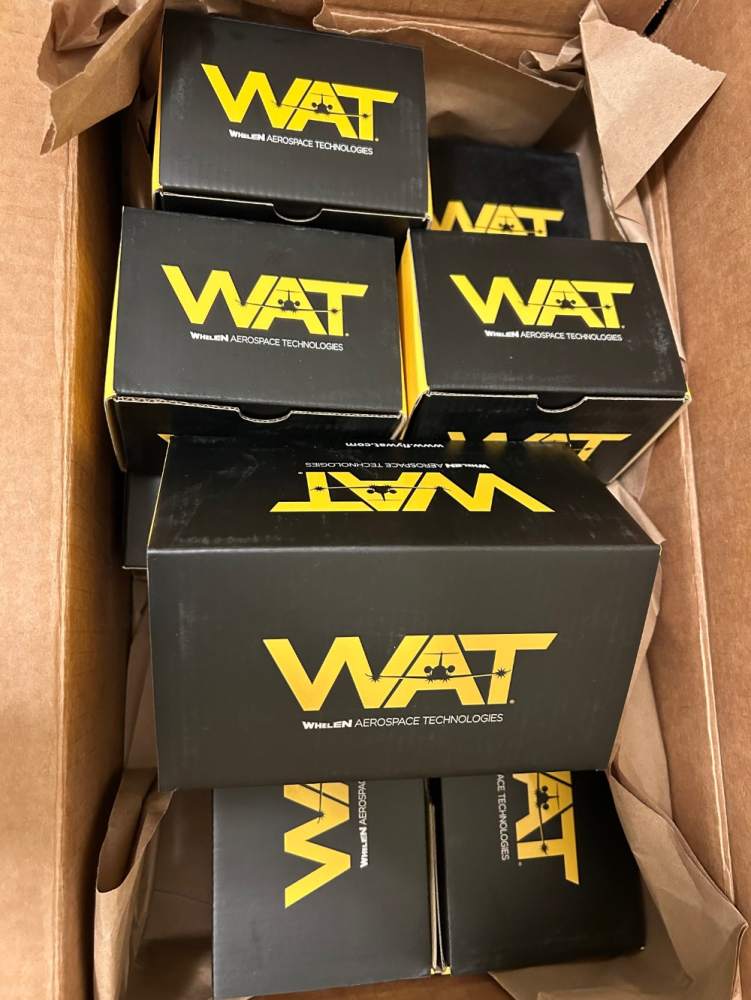
I am nearly finished with the total conversion of factory exterior lights on a 1996 Ovation to the Whelen (WAT) LED’s. I chose the latest, brightest Prometheus G3. Whelen did the original exterior lighting on the Ovation and they produce high quality replacements for everything EXCEPT for the ice light and and the rear, white wingtip light. First, let me say that you just do not know what you are going to get into until you begin. Experience and/ or your AP standing by is highly recommended. On the wingtips, at the very least, you are going to have to take out out the strobe boxes (x2) and any other wiring mess created by previous attempts at early LED lighting (if any). If you want the wing tips and the tail recognition light/ strobe to flash together, a “sync”wire is going to be required. We removed 8+ lbs of equipment and old wiring from the wings alone. The landing/ taxi lights are done through access panels and are not hard but frustrating. I chose to put 4 landing lights in vs 2 taxi and two landing lights. The lights are set back in the wing a bit so there is plenty of light diffusion without the diffusion lenses on the Whelen taxi lights. I did the beacon on my airplane too. Not a “blade” design but highly visible. My 27 year old beacon was cracked and dull. Let me say that the lights are VERY VERY VERY bright. And, i was skeptical of the claims. You can’t even stare at the position lights. The strobes…..are they too bright? We turned out the lights in the hangar and turned on the strobes and its nearly disorienting. They will definitely be OFF in the clouds at night. They make several beacons. ALL very bright. No one is going to miss you on the ground or in the air. The Ovation comes with a ton of lights to begin with and they are now 50X brighter and longer lasting. Total cost: about $3300-4000. Some curse words. A bunch of wire. And, a LOT of crimping and heat shrinking. I used waterproof butt splices with adhesive. Pictures at a later date when its all done. -
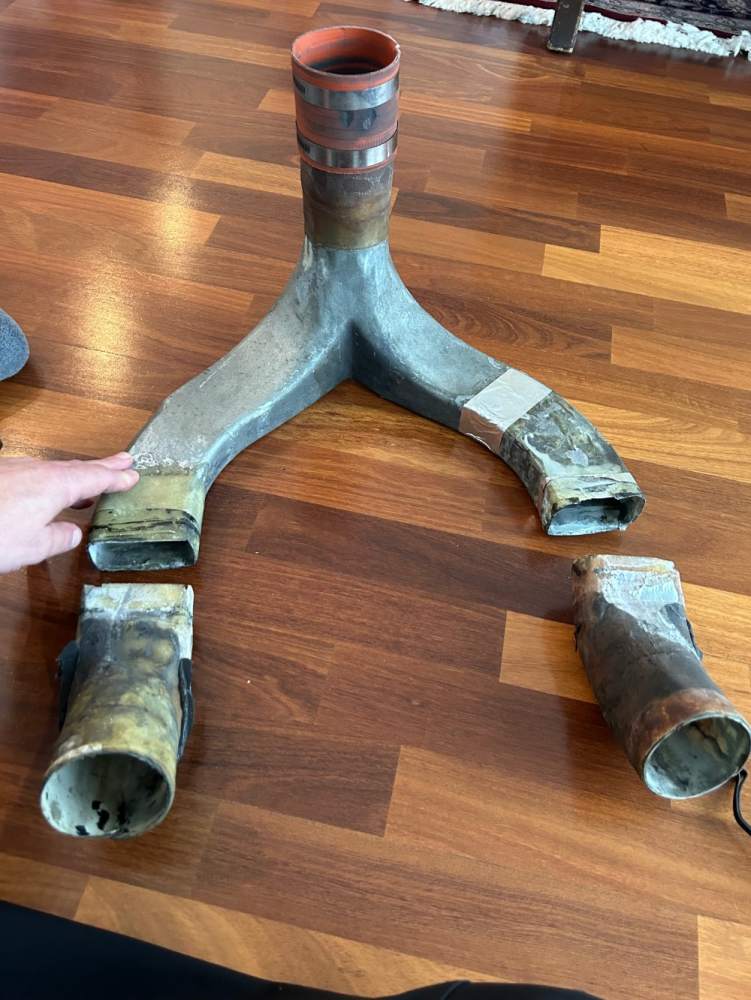
Does anyone know where i can find a fiberglass intake for M20R Ovation sporting the IO550G? Mine has been cracked and overtightened by ham-fisted owners or maintainers and I would like a new one or suggestions on how to make my own under “owner supplied parts”. Here is a pic of my current intake. It’s functional but ratty. Happy New Year. Thanks all.

-
Night flying and actual IFR is dangerous even for instrument rated pilots if you are not current and proficient. Enter at your own risk.
-
Start on the fullest tank, then taxi and takeoff. Once you have a clear and demonstrated functioning pathway from the tank to the engine, why would you change it for takeoff? Stick with what is working until cruise.
-
I’m passing on shipping a container to Hector. He is very expensive, freight is expensive and then you have the variable costs and results of uninstalling and then reinstalling your own interior. I’m going to sub it out. There are thousands of interior and upholstery shops in the US. I found several locally who are MUCH less expensive and enthusiastic about the project. The Hector price tag of $25k was tough enough to swallow when it was a drop-it-and-done deal. Seats and carpet are coming out next week. Clean and inspect the interior. Ordered the foam and carpet already. Looking for leather. And, I can do the windows too if i want and still save money. Yes. It’s going to be work but getting held hostage in the GA market is getting tiresome. Less service for more money everywhere you look.
-
Thank you. That makes my options clearer regarding the white light on the tail.
-
Ok. Here we go. I will be direct. This is really none of your business Boomer. This thread is about seeking advice for LED conversions and has been great. If there is a problem please direct message me. I left your original post alone but you don’t look like you are going to let it go. By the time i received your not so subtle “suggestion” to buy from OSUAV8TER I had already bought the lights. Done deal. I honestly did not have any one in mind when i did so and would have been as happy to buy from someone here as I would have another. My timing had to do with Whalen’s 15% sale. Not resellers. And, as I said, I do not yet know who is who here or who sells what. If your original comment had to do with who is or who is not on the Whelen reseller list, I have nothing to do with that. It’s on their website. Take it up with them. However, your comment also sounds like a directive to me about where i should buy. To be clear, what i was saying, before you incorrectly put words in my mouth, was not that was I opposed to suggestions but that, ultimately, the decision to buy from one seller or another using money I have worked for remains mine. I believe this is almost universally understood. My statement has absolutely nothing to do with taking suggestions about resellers especially if it’s the resellers here contacting me. I did hear from OSUAV8TER, who seems like a nice guy, after I had already made the purchase. He also sells Tanis cabin heaters which i considered as a way to prevent my avionics from freezing. Like to move on with this if that’s alright. You might be a good guy. I have no idea. I don’t like getting pushed around…even gently. Probably same as you? And that’s all I have to say about that. Apologies to everyone else for the sidetrack. I should have pictures before Christmas of the install.
-
Tanis Cabin/ Avionics Pre-Heater?
William Munney replied to William Munney's topic in Modern Mooney Discussion
Bought a Hornet 45 w/ custom thermostat. I just wanted enough heat to keep the avionics from deep freezing in the Midwest January weather. I don’t need it to be 70f in there. HAD to have a thermostat. For me, this is only for unattended aircraft avionics comfort in the worst cold. Looking for a heated hangar actually. -
Thanks “Art”.
-
Are you an Importer/ exporter or just an importer? Ha ha Anyway, that lens install looks great. What is PRC and, it’s hard to tell from the picture, does it overlap the lens or is it just in the small lens gap? Also, can you get it off easily if you need to get in there or remove the lens?

