spitzfyre
-
Posts
48 -
Joined
-
Last visited
Content Type
Profiles
Forums
Blogs
Gallery
Downloads
Events
Store
Everything posted by spitzfyre
-
Copilot brake bleeding woes and solution
spitzfyre replied to spitzfyre's topic in Vintage Mooneys (pre-J models)
It shouldn't introduce any extra air because you are blowing into the side you haven't bled yet and closing off the side you did bleed. After pushing it over, you can connect the line that goes up to the brake pedals and then push fluid from the caliper up, thus bleeding all the air. -
Hello, I am posting this in the hopes that I can save someone major headaches and frustration in the future when it comes to bleeding the brakes; specifically, the copilot side brakes. From what I understand, not many of our birds have these installed, and mine happens to be one of the rarer ones that does. I've spend 8+ hours in the past few days trying to get it right so here is my writeup so hopefully it may help someone in the future. So, annual time on my Mooney. I removed the leaking parking brake for cleanup and rebuild, as well as replace one of the brake lines. Before removing these components, I decided to simply open the bleeders at the calipers to let the system completely drain. Figured I'd give it all new, fresh fluid while I was at it. After completing my work I bled the brakes as per normal procedure, ie pushing fluid from the caliper up through the system to the reservoir. My friend reported no more bubbles, cool, switch sides and complete procedure again. Afterwards I climb into the cabin to test the brakes. Pilot side feels great while copilot side goes straight to the floor. I won't bore you with all the details of the troubleshooting but it was several head-scratching hours of frustration. Rebuilt the copilot master cylinders thinking that maybe they were letting in a small amount of air (I got this idea from someone else's past post here on Mooneyspace), which did not fix it. Eventually I removed the belly panel I'd previously installed, thinking I was nearly done with my annual and didn't need access above it anymore, and traced the brake lines back to find two shuttle valves that I had previously not known existed. Apparently, part of the installation of the copilot brakes is to put these shuttle valves in; with these valves, whichever set of brakes is depressed will push the valve over and allow fluid to go to the calipers. This, of course, means that both sets of brakes cannot be used at the same time, which really doesn't make much sense to me. Maybe its purpose is to protect the calipers from too much pressure from both pedals depressed at the same time...? I don't know. But anyway... I removed the shuttle valves and made sure they were not seized/frozen. Replaced the O-rings while I had them out. Reinstalled. So here's when all the pieces came together on why the pilot brakes were bleeding fine but copilot's were not; in order for the shuttle valve to move, the pressure has to come from the pedals to push it over. Pushing fluid up from the caliper is putting pressure on the wrong side, so the fluid all goes to whatever side the shuttle valve happens to have open at the time; in my case, the pilot side. So we bled the pilot side like normal, then I took an air nozzle and shot a quick blast of air into the shuttle valve where the line to the copilot brakes should be connected. This air pushed the shuttle valve over. So then I reconnected that line and we bled the brake again, this time the fluid was directed to the copilot side. Repeat entire procedure on the other caliper. Now the brakes all work great. In my searches for solutions to copilot brake bleeding problems on Mooneys, I was not able to find anything that helped, so I really hope that someone who needs it finds this writeup someday.
-
Overhead vent upgrade project
spitzfyre replied to Utah20Gflyer's topic in Vintage Mooneys (pre-J models)
Would anyone be willing to share the file to 3D print these adapters? -
Instrument Panel Switch Replacement
spitzfyre replied to Speed Merchant's topic in Modern Mooney Discussion
Sorry to revive an old thread.. I'm getting a panel upgrade and want to upgrade my switches, too. How have these worked out for you? Do you like them? It looks like they're built to Mil specs so they should be able to go in as a minor alteration/simple logbook entry... Thanks! -
I did...... I have a tap/die kit that has the 1/8 npt tap that I needed
-
I ended up tapping the holes, the tap had little resistance so that made me feel better about the condition of the threads. Upon install, I was able to get 3 of the 4 nozzles properly aligned, the 4th one would have required way over- or under-torque so I just left it. Ops and leak check went great. Thanks for the advice and info everyone
-
Thanks, I'm aware of proper torque procedures and have all the manuals, but blindly turning something until it reaches torque isn't correct, either. I'm only getting 3ish threads down. My concern is that this is not enough, which would indicate galled threads. They don't look all that terrible upon inspection, though, so my question is, are 3ish threads normal, or are they galling?
-
Resurrecting an old thread... When installing the injectors, how far into the cylinder were any of you able to get them to go? Do the shoulders have to be flush with the cylinder? I can get about 3-4 threads on mine before they tighten up. I admit that I didn't pay attention to this when removing the old ones, and I don't see any reference to this in the Mooney Service Manual.
-
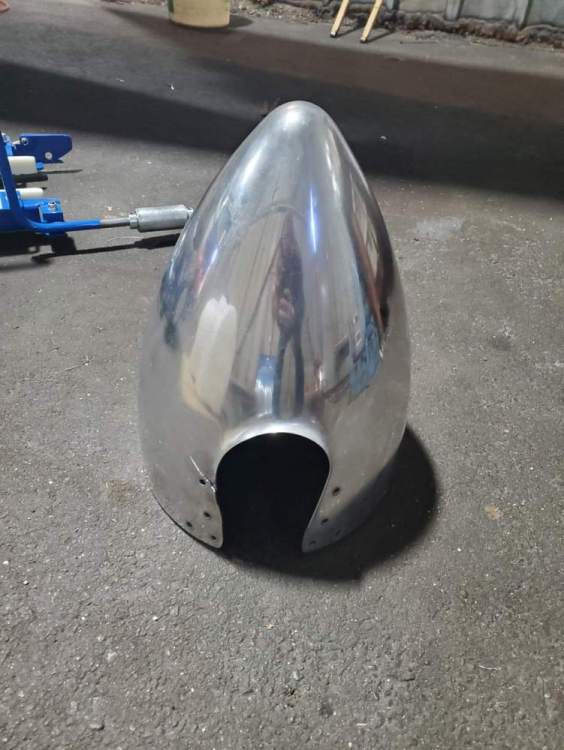
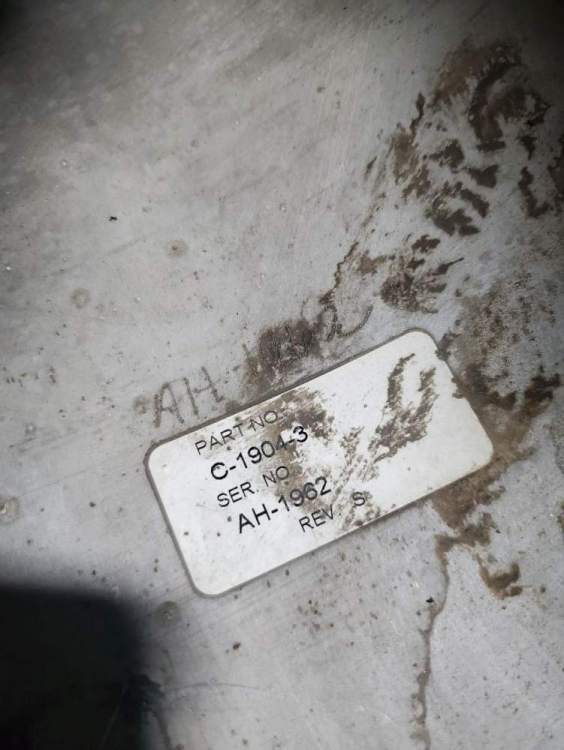
Want to buy: Hartzel 2 blade spinner
spitzfyre replied to spitzfyre's topic in Avionics / Parts Classifieds
I don't know about interchangability, but I have a rounded spinner off my F that needs repair. It's dented. I never got around to sending it out, but I'll do so today or tomorrow. If it's repairable, I'll sell it to you for the cost of the repair. If you haven't found another one before then, anyway. As an FYI, I was able to get my cracked one pictured in this thread repaired at ASEI. They are located in Georgia -
WTB - control shafts PN 710072-508 and 710072-507
spitzfyre replied to spitzfyre's topic in Avionics / Parts Classifieds
I believe it was 710065-501 -
WTB - control shafts PN 710072-508 and 710072-507
spitzfyre replied to spitzfyre's topic in Avionics / Parts Classifieds
Thanks, after researching it a bit more after posting, that is exactly what I've decided to do. I've got an elevator yoke on its way to me from a salvage yard. Thanks for your input! -
I realize this is a long shot, since this post is >1 year old But do you still have the pair of PN 710066-501? They should look like this Thank you

-
Just like the title says. Looking for control shafts for my 201 upgrade. I bought shafts with control yokes several months ago and have just gotten around to installing them. Unfortunately, they don't fit under the panel (where they connect to the elevator yoke). The correct PN's I need are 710072-508 and 710072-507. Lasar says the factory can make them to the tune of $1200 each with 6-8 week lead time. I'd rather not spend that kind of money. Would also be interested in the Brittain solenoid for the PC retrofit (PN 4085-20) but I have another lead on this part so I'm not too desperate for it. Thanks!
-
Just a followup I'm not sure if its the result of the warmer weather or my lubing all 3 switches, but the horn and light are behaving better. Now it shuts up shortly after takeoff as opposed to 20-25 minutes after. We'll see if it continues to improve, especially when the weather starts getting cooler again
-
*Her* gear horn :-) Rags, yeah I definitely have a squat switch. I went back to the airport earlier this evening and found no gap at the top of the donuts with weight on wheels, as the manual instructs. But that doesn't make much sense to me doing it with weight on them; you'll never have a gap. So I used my bottle jack and lifted one side (wish I could lift both at the same time for gear swings!), measured the gap. Came up with 86 thou, which is supposedly within tolerances. Unless the manual limit of .6 is a typo and should be .06" I have a scheduled flight tomorrow, I'm thinking I'll pull the belly panel beforehand and lube the two limit switches. And look into getting new donuts. My annuals coming up in December so that'd be a good time to do them. Thanks for all the replies, guys
-
Hmm. I don't have jacks, but the Mx manual says full fuel, weight on wheels. I'll be back out at the airport either later today or tomorrow and will take a look

-
Interesting! Does your C have a squat switch? Maybe that's where the issue lies, and the logic thinks the gear is still down? Maybe it's a "gear unsafe" horn even though I don't have a light for it. I've been trying to find a wiring diagram for my plane but so far no joy. Looks like my donuts are from 1998. Might be time for a new set

-
Yes I'm sure. When the "gear up" light eventually illuminates, the horn shuts up.
-
I will try that, thank you
-
Hello all, I'm hoping there's someone out there who's experienced something similar to my problem and can relay what their solution was. It used to be an intermittent issue, but now it happens nearly every time. I take off and put my (electric) gear up. I have a 74 F model with only 2 lights, green down and amber up. The amber up light will flicker but not remain lit, and the gear horn will start blaring. Weird thing is, pulling the gear horn CB does not shut it up. It will silence the horn when I have low power (below the microswitch in the throttle quadrant) with my gear up, though, so the CB does in fact work. I pulled the belly panel and pushed the gear up limit switch with my finger and had a friend watch the amber 'gear up' light, which did not illuminate. I also put my ohmmeter to it just for the heck of it and it checked out fine. Also to be clear, my gear is moving, evidenced by the floor sight glass and the fact that I can feel them swing. Sometimes like on my way home today, the amber 'gear up' light decided to come on halfway through the flight, and the blaring stopped. I've tried cycling the gear several times after takeoff, but this doesn't fix anything. I don't have jacks so I haven't been able to simulate this on the ground for troubleshooting, but I'm hoping someone else has some idea of where I should start. Thanks
-
Used misc avionics for sale from M20F
spitzfyre replied to spitzfyre's topic in Avionics / Parts Classifieds
Sure why not. PM me and we'll get everything squared away -
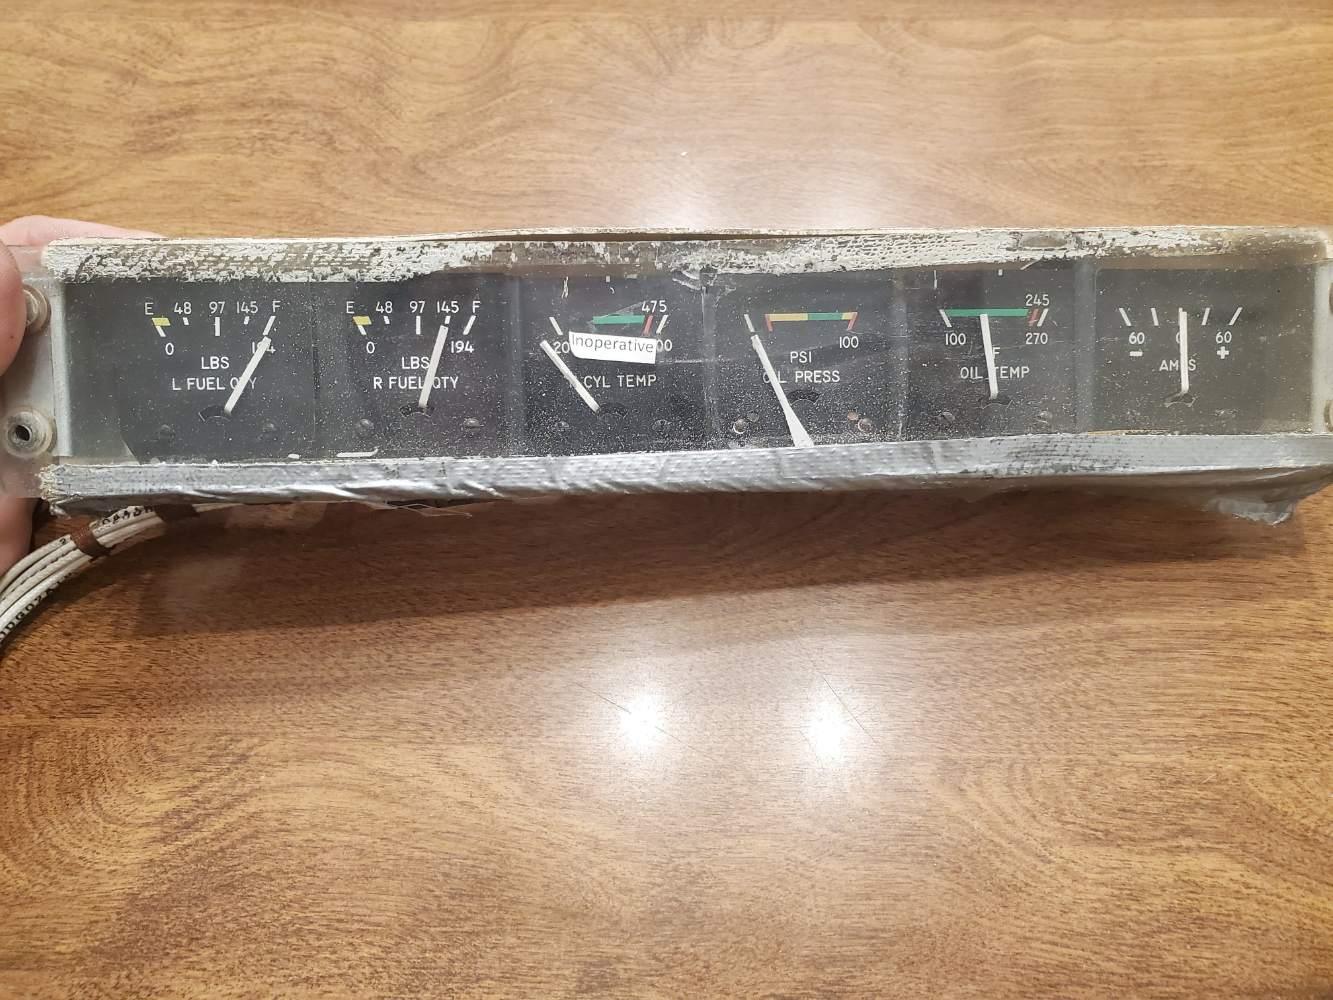
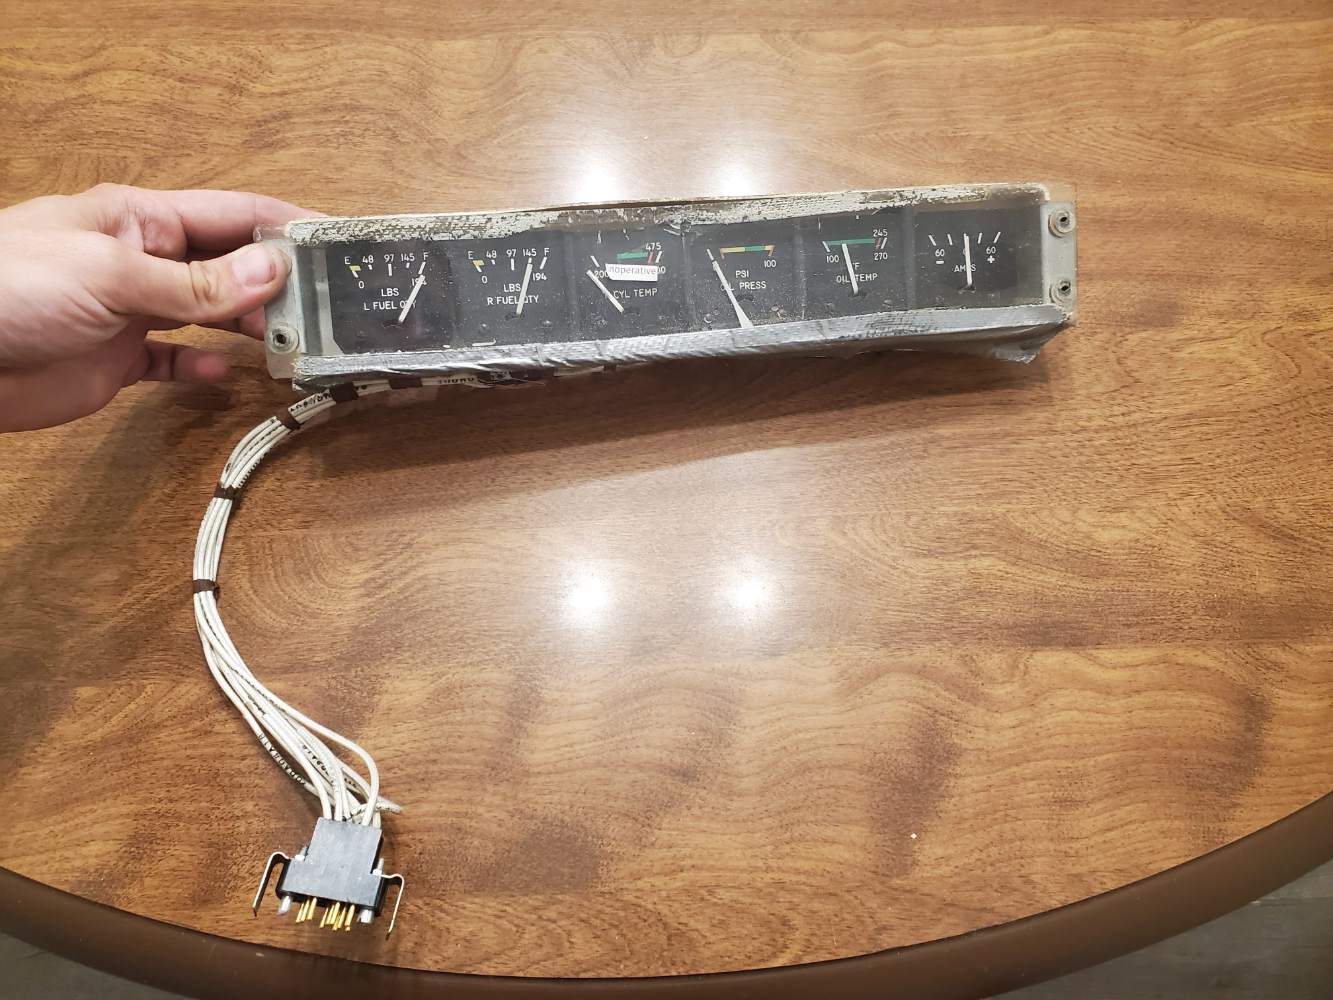
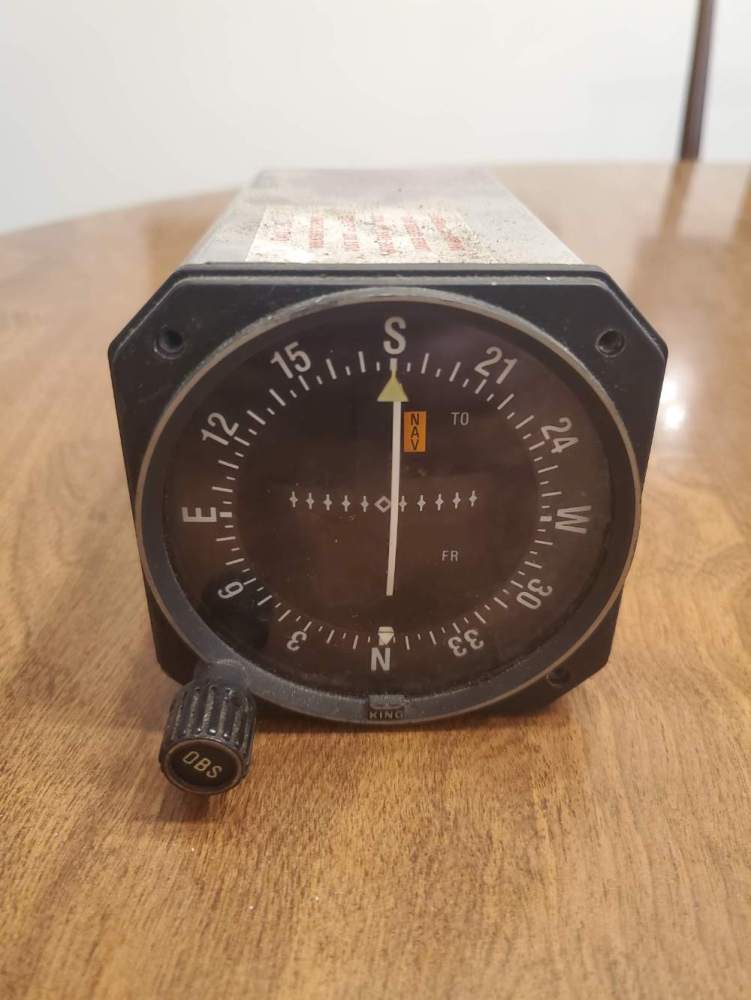
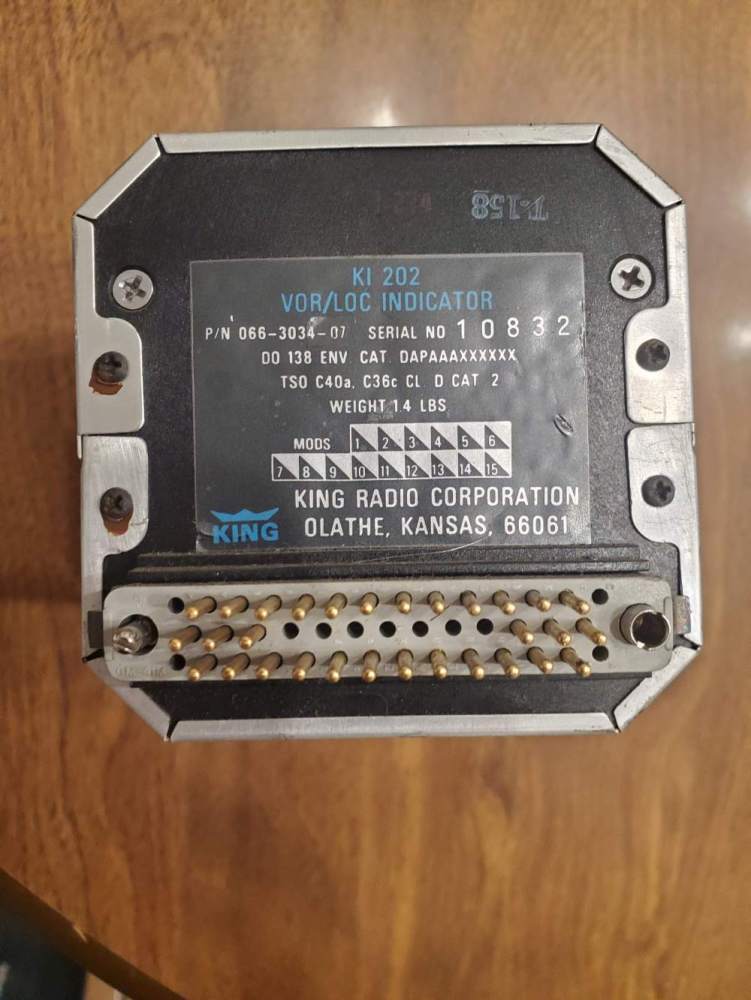
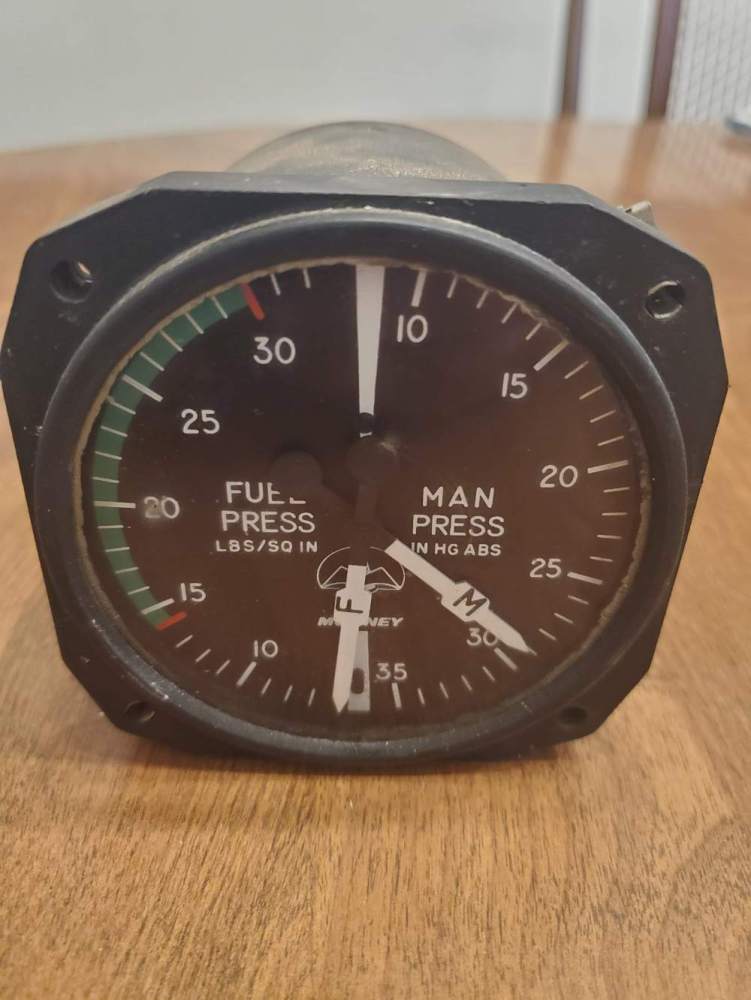
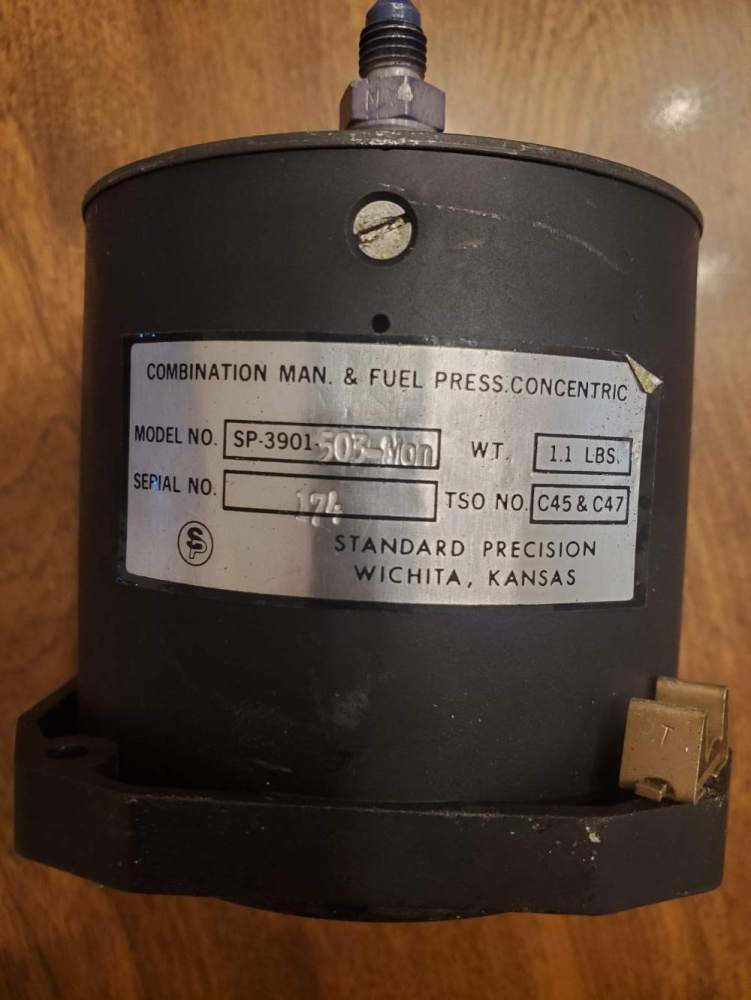
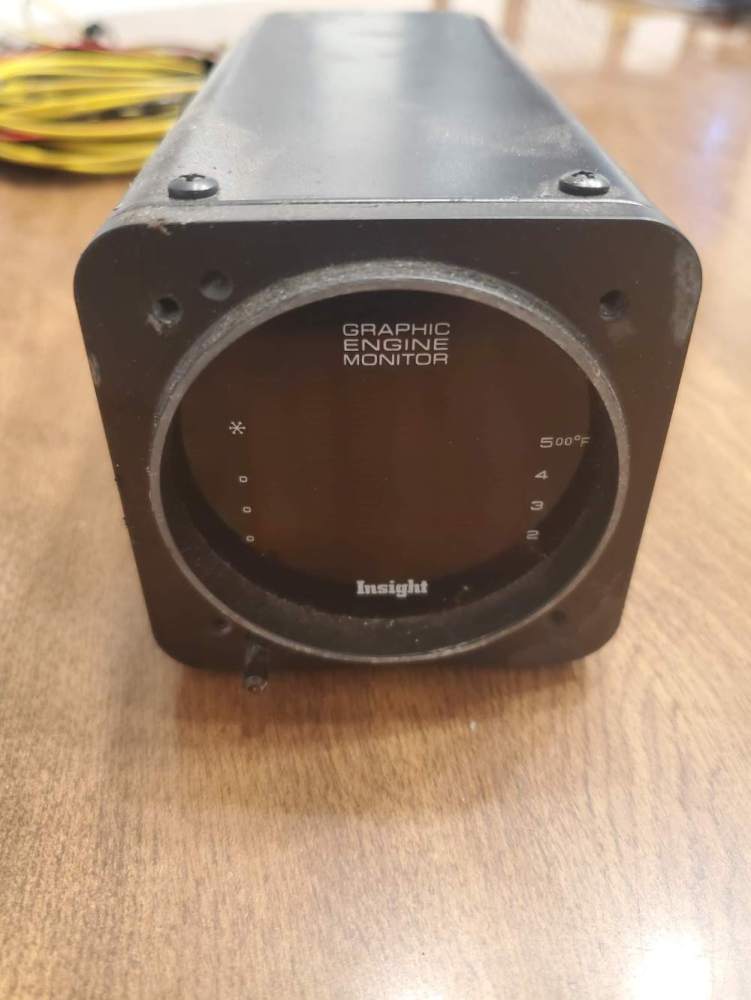
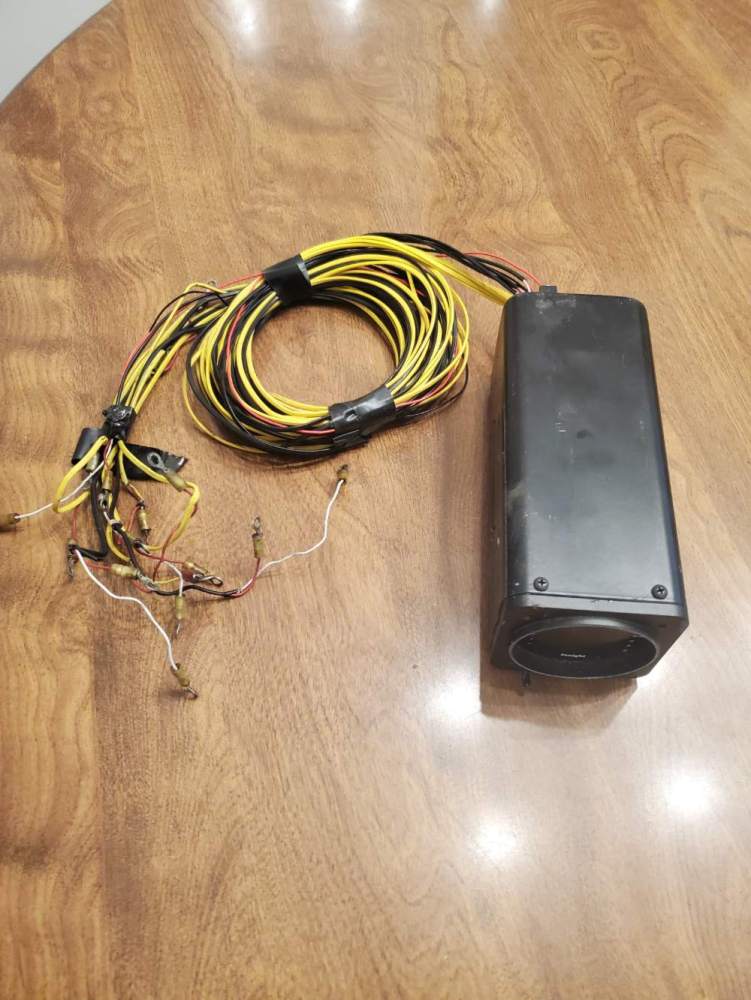
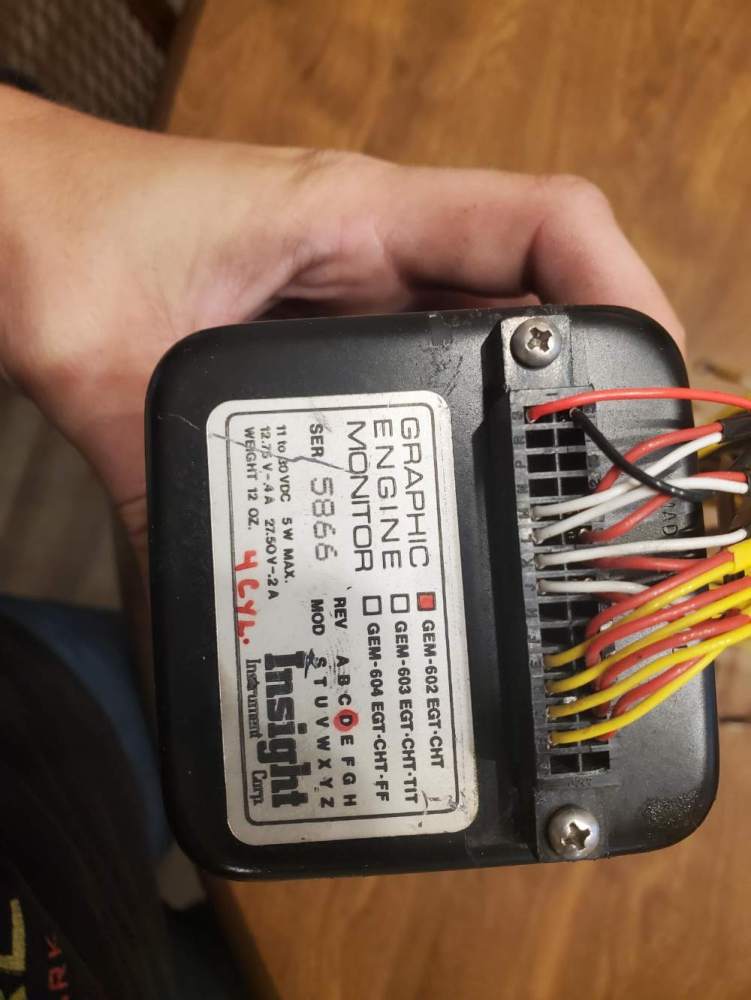
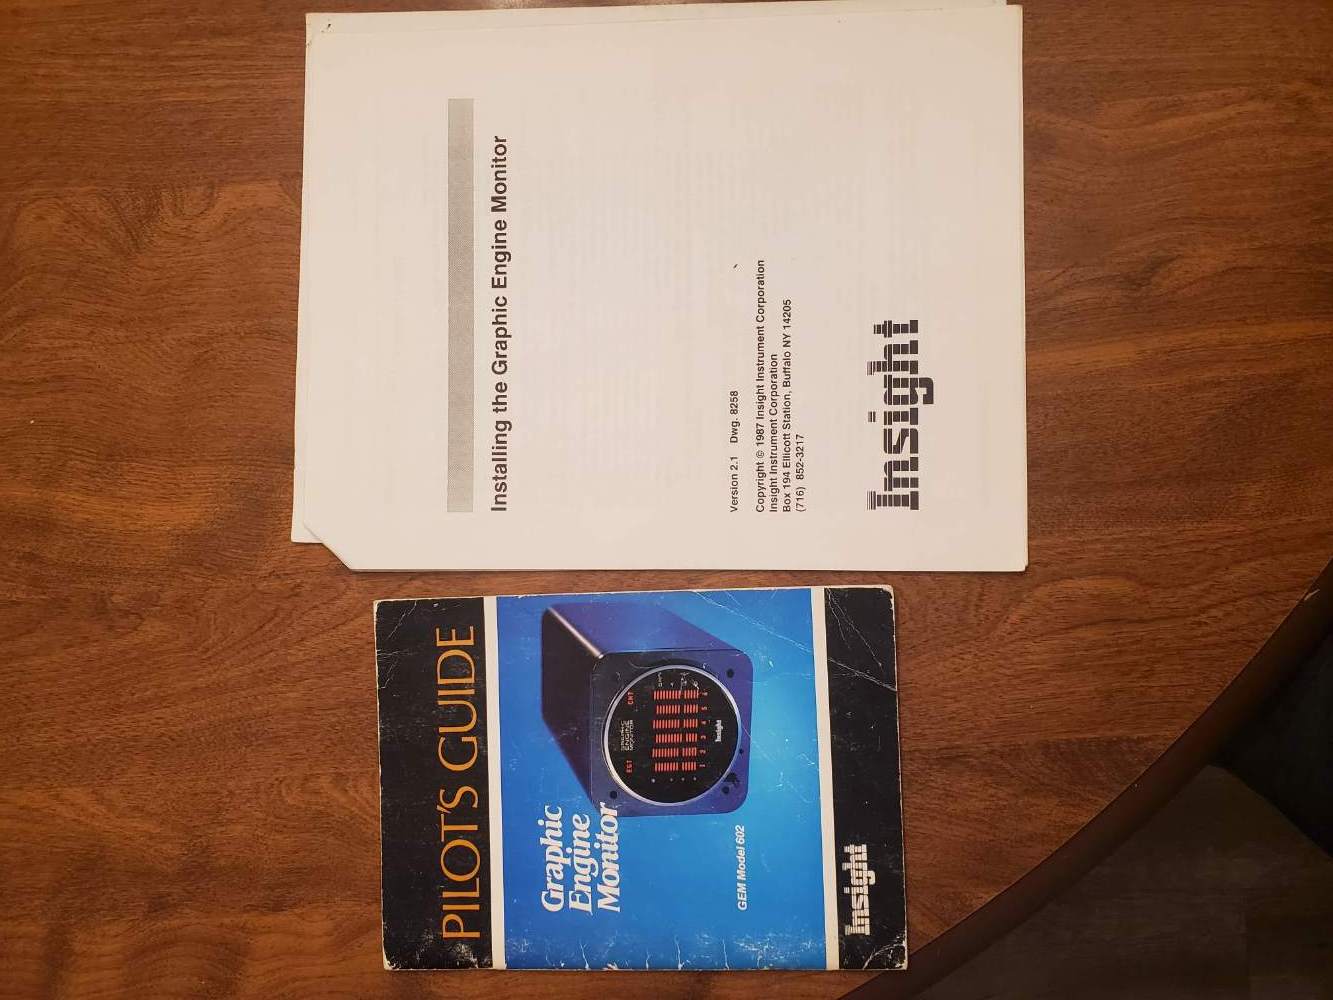
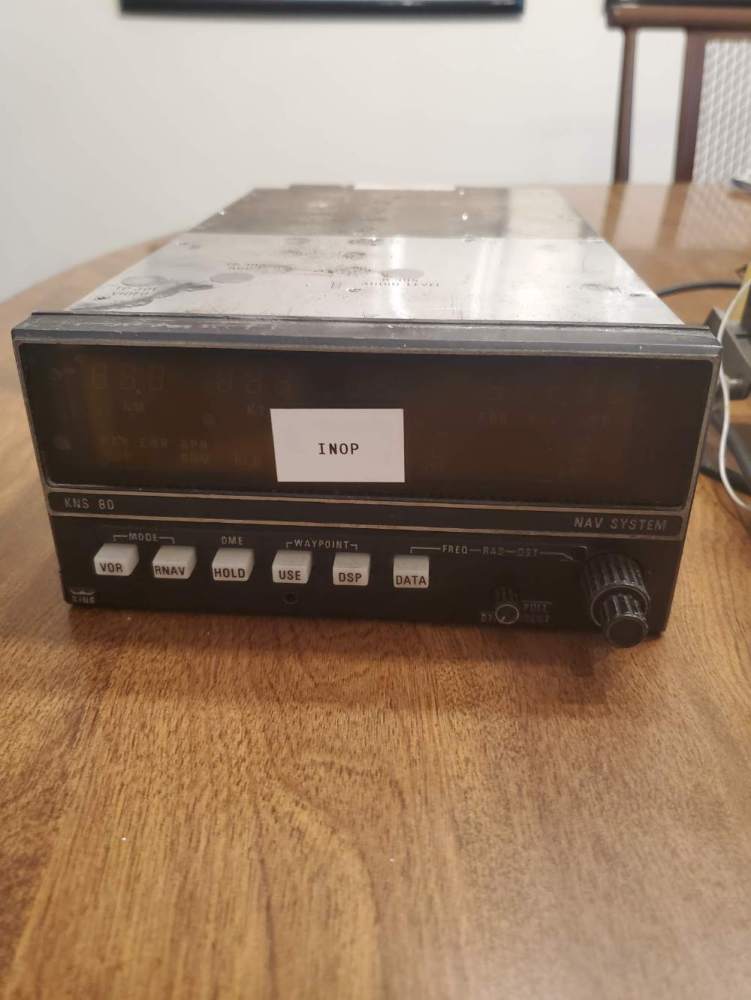
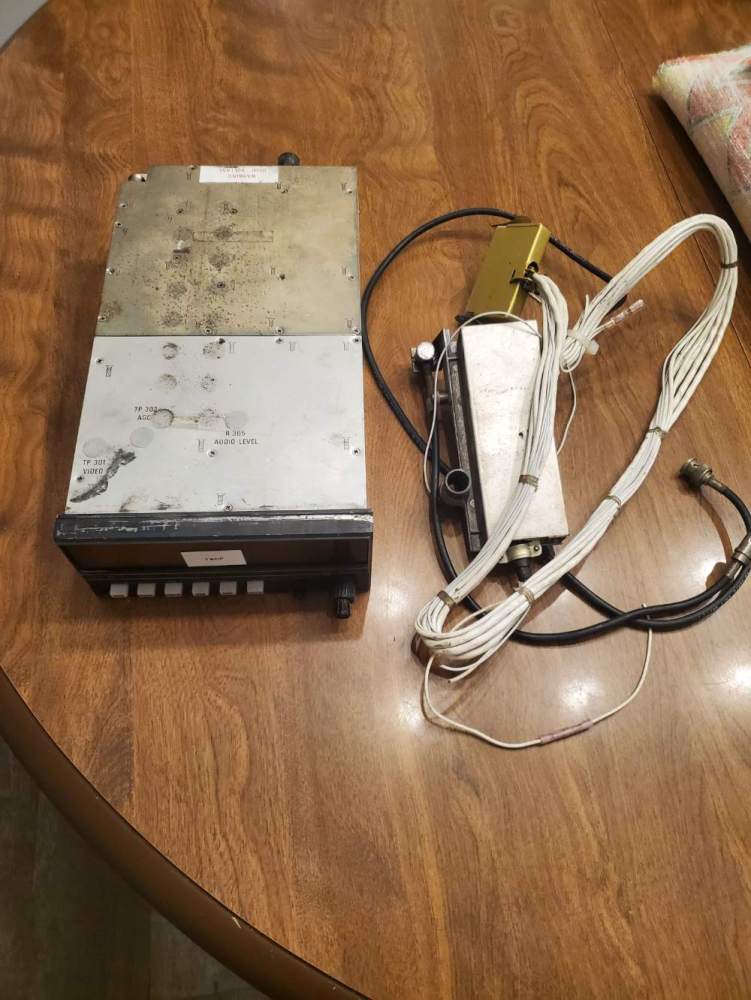
Hello all, I just put in a Garmin EIS and have some gauges/a few other radios to get rid of. Figured I'd post here first before heading to Ebay or Barnstormers. All prices are OBO See attached pics Cluster gauges: includes both fuel quantities, oil pres and temp, and amps. cyl head temp is inop. LH fuel gauge was recently overhauled by Air Parts, can provide a copy of the 8130 if desired. Make offer for whole cluster or individual gauge(s) - SOLD KI 202 VOR/LOC indicator - no idea if it works, since the radio it was linked to was inop when I purchased the plane. No reason to think it doesn't, though, and it wasn't labeled inop. SOLD Combo fuel pres/manifold pres gauge - worked upon removal. Asking $200 Insight graphic engine monitor 602 - worked upon removal except #4 CHT didn't indicate. Probably just needed a new probe. I have the old probes (both EGT and CHT) I can throw in if you want, but they're tired looking, and I don't know which one was the #4 CHT. Comes with on/off button. Have install manual and pilots guide booklet. Asking $600 KNS 80 NAV system - inop when I bought the plane. I never bothered to fix it, and when I finally ripped it out, I found a broken wire while crawling under the panel. I'm guessing it was the power wire, so the thing probably would work if hooked up to power. This is probably only good for a parts radio anyways, as there's much better systems out there nowadays. Have wiring harness but no tray. Make offer

-
Hello all, For those of you who've upgraded to a GI 275 Engine indication system, have you run into any issues with the fuel indications showing red x's on the instrument? I have the original resistance-type floats, and they worked/indicated just fine on the old gauges before I dove in to this project. I can go into the diagnostics page of the 275 and can see that the GEA24 is reading something, since it shows numbers there, and those numbers change when I stick my hand in the tank and physically move the float. (those numbers are small, though, like .1-.2) I have the system set to 0-5V, as instructed in the STC on page 3-18. I tried it in the resistance setting also, just for the heck of it, but still got red x's. I also measured the resistance at one of the outboard senders and moved it through its travel. Got 1-35ish ohms doing this, which is about right. I spliced in to the existing wires, and I got my wiring harnesses for the Garmin setup from Midwest Panel Builders (they built them for me), so I really don't think the wiring harness itself is wrong. I feel like my issue isn't my gauges, since they worked before. But I'm confused on why I can see readings in the diagnostics page but still get red x's on the default page. I'm aware Garmin put an alert out for resistance type floats, but the alert does not have anything to do with zero indications at all. Anyone run into anything similar? What was your fix? Ceis is 5 weeks out. On top of the extra cost that I don't want, grounding my plane for 5 weeks is not desirable. Thanks in advance
-
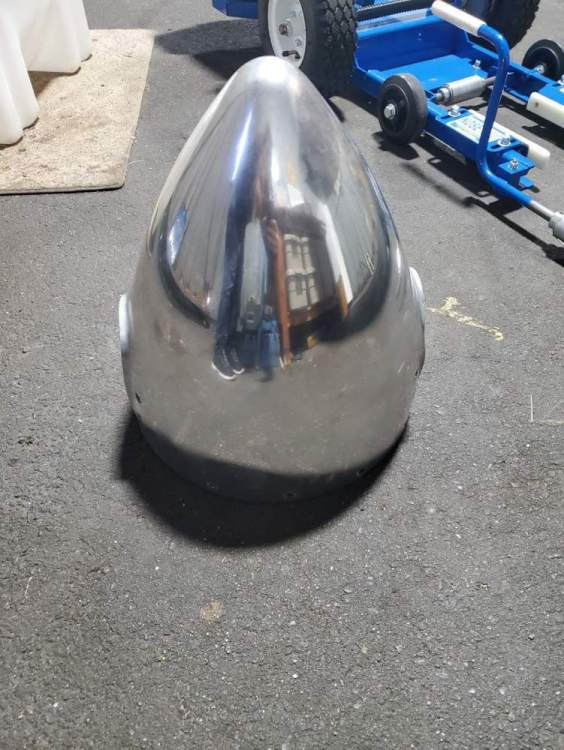
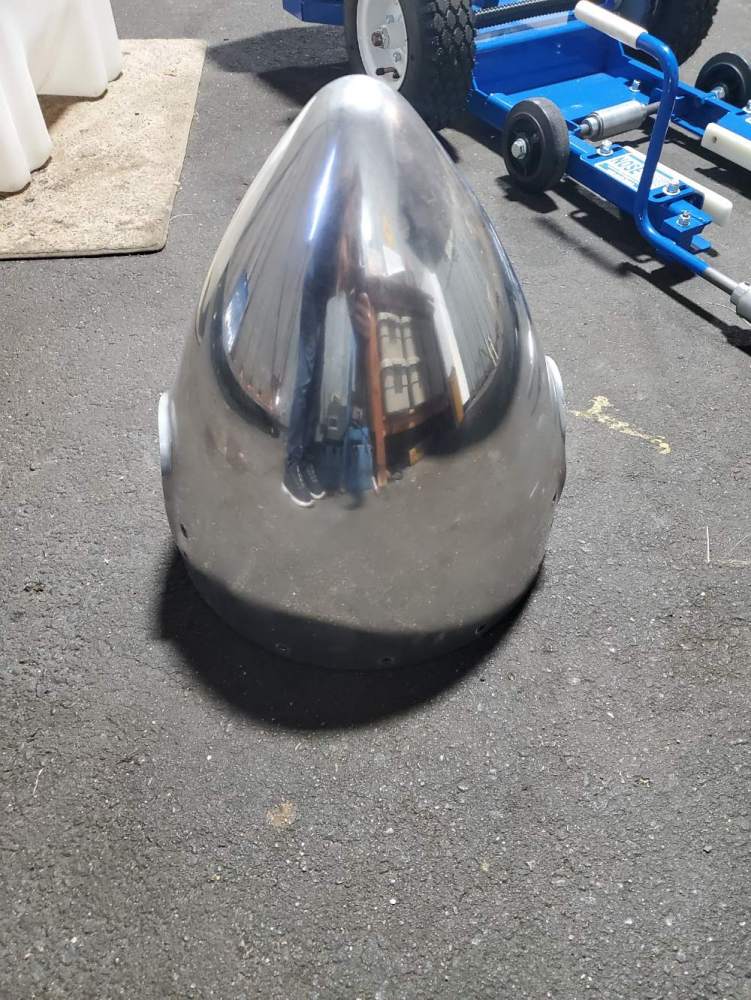
Want to buy: Hartzel 2 blade spinner
spitzfyre replied to spitzfyre's topic in Avionics / Parts Classifieds
Update, I have found and purchased one. Thanks -
Want to buy: Hartzel 2 blade spinner
spitzfyre replied to spitzfyre's topic in Avionics / Parts Classifieds
More pics