Search the Community
Showing results for tags 'upper latch adjustment'.
Found 1 result
-
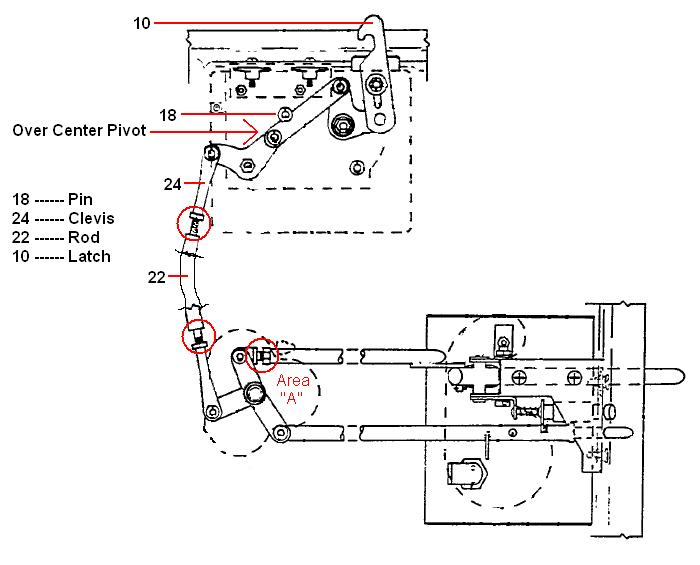
 After putting it off for several years I finally decided to adjust the cabin door, it now has a very positive over-center and holds the top latch secure. Since I’ve owned my Mooney the door has never really had a positive feel when rotating the interior handle forward to latch the door closed and the exterior handle always stuck out farther than I thought it should have. I’ve never had the door come open in flight but I did get a ton of wind noise around the top of the door. Another thing that I didn’t like was having separate keys for Ignition switch, Cabin Door and Baggage Door. I didn’t take any photos but I do have the drawing out of the Parts Catalog along with a few I did for replacing the Door locks. The following drawing is from the 1965~1967 M20C, 1965~1966 M20D, 1965~1967 M20E and 1967 M20F Parts Catalog. The first thing was to remove the plastic cover from the cabin door, and in typical Mooney fashion I ended up with a pile of screws. After the cover was removed and the door open I was able to find part of the problem, there was pink fiberglass insulation packed in and around the interior door handle up inside the door (Area “A”). Once the insulation was removed rotating the interior handle forward felt a lot more positive but still no over-center that I could tell. I knew my top latch needed adjusting due to the wind noise so I started there. The upper latch assembly (#6) comes out as a unit, start by loosening the jam nut on the clevis (#24), then remove the small screws that holds the assembly in place, there are 2 machine screws that come in from the top. Care should be taken when removing the cotter, washer and clevis pin from #24, don’t drop them in the door. Once the latch assembly was out I got a better idea as how it all worked, item #18 is a stop, keeping it from going to far over-center. I turned # 24 2 full turns in (shorter) and re-installed the assembly (#6). I could now feel in the handle it going over-center but it was more pressure than I liked. Removing #6 and turning #24 in 2 more turns did the trick. The interior handle now has a positive lock and the outside handle fits nicely with the door. With the door closed and latched I wasn’t able to pry the top of the door away with my finger tips as before and it felt very secure. The next thing was to look at the locks for the Cabin & Baggage doors. Ideally I want just 1 Key that works the Ignition and both door locks. I removed the lock assemblies from the doors but was unable to remove the cylinders to key them the same as the ignition. I stopped by a local Locksmith shop to see if they had any lock assemblies that could be keyed to my ignition key but they had just sold all 20 something they had in stock (figures). I stopped by Lowe’s to see what they had but no joy, Home Depot was my next stop and it was a score, Gate House # 0252974 looked like they would foot the bill but I wanted to make sure my original Bendix ign. key would fit the new locks. A clerk came by and asked if I needed help and told him I want to see if this key fit in that lock, he opened that package and the key went right in, plus the key cut was very close to mine. Once home I removed the cam which allowed the cylinder to be removed from the body. The way most locks work is the body of the lock has a keyway (these have 4) and the wafers/pins are spring loaded into that keyway, keeping the cylinder from turning (unlocking), when the key is inserted into the cylinder the cut of the key allows the wafers/pins to be pulled into the cylinder out of the keyway which allows the cylinder to turn. These were never meant to be re-keyed and the wafers were not removable. By inserting my ignition key in the cylinder I could see which wafers stuck up past the cylinder. The drawing below shows what I’m talking about. The wafers are brass and easily filed down to the radius of the cylinder allowing it to rotate in the body. Filing is done with the key inserted (fully), once they are filed down insert the cylinder with the key installed and check that it rotates freely in both directions completely. Once all the filing is done clean out all the metal filings and reassemble. I had to modify the cams to match the originals but its fairly straightforward looking at them side by side. Pay close attention to your old locks on orientation in the locked and un-locked positions, the new locks can be set by how the “Rotation Washer” is installed. Once I had both new locks keyed and correct (after a test fit & try) the cam is held on with a screw, which was removed and installed back with thread locker (loctite). As an added measure once the locks were in place and tightened I verified that they worked as needed, I then added several dabs of RTV on the nut/body/door skin and the screw/cam for safety. I now have 1 key that works the ignition switch and both door locks……..Hope I explained this well enough and if not shoot me a message and I’ll try to explain it better.
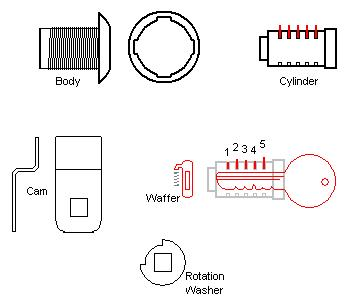

- 27 replies
-
- 12
-

-

-
- single key
- re-keying
- (and 1 more)