Garmin Aviation Team
-
Posts
7 -
Joined
-
Last visited
-
Days Won
1
Content Type
Profiles
Forums
Blogs
Gallery
Downloads
Events
Store
Everything posted by Garmin Aviation Team
-
Yes, but with future TXi and GTN Xi Software releases. No timeline for those SW releases. "With future software updates and an optional enablement, compatible Garmin avionics can automatically scan and tune up to three additional DME frequencies. Pilots can leverage this multi-channel capability for DME-DME Area Navigation (RNAV), using distance calculations from two or more DME ground stations to determine the aircraft’s position for RNAV routes." Joe - Garmin Aviation Team
-
We are considering approving the GHA-15 in certified aircraft, however I have no timeline for when that would be completed. Joe - Garmin Aviation Team
-
This is the MFD display from the Cirrus Perspective+ G6 aircraft, which will soon be available for upgrade in G3/G5 Perspective aircraft. Joe - Garmin Aviation Team
-
Hello everyone, the Garmin Aviation Team is excited to share new products and services, get you prepared to fly into Oshkosh, and share what you can expect during your visit to the Garmin Exhibit. Let’s dig in! Automatic Aircraft Flight Data Log Uploads and Analytic Service Provider Integrations GDL 60 PlaneSync subscribers or Flight Stream 510/Garmin Pilot subscribers have a streamlined path to upload their aircraft flight logs to a new Aircraft Logbook on flyGarmin.com. Pilots can opt-in to automatically share aircraft data with flight analysis services, including FlySto, Savvy, and CrewChief. We expect this to become available early August. Customers with GDL 60 and PlaneSync service can now have this flight and engine data automatically uploaded to the flyGarmin cloud after landing. Under “Sharing” in the “Aircraft Logbook” on flyGarmin.com, you can link your accounts from the listed service providers to gain valuable insights into the health of your engine, data driven trend analysis, track flight operation in real time, and advice/troubleshooting from maintenance professionals. Stay tuned for Flight Schedule Pro, novoFlight, and Navi service provider integrations coming soon. To learn more about how to your aircraft logbook, visit our support page. New: Garmin Guided Visual Approaches Fly stabilized visual approaches into complex environments with terrain, tall downtown buildings, or at night near bright metropolitan areas with Garmin Guided Visuals. To help increase safety and reduce pilot workload, Garmin has partnered with Hughes Aerospace to create airport-specific Guided Visual procedures for 31 approaches into 25 airports. Guided Visuals can be loaded from the new Garmin Navigation Database and coupled to the autopilot in the same way as an RNAV procedure. Each Guided Visual includes a georeferenced chart, with the same look and feel as traditional instrument approach charts that can be displayed on select avionics and the Hughes iOS App. Guided Visuals are compatible with GTN/GTN Xi series, GPS series, and select Garmin Integrated Flight Decks. Reference your Pilot Operating Handbook (POH), Aircraft Flight Manual (AFM), or Aircraft Flight Manual Supplement (AFMS) to determine operational capability of RNP procedures with RF legs in your aircraft. Guided Visual procedures are included in new Garmin Navigation and FliteCharts databases. Starting August 7th, databases that include Guided Visuals will be packaged in a new Garmin OnePak from FlyGarmin.com. A United States Standard + FliteCharts OnePak with Guided Visuals is $1,319/year. Customers with existing OnePak subscriptions that would like to add Guided Visuals can contact Garmin Aviation Support at aviation.support@garmin.com or call 866-739-5687 to upgrade their subscription. NEW: Garmin Retrofit DME Coming Soon for TXi The GDM 450R is a remote mounted radio which provides slant range distance information on TXi displays. The DME information window on the TXi will display DME distance, frequency, and station identification data. Pilots can tune and track up to two separate DME frequencies, based on data received from existing VHF NAV radios (GTN series, GNS series, etc.) With DME hold capability, pilots can retain active DME distance information when tuning the NAV radio to a different frequency. This can be useful when a localizer or other approach aid is needed in combination with DME information for instrument approaches. The GDM 450R hardware and software, listed at $8,995, is scheduled for availability this Fall for TXi flight displays. Come by the Garmin Exhibit on Celebration Way @ AirVenture Oshkosh NEW! First off, Garmin is helping you get to AirVenture! The FISK VFR arrival is now available for Garmin avionics and in Garmin Pilot! Reduce your workload by loading the procedure directly into your avionics and follow along with a Garmin SmartChart. To get the arrival, make sure you have database cycle 2507 or purchase the Garmin Navigation Database at flyGarmin.com. Also, the entire NOTAM can be viewed in the Oshkosh Airport Chart page or downloaded in Documents (select “Event NOTAMS” in Documents). Garmin has a host of activities planned for this year’s AirVenture, including daily seminars, in-person database subscription incentives, avionics promotions and meetups with some of our favorite people in aviation. The Garmin exhibit will feature select aircraft with some of our most popular avionics configurations including a C172, C185, C195, Legend Nomad, and a Bearhawk 5. As usual, we will have avionics on display with Garmin staff ready to answer any questions you might have for your next panel upgrade. More details here: Garmin.com/Oshkosh. Promotions Sync Up the Savings - You can add a GDL 60 with PlaneSync to your next installation with up to $4000 available in savings, when maximizing the rebate savings. You can save up to $4,000 per aircraft by purchasing additional products. Full details and qualifying products and be found at the promotions link below. GI 275 EIS - Single-engine aircraft owners receive a $350 rebate and twin-engine aircraft owners receive $700 with purchase of GI 275 EIS. Additional saving available on databases, aviation training, and Garmin portables. View all aviation promotion details here: https://www.garmin.com/en-US/promotions/aviation/ I look forward to meeting many of you at the Mooney Caravan Dinner on Sunday, and at the Garmin Exhibit throughout the week! Joe Megna Garmin Sales & Customer Experience Manager


-
Hi everyone, We are grateful for all your feedback about SmartCharts! To get a more in-depth look at the SmartCharts technology, check out this new video tutorial that walks through a scenario flight: https://www.youtube.com/watch?v=KCYZNTRX8bU This video has chapters for each chart type, making it easy to view the sections you want to learn more about. To answer some frequently asked questions about SmartCharts: Are SmartCharts legal charts? Yes, SmartCharts are legal charts that provide pilots with the required aeronautical information for flight. They provide the same information as traditional government charts, just in a different format. What version of Garmin Pilot will I need? Version 25.5.0 If I don’t see SmartCharts, what do I need to do? 1. Update to Garmin Pilot 25.5.0 by going to the app store > search Garmin Pilot > click on the Garmin Pilot app > click on the blue update button 2. Confirm that the Garmin Navigation Database is current and active in the downloads page 3. Toggle SmartCharts on in the top left corner of the airports page > charts section or the charts page> binders section. MooneySpace answers: Rick Junkin, exM20K, and LANCECASPER Garmin shares your interest in having SmartCharts on flight displays and portables, though we do not have a plan for this today. The team is focused on getting this into as many hands as possible with the Garmin Pilot app. We appreciate your interest in SmartCharts! kortopates Currently there is not an option to overlay Track Vector Mode and Traffic on SmartCharts, although there is an option in the menu button in the top right to have a split screen of the SmartChart and the map. I have passed your request along to the team. Thank you all for your comments and questions, and hope you are enjoying this new feature. Joe Megna - Garmin Aviation
-
The Garmin team is excited to announce the release of SmartCharts, the newest tool in the Garmin Piot iOS app: Terminal procedure chart formatting has not changed much since their inception in the early 20th century. These traditional charts have to account for all runways, transitions, approach minimums, etc. which can make charts congested and hard to quickly analyze. The Garmin Team has revolutionized how we view and process chart data with data-driven SmartCharts that declutter, simplify information, and help to reduce mental math in a high workload environment. SmartCharts serve as a primary charting tool with enhanced airport diagrams, departure procedures, arrival procedures, and instrument approaches to help pilots visualize the flight environment right from their iPad or iPhone. Enhanced Airport Diagrams SmartCharts airport diagrams utilize the foundation of the SafeTaxi chart and incorporate additional details that enhance the amount of information at your fingertips. Pilots can visually see detailed runway and taxiway markings, approach lighting systems, and airport iconography such as VORs and wind sock location. Each airport diagram has imbedded hot spot, takeoff minimum, and alternate minimum chart data to prevent swapping back and forth between charts to find relevant details. With the one touch buttons around the perimeter of these charts, pilots can quickly view COM frequencies, NOTAMs, and traditional government charts. Departure and Arrival Charts Traditional departure and arrival charts provide pilots with way more information than they will need for their flight. By filtering aircraft type, route transition, and runway of intended use on SmartCharts, pilots can utilize a decluttered chart which shows only the applicable route, fixes, and crossing restrictions. Departure and arrival procedures become much simpler to brief with the details button and quick access COMs/Routes buttons. Instrument Approach Charts Finding, briefing, and executing approaches becomes a breeze with SmartCharts technology. With the ability to filter all approaches by height, visibility, and approach lighting systems, pilots can get their ATIS information and quickly decide on which approach will work best for their flight. The set minima tab also helps reduce mental math by allowing pilots to select their approach category, specific approach type, and toggling on applicable non-standard conditions at the airport to automatically correct ceiling and visibility requirements. SmartCharts is the first to provide a georeferenced vertical profile view of approaches to help visualize aircraft position relative to the approach path, terrain, and obstacles. With quick access to COMs, briefing details, and missed approach procedures, pilots can spend less time heads down when in a high workload environment. Getting Started SmartCharts are available in the US and Bahamas for Garmin Pilot Premium iOS users. Current Garmin Pilot Standard subscribers in all regions have received a complimentary Premium upgrade through August 31st. Subscribers that have completed a trial in the past have received a complimentary 30-day trial of Garmin Pilot Premium starting today. If you have never tried Garmin Pilot before, we invite you to try it any time with a complimentary 30-day Premium trial. This complimentary upgrade unlocks all Garmin Pilot features and functionality in the app as well as Garmin Pilot Web, so give them both a try today! If your app hasn’t automatically updated yet, please go to the app store, search for Garmin Pilot, click on the Garmin Pilot app, and select the update button next to the Garmin Pilot icon. I'll follow-up later this week with a video my colleague, Sabrina, a V-Tail Bonanza owner and type-rated Learjet and Hawker pilot put together that walks through SmartCharts and how she uses it in her everyday flying. In the meantime, there are short videos you can watch at garmin.com/smartcharts for more details. We are excited to be sharing SmartCharts with you all today and look forward to hearing your feedback. Joe Megna Sales & Customer Experience Manager

-
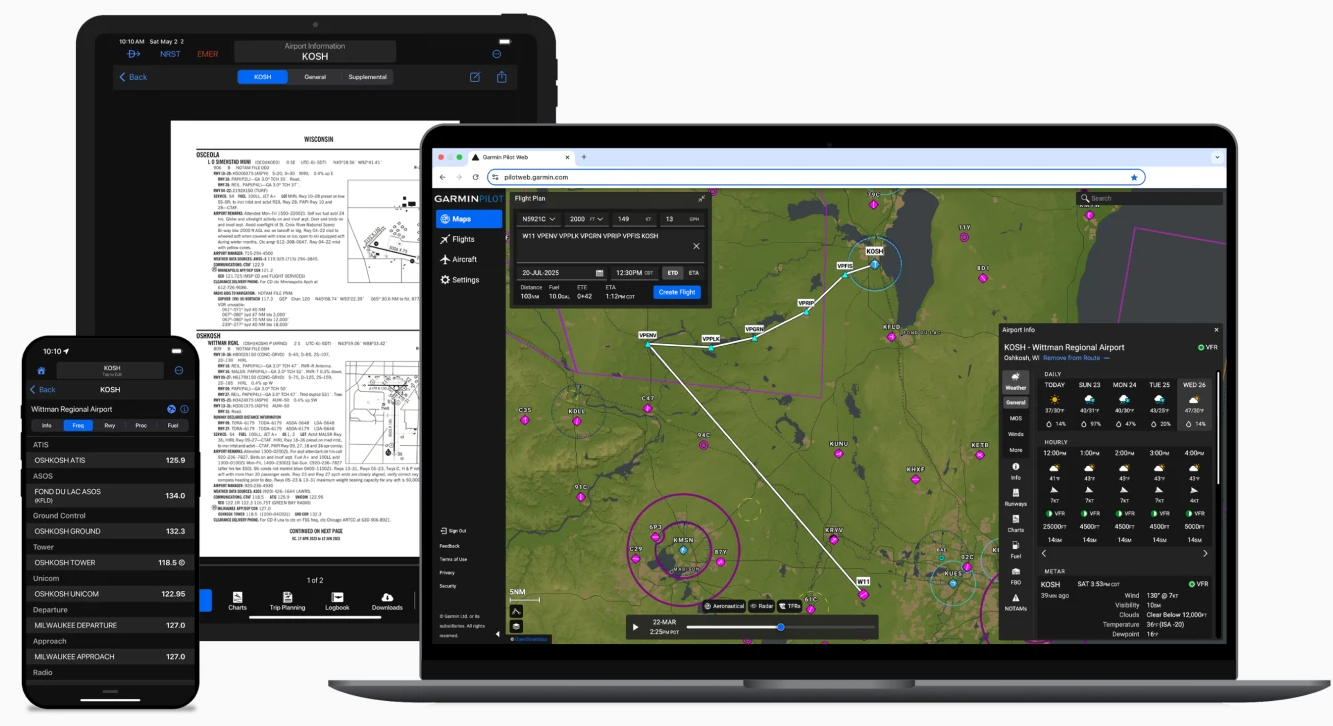
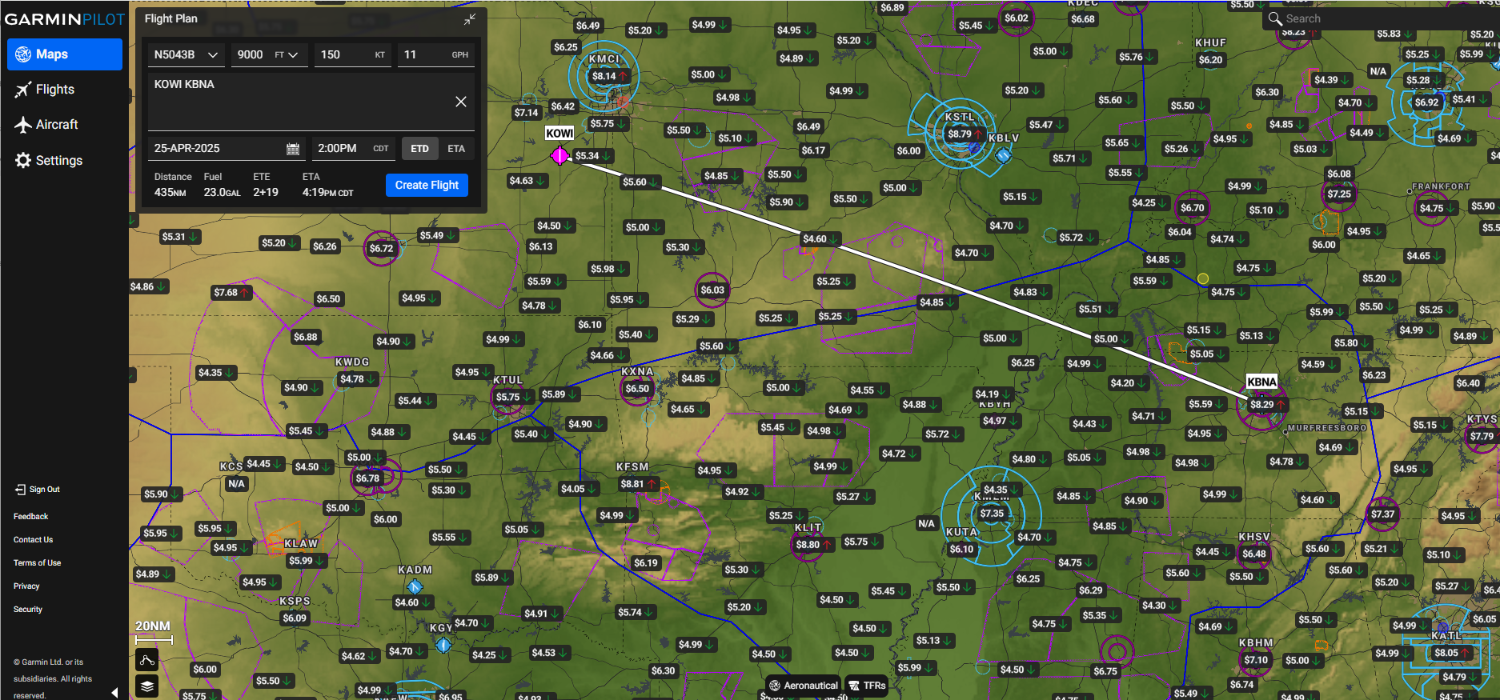
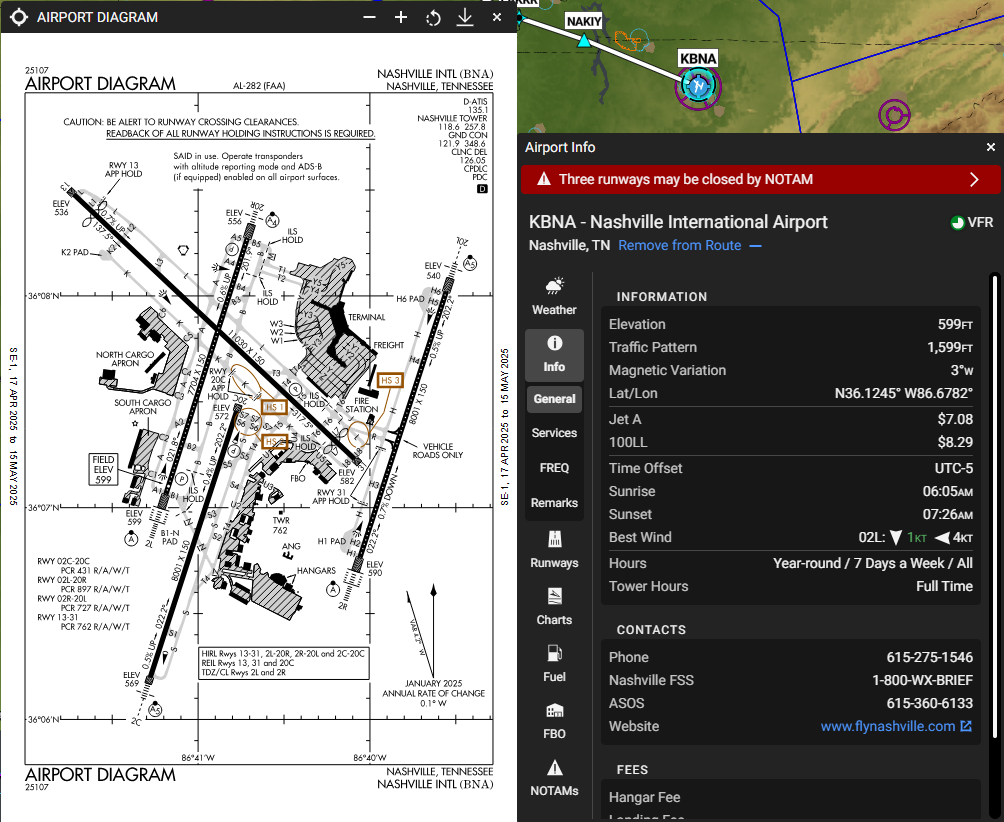
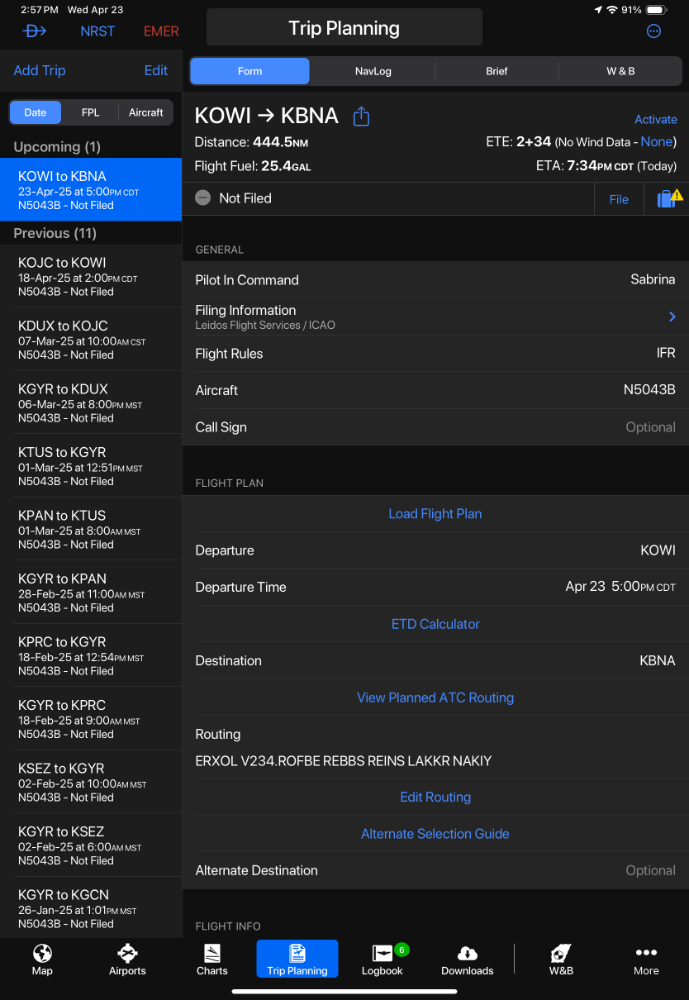
Hi everyone, The Garmin team has a big announcement that I am excited to share with you today. Garmin Pilot Web, an all-new flight planning companion tool to Garmin Pilot mobile, is now available for pilots to plan, file, and sync flight plans from computers to mobile devices. With access to free at-a-glance flight planning tools on the maps tab, pilots have all the data at their fingertips to run what-if flight scenarios and get in-depth weather information without a Garmin Pilot subscription. Subscribers can seamlessly create trips, file flight plans, and sync data to the Garmin Pilot app. With easy to navigate maps, flights, and aircraft tabs, Garmin Pilot Web gives you many of the beloved features in the Garmin Pilot app on a larger viewing platform. As a new Garmin Pilot user, I thought I would bring you all in on the flight planning process I went through on a recent flight to Nashville to visit my family. While sitting at home, I wanted to see if I could make it from Kansas City to Nashville non-stop in my F35 Bonanza. I didn’t have my iPad with me, so I decided to pull up Garmin Pilot Web to do my flight planning and filing. I like to start with the simple, at-a-glance flight planning tools on the maps tab to determine if I need to add fuel stops along my route. By entering basic route details, TAS, and fuel burn, the performance engine instantaneously generated the distance, fuel burn, and time enroute values I needed for easy decision making. Looking through the 100LL layer with price color coding, I was able to quickly scan the estimated fuel prices in the Nashville area. Once I confirmed my departure and destination airports, I clicked the blue Create Flight button which brought me to the Flights tab to calculate detailed flight plan information. With basic flight plan information auto filled, I refined my routing by clicking the routes button to generate frequently flown and ATC prescribed routing options. I selected the most economical option for my altitude and previewed the expandable map on the flights tab to get a high-level overview of my new routing. To get the most accurate performance and weight and balance calculations for my cross country, I added a new aircraft under “Aircraft ID” to build out an aircraft profile for the Bonanza. This gave me the option to manually add the aircraft or utilize loaded templates which are available for many piston single, twin engine aircraft, and some turboprop aircraft. I chose to manually enter data since my older bonanza has multiple STCs. Across the top of my flight plan, I walked through the summary of details that outlined distance, required fuel, average wind speed, estimated time in route, estimated time of arrival, and filing status. In the payload section at the bottom left, I clicked on weight and balance to insert passengers, cargo, and fuel on board. The graphical flight envelope showed my zero fuel, landing, and takeoff weights all within range. Now that I knew I could make the trip non-stop, had my route plotted, and knew that I was safely within my weight & balance limitations, I headed over to the maps page to build my situational awareness for the upcoming flight. Clicking on the layers icon in the bottom left corner, I was able to toggle through the variety of base map options such as topo, satellite, street map, and VFR/IFR charts. I personally like to use the topo map because it’s easy to see terrain shading along your route. I also added the all-new aeronautical overlay to easily identify airspace, airports, and other aeronautical details near my planned route. In areas where I wanted more information, I was able to click anywhere on the map to reveal highlighted airspace, altitudes, and elevations to confirm that my routing and altitude kept me free from hazards. Since it was my first time flying into Nashville, I needed to learn as much about that busy airport as possible. To do that, I clicked directly on the airport to walk through general airport information, FBO pricing/hours, available services in case I had a maintenance issue, runway details, etc. The Info section had a great recap list of important details such as tower hours, elevation/traffic pattern altitude, best wind runways, fuel pricing/fees, and more. I like to be overprepared when flying into congested airports like Nashville, so I turned on the map traffic layer to get an idea of the different types of aircraft flying in. That day I ended up at “best forward speed” with a 747 in front of me and a 737 behind me! To familiarize myself with the airport layout and FBO locations, I went to the charts section for the BNA airport to view the FAA airport diagram. I also looked at approaches, which were easy to scan since the data is sorted by runway, with current wind conditions and runway closure information all right there to see. Lastly, I checked airport NOTAMs, which can be quickly filtered to show information important to me. Now that I was familiarized with the airports I was flying into, the next step was to look at forecasted weather along my route. The weather layers on the maps tab are a great resource to help see the high-level overview of weather systems across the country. Since I was flying in the Midwest which is known for convective activity this time of year, I started with the high-fidelity weather radar. Many of these layers have a slider across the bottom and expandable layer filters found by clicking on the layer name in the bottom middle. I was able to manipulate the data to show a specific time frame and include lightning, storm cell, and IR cloud selectable options. Next, I added the new color-coded visual winds aloft overlay that shows wind direction and velocity. These wind particles helped me visualize wind speed/direction patterns around convective activity. Since my flight was planned for later that day, I also looked at the color-coded temperatures aloft data to get an idea of aircraft climb performance. While icing wasn’t a huge factor this time of year, I quickly glanced at the icing forecast as well as the AIRMET/SIGMET, PIREP, and METAR overlays. Lastly, I checked the weather at my departure and destination airports. When clicking on the airport, I walked through the daily/hourly forecasts, METARs, TAFs, MOS, Winds Aloft, and the textual weather synopsis. Once I built up my situational awareness, I was almost ready to file my flight plan. Before filing, I like to look through the weather briefing to double-check for any factors that may cause me to cancel or delay my filed flight. The Leidos weather briefing, found on the top middle section of the flight I created on the flights tab, does a great job of giving you granular data along the whole route. The standard briefing outlined adverse conditions to be aware of, current and forecasted weather, NOTAMs, and more. After I made the “GO” decision, I clicked the blue filing form to review my flight details and file the flight plan (filing/syncing currently only available in North America). Once I arrived at the aircraft and completed my preflight, I opened the Garmin Pilot app on my iPad to see the Nashville trip under the Trip Planning section that synced automatically from Garmin Pilot Web. I clicked the “view on map” button to bring my filed flight route to the maps page and walked through the Leidos briefing one more time to review any updated information. From flight planning and filing on my computer at home to taking off using the trip synced to my iPad, I was able to use the robust data on both Garmin Pilot Web and the Garmin Pilot app to safely visit my loved ones in Nashville! Garmin Pilot Web (pilotweb.garmin.com) offers a wide variety of flight planning tools within the Free, Standard, and Premium packages. The free version gives pilots access to the maps tab with selectable base maps, data layers like weather/NOTAMs/fuel prices, FAA charts, airport information, and more. The free version also includes simple, at-a-glance flight planning tools on the maps page to run what-if scenarios on upcoming flights based on forecasted winds aloft at the time of departure. Pilots with a Standard Garmin Pilot subscription ($109.99/yr in US) now have access to advanced functionality on the Maps, Flights, and Aircraft Tabs. With the ability to plan, save, and file flight plans, request briefings, add/edit aircraft profiles, and view internet traffic, users can finish the flight planning process all in one place. Garmin Pilot Premium users ($209.98/yr in US) get access to all standard subscription features plus icing forecasts and Garmin SafeTaxi® diagrams. To learn more about what this tool can do for you, sign up for our Mooneyspace member exclusive Garmin Pilot Web Webinar hosted by Joe on May 21st at 4pm CST. I look forward to hearing your feedback and learning about your Garmin adventures! Sabrina Meiklejohn Sales & Customer Experience Manager