Aspen2013 Posted July 6, 2020 Report Share Posted July 6, 2020 (edited) Just some background info. This aircraft uses a Safe Flight Lift Detector. fancy stall horn. Overhaul cost $1800. If anyone has experience where it is going off a lot in flight or when you are sitting on the ground this is the culprit. Once you loosen the stall warning switch you see that just tinkering with the screws that tighten the switch to the wing it will set off the stall warning. Called the company and they said that is a common problem and the switch is bad. Just send it in for O/H. This isn't overhaul at all but gets you a new switch with same data plate. New one is probably over $2000. I found in the maintenance manual that you have to fly the plane and check stall speeds at different configurations. Then adjust up or down to where you want the stall warning horn to go off. I found that the switch has to be pretty much in the full down position. It doesn't match the curve of the wing so the base plate does flex when tightening?? Anyone else find best position to tighten switch? Before anyone gets excited about the fluid under leading edge - yes its TKS fluid. I run it once a month. Edited July 6, 2020 by Aspen2013 add info 1 Quote Link to comment Share on other sites More sharing options...
carusoam Posted July 6, 2020 Report Share Posted July 6, 2020 On older planes... That type of device was mounted on the other side of the sheet metal... The vane is usually placed where the split line occurs just above the stall speed... In the above pic... that doesn’t look right. Airflow has to come from behind the switch to raise it up... Making the split line occur below the vane... Is that even possible with the switch in this position/placement... My experience is pretty limited... I don’t have an Acclaim with a FIKI system... so my reference may be a bit off... Compare what you have to other Mooneys... The vane placement and operation will be very similar... Do you have an MSC with experience for that switch? A call to somebody like DMax May be in order... Best regards, -a- Quote Link to comment Share on other sites More sharing options...
GeeBee Posted July 6, 2020 Report Share Posted July 6, 2020 I don't know your TN is but mine on my FIKI R is heated and a lot more than 2 AMU. It also is not tightened up that hard (or that low) on the leading edge. Me thinks something is amiss here. 2 Quote Link to comment Share on other sites More sharing options...
carusoam Posted July 7, 2020 Report Share Posted July 7, 2020 See if @StevenL757 has insight on this stall sensor.... Best regards, -a- 1 Quote Link to comment Share on other sites More sharing options...
StevenL757 Posted July 7, 2020 Report Share Posted July 7, 2020 @Aspen2013, on the Acclaim, IIRC, this was established during flight test under the following parameters... Gear Down Flaps 33 (full) 8000 ft 5 - 10kts above stall If the assembly is down all the way and the screws are tight (snug, NOT overtight or torqued), that's the correct position and it should be good. If it stalls early, it needs to be lowered. If it stalls late, it needs to be raised. However...the vane is very sensitive, and will go off in gusty winds or close to ground at low airspeed. It should not go off in cruise flight for any reason under any circumstance. Failing all else, the switch may be bad. Water will short it out. Age will also wear it out. Also, be aware that as you've removed the assembly and will continue to adjust, you need a logbook entry. Although it's a grey area under 14 CFR Part 43, it's likely ok, so just document what you do in the Airframe log to cover your bases. Keep us posted. Steve 1 Quote Link to comment Share on other sites More sharing options...
StevenL757 Posted July 7, 2020 Report Share Posted July 7, 2020 Posted this on a related thread, but including here as a supplement to above...in the event you need a replacement or overhaul on your existing switch. Contact Jim Hamel at Sure Flight. 914-946-9500, x1159. They're a bit north of me in the White Plains/Westchester area. The new part (C98307-1) is $2,981 The overhaul cost is $1788.60 The OH basically includes new "guts" to the switch...you really only get back the outer casing. Everything else is replaced Jim can give you lead/turnaround times, so reach out to him Website is https://www.safeflight.com/ for reference Quote Link to comment Share on other sites More sharing options...
GeeBee Posted July 7, 2020 Report Share Posted July 7, 2020 Should it not be a heated vane? Quote Link to comment Share on other sites More sharing options...
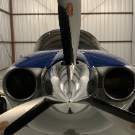
GeeBee Posted July 8, 2020 Report Share Posted July 8, 2020 Here is my heated vane, C98307-1. It looks much different than Aspen 2013 vane. I don't see a heating element on it although the part number on it looks correct. Quote Link to comment Share on other sites More sharing options...
carusoam Posted July 8, 2020 Report Share Posted July 8, 2020 Nice pic GB! Much easier to tell where the vane is compared to the center of the leading edge... One question for your heated vane..? It looks like something got cooked on the edge of it...? See blue arrow... The Fiki installations get the heated stall warning vane... Best regards, -a- Quote Link to comment Share on other sites More sharing options...
GeeBee Posted July 8, 2020 Report Share Posted July 8, 2020 According to my information, that is the thermal strip. That is what I don't see on Aspen 2013's. That is why I ask where the heat is coming from on his vane. 1 Quote Link to comment Share on other sites More sharing options...
larryb Posted July 8, 2020 Report Share Posted July 8, 2020 According to my information, that is the thermal strip. That is what I don't see on Aspen 2013's. That is why I ask where the heat is coming from on his vane. Mine has the heater on the whole vane. Your pic looks like it has only the left 20% covered. I’ll take a pic next time at the hangar. To me your looks partially damaged. Quote Link to comment Share on other sites More sharing options...
GeeBee Posted July 8, 2020 Report Share Posted July 8, 2020 I asked about that at the last annual at a well known MSC and was told it looked ok. Quote Link to comment Share on other sites More sharing options...
carusoam Posted July 9, 2020 Report Share Posted July 9, 2020 I tried to get some details off this fine inter web device.... Trying to find what a heated stall vane looks like... https://www.safeflight.com/products/aoa-stall-warning/ Not enough detail... So I left their tech department a message... see if an answer comes back... Best regards, -a- Quote Link to comment Share on other sites More sharing options...
larryb Posted July 9, 2020 Report Share Posted July 9, 2020 1 Quote Link to comment Share on other sites More sharing options...
carusoam Posted July 10, 2020 Report Share Posted July 10, 2020 Looks like the vane may be showing some heat related damage over time..? That thing must get really hot when on... PP thinking out loud, not a mechanic... Best regards, -a- Quote Link to comment Share on other sites More sharing options...
larryb Posted July 10, 2020 Report Share Posted July 10, 2020 I think mine is fine. But the system is complicated for sure. It uses a leg of the airspeed safety switch to go to high power when flying. When on the ground heat is reduced to keep it from burning up. Quote Link to comment Share on other sites More sharing options...
StevenL757 Posted July 10, 2020 Report Share Posted July 10, 2020 On 7/8/2020 at 10:44 PM, carusoam said: I tried to get some details off this fine inter web device.... Trying to find what a heated stall vane looks like... https://www.safeflight.com/products/aoa-stall-warning/ Not enough detail... So I left their tech department a message... see if an answer comes back... Best regards, -a- I can probably save you time. All Mooney aircraft equipped with TKS having the Known Ice certification/STC have heated stall tabs as part of the STC. The known ice cert requires it. Those models with inadvertent or no TKS installed have the non-heated version of the stall tab. Steve 1 Quote Link to comment Share on other sites More sharing options...
PMcClure Posted July 10, 2020 Report Share Posted July 10, 2020 4 minutes ago, StevenL757 said: I can probably save you time. All Mooney aircraft equipped with TKS having the Known Ice certification/STC have heated stall tabs as part of the STC. The known ice cert requires it. Those models with inadvertent or no TKS installed have the non-heated version of the stall tab. Steve And perhaps much cheaper. I will report back next week. Quote Link to comment Share on other sites More sharing options...
carusoam Posted July 10, 2020 Report Share Posted July 10, 2020 Steven, I was trying to ascertain what a healthy heated vane actually looked like... Because the one pic posted further above by gee bee seemed to be missing a piece... The next one posted by LarryB shows some wear look to it... The first one posted by Aspen is only showing some minor wear maybe... How is yours looking? The vane itself looks like it might have a heated ‘blanket’ glued to it... Under certain conditions, like heat on, while on the ground, it might be getting really hot.... damaging whatever glue is trying to hold it in place... Could be an easy In-situ fix... The heated stall warning sensor seams to be logically mounted from the outside surface... if it needs to be removed for service... it can probably be done by an ordinary mechanic with one elbow... the I heated but internally mounted sensor is much harder to access and may require a second elbow on one arm... PP thoughts only, not a mechanic... Best regards, -a- Quote Link to comment Share on other sites More sharing options...
StevenL757 Posted July 10, 2020 Report Share Posted July 10, 2020 11 minutes ago, carusoam said: How is yours looking? The vane itself looks like it might have a heated ‘blanket’ glued to it... Pretty good actually. And yes, there is indeed a thermal pad of sorts between the bracket and the TKS panel. 1 Quote Link to comment Share on other sites More sharing options...
carusoam Posted July 10, 2020 Report Share Posted July 10, 2020 Steven, Yours looks the most healthy of all the pics here... It is possible that the ‘thermal strip’ mentioned above... starts out very black and smooth.... After a while, the black surface looks like it erodes or may be easily damaged.... After a while, the black surface chips revealing the next layer.... If it becomes unglued... it probably doesn’t last very long at 180kias... So.... If you have a heatEd stall sensor... Check your heated stall vane... to see that it’s thermal strip On the vane is still coated black, and that it’s still there... It will be nice to know that it is still working as designed... PP thoughts only, not a mechanic... Best regards, -a- Quote Link to comment Share on other sites More sharing options...
StevenL757 Posted July 10, 2020 Report Share Posted July 10, 2020 Yeah, I agree. When I wrote earlier that "...age...and water...will wear it out", I should've added "heat will wear it out" as well. Quote Link to comment Share on other sites More sharing options...
CAV Ice Posted July 10, 2020 Report Share Posted July 10, 2020 For what it's worth here is a new one right out of the box. 1 1 Quote Link to comment Share on other sites More sharing options...
GeeBee Posted July 10, 2020 Report Share Posted July 10, 2020 Looks like mine is not in as good a shape as it should be, despite declarations to the contrary. It sure does get hot though. I can see it steaming when flying through precipitation. Quote Link to comment Share on other sites More sharing options...
carusoam Posted July 10, 2020 Report Share Posted July 10, 2020 Great pics CAV! Thanks for sharing the supporting documentation! Best regards, -a- Quote Link to comment Share on other sites More sharing options...
Recommended Posts
Join the conversation
You can post now and register later. If you have an account, sign in now to post with your account.