Search the Community
Showing results for tags 'lights'.
Found 5 results
-
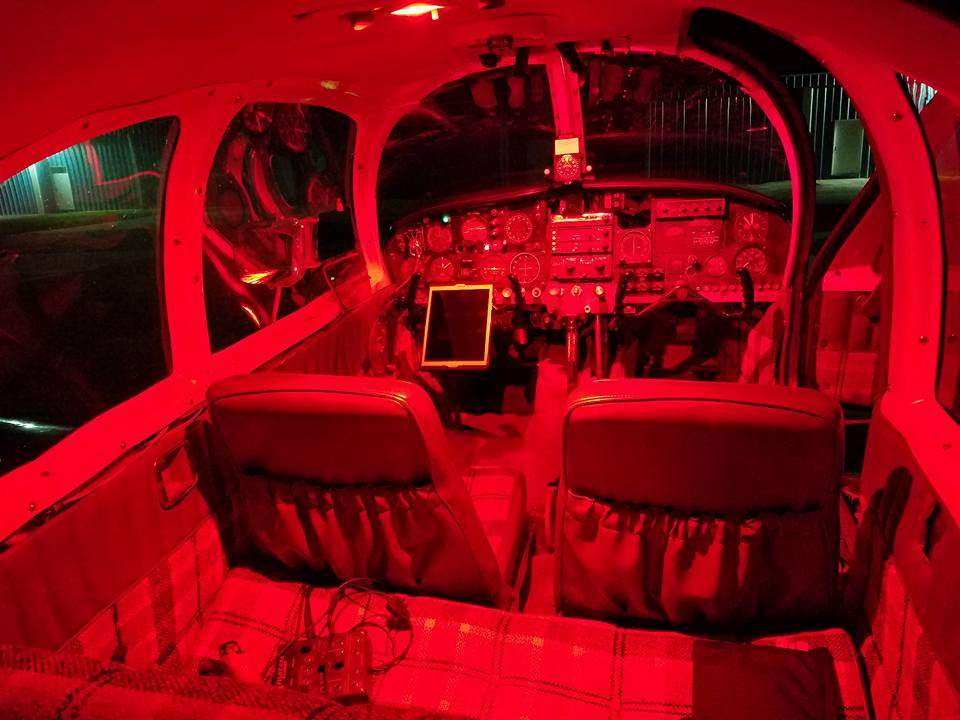
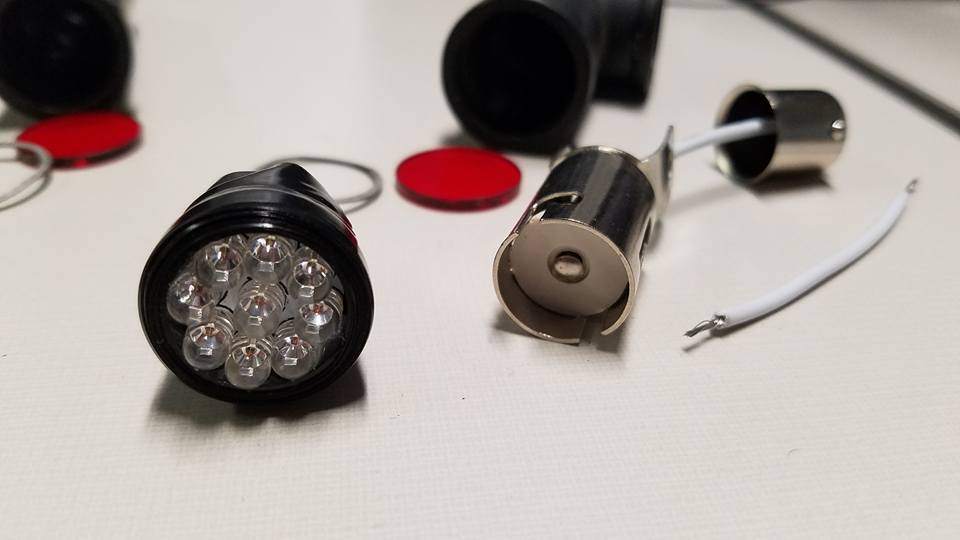
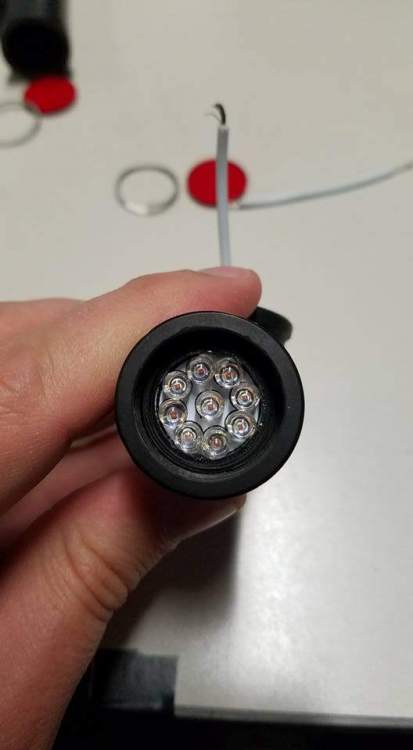
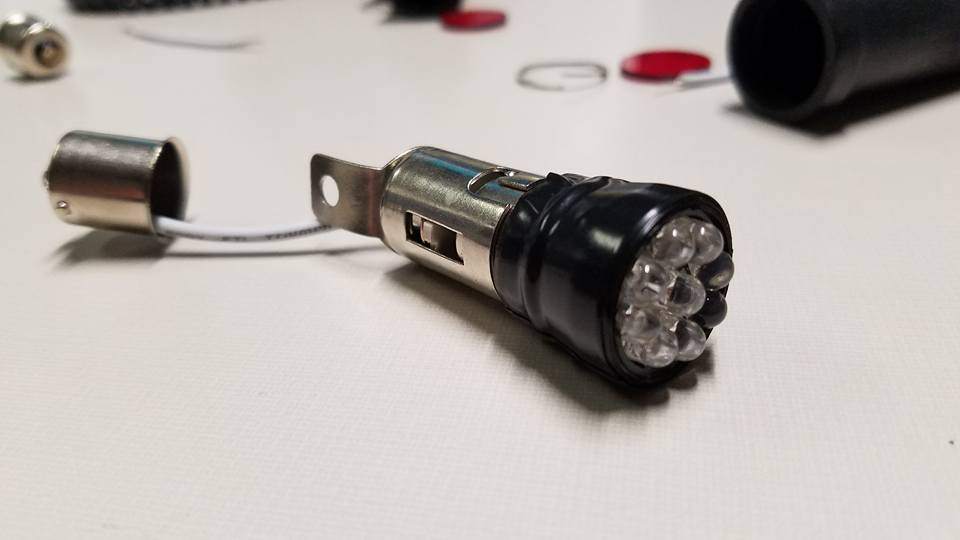
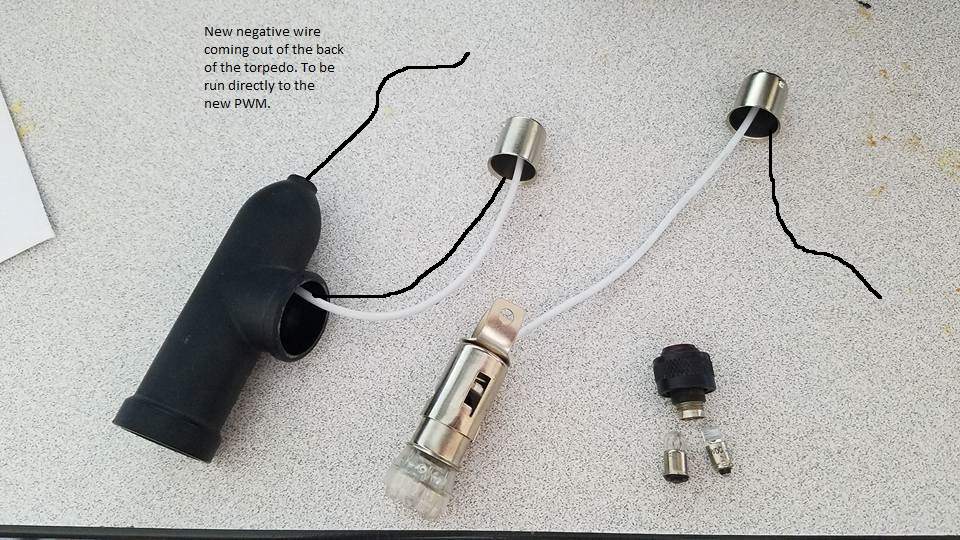
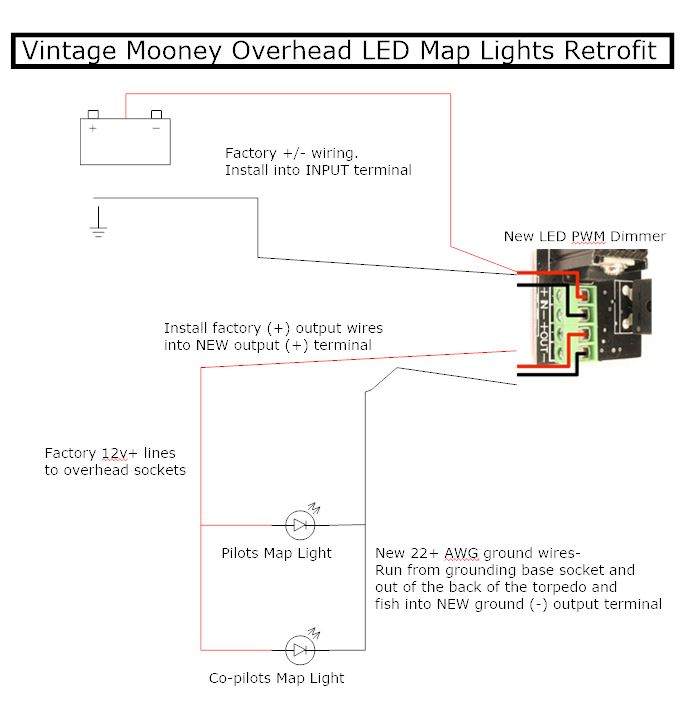
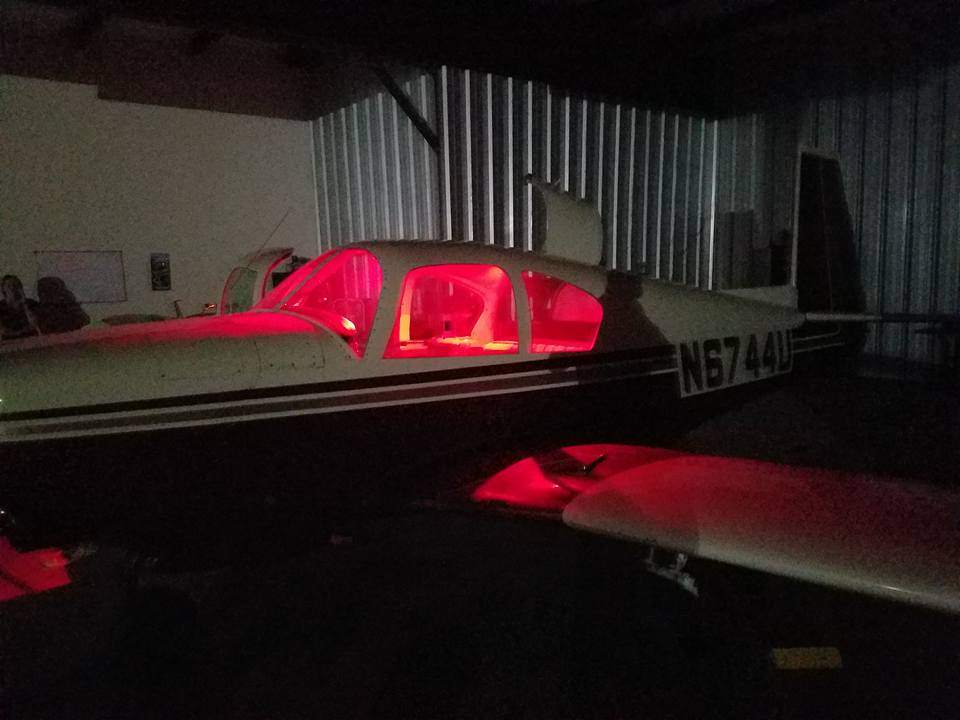
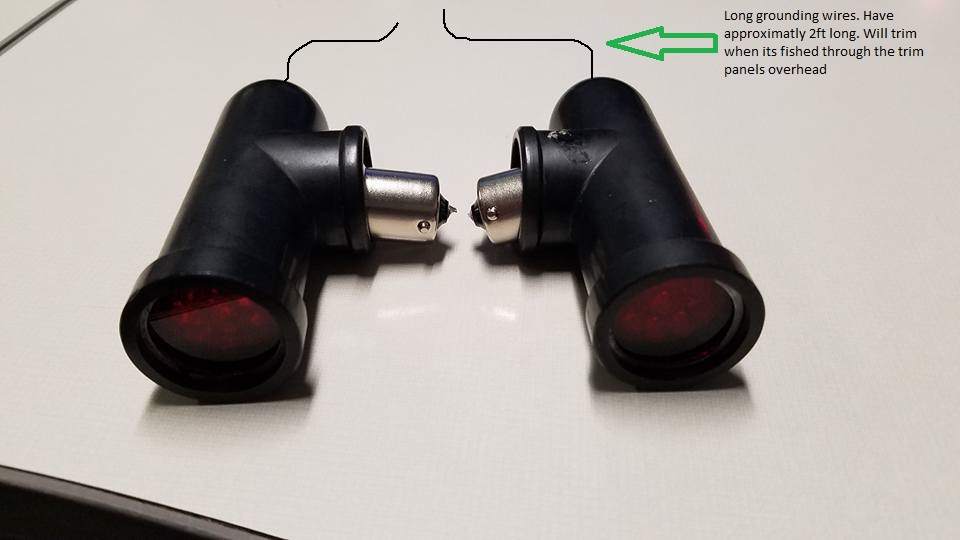
I did this a while ago but seem to be getting a lot of private messages on finding it, so I've consolidated the pictures and will be making a "how-to" in its own thread which can be searched. This is a purely informational post about the possibilities of LEDs and is tested on a grounded aircraft and is no way airworthy pending your IA, local FAA DAR, or 337 modification. This requires rewiring and removal of the old overhead rheostat that controls the lights. Approx time to complete: 2-4 hours. |Approx cost: $50 Parts needed: (I ordered my parts from SuperBrightLEDs.com, but some of these have since gone out of stock. You will need to source them elsewhere) Note: The wiring layout in these pictures is incorrect when I took them. I later rewired them. I have edited the photos that needed new wiring since taking them. Refer to the final wiring diagram at the bottom of this post. 2x BA15S Empty Bases (BA15S-EB) 2x BA15 1156 wired sockets (BA15S-SW) 2x BA15/1156 LEDs (67-R15) LED PWM Dimmer (Oznium makes a great product that is small enough to fit where the old one goes) Soldering Iron Solder Electrical tape Knife or another pointed object Wire strippers/dikes Thin (20+AWG) wiring approx 2 feet 1.)Pop the existing torpedo's off the stock lamps by gently pulling them off. Twist and remove the 1156 bulb. 2.) Using a knife, gently pry up one end of the retaining clip holding on the red lens. Remove the red lens. 3.) Turn the focusing ring counterclockwise until it stops. Using a pair of pliers, grip the twist knob and continue to turn counterclockwise. You will feel resistance, you will be ripping apart the solder holding it to the clip inside. *THIS WILL RESULT IN PERMANENT DESTRUCTION OF THE OEM FOCUSING LENS*. Once it is broken off, tap the insides out. 4.) Now that everything is disassembled, clean everything good. You'll have 50 years of crap over everything. 5.) Using the electrical tape, wrap it around the 1156 bulb about 8-10 times. Keep test fitting in the housing, it should slide back into the torpedo and fit snugly. 6.) Bend the two tabs of the wired sockets back about 85 degrees. You want a little bit of flare in them as they will press against the inside of the case to hold the fixture in place. 7.)Solder the positive 12v+ lead into the center electrode. Add some solder to the inside of the empty base and attach your 22AWG wire to that. Leave about 2 feet of dangling wire as we will need to fish through the overhead panel. Insert the soldered base into the torpedo, fishing it out through the side hole. Run the (-) wire out of the back of the torpedo. Slide the rest of the LED into the unit, and reinstall red lens and clip. Put the units back together and they should look something like this. I recommend having another 4-5 inches between the torpedo and the base socket. These were ultimately too short as you have to twist-lock the bases with the torpedo out of the way before you slide the torpedo back onto its mount Now for the hard part. (Again, please have an A&P handy for this if you are not versed in 12v applications. Of course, this is not a legal modification for flying aircraft and appropriate documentation and paperwork needs to be filed before flying). I don't have any pictures of this process but its simple once you see what I am talking about. You'll need to drop the overhead trim panel and find your old rheostat. Remove it but carefully identify which wires are which. You should have a positive and negative ship input, and one positive output (the factory map lights are grounded at the sockets. We cannot have that- they need to be grounded at the PWM hence the new wire). Remove the old rheostat and install the new one. Run factory wires into the INPUT terminals of your PWM. Run the factory output (+) wire into the appropriate terminal. Fish your 2 foot long ground wire through the steel roll cage and all the trim pieces, and then trim it down and attach to the PWM. Flick on the master, and with the PWM in the OFF position, nothing should happen. If the LEDs come on full brightness, they are prematurely grounding somewhere else. Turn the rotary dial on. It has a duty cycle of 5-100% variable and the LEDs should correspond. If this works, you have completed it. Put everything back and enjoy. (In the following pictures, I also changed out the cargo compartment dome light with a simple 3156 LED that replaces the old bulb. This is full-brightness output and can be dimmed by 95%). Any questions, feel free to PM me. -Alex


-
 This right wing (green) Hoskins P/N 202144-2 nav/stobe unit including bulbs and Aeroflash 152-0007 power supply (top picture) was installed on my plane 3 years ago and working perfectly when removed to install LEDs a couple weeks ago. $160 + ship. If you want, I will throw in the much older left nav/strobe unit (red) and tail light for free (bottom pic). The strobe on the left was weak and working only intermittently - I don't know which component was defective but suspect it's the power supply. Use that one for spare parts if you like, including swapping the red lens to the other unit if needed, or just use the two extra working nav bulbs.

-

Shakedown cruise, let the troubleshooting begin...
KevinR posted a topic in Modern Mooney Discussion
Hi All, I just returned from my first business trip in N252DR, a 1986 252 Rocket. She had been parked for a while before I bought her but Jimmy Garrison & Don Maxwell provided an accurate assessment of her condition. Maxwell finished an extensive annual the last week of August & the flight home from Longview TX to Ocala FL was nearly trouble-free. Last week I made a 1700 mile trip to Columbus OH, Destin FL, then back to Ocala. A few (hopefully easily fixable) bugs appeared and I'd really appreciate a little crowd-sourced troubleshooting advice. Here's what I found: Panel lights, which were working, went inop. Instrument lights worked fine and so did my three flashlights that I rechecked en route when I realized the panel lights wouldn't come on. EDM-700 tach wildly erratic. Ship's tach worked fine. No sign of actual RPM fluctuation. Ship's CHT gauge wildly erratic. EDM-700 CHT steady on all 6 cylinders. Occasional weak & unreadable on comm 1, a G530W. Switched to comm 2, an old King 165, and was loud & clear. KAP 150 autopilot preferred to stay 100' below selected altitude and about 10 degrees right of selected heading. En route GPS nav would often try to fly 10+ degrees difference between DTK and TRK. HSI was spot on during GPS approaches. I do have a digital copy of the 252 maintenance manual, parts catalog, & POH which I am happy to share with anyone if they need it to help me troubleshoot these problems :-) Any advice is much appreciated- I've been out of the aviation world for a while and am thankful to find this great community on Mooneyspace. Thanks!! P.S. does anyone have an electric tow bar for sale? -
 Guys! Need your help again with some issues on my 1989 M20J MSE. Few months ago I had a major electrical failure (you can read here), and now, after lots of avionics repair, we're getting things as they were before, little by little. But still got some annoying troubles: - We had our R1 Eletronics International Tach replaced by a new one, but now we have approx. 30-60 RPM error, for example, at T/O, full power, full high RPM, the tach displays 2730-2740, and once the plane starts rolling, it may rise to 2760. We have no reasons to believe that the prop its really at more than 2700 since with the old R1 it never excedded it, and any adjustment was made at the governor, and we had checked rotational speed with a Tuning Fork (is this the right english term to reffer to it?) and it indicated 2700, full power, full rpm. We had not replaced the mag sensors, though, we are using the old ones. Do you think this could be the problem? - We replaced our Gauge Cluster, but sometimes, when you push PTT (both sides), the oil pressure indication drop till yellow arc. This happens on both radios (GNS430 and KX155), on transmitting modes. It seems to happen with frequencies higher than 130,00 MHz, but I'm not sure of this and if it has anything to do with it. - Our EGT/OAT (B & D P/N 0230-003, Mooney P/N 880001-509) is out of work: I know it gets energized, because it is noticeable when I pull the CB, but it just give wrong indications such as -30°C when the real OAT its like 30°C, and no rise in EGT at all while leaning. - Finally, the interior lights seem to be flashing at very high frequency, slower when the engine is at slower speeds, and higher, when the engine is at higher speeds. During flight its almost imperceptible, but during taxi its quite clear. Some general info: its a 28V system, SN 24-3139. We have replaced the Voltage Regulator and tested it several times in the plane (direct in the VR and with a multimeter through the cig lighter) and it seems pretty steady on the correct range. And at last, but not least, I am (as does the plane) in Brazil, so all of these nice avionics shops you guys indicates here at Mooneyspace are sadly unavailable for me! So, any help will be much appreciated!!! Tércio
 -
Hello! I have a strobe light kit for sale, comes with left and right wing lights and 2 power packs (PN12800). Im selling the package for $500. Excellent shape, minor wear, but that's all, strobe power packs are in mint shape (see pictures). Will fit every type of Mooney.


