

bcg
-
Posts
440 -
Joined
-
Last visited
-
Days Won
1
Content Type
Profiles
Forums
Blogs
Gallery
Downloads
Media Demo
Events
Everything posted by bcg
-
I've got a C at Kerville that I'd be willing to give you a ride in. I had 20 hours when I bought it. Finished my PPL training and did my check ride in it. They're not hard to fly and really aren't much more to manage than a Cherokee. Sent from my Pixel 6a using Tapatalk
-
It's not uncommon to see a different reading from different parts of the wiring. Voltage drop across the wire, the EDM should be grounded directly to the engine vs the AV20 likely being grounded to a convenient spot on the airframe, etc. I wouldn't worry about it, the EDM is the one you should trust. Sent from my Pixel 6a using Tapatalk
-
https://www.amazon.com/DIYChemicals-Methyl-Ethyl-Ketone-Gallon/dp/B096SVGMN9
-
https://www.laballey.com/products/varsol-solvent If you're actually in Kerrville, David has a 55 gallon drum of Varsol at Dugosh.
-
PILOTS SIDE AIR INTAKE MYSTERY OUTLETS ?
bcg replied to DCarlton's topic in Vintage Mooneys (pre-J models)
That's exactly how it is in my 63 C, open scat tube secured behind the radio rack for cooling. Sent from my Pixel 6a using Tapatalk -
Mine are in an access panel in my left wing. They both read the same and both are a few degrees cooler than the analog gauge in my windshield that gets full sun. Sent from my Pixel 6a using Tapatalk
-
Solar eclipse 8 Apr 2024 totality spots in Texas
bcg replied to Will.iam's topic in Texas Mooney Flyers
There's usually lots of transient parking but, they're closing down 03-21 to park planes on for this so I don't know what might be available. It's supposed to be overcast with a 50% chance of rain on Monday so it may be completely empty. You could try T82 also, it's only 30 minutes from KERV by car. 49R is a small, public use private airport that's in the totality zone, they don't have any services but, Leakey is a nice little town. KUVA would be another possibility. Sent from my Pixel 6a using Tapatalk -
Exhaust repair shops, post Hartzell?
bcg replied to Immelman's topic in Vintage Mooneys (pre-J models)
I don't know that there are really any options other than AWI now. They told us we had to send them everything so they could inspect it all, I'm not sure if they'll let you send just the muffler if you push back on that. I had to send the shroud and we needed the EGT probe hole welded anyway, so it wasn't really a big deal to me. This was an expensive annual but, its over with now and the plane flies great. It's only money, I can make more...I hope. -
Exhaust repair shops, post Hartzell?
bcg replied to Immelman's topic in Vintage Mooneys (pre-J models)
It was everything. Muffler, the shroud, down pipes, the whole shebang. The shroud has a hole in it and they had to do some work on the pipes as well, I can't remember what all. I was adding a JPI also so, we had them weld up the old EGT probe hole while they had it. -
Exhaust repair shops, post Hartzell?
bcg replied to Immelman's topic in Vintage Mooneys (pre-J models)
AWI did my exhaust in September when I did my annual. Flame cones were gone, it ended up being $2700 for everything, including shipping, and took right at 3 weeks. I only had an IRAN done but essentially got back an overhauled exhaust because it needed almost everything. Sent from my Pixel 6a using Tapatalk -
Dugosh is in Kerville and does very good work. I spent several months in their hangar when I was doing my avionics work and can say that David knows his stuff and is very thorough. Sent from my Pixel 6a using Tapatalk
-
When I still lived in Houston, I dropped someone off to catch that bus once. They just picked you up in a parking lot downtown, no terminal or anything. That was probably 10 years ago though, it may have changed since then.
-
I do San Antonio, well Kerrville actually, to Dallas pretty regularly. Typically burn 28 gallons round trip but, it turns what would be 13 hours of driving into less than 4 hours of flying. I'm pretty sure I spend less flying than it would cost to make the drive.
-
I bet just about any printer or sign shop would be able to either print on the acrylic or put vinyl decals on it. Another alternative would be to mask the entire visor, laser etc the image/text through the masking and then spray paint it. I have a laser that could probably do that, it's hit and miss with acrylic because it's a blue LED laser that passes through clear acrylic but, I think it would work fine on the smoked acrylic used for visors.
-
That's crazy, mine have been like $150. I've had 3 in the last 18 months. Sent from my Pixel 6a using Tapatalk
-
Here's the BOM, not including the steel to build the tow bar. Motor Motor controller Wheel Type 25 chain sprocket - You'll have to drill detents in the motor driveshaft to keep it in place. Chain Milwaukee battery adapter I used the 1/4" pin from my original towbar on this one and had some Duestsch connectors on hand for other stuff so used a 2-pin connector for the motor connection. The motor mount was made out of some 1/8" x 6" flat bar and I drilled and slotted the holes in that for the adjustment. The rest of it is pretty straightforward. If someone wants me to build them one, or just the tow bar part, send me a message and we'll figure something out. I may try one with the wheelchair motor @Skyland used in his, going direct drive would clean this up a little and reduce some weight.
-
Success! I had to brace the wheel mounting bracket, it was deflecting enough to put too much slack in the chain. I also had to reduce the angle of the bend in the top section to clear the spinner and get the towbar in. It works pretty well, I still have to put the boards in between the hangar door tracks or it gets stuck between track 2 and the concrete lip, with those in place this is pretty effortless. Once split, it gets really compact so it'll be easy to find a place for this in the plane. I'll put together a material list with Amazon links a little later. Sent from my Pixel 6a using Tapatalk
-
You went big, that's awesome. I've mentioned before that I bought a C with 20 hours in my logbook, finished private in it and went straight into instrument. 18 months later and I've got almost 300 hours in that C and several 1,000+ mile XCs, including a trip to OSH. It's been a fantastic first plane for me and it was a lot less expensive than a traditional trainer. Mine was flying about 100 hours a year with the previous owner, I still ended up having to do the starter, battery, generator to alternator conversion (generator failed), an ignition switch (which wasn't a big deal except that it's $800 for the part), overhaul the exhaust and I had a stuck valve that bent a push rod and required a cylinder replacement. All of that added up to about $10,000 in parts and I did most of the work myself, under supervision. I also did some avionics work, first replacing a failed KLN90B GPS with a Garmin GPS 175 and then redoing the panel completely at annual, which was another $23,000 or so in parts, again with me doing most of the work under supervision. The avionics at annual was just supposed to be adding an EDM930 but, I got caught up in scope creep and it kind of got away from me. I'm really happy with the outcome though, it's been a joy to fly behind the new panel. I also had an IRAN done on the prop at annual time, mostly because it needed to be repainted and the shops doing the eddy current inspection were starting to complain about it not being airworthy because of the lack of paint. Anyway, like you, I say if you want the plane and can afford it, get it. Just be realistic about planning for first year expenses, mine was well cared for but, it's still a 60 year old airplane with 6600 TTAF and 1800 SMOH, stuff is going to break and none of mine was predictable or preventable, other than the bent rod. I didn't recognize that the morning sickness I was experiencing was probably a stuck valve and didn't get on that as quickly as I should have, I'd like to think that with the knowledge I've gained and the logs from the EDM I would catch that early enough to just ream the valve guides instead of bending a push rod and having to replace the cylinder if it happened again. If I didn't have such a great shop on my field that was willing to let me work under supervision, my expenses would probably have been 2-3x what they were with labor added. I'm not going to count the value of my time in the costs because honestly, I don't want an accurate total...lol
-
Edit - battery adapter showed up today, adding a pic of that. V3 The biggest issues with the last version were that the drive wheel was outside the center of the nose wheel where it wanted to pull the tow bar out when you started putting tension on it and trying to turn. The other problem was that to get enough pressure to have good contact, you'd end up so low you couldn't see where you were going. To solve that, I built a new tow bar from scratch that has the part that goes into the nose gear offset so I could move the drive wheel over and I put a bend in the top part. I still made this a 2 piece tow bar so it can be broken down for easy storage in the plane. I think I'm going to put a quick connect on the motor cable so that the 2 parts can completely separate. Milwaukee battery adapter is supposed to be here tomorrow, I'm going to wait on that to finish this and test it out. I expect this one to work the way I'd hoped the last one would and only take up a little more space. Sent from my Pixel 6a using Tapatalk
-
Let me get the rest of the kinks worked out first and then I'll share what I did and used.
-
It worked, got the plane in and out but, not well enough that I'd have been happy if I paid for it. Using an already made tow bar won't let me put the drive tire where I really need it to be for this to work really well so I'm going to build one from scratch exactly how it needs to be. It was nice to not be worn out and winded after getting the plane in the hangar though, especially since it was raining off and on and everything was wet. And, I got a couple of approaches and a hold done today in actual with 700' ceilings so that was nice. Sent from my Pixel 6a using Tapatalk
-
Let the games begin - MAJOR Avionics Upgrade.
bcg replied to Pinecone's topic in Avionics/Panel Discussion
I'm sure they have a way of doing the labels already. When I did mine though, I powder coated the panel with a layer of white, partially baked it, coated it again with black, fully baked it and then used the laser to burn the black off and reveal the white for my labels. It came out really clean and was, for me anyway, a lot faster than trying to color fill them. I also did it as 2 pieces, the tan comes out separate from the black so I can remove and replace the panel without having to remove the yokes or pull the TPM cables from the engine. Look forward to seeing your finished panel, I wish I could have done something more like what you're doing. Mine was a huge upgrade for me though and I'd like to replace the C with a 252 or Bravo in the future so I just couldn't justify the cost.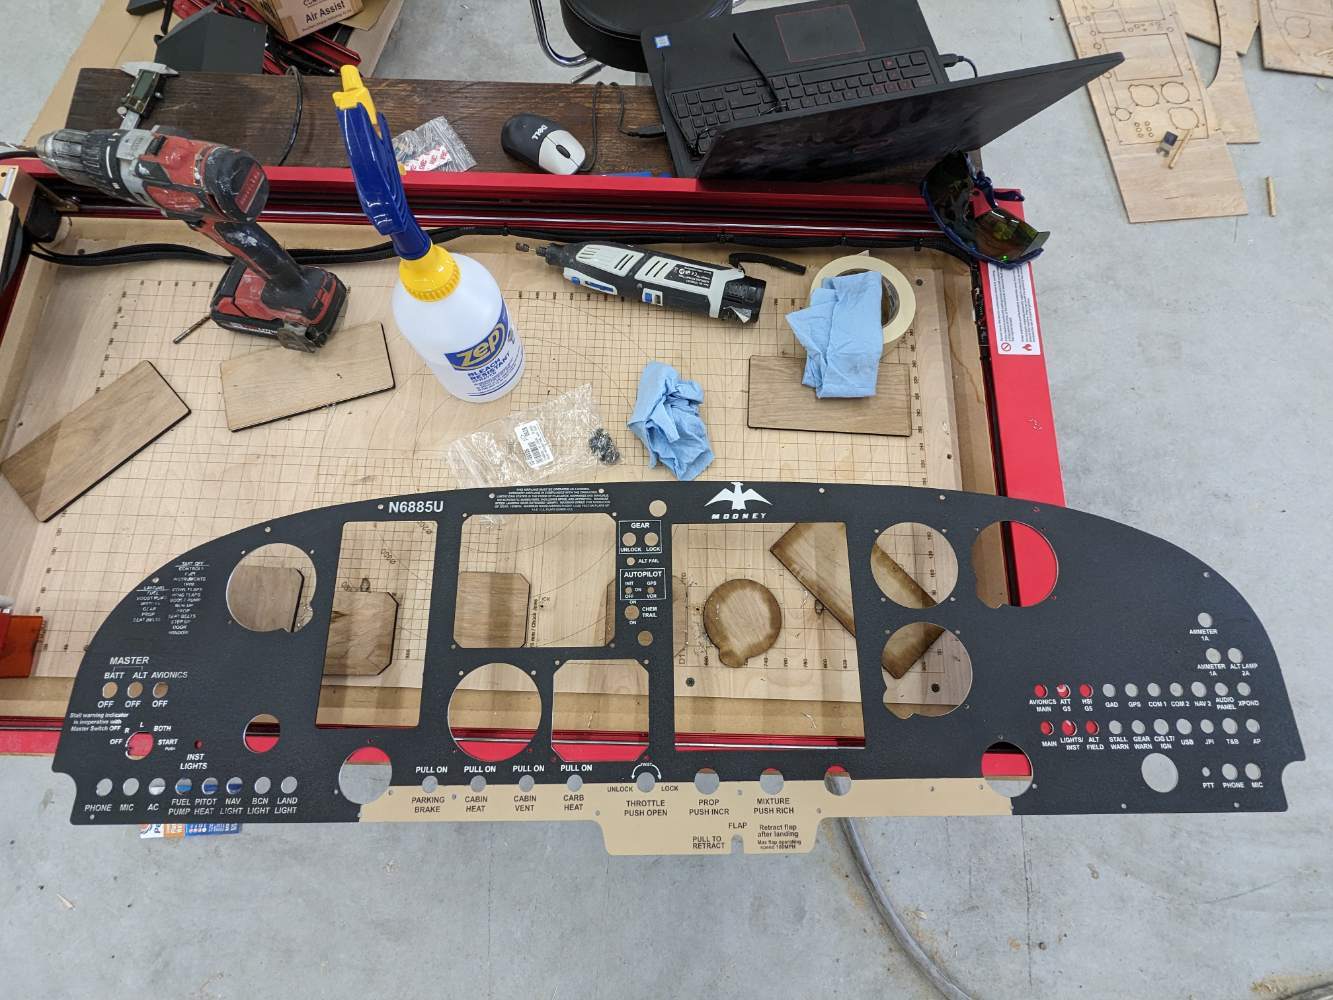
-
V 2, minus the Milwaukee battery adapter that won't be here until Sat. /// Side rant, Amazon Prime sure has gotten slow lately, it's ridiculous. /// Assuming this works the way I expect, I'll pull the motor and tire off, strip the rest of the paint and powder coat it so it'll be pretty. Sent from my Pixel 6a using Tapatalk
-
Now that I have the wheel location nailed down, I should be able to safely mount the motor more permanently. I took a piece of 2" x 6" 1/8 plate and put a couple of slotted holes in it to allow adjustment of the motor to take the chain on it off and tighten it. Welded that to the tow bar and I'll bolt the motor onto it. Welding it on put a couple of bumps inside the tube so the smaller piece won't slide down anymore, which kind of sucks but, I'll be able to just pull it out and have 2 small pieces which will make this easier to keep in the plane so I can take it with me. I'm liking how this is coming together now, I think it's going to be really functional and as lightweight/portable as something like this can be. Sent from my Pixel 6a using Tapatalk
-
I think I'm going to move the wheel forward another 3/4" and it'll be good. It kind of rides on the side/top of the nose wheel but, that gives more surface area for contact so it should work well. Now that I know where the tire needs to go, I can put all the other stuff back on. Sent from my Pixel 6a using Tapatalk

