MinneMooney
-
Posts
167 -
Joined
-
Last visited
-
Days Won
1
Content Type
Profiles
Forums
Blogs
Gallery
Downloads
Media Demo
Events
Everything posted by MinneMooney
-
I replaced all 4 side windows on my ‘65C during my annual last November. It was not difficult, however, it was helpful to have multiple people help during the install. On my plane, there were no clips(other than the tabs used to secure the interior panels). We had to drill holes for all the screws. I bought a 3/16” and a 1/4” acrylic bit from Aircraft Spruce and would highly recommend them. We used Chemseal CS3204 B2 in 3.5 oz tubes. I ordered 5 and my A&P only used 3. It was my A&P’s idea to use clecos to hold them in place while the sealant cured. It worked great. Also, don’t skimp on the masking tape and buy a bunch of the plastic razor blades and a couple holders to make the cleanup a snap.


-

Anybody have a source for Placards
MinneMooney replied to apriav's topic in Vintage Mooneys (pre-J models)
I ordered this: https://www.amazon.com/gp/product/B000S15KDS/ref=ppx_yo_dt_b_asin_title_o04_s00?ie=UTF8&psc=1 and printed my own. -
Long ago, I used to work with methyl cellulose at a chemical distributor. We blended methylene chloride based paint strippers. Methyl cellulose was used to thicken it, however, it had to be added in the correct sequence. Methanol was the final add to the mix and it quickly caused the entire mixture to dramatically thicken. I don’t believe that you could successfully add methyl cellulose to this stripper and have it gel. I think it would either 1. do nothing or 2. form many gelatinous clumps. Also, methyl cellulose seems expensive (sold by the pound) however, it’s a very low density powder. A 10 pound bag was quite large.
-
Ok, what airplane WOULD you trade your Mooney for?
MinneMooney replied to 201er's topic in General Mooney Talk
P51D, as long as it’s an even trade! -
Just bought my first plane 66 m20c
MinneMooney replied to Jackhammond21's topic in General Mooney Talk
Welcome aboard. I’ve owned my ‘65 M20C for just over 2 years. I’ve learned a tremendous amount of information by spending time on this blog. I haven’t had any questions that I haven’t been able to find the answers by searching here. -
I replaced both main tires last November. I went with Air Hawks as that’s what was already on the nose. I did choose to replace the tubes at the same time as I figured the current tubes were at least 15 years old. I chose to go with the butyl rubber low leak inner tubes. They cost almost as much as the tire, but thus far, I haven’t had to add any air to the mains, unlike my nose tire. That, to me, is worth the price.
-
That spinner looks like the 2 blade version of mine.

-
Welcome Bill. Possibly we’ll run into each other (figuratively speaking) once we can have pancake breakfasts, etc. again. I have a hangar at KANE. How long have you owned N7802V?
-
This fuel gauging tool came with my plane when I purchased it. After seeing others post about using paint stir sticks to try to gauge their tanks, I thought I should post information in case anyone wanted to make one of these for themselves. Mine is fabricated from aluminum sheet metal and painted black. As you can see, it’s angled so that it protrudes into the tank towards the wing root. Gauging markings are scribed on both sides and labeled right/left. I have checked it many times when refueling and have found it to be generally within a gallon. However, I have not drained the tanks and checked it while refilling. I have standard 52 gallon tanks. Feel free to ask any questions.


-
Uavionix Skybeacon And Tail Beacon install question
MinneMooney replied to nels's topic in Modern Mooney Discussion
I had a Tailbeacon installed on my ‘65C. Easy install and it’s been working just fine. I am having trouble lately with the app not working so I guess I need to contact Uavionix. -
Homemade Electric Powered Self Propelled Mooney Towbar
MinneMooney replied to MinneMooney's topic in General Mooney Talk
Someone just sent me a message asking about several items on Amazon working for this project. Somehow the message has disappeared. Please resend. -
Homemade Electric Powered Self Propelled Mooney Towbar
MinneMooney replied to MinneMooney's topic in General Mooney Talk
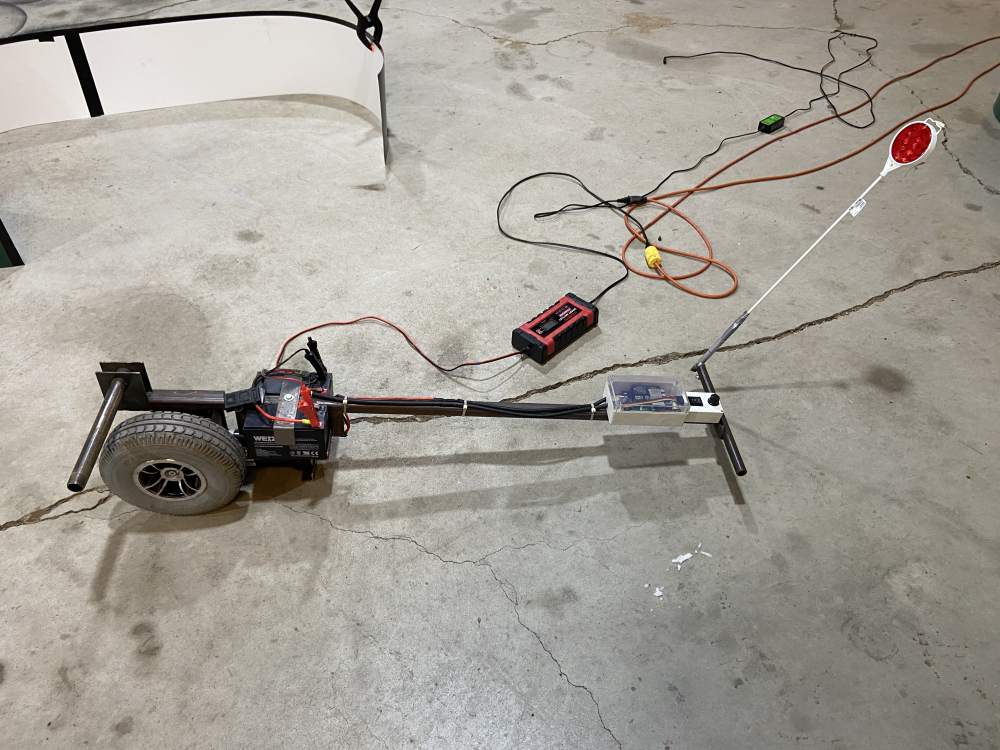
I just found that searching for “Jazzy motor” on eBay still brings up several sources for $32.50 with shipping. You would still need to adapt a wheel to fit unless you get one of the 14” wheels with the 5 bolt hub. Then my concern would be that it would travel 40% faster and have a lot less power at the same rpm. I would estimate my setup moves the plane (on level ground) about 5 mph at 100% on the speed control. That’s fast unless you’re traveling in a wide open area. I’m usually down around 40% when I’m pushing into the hangar and slowly decrease to 15-20% until it hit my wheel chock stop. -
Homemade Electric Powered Self Propelled Mooney Towbar
MinneMooney replied to MinneMooney's topic in General Mooney Talk
I have seen some drive units with wheels for sale in the past. That would have kept things simpler. -
Homemade Electric Powered Self Propelled Mooney Towbar
MinneMooney replied to MinneMooney's topic in General Mooney Talk
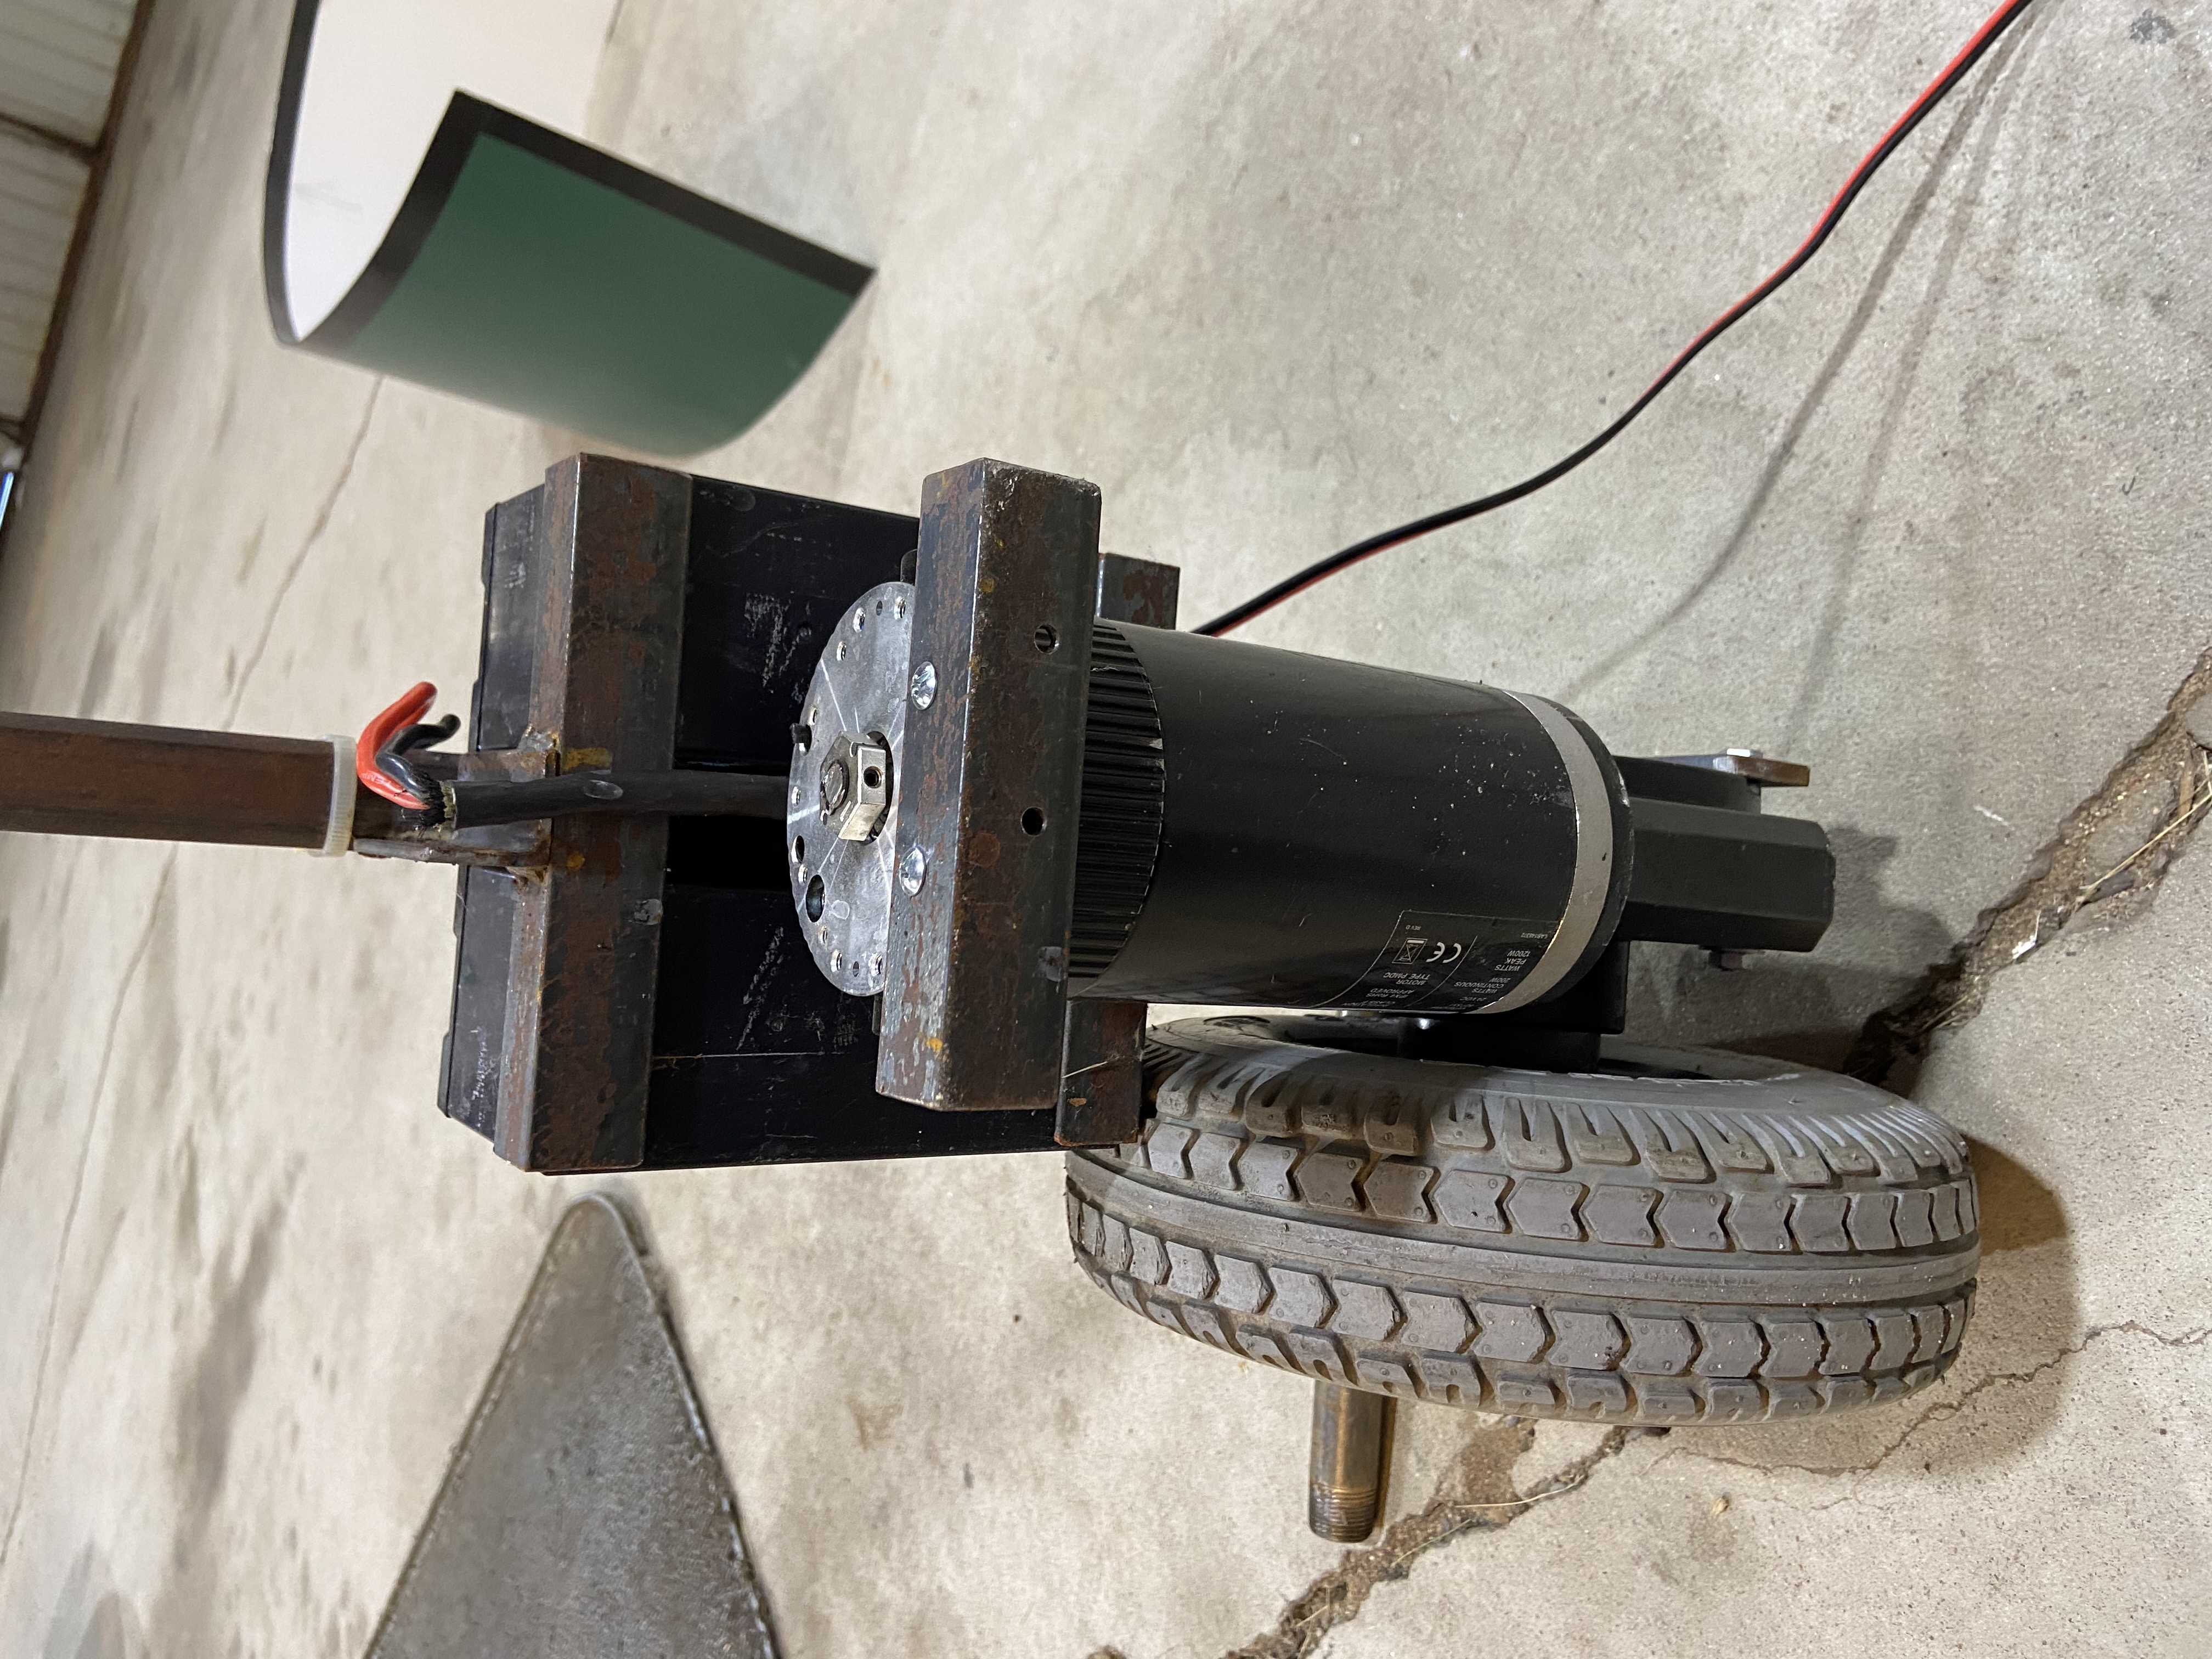
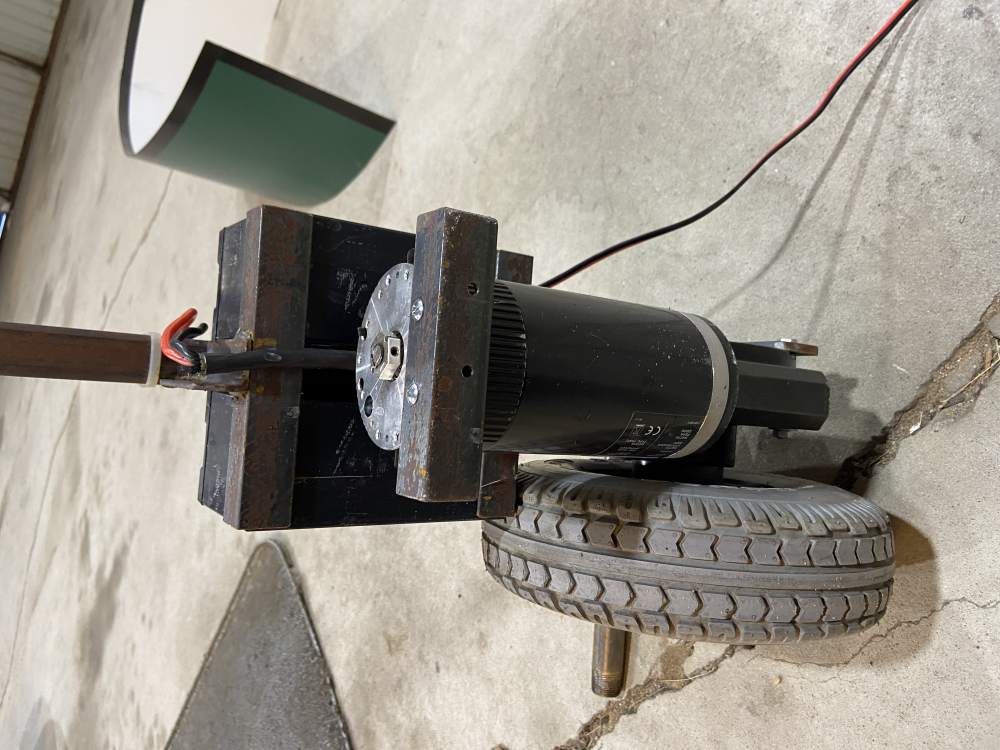
I modified the wheel I found by drilling it out to 1” to fit the shaft. I then cut a key way into the wheel using a file, which was not that hard given that the wheel is aluminum. -
Homemade Electric Powered Self Propelled Mooney Towbar
MinneMooney replied to MinneMooney's topic in General Mooney Talk
The key to this was that I was able to buy a drive motor/gearbox and a tire for $40 on eBay. I used to see them listed fairly often a year ago. Not so much lately. -
Homemade Electric Powered Self Propelled Mooney Towbar
MinneMooney replied to MinneMooney's topic in General Mooney Talk
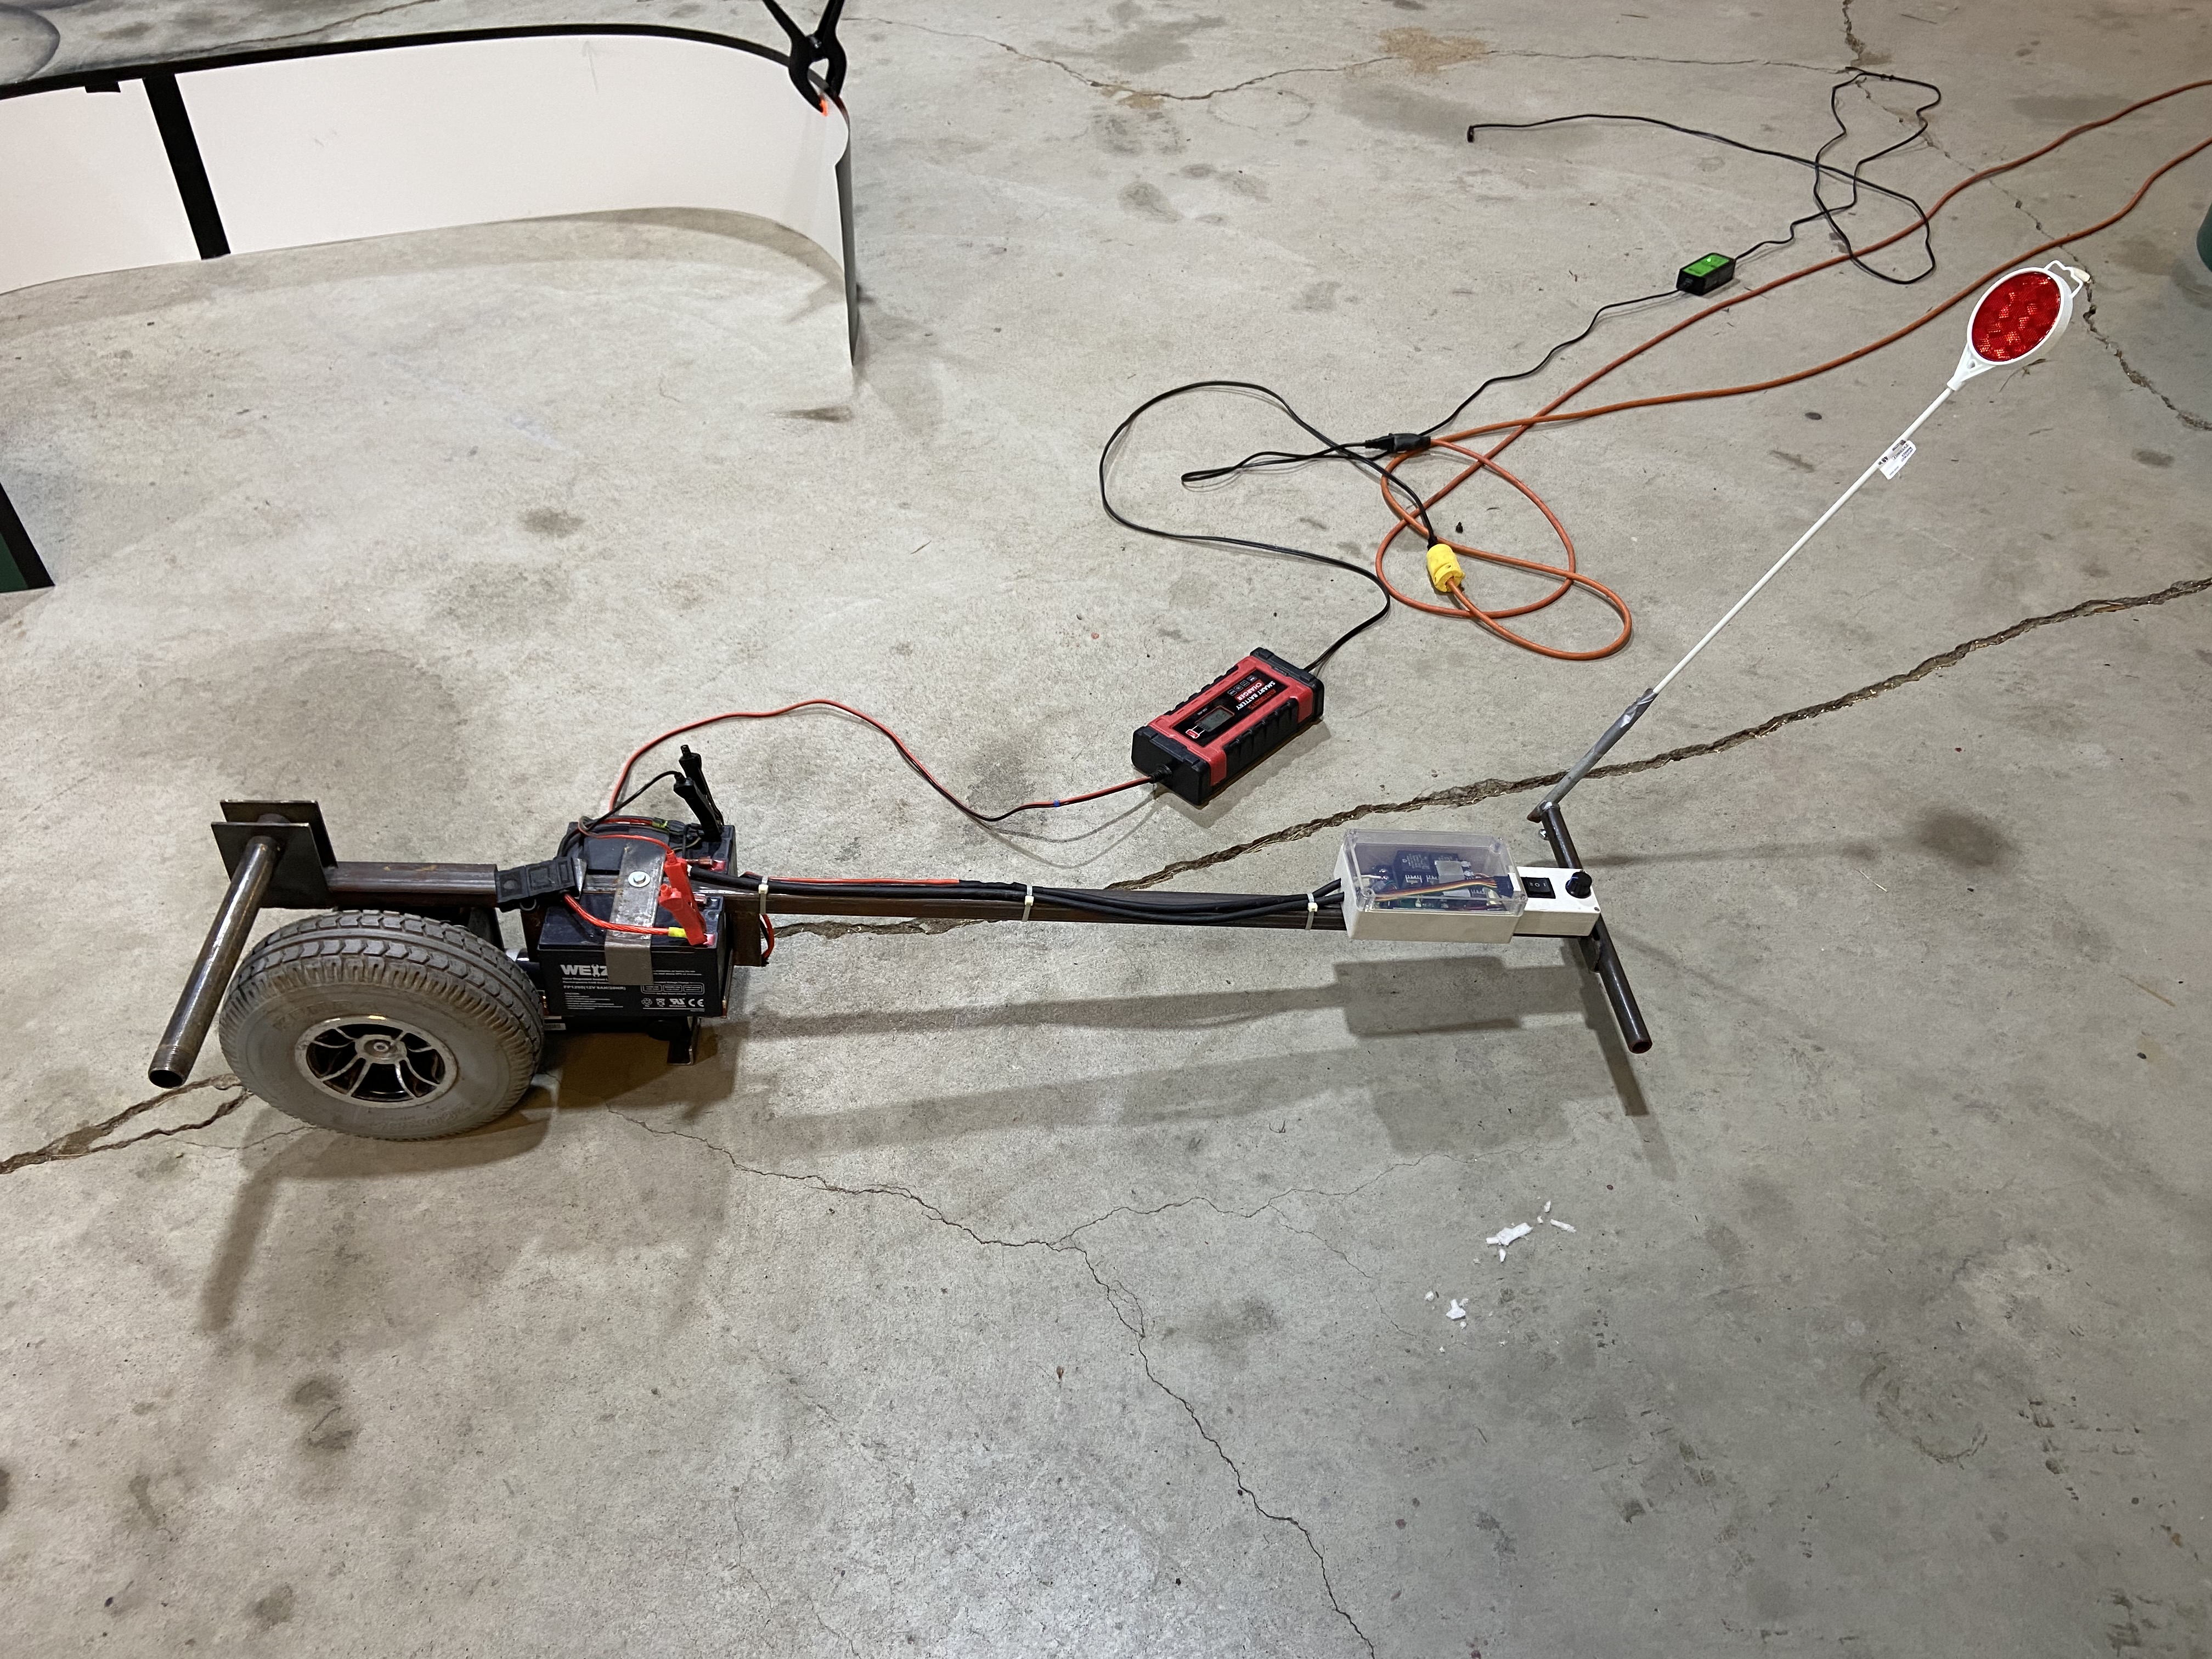
Also I was able to buy 2 batteries for about $30. Can’t beat it for the price. -
Homemade Electric Powered Self Propelled Mooney Towbar
MinneMooney replied to MinneMooney's topic in General Mooney Talk
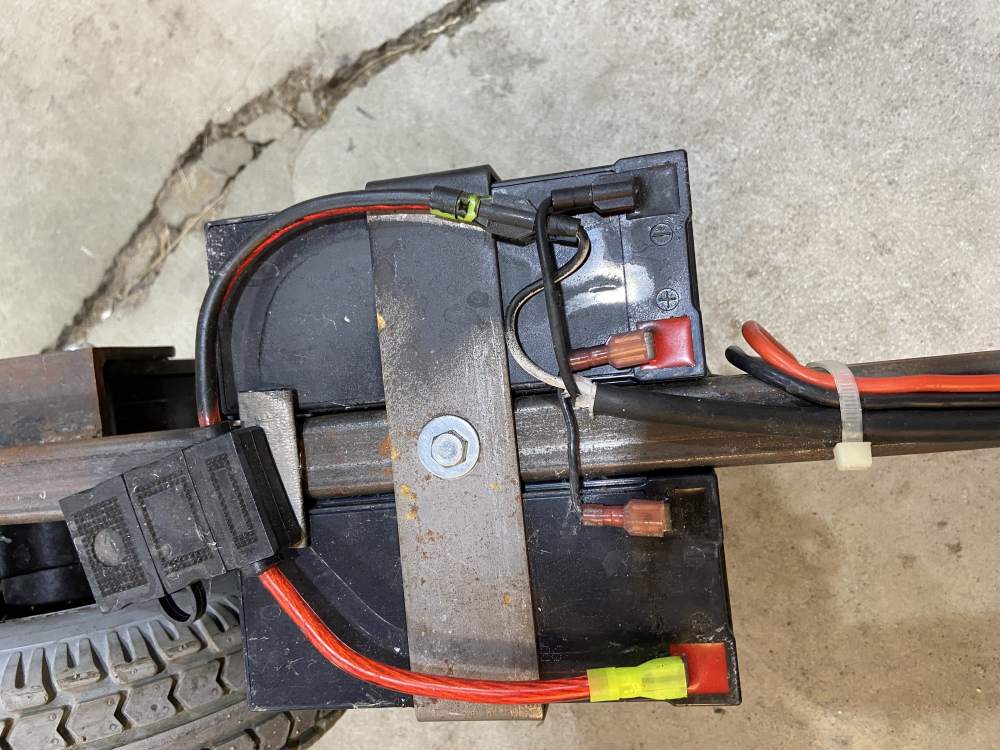
The batteries are wired in series. The motor is 24volt. I did try it at 12 volts just to see what it could do. It was really slow moving the plane and it had very little power. The difference @24volts is dramatic. -
Homemade Electric Powered Self Propelled Mooney Towbar
MinneMooney replied to MinneMooney's topic in General Mooney Talk
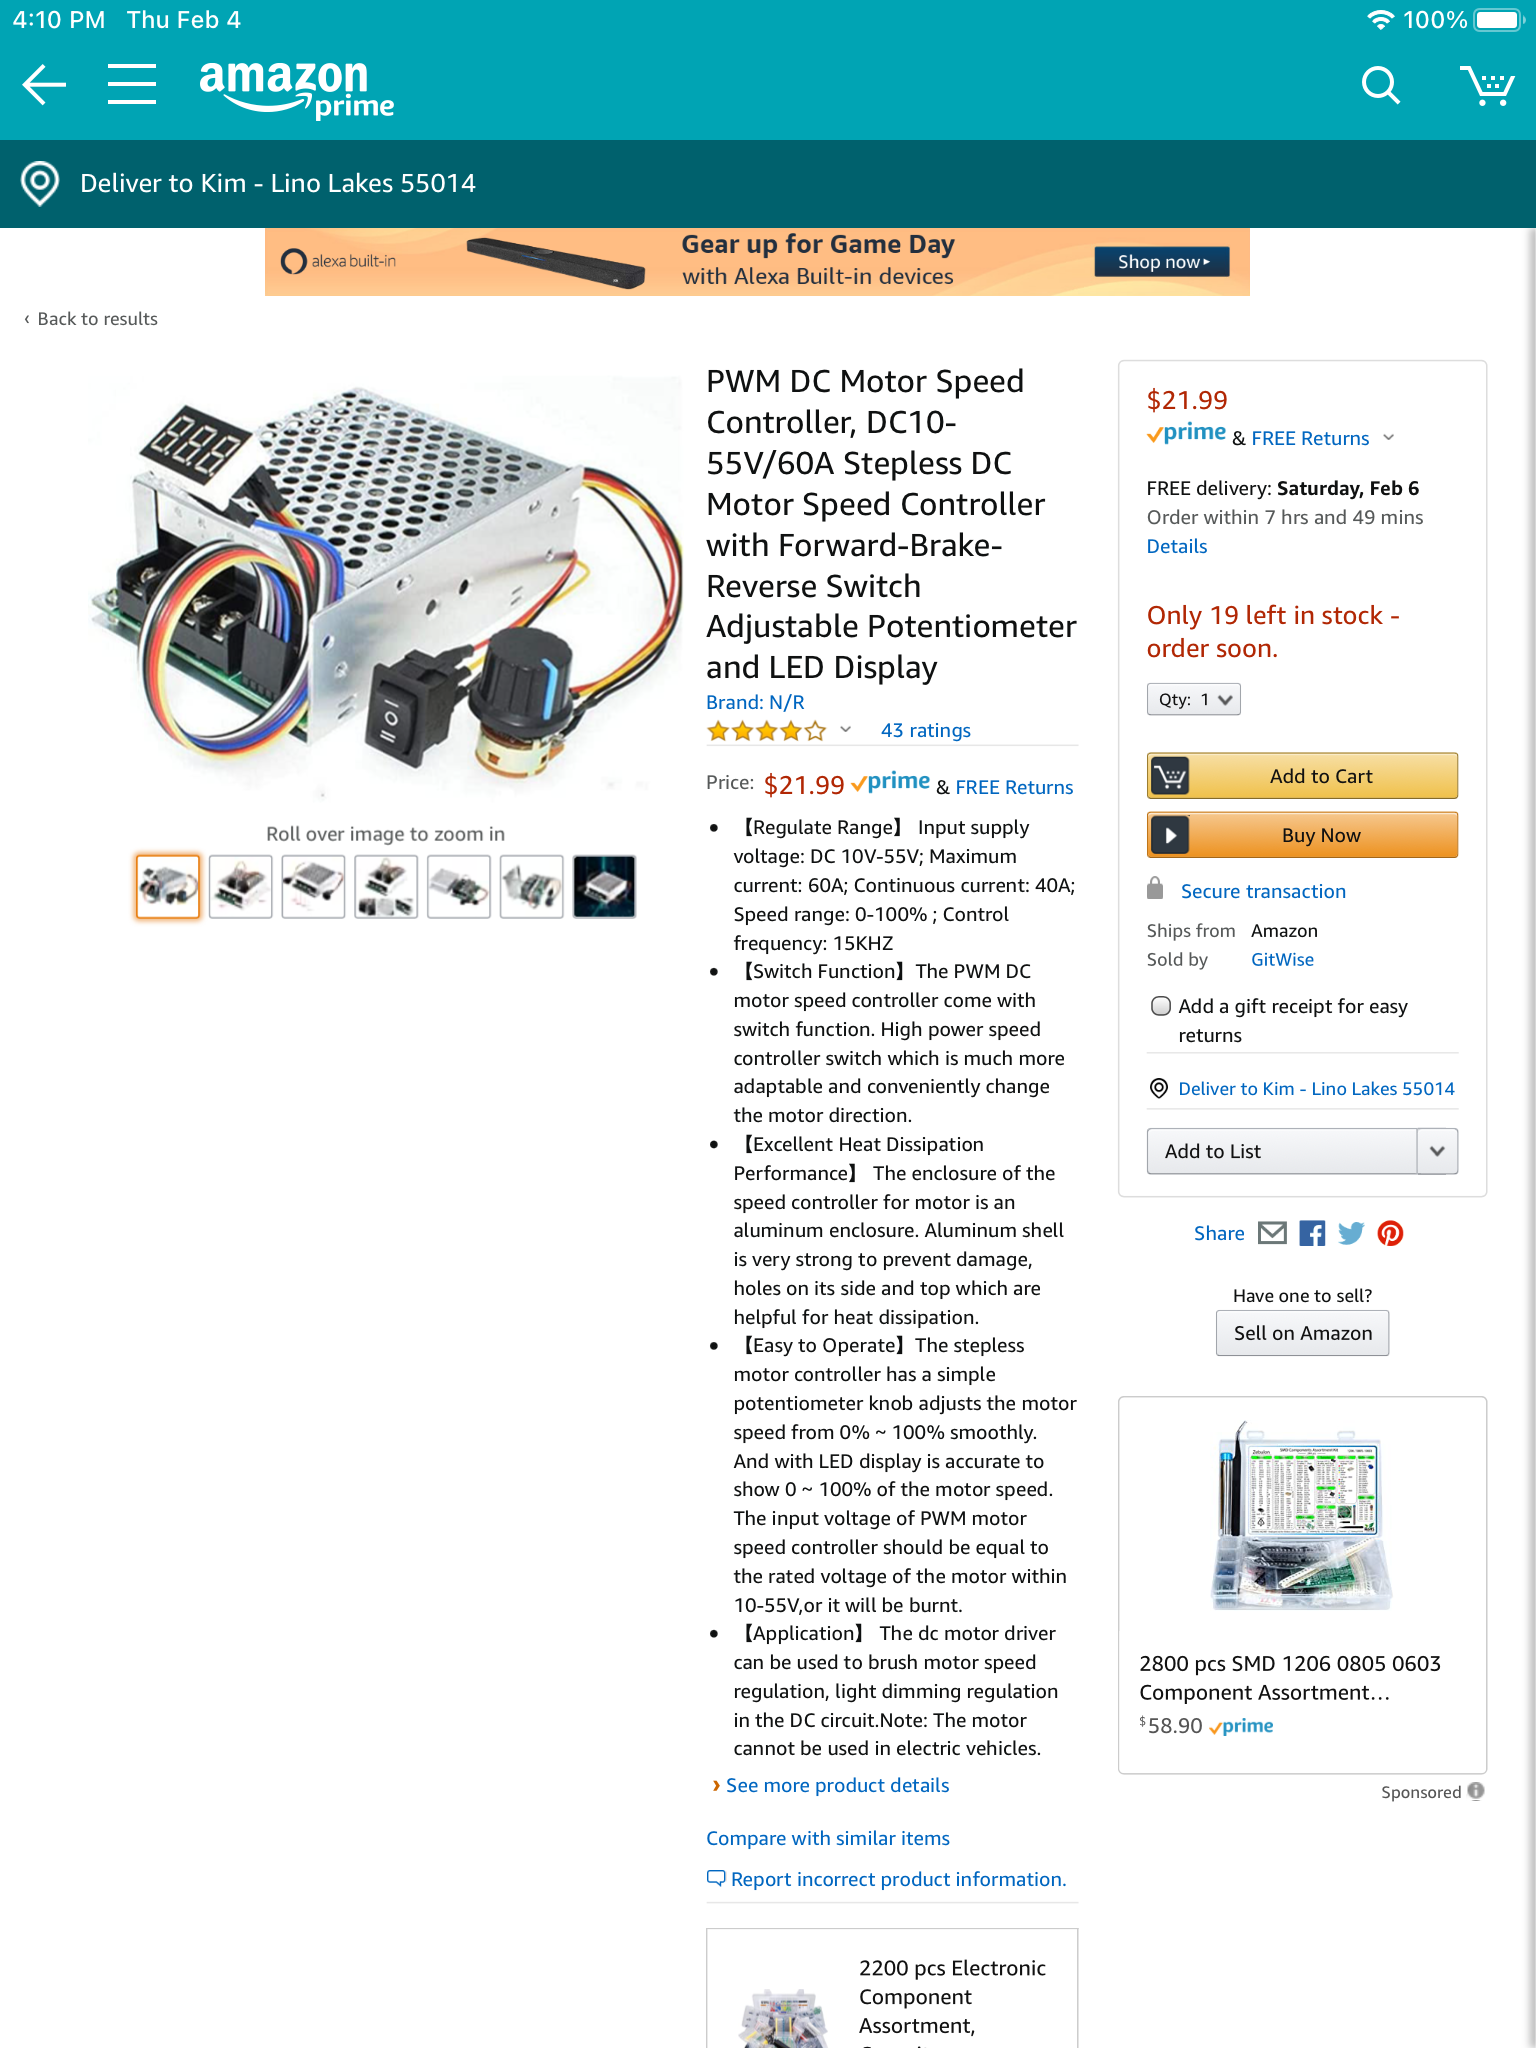
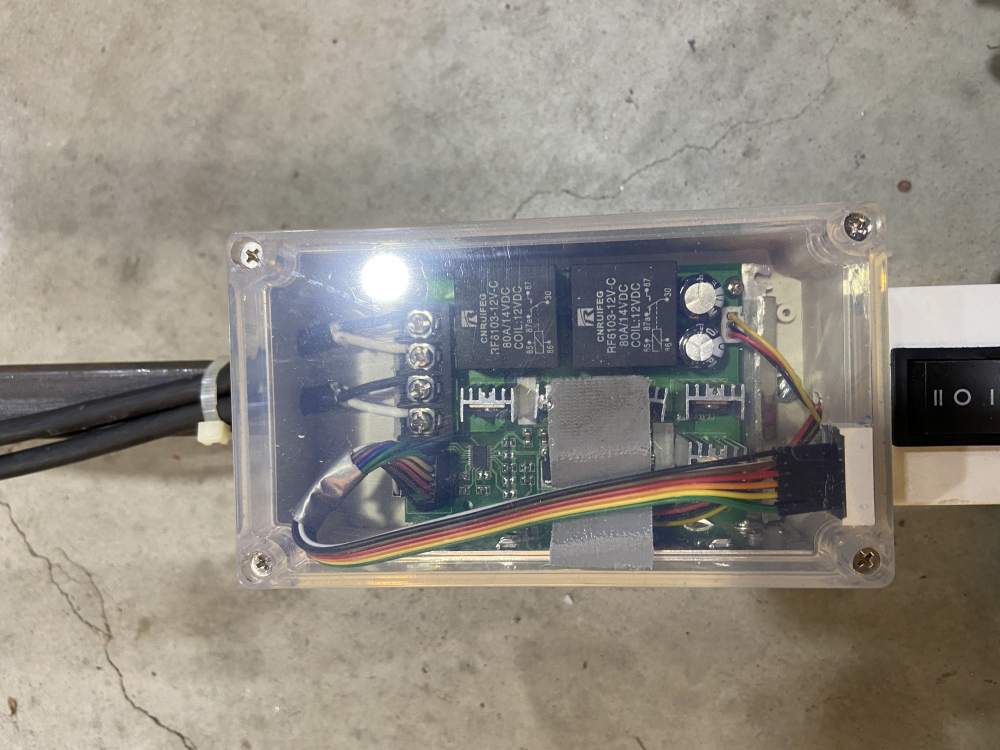
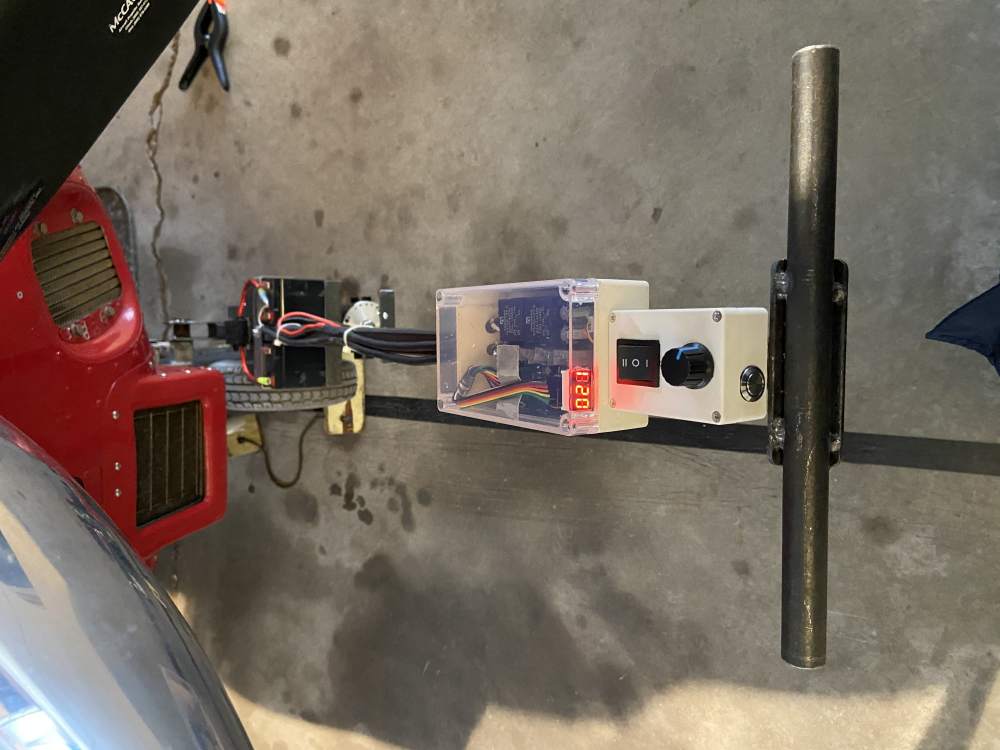
I think this is the control I bought. It comes with with a rocker switch to switch forward/reverse, a rotary on/off speed control, a digital display and it had contacts on it for me to add the momentary push button to switch a solid state relay on the power supply board. That way, all that power for the motor does not run through the switch. So, I could use a $5 5 amp rated switch and not a 60amp $$$ switch!
-
For those interested, I just started a new thread with my towbar fabrication.
-
Homemade Electric Powered Self Propelled Mooney Towbar
MinneMooney replied to MinneMooney's topic in General Mooney Talk
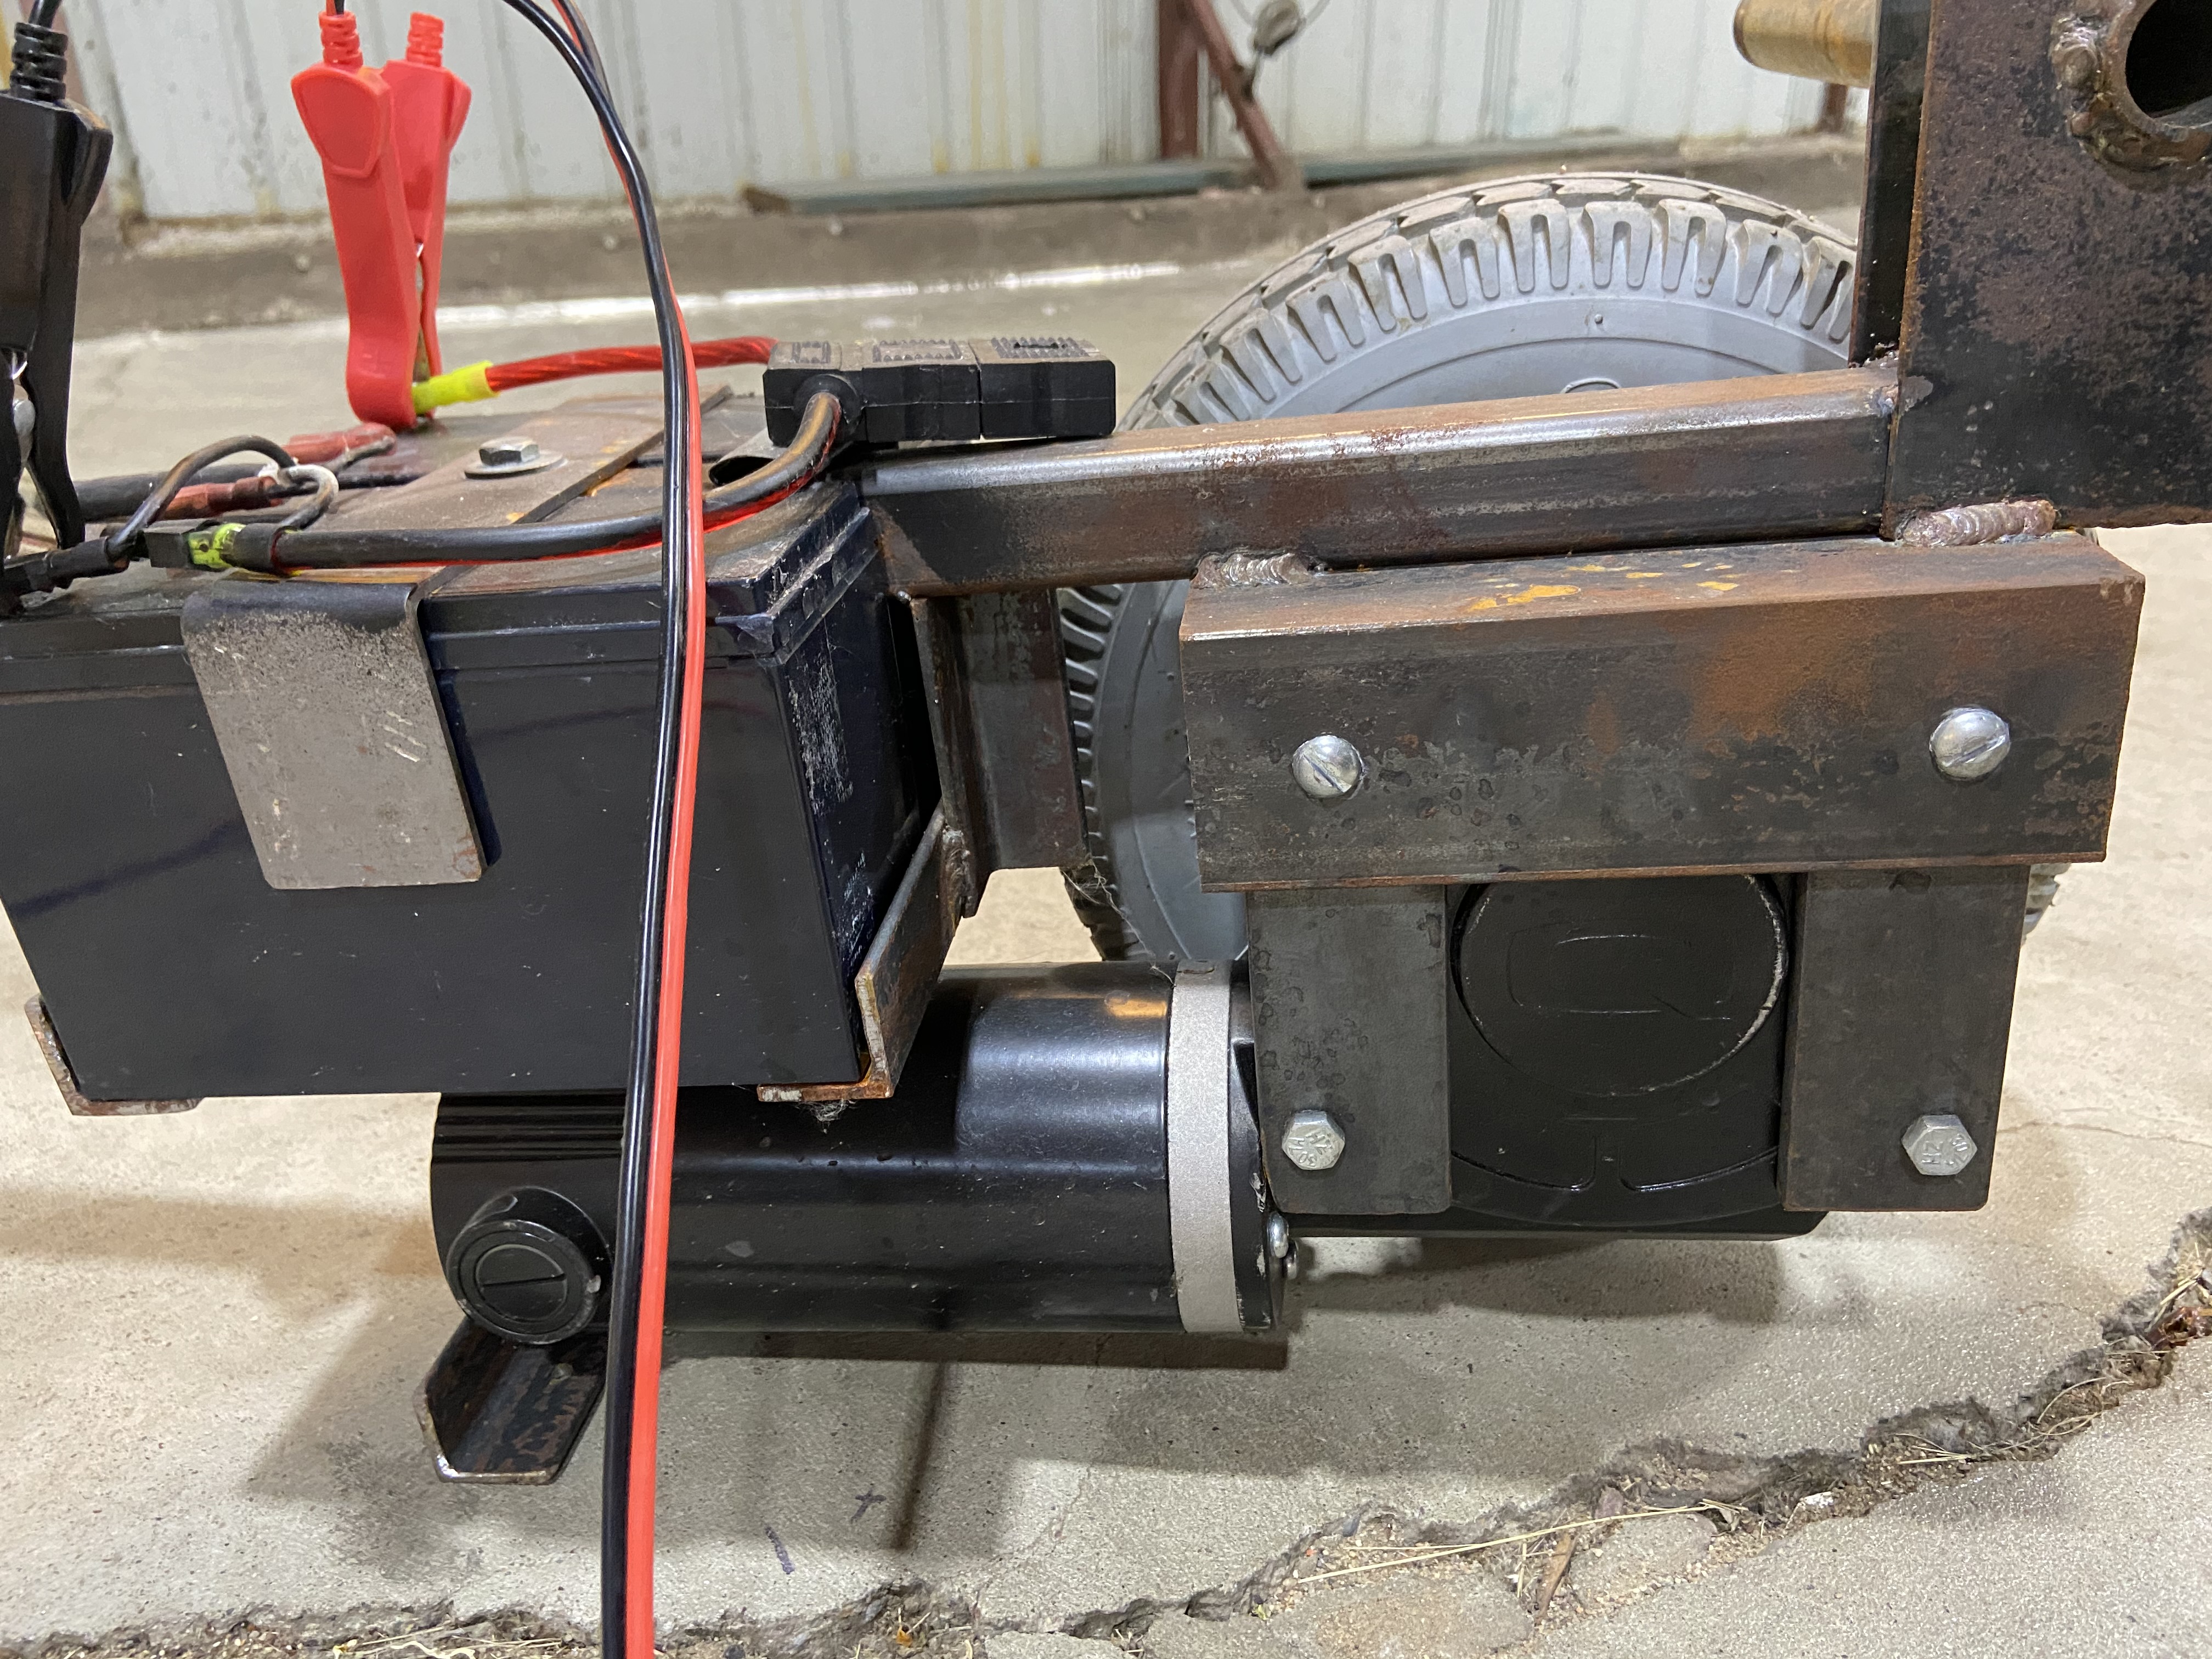
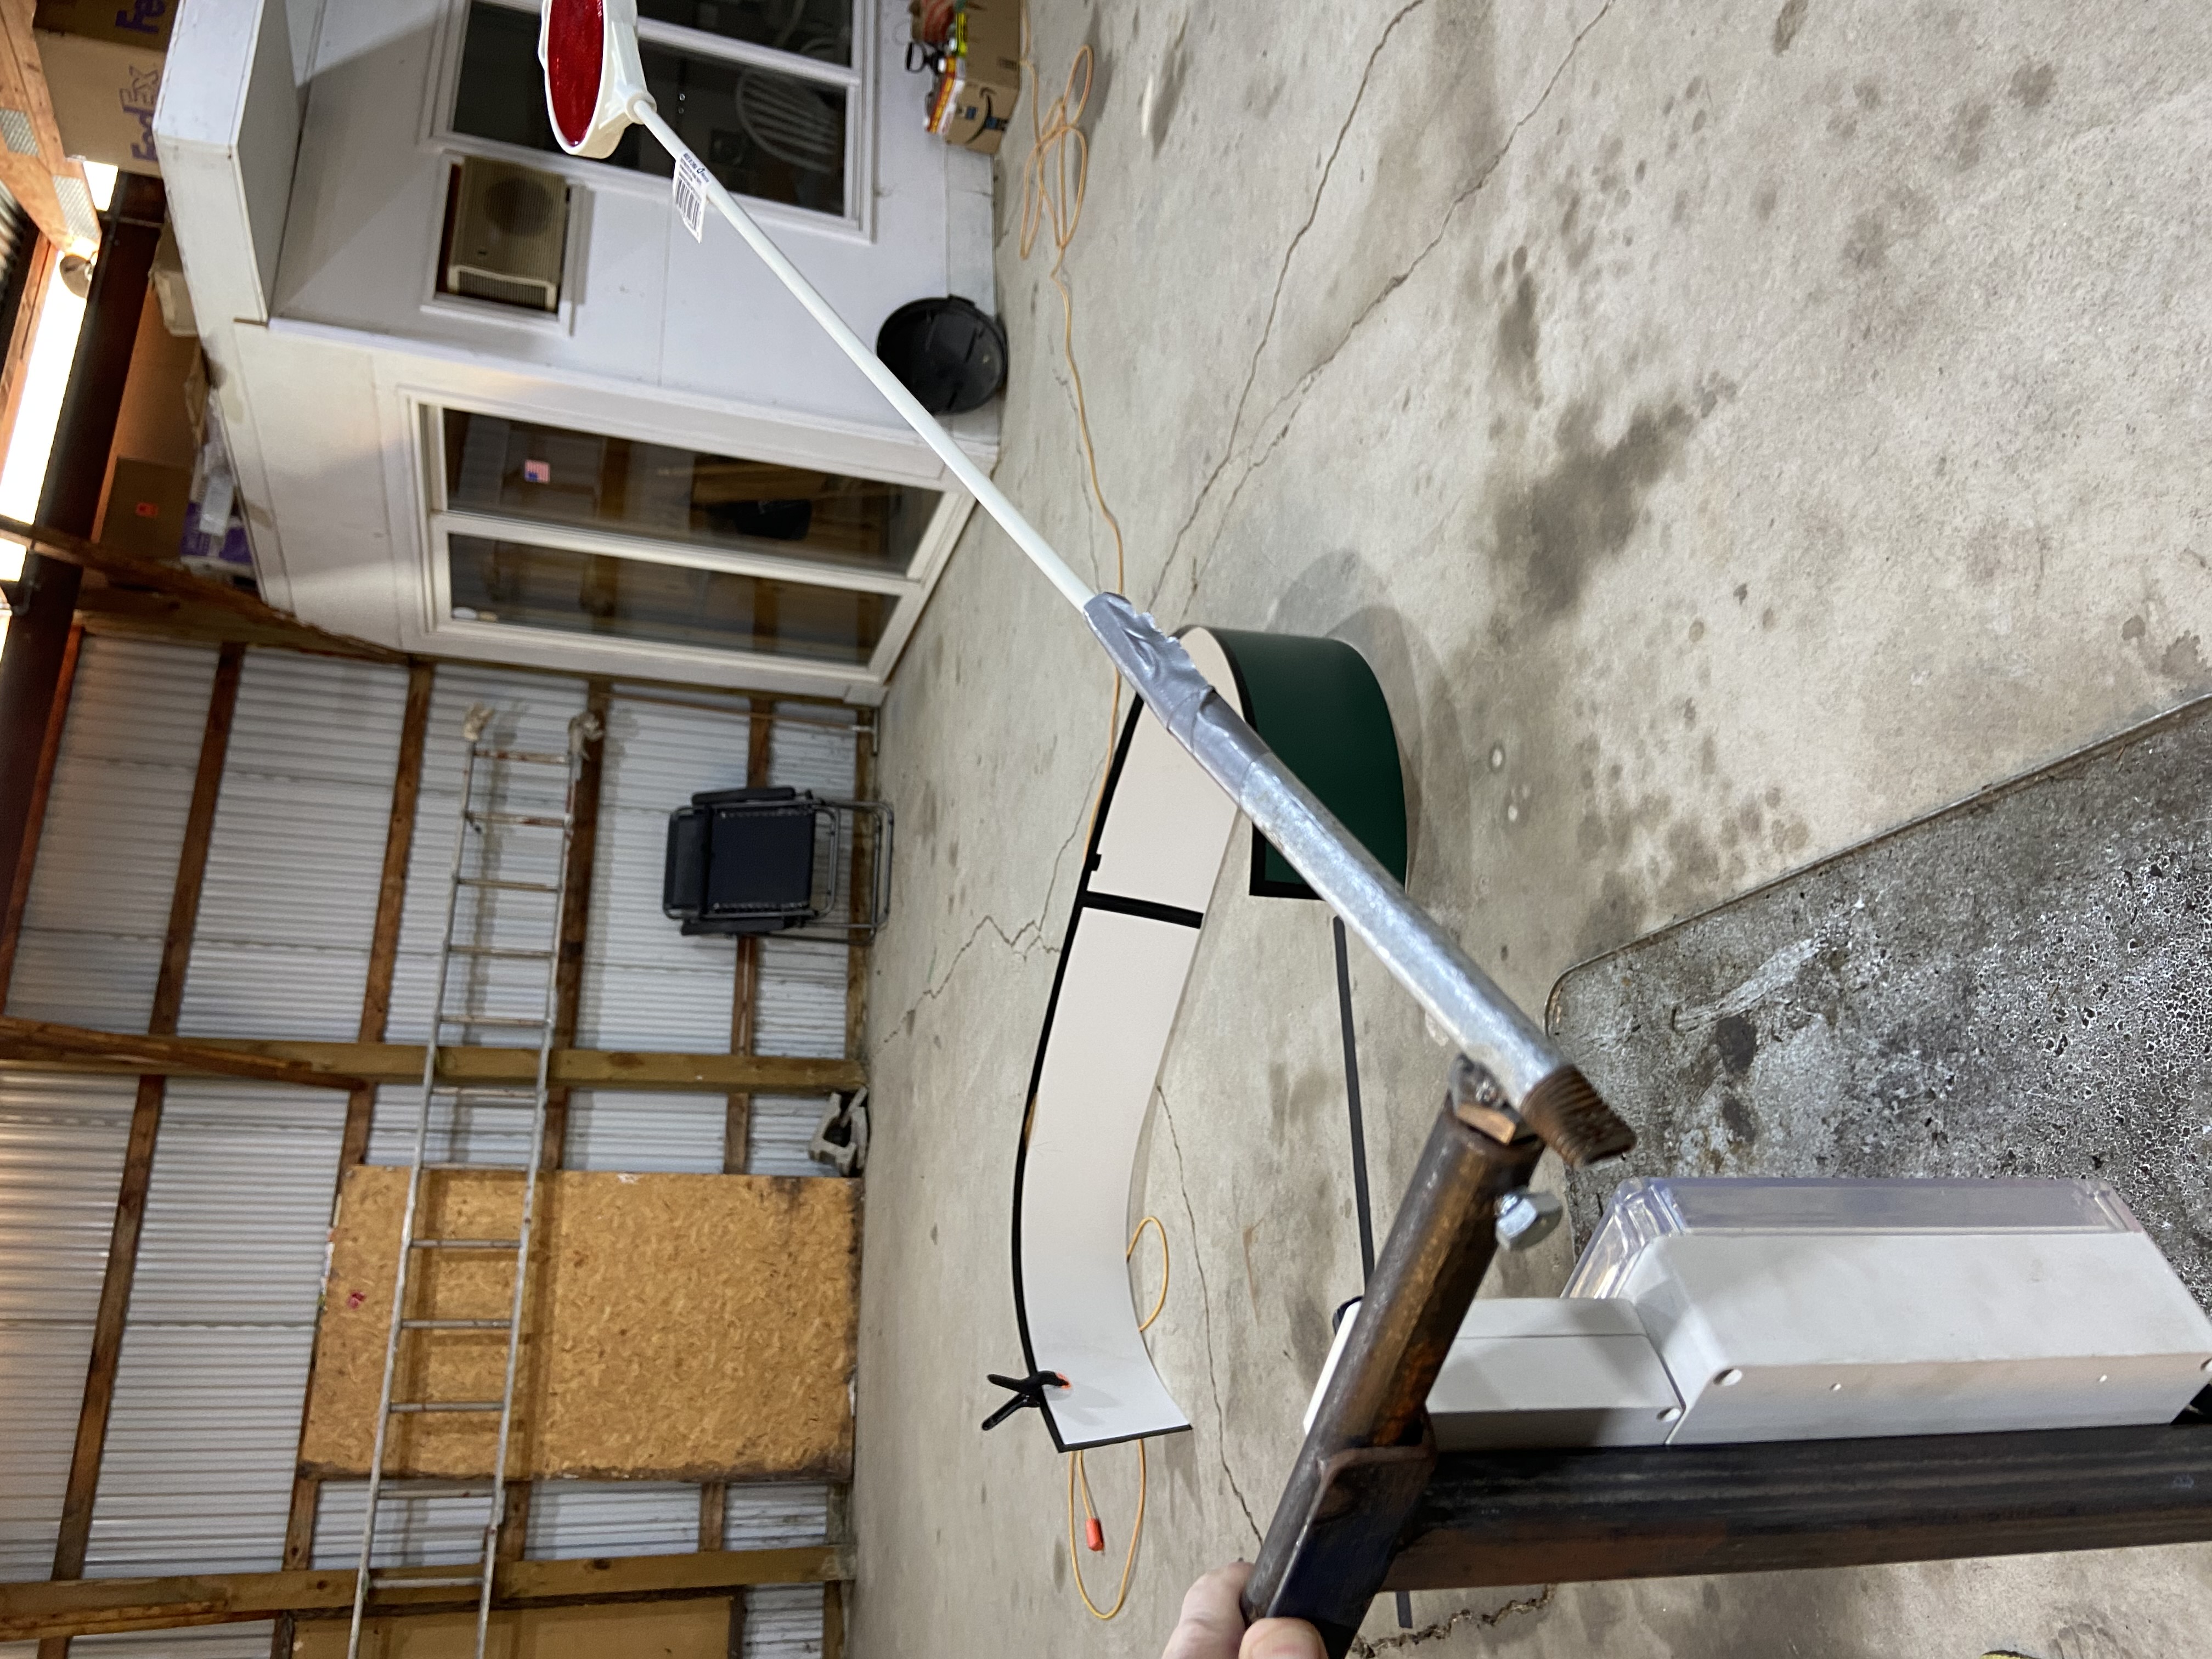
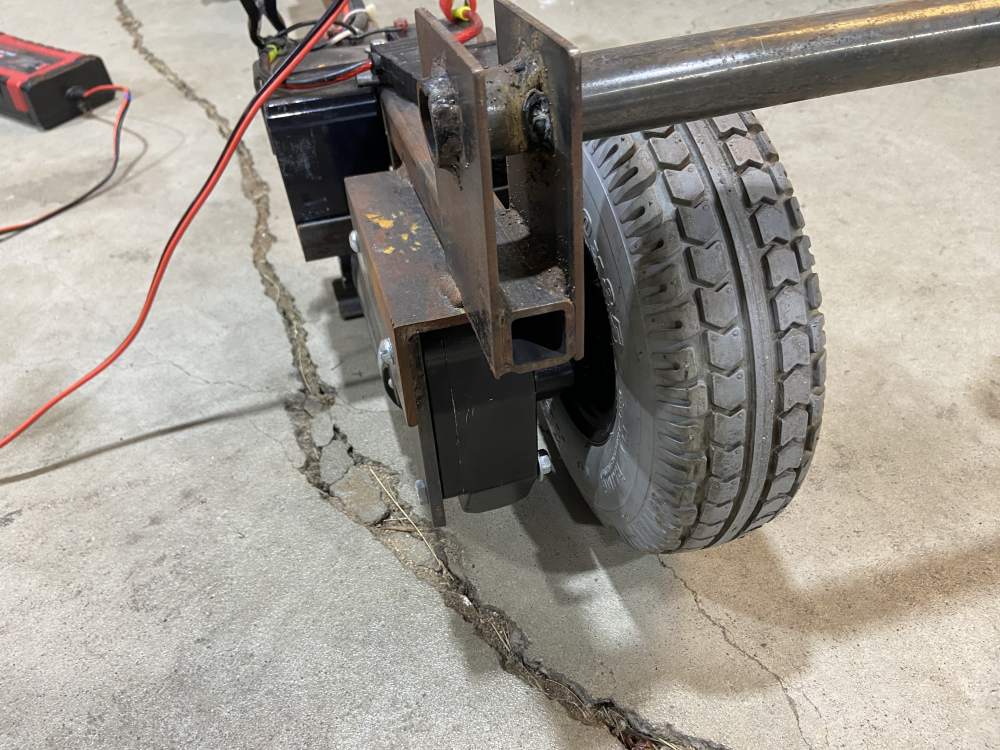
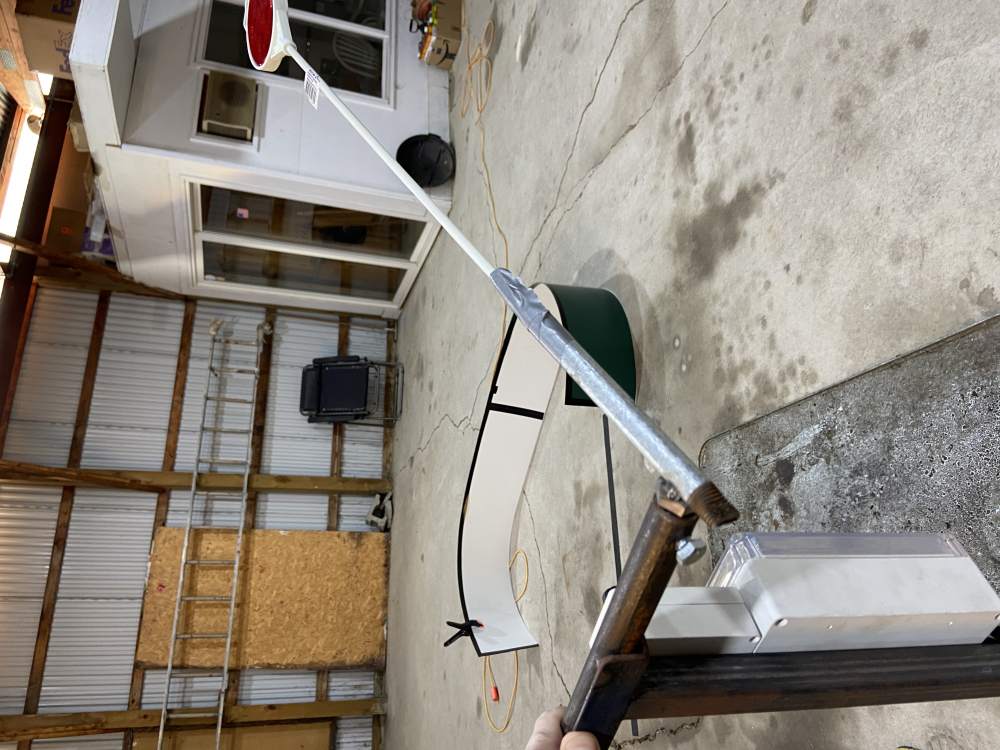
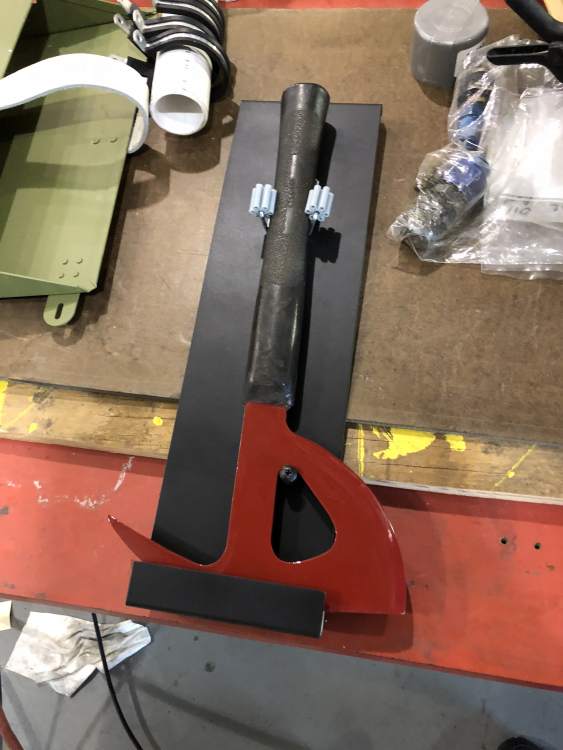
Feel free to ask me questions. It weighs about 45#. You do have to get down on your knees to attach it to the nosegear. However once it's there, I leave it in place in the hangar. The momentary pushbutton is wired into the speed control so that everything stops unless you are pushing that button. Very easy to stop that way. I've used it for about a year so far and it's working great. I even pushed the plane back into my hangar over a layer of snow and ice the other day without slippage. It just took a bit higher power setting than normal. In the summer I rarely set it above 50%. -
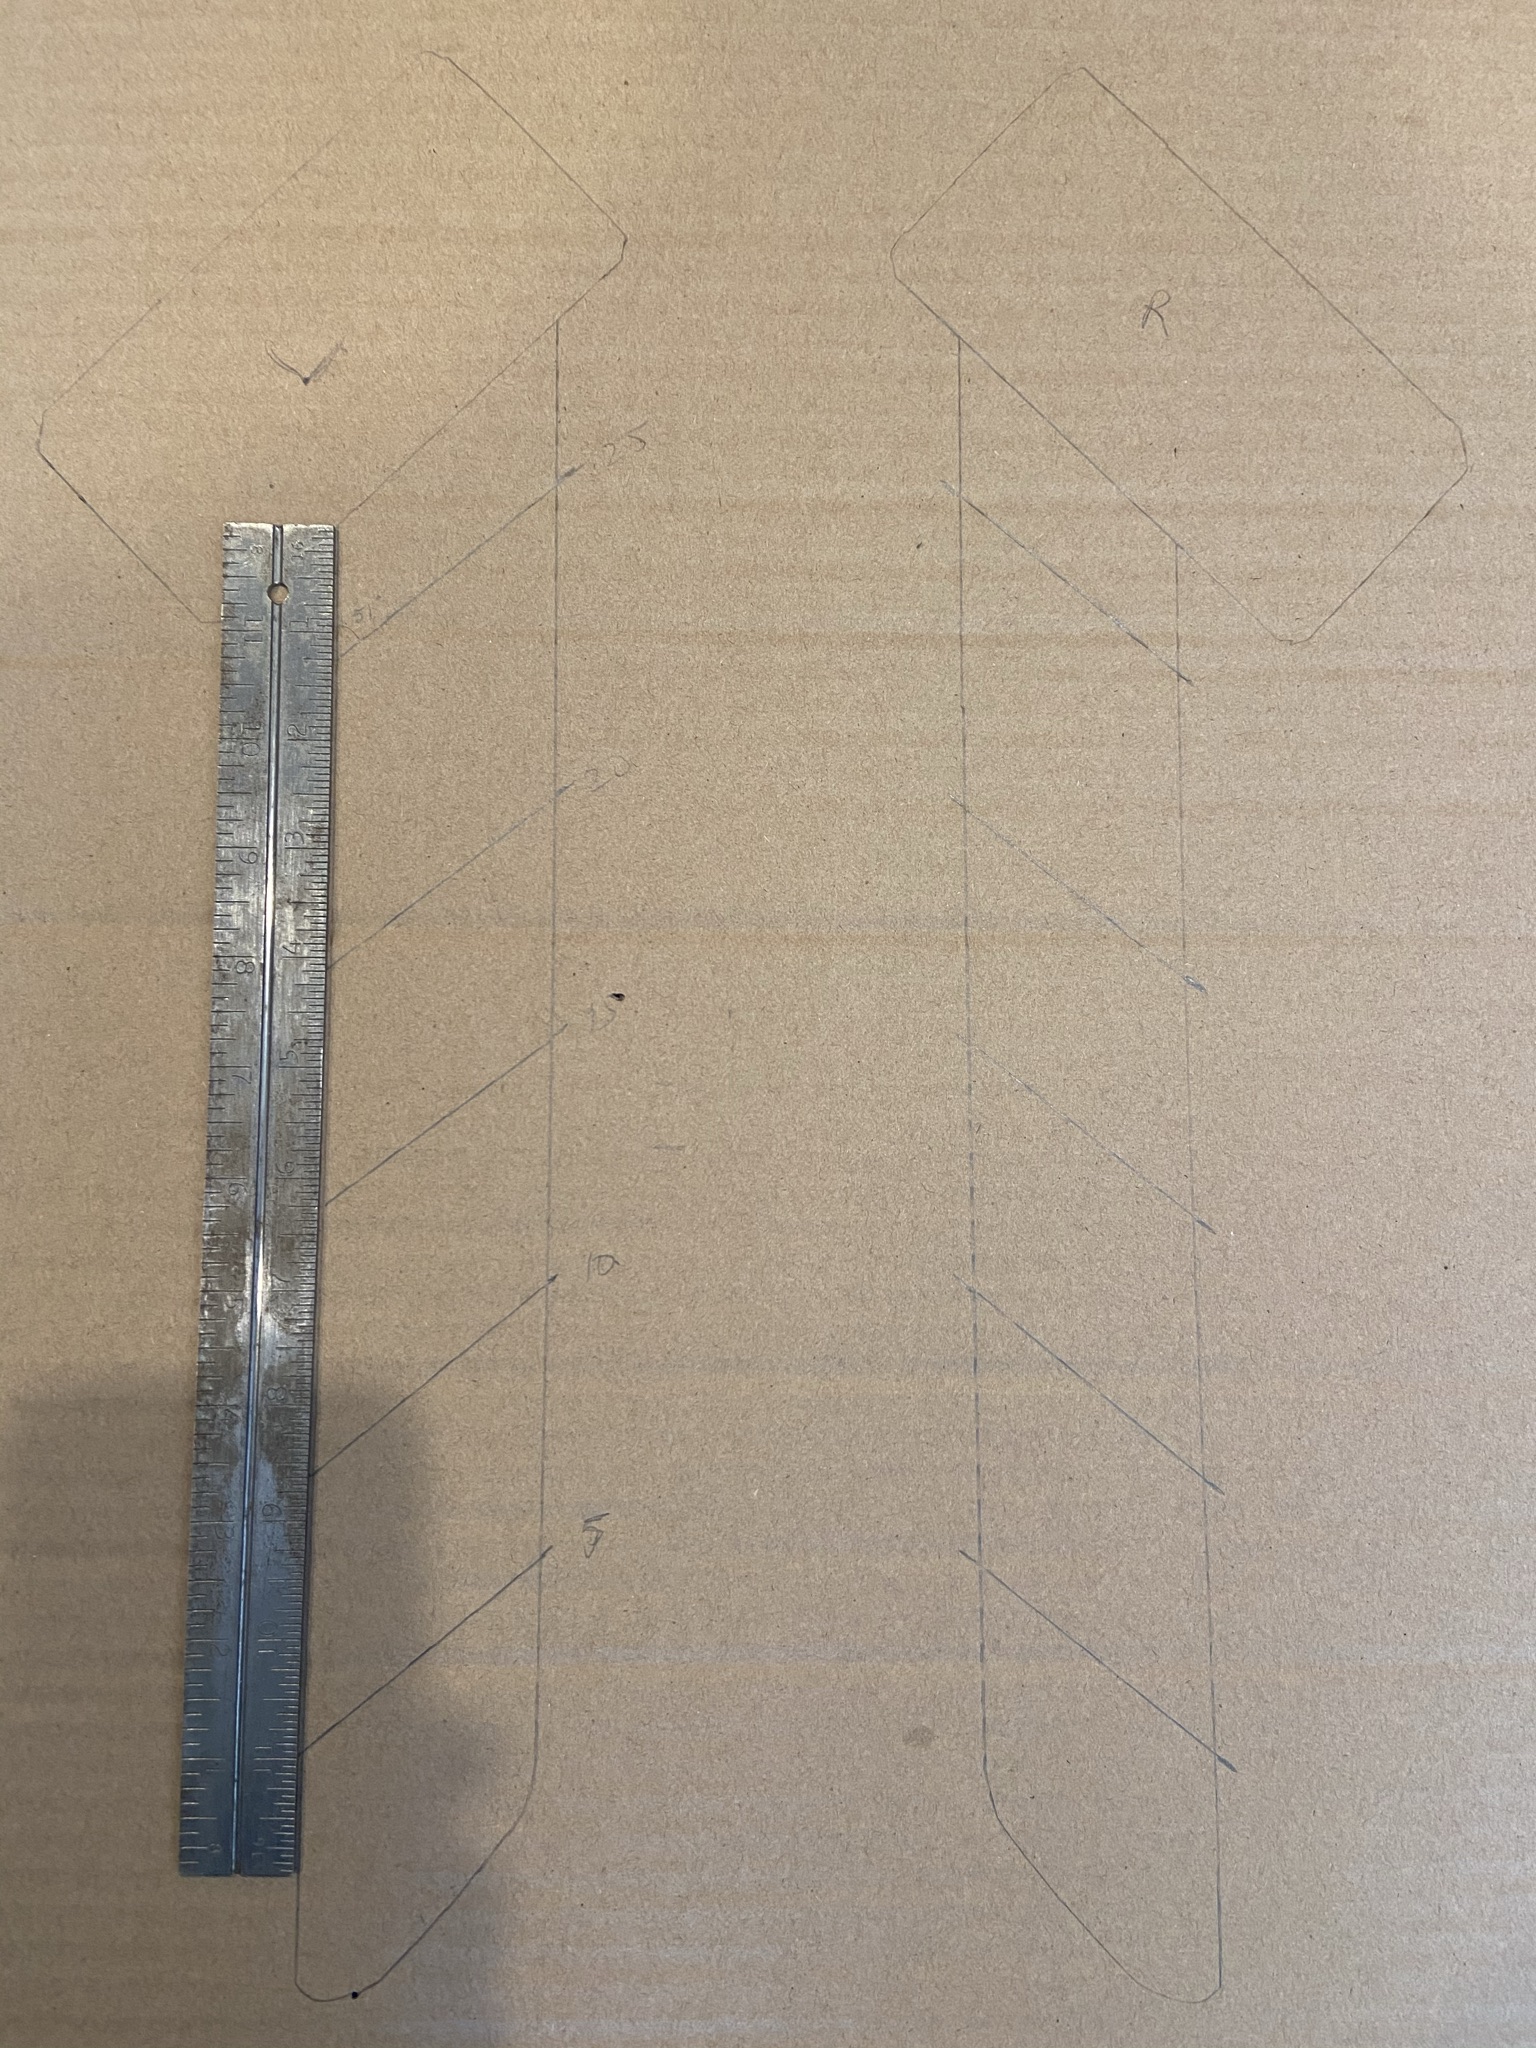
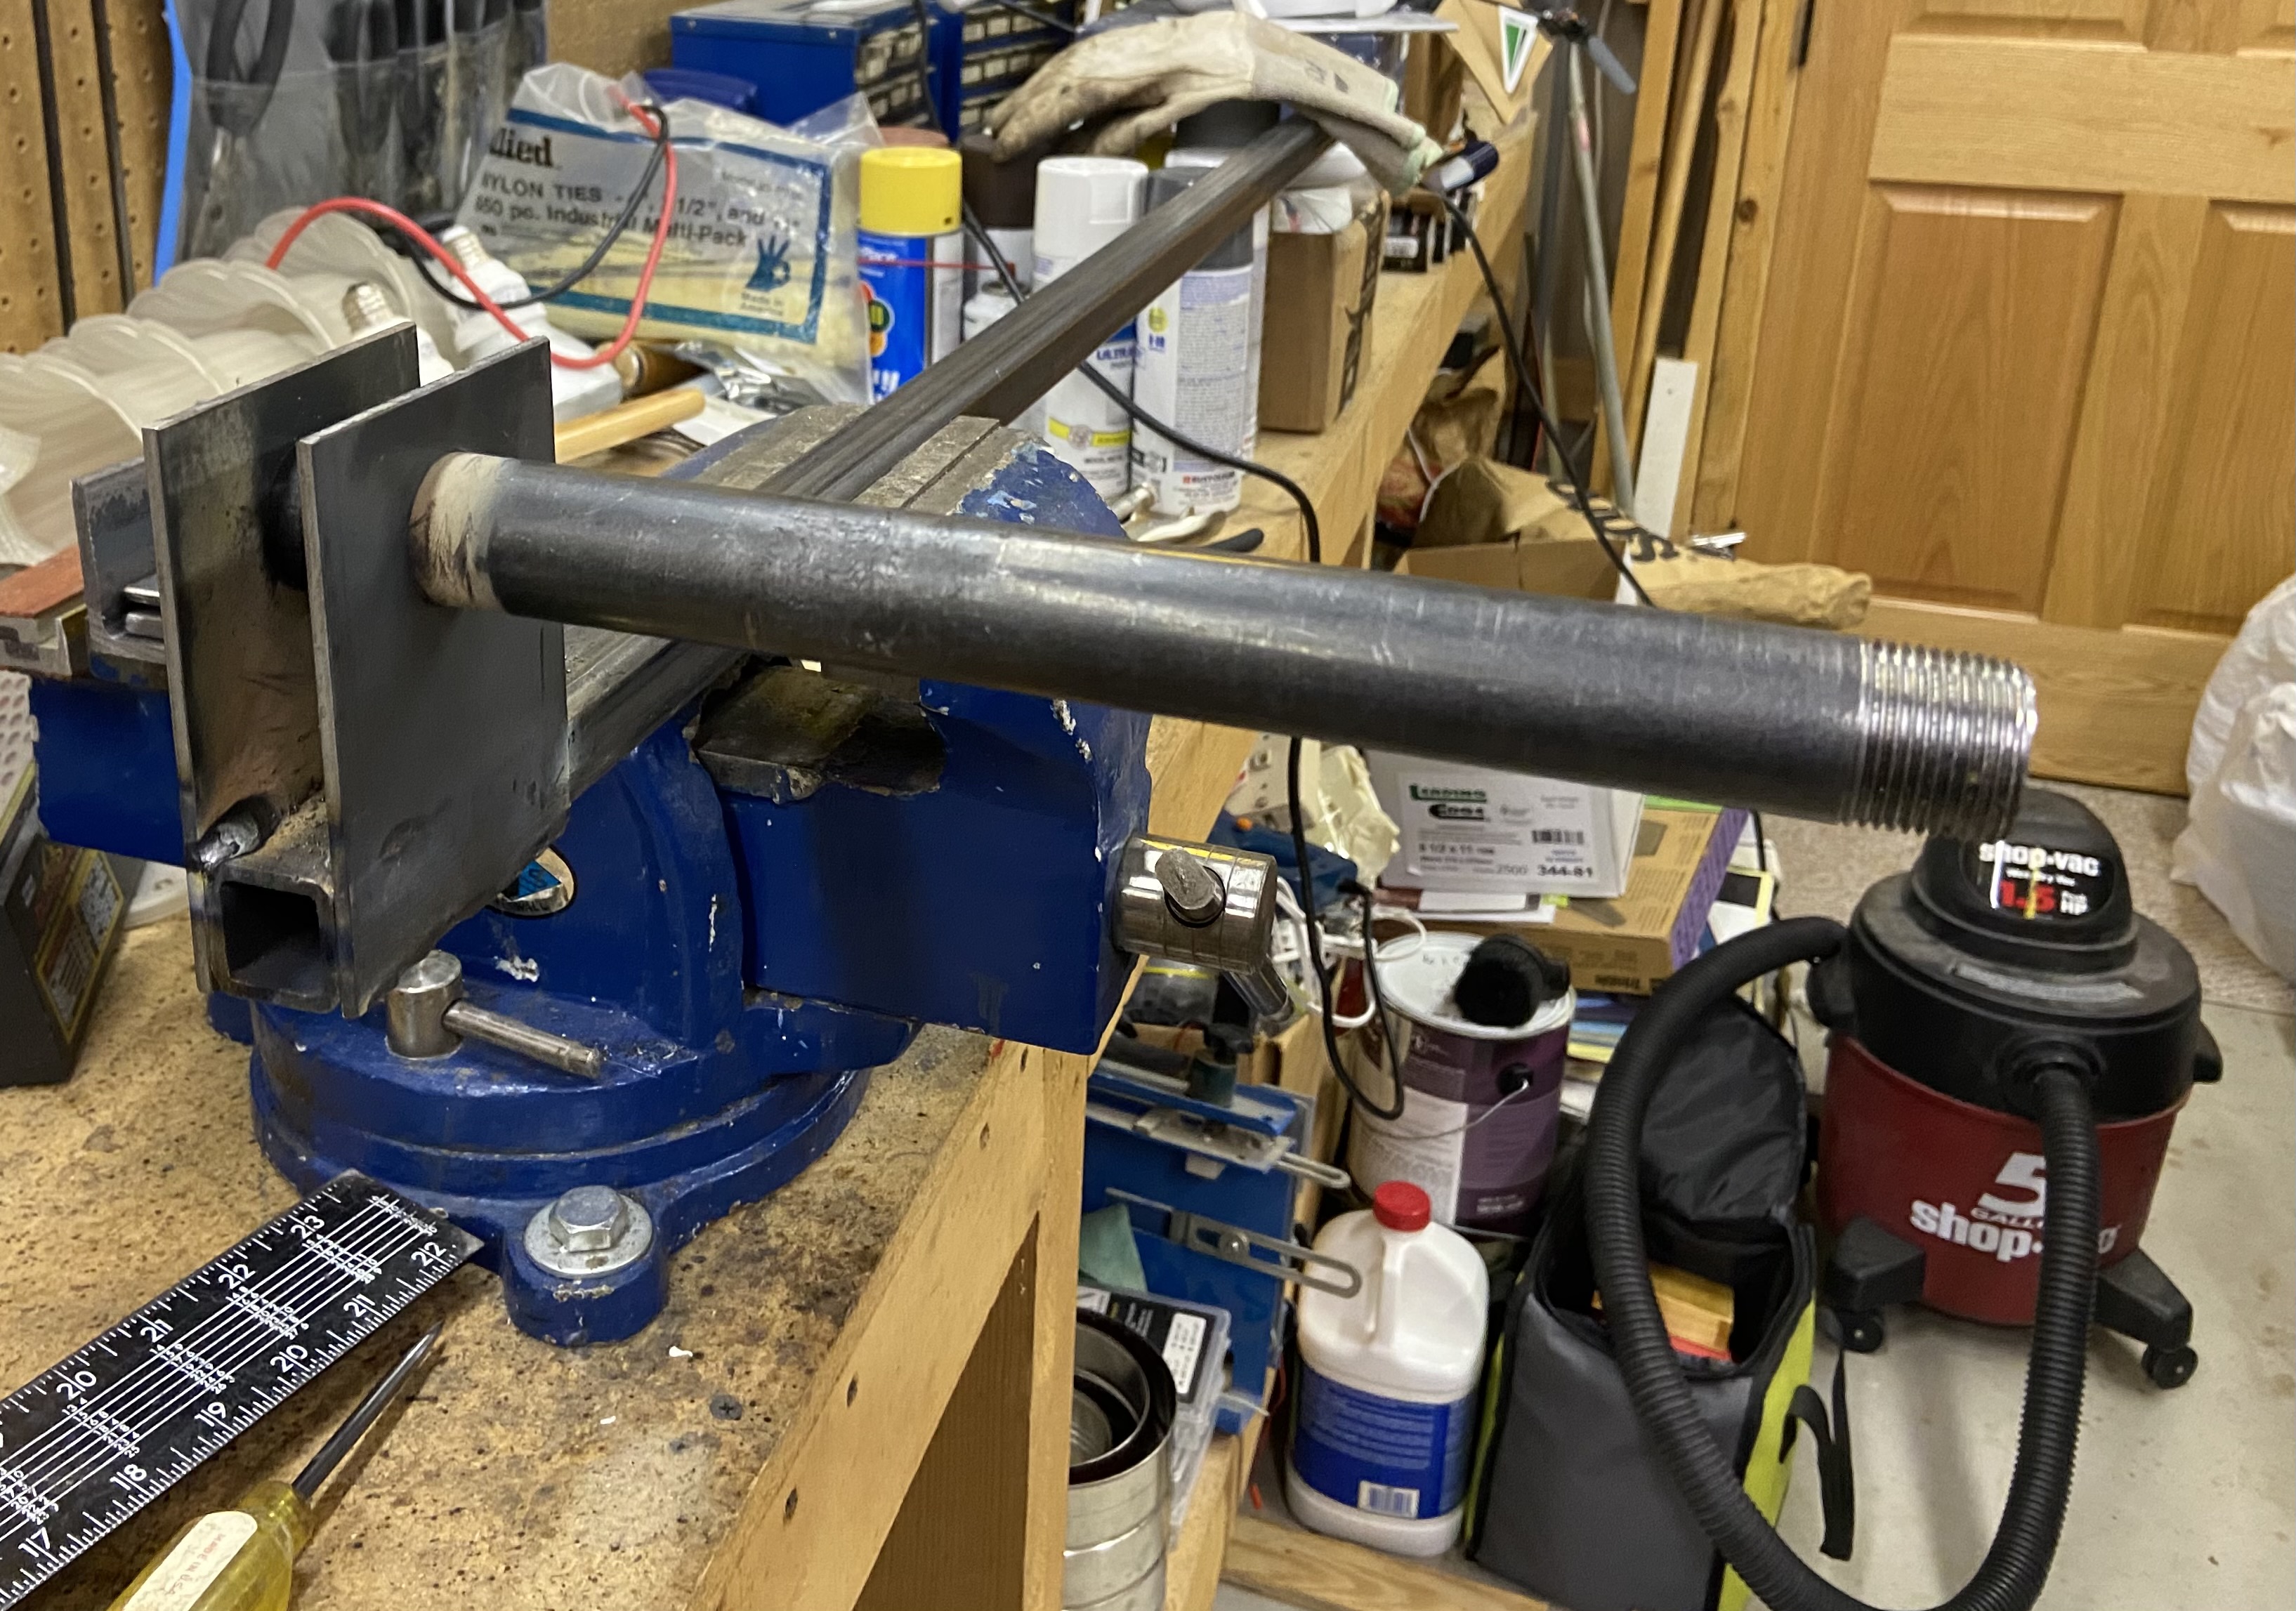
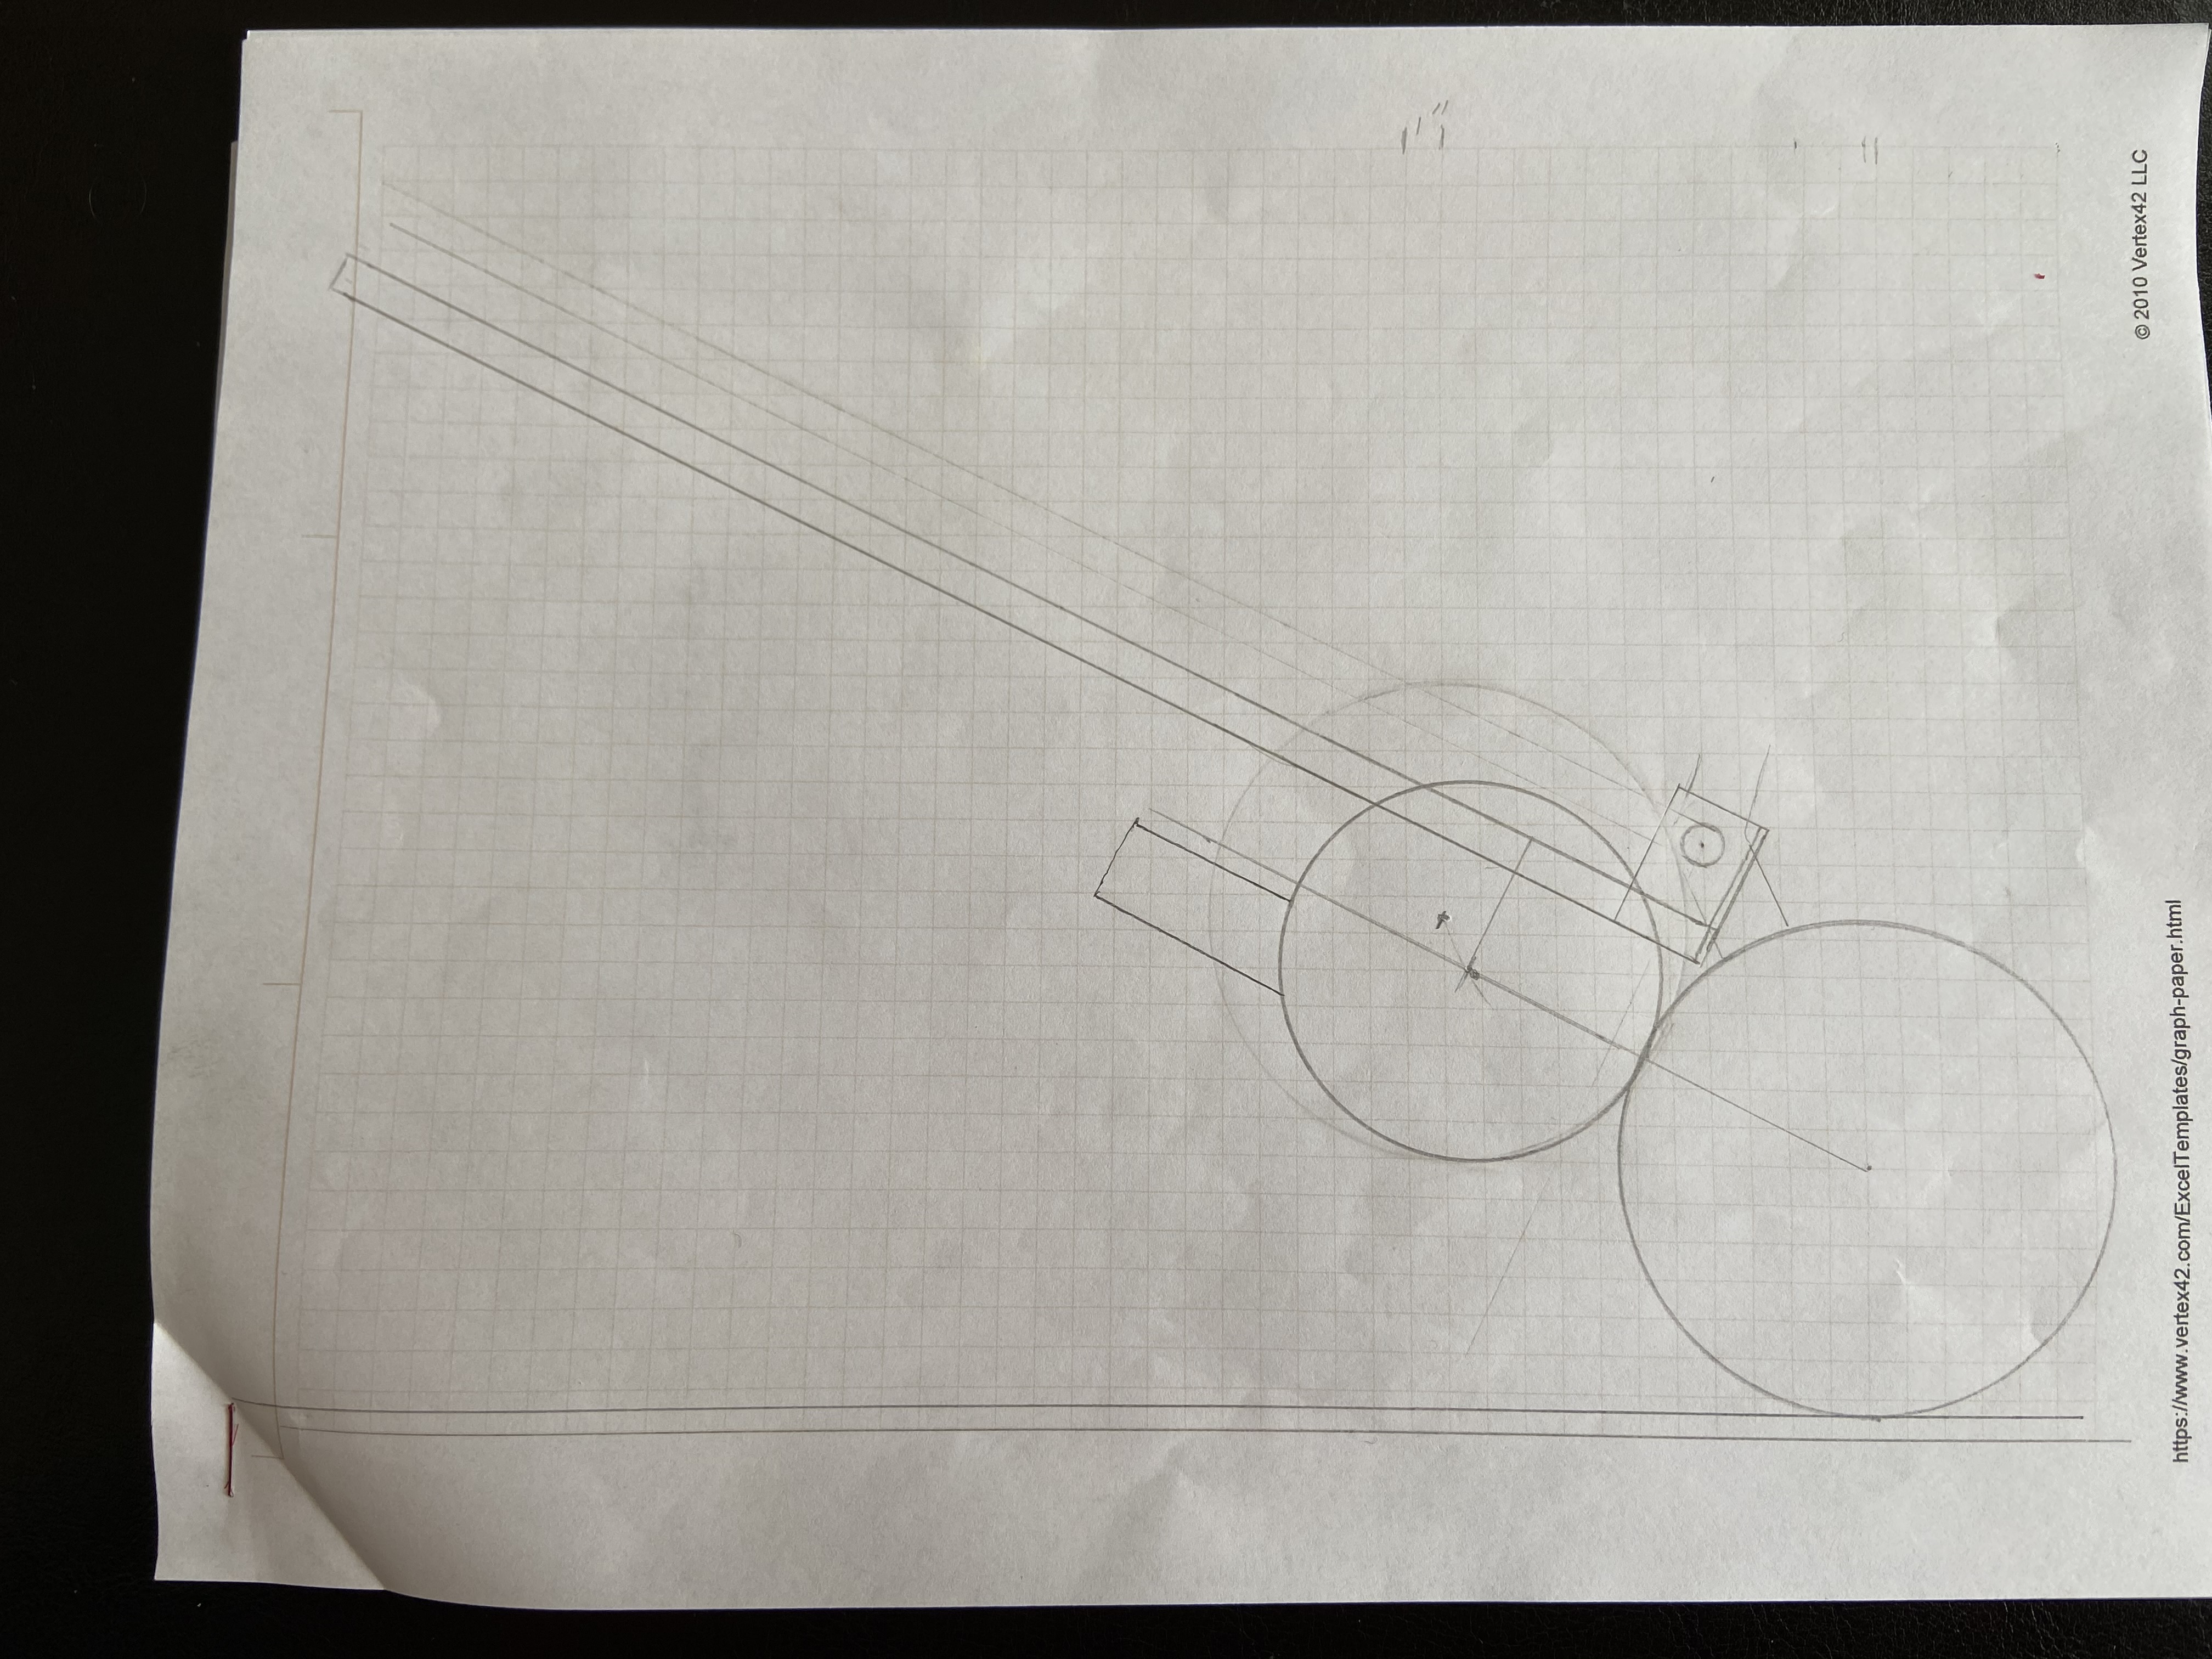
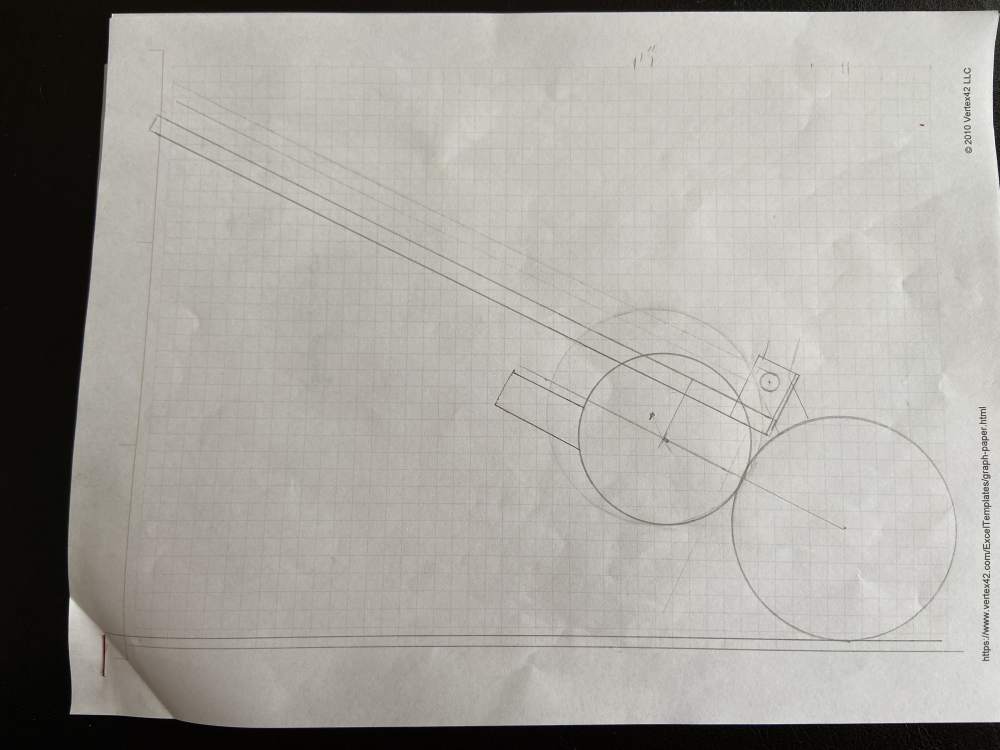
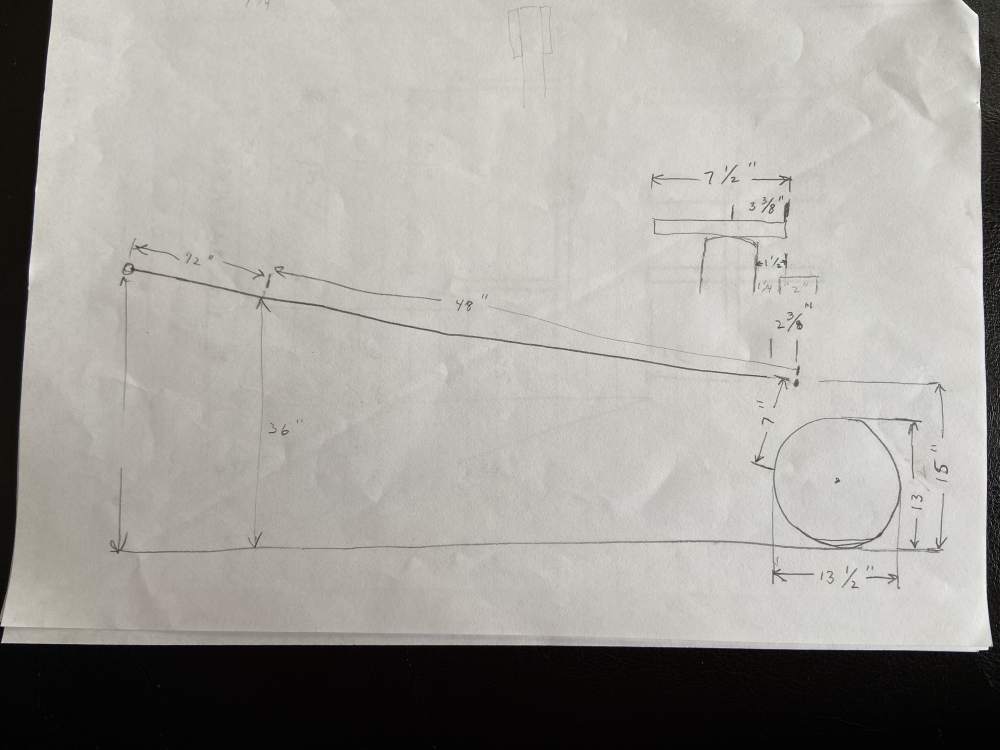
Here is a list of materials I used to fabricate a powered towbar to tow my Mooney. I have attached pictures and a couple of drawings too. Hopefully, that will be enough to build your own, if interested. I spent about $150 to make mine. Materials List eBay 1 – Jazzy Wheelchair Gearbox Motor 1 – Wheelchair Wheel & Tire 3.00-4 (10” dia) Amazon 2 – 12v 9Ah Rechargeable Batteries 1 – 10-55v 60A Reversible DC Motor Speed Controller 1 – 60A Inline fuse holder 1 – 6”x3-1/2”x2-1/2” IP65 Junction Box 1 – 3-1/2”x2-1/2”x1-1/2” IP65 Junction Box 1 – Pushbutton Momentary Starter Switch Metal Towbar 1 – 4’L -1”x1”x1/8” steel square tube 2 – 3”x4”x1/8” steel plate (drill 1” hole 1” from the top through both) 2 – 4-3/4”x1-1/2”x1/4” steel plate 1 – 6”L - 2”x3/16” angle steel 1 – 12”L – ¾” black sch.40 steel pipe Battery Support 2 – 6”L – 1” x1/8” angle steel 2 – 2-3/4”L – 1” x1/8” angle steel 1 – 8”x1-1/2”x1/8” steel strap Handle 1 – 12”L – ½” black sch.40 steel pipe 2 – 4”L – 1” x1/8” angle steel This is drawn to scale. each square = 1".


-
Sorry. Working on it. I’m not sure how detailed I can get. I had to go to my hangar to take some more pictures. I never really had a dimensional drawing. Some of the dimensions were driven by the drive motor and wheel that I found on eBay. I just built it. I did lookup all of the bits I bought and found that I spent just under $150.
-
Here is where it’s mounted.

-
Maybe you need one of these!
-
I would also keep in mind the fact that materials like vinyl or leather are going to be much less flexible in the wonderful wintery conditions we experience in the great white north (i.e. Minnesota). I, for one, would stick with a heavier fabric that also is not especially water absorbent.