
Warren
-
Posts
256 -
Joined
-
Last visited
Content Type
Profiles
Forums
Blogs
Gallery
Downloads
Media Demo
Events
Everything posted by Warren
-
While I haven't installed the GEA24 with traditional fuel senders, the manual does say that they are compatible. Make sure your installer configured them correctly and that the senders are working. From the G3X installation manual: Select the installed fuel quantity probe configuration: Voltage or Digital. The GEA 24 supports four fuel quantity inputs (FUEL 1 through 4), any of which can be used with a resistive, analog or digital fuel quantity sensor. Reference Table C-6 for input selection nomenclature for approved interfaces. CAUTION Resistive fuel probes must be configured as ‘Voltage’ interfaces per Table C-6. If a resistive probe is incorrectly configured as ‘Resistive’, the fuel gauge indication may appear to be valid on the display, however it will not be accurate in all operating conditions. It should support what you are trying to do. You can also check the resistance of the sensor when empty and while filling to make sure the float is moving and the sender is working.
-
10" is a great display -- but more expensive and you still have to keep one G5 as a backup. Once you get used to the tapes it is a non-issue. Even less of an issue on a larger display like the 10". I started on an Aspen with backup round gages. I eventually had to cover up the round gages to force myself to learn the tapes. Now, I hardly look at the round gages. It's a lot more money for the upgrade but you get a lot more panel and the option to add an integrated engine monitor. Needed - no. Cool - yes. Garmin is 5 months backorder on the 10" G3X so plan ahead.
-
Based on all the discussions about how challenging it can be to get this engine to run LOP, I fully expected to go up, discover it ran rough LOP, and do a GAMI sweep to see how bad it was. I was shocked at how well it behaved. It runs well lean all the way from 60% power through 75% (at 75% the cylinders are getting a little warm - over 400). It has to be severely leaned to start to get rough. It supports LOP better than my TSIO-360-LB in a 231. I told @PilotX he was lucky and GAMI injectors wouldn't make a difference for him.
-
Not sure if this helps. Looks like you have an MB engine. On my K (LB engine, 231 model), the numbers on the dipstick face the front of the engine and the dipstick curves forward at the bottom. I usually grab a light and rotate the dipstick 180 as I pull it out so I can see the numbers from the access panel without fully pulling out the dipstick. Then, rotate 180 as I reinsert it. The oil level also comes up if I leave it at least 24 hours after shutdown - increases .5 - 1.0 quart on dipstick. Warren
-
+Great product that works well once installed. -Nightmare for the installers to fine tune sender geometry. It is great to write a caveat to cover all installations that just says “make sure sender is free to move from the top to the bottom.” It is also great to see this in a cutaway of a tank — much harder in real life where filler ports are one or more ribs aways from the sender ports. It is impossible to see the installed float in many applications. The real installation process is: 1. Look in the installation hole (lights, mirrors, camera,...) and try to guess what the sender might hit. Then guess if a bend is needed and install the sender. 2. Start the calibration process by filling the tank and watching the electronic output for sender movement throughout the full tank range. This requires a full fill of the tank. 3. If issues arise, the tank now needs to be fully drained. 4. Try to figure out what the problem is when it is almost impossible to have the sender installed and look for interferences in many installations. Do whatever you can to fix, bend,... the installation. 5. Reinstall and repeat. Then you get to start over on the other side. Then imagine a bigger plane with two discrete tanks on each side. As you can see the installation process can be very extended, time consuming and expensive. We will no longer quote a flat rate for this installation and will coach potential customers that the install process can be difficult and can get expensive. I don’t want to be too negative, just set realistic expectations for all parties involved. I will repeat that they are great senders and seem to be very accurate. It would be great if CIES could find a way to reliably duplicate the geometry of the senders being removed to resolve installation issues.
-
Paint restoration - no clear coat
Warren replied to SLOWR426's topic in Vintage Mooneys (pre-J models)
If you want it to look “OK,” you can try simply waxing it. This will help fill in/cover up some of the oxidized paint. It will require frequent reapplication but is by far the lowest cost option. If you really want to make it look its best, the only option is to do a polish. You have to remove all the oxidized paint and get down to good quality paint. Depending on how thick the paint is this can be a touchy process. However, you will not get a good shine until the oxidized paint is gone. The thinner it is, the more careful you have to be. Worst case you burn through in some areas and may have to do some touch up. It is much easier to match the base color (after a good polish) than an oxidized paint. Once you get it to a good shine, protect it so you don’t have to do it again. Ceramic coatings are great for this. And, the basis for any quality ceramic coating is a paint correction prior to application. From the pictures, the only bad areas are the stripes on the top surfaces (those most exposed to the sun). The sides and base color looks pretty good. Polishing should quickly remove all the loose material and get you on to polishing the paint. Go slowly and hopefully you can removed the oxidized layer to reveal good looking paint. Worst case is the stripes are beyond saving and will cut through in some areas. You should then be able to match and touch up the stripes and have a pretty good looking plane. -
I have a 231 and I have to be very patient and fill to the limit of overflowing to get close to the rated capacity -- mine is a little more confusing with the extended range tanks. However, I believe that you need to squeeze in every ounce to get to rated volume on the K models.
-
A simple power supply that can set to a fixed voltage is perfect for this kind of work. For a 12V system, set it to 13-13.5 V - 30A (20A would probably work reasonably well too) -- for a 24V system use 26-26.5V. This is the maintenance voltage for the battery that a smart charger would maintain for the long term after charging is complete. At this voltage, the battery will not receive significant charging and 30A should be lots to support what you need to run with the avionics while you are updating, training,... to avoid draining the battery.
-
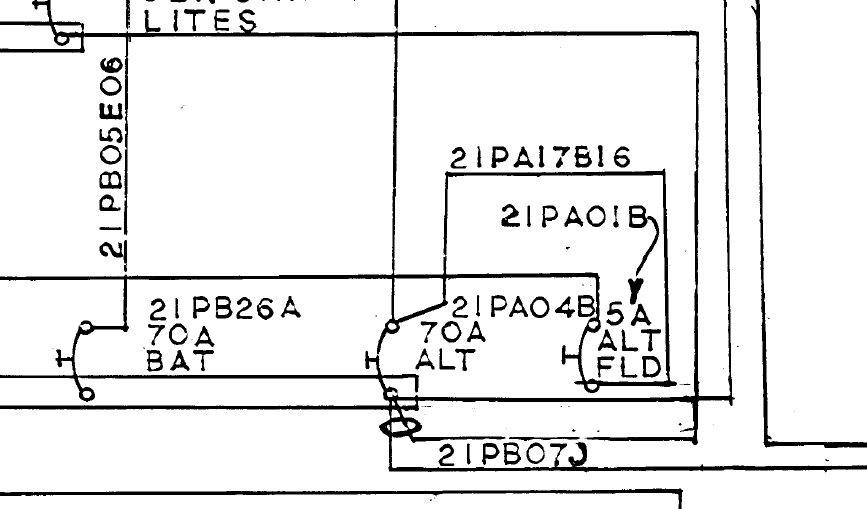
Power goes through the ALT FLD circuit breaker -to- master switch -to- voltage regulator.
-
After more investigation, the power to the ALT Field breaker. So the master or the breaker will turn off the alternator field.
-
On my 1985K Model (12V), the A+ wire in the regulator comes from the master switch. FLD goes directly to the alternator.

-
Agree with above. The autopilot flies great without the yaw damper. It is purely a comfort/convenience option. I chose to spend the extra money and install the yaw damper. After experiencing flying with it, I am very happy with my decision. On climb, no more right rudder. It will cruise and turn coordinated at any speed. On descent, no left rudder. And, in turbulence it really smooths out the yawing. See if you can find a plane with a yaw damper and go for a ride to see how much better it is. Of course, it costs more and there are lots of other places to spend the money that may be higher priority. Fortunately, it is always an option to add the yaw damper at a later date if you change your mind or have extra airplane money sitting around that you don't know what to do with.
-
PAI 700 Vertical card compass , with Mooney mount 250.00
Warren replied to Alan Fox's topic in Avionics / Parts Classifieds
Sold. I have been thinking about adding one for awhile. -
JPI 700 K-factor calibration question
Warren replied to Stryk77's topic in Avionics/Panel Discussion
In general mechanical flow meters are sensitive to turbulence in the flow. In the installation manuals there are specified straight sections leading into the flow meter. The purpose of this is to stabilize the flow for consistent readings throughout the flow range. Of course, this is almost impossible in most aircraft environments and many have a 45 or flexible hose with a bend leading to the flow meter. Turbulence changes with flow rate adding a variable that the mechanical flow meter cannot accommodate by adjusting a fixed flow constant. The best you can do is to arrange the input with minimal bends near the flow meter. And, you probably cruise at close to the same settings and fuel flow for the majority of your fuel burn. Adjust for accuracy here and it should get you close enough. -
You can buy/install the autopilot with 2 servos (no pitch trim), 3 or 4 servos depending on which option you desire.
-
Here is the link to the Garmin Warranty Policy https://www.garmin.com/en-US/legal/aviation-limited-warranty/ The GFC500 is a non-TSO product. Looks like this means 1 year, 400 hour warranty.
-
Aspens are disagreeing with each other. Suggestions?
Warren replied to Oldguy's topic in Avionics/Panel Discussion
It is likely. The calibration is specific to the RSM and not the Aspen unit. Is should be pretty easy to run through the calibration. You just need an installer or other qualified person to find a compass rose or some other relatively quiet (magnetically) area to go through the calibration. Enter calibration mode and follow the instructions to taxi in a 360 circle. -
G3X Touch: on-screen gear, flap, and trim indications
Warren replied to SkepticalJohn's topic in Modern Mooney Discussion
Not STC approved (legally with the certified version). Lots of options in the experimental version and not that hard to do. -
Aspens are disagreeing with each other. Suggestions?
Warren replied to Oldguy's topic in Avionics/Panel Discussion
Yes, it is an RSM heading error. Winds are calculated from TAS, GPS speed and heading. The GPS Speed and TAS are very close but the heading is off by 50 degrees. The RSM heading is very magnetically sensitive. Depending on where it is mounted and how the plane is loaded, you can skew it significantly. Mine is mounted above the hat rack and on one trip it was consistently off by about 60 degrees from cargo interference. Removed the cargo and it went back to normal. Or, it may just need to be calibrated but it is hard to believe that it wasn't calibrated during install. -
Keep it as far from the ocean as possible to minimize corrosion. Get a good cover to keep sun out of the interior. If the paint is good, get a ceramic coating done -- it will protect it from damage quite well and just need the coating touched up every couple of years. Good luck with the move and finding space.
-
@Microkit I am happy to test the modification. The email link in the post is not working.
-
@81XOn the 750, you can configure it to load the ILS frequency automatically (it loads it to the backup NAV frequency and you need to manually switch it to active). You can also configure it to automatically switch to VLOC as you intercept the procedure (I forget exactly where but it usually happens ~ a few miles outside the FAF)
-
In the wiring from the GMU11 to the GAD 29, leave an extra length/loop in the CAN wiring that can easily be cut and spliced into the GAD 13. You can probably mount the GAD 13 right beside the GAD 26 so this will not need to be a long loop (may be 2').
-
I am certainly not the average but I got my private in a Cessna and bought the M20K with about 65 hours. I would absolutely recommend getting through your private while abusing a flight school plane and not your own. Cessna's take the abuse better, are more forgiving and most importantly are not your problem long term. I am an engineer (we can debate whether this is good or bad) with a background in engine and fuel system development. The turbo management and temperature management as well as the complications of lean vs. rich, too hot, too cold,... came relatively easy to me -- probably a lot easier than most. However, it was a handful to jump in and add propellor management, gear, cowl flaps, general temperature management, potential overboost (M20K 231), a much slicker airframe and the associated speed management as well as a plane that takes more finesse on landing. I can also tell you that I wouldn't do it any other way and am happy with my decision based on my aptitude and experience. Here is the time to be brutally honest with yourself: 1. Do you have a natural aptitude for flying - did it come quickly or did you have to work hard. 2. Did engine management, leaning, starting,... come easily. 3. Do you have good spacial perception when flying around other planes, in the landing pattern, finding other traffic, general awareness of airspace,... It is hard to transition to a faster airplane and stay ahead of the plane. If you honestly feel like you have a good aptitude vs. have to put in the hours, struggle and learn the hard way, you could make it work as a low hour pilot. I also learned the plane and soon started into Instrument training with an experienced instructor in higher performance airplanes. This was a great way to also learn to fly the plane and get lots of supervised experience. I also know one moderately experience pilot - went through learning the hard way and generally is in the "has to work hard to learn" portion of pilots. He has had two prop strikes and the associated engine teardown/inspection and prop work -- this is a very expensive way to transition into a Mooney. He is terrified of landing the plane, has spent a ton of money in fixing the plane, has spent lots on additional training hours and has generally had a miserable experience. So, there is the good and the bad. You will have to evaluate yourself and live with your choice. Good luck with your choice, abuse someone elses plane while learning and buy a plane when you think it works for you.
-
Great news. Glad it all worked out and you finally have it home. Enjoy.
