

neonbjb
-
Posts
37 -
Joined
-
Last visited
Recent Profile Visitors
855 profile views


neonbjb's Achievements
")


-
Sold!
-
Bump - still available. $1300 shipped.
-
@jandj - You seem to be reading this thread but are not receiving messages from me. Please e-mail me at jbetker -at- gmail.com
-
This is still available, dropping price & bumping.
-
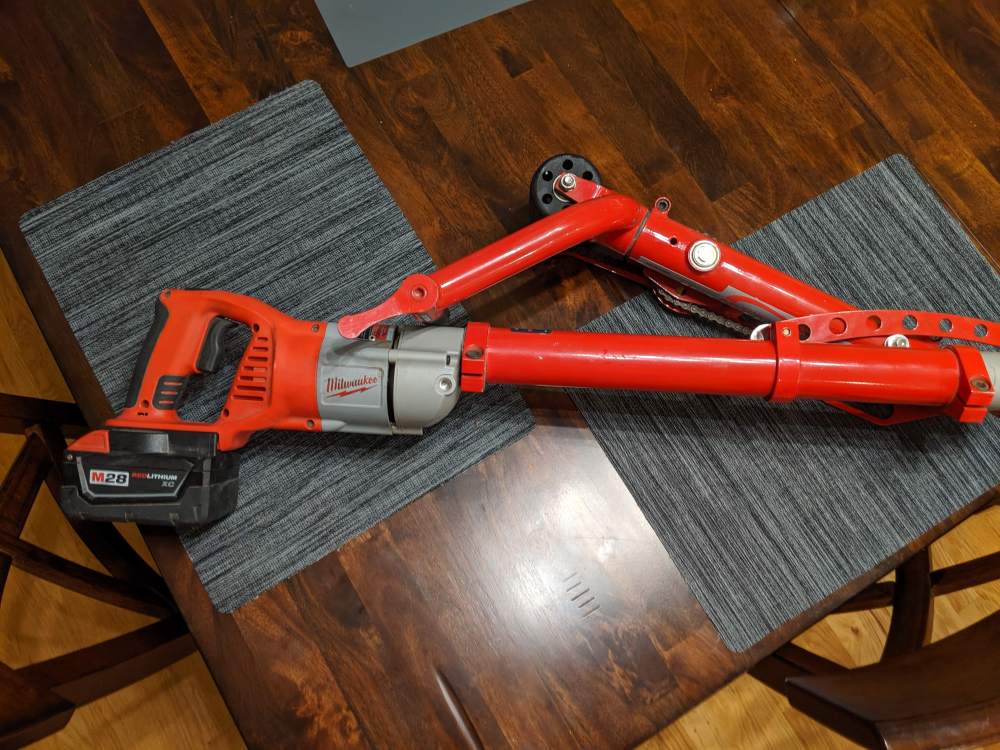
Redline Sidewinder for Mooneys F/S. Comes with battery and charger, all in great working condition. Battery has lots of charge. $1300 shipped.
-
Ah you might be right. I've seen a couple of Mooney's with that paint scheme and had assumed it was type-specific.
-
Looks like Harvey got another Mooney:
-
Tempest REM37BY in O-360-A1A?
neonbjb replied to neilpilot's topic in Vintage Mooneys (pre-J models)
I also put these plugs in when I had a lead fouling incident about a hundred hours after I purchased my M20C. They're working great so far and seem much more resistant to lead fouling. -
I'll be there!
-
How is your lower cowl sealing? A misconception many have with aircraft engine cooling is that it is all about sealing up the baffling / doghouse / whatever - when that is, in fact, only half the equation. The goal is to create a pressure differential between the upper and lower cowling which forces the air through the cylinder cooling fins. When I purchased my M20C there were huge holes in the lower cowling - the worst of which was a cooling hole for the old generator which had had it's hose disconnected but was not plugged. This meant the poor plane had a ram air hole in the lower cowling which was pressurizing it with air and completely defeating the pressure differential. Another big offender for my plane was the alternator install did not have proper baffling surrounding it which resulted in large holes allowing air around the prop and into the lower cowling. Finally, there were considerable gaps between the oil cooler's mounting plate and the cooler itself. Going to town with some silicone sealant, and baffling material in these areas dropped my CHTs by a little over 20 degrees at their hottest. That being said, my M20C can still get up to 420 or so on #2 with a lot of heat soak and a steep climb. Just the nature of the beast on these planes for whatever reason.
-
Alex's M20D (continuous thread)
neonbjb replied to Raptor05121's topic in Vintage Mooneys (pre-J models)
Ah crap, I was really hoping it would be that easy. If it was easy to get inside of those Dialight LEDs all you would have to do is swap the terminals, but it doesn't look like that would be easy from the spec sheets. -
Absolute minimum for me is to get there + VFR minimum at climb fuel burn (~16GPH in my C at my home altitude) - so 8 gallons if I'm just going to do a pattern hop. I would never go that low if it wasn't for my fuel flow gauge though.
-
Alex's M20D (continuous thread)
neonbjb replied to Raptor05121's topic in Vintage Mooneys (pre-J models)
Hey Alex, Just wondering if you got a chance to install those LED gear lamps and if you had any issues doing so? Thinking about "upgrading" mine too.. -
Here are the areas I specifically had inspected when I was having the pre-buy done on our Mooney - based almost entirely on suggestions I've found on this forum and in the MAPA magazine: Pull wing inspection panels and inspect main spar along entire length of wing Thoroughly inspect in wheel wells. Towards the aft of the airplane in the well you can see the stub spar. The front side of the well is the main spar. Inspect main spar right under rear seat. Pull rear seat inspection covers. Once again you can see the rear side of the main spar by looking forward from these inspection covers. You can see the stub spar by looking rewards. This area rarely sees inspection. Open up access panel behind passenger side of the wing (where flux detectors, ELT, transponders, autopilots, etc live) - check the structural members found in the rear section of the airplane (referred to as the "tail cone") for corrosion. Pull inspection plates below the elevators and check the structural elements of the rudder spar (is that what it's called?). Pay attention to areas where water can accumulate for long periods of time. Pull all interior trim to check the steel frame for SB-208 compliance and corrosion. Unlike others found in the list - corrosion found here will rarely condemn the plane as long as it isn't extensive - it is reparable. Of course, doing an inspection on your own is of no use unless you know what you are looking for. I'd recommend looking for pictures of corrosion findings on this forum, check out the FAA corrosion control handbook: https://www.faa.gov/regulations_policies/handbooks_manuals/aircraft/amt_handbook/media/FAA-8083-30_Ch06.pdf And there's a great article that covers pretty much my entire list above and has some great pictures in the MAPA magazine in October 2012 - I recommend you check it out: http://www.themooneyflyer.com/issues/MooneyFlyerOctober2012.pdf BTW - please don't consider me an "expert". I just bought my Mooney in January and am absorbing things like a sponge, but still have tons to learn. I'm sure I'm missing some things. I highly recommend using a MSC for pre-buy inspections if possible.
-
C vs E, really night and day difference?
neonbjb replied to mooneym20c's topic in Vintage Mooneys (pre-J models)
Don't take anyone's word on corrosion. Even the pros regularly miss it. Check the spar from tip to tip, including underneath the rear seat panels. It'll take about 4 hours but is time well spent.

