
rrbeck11
-
Posts
10 -
Joined
-
Last visited
Recent Profile Visitors


rrbeck11's Achievements
")


-
Overhead Ventilation System Air Deflector Removal -M20J
rrbeck11 replied to txmooney201's topic in Modern Mooney Discussion
trevttu - There's some confusion in this thread about the set screw. The set screw I referred to previously is the one attaching the air valve (nuclear symbol-looking plate) to the cabin roof side of the knurled knob (see the small screw next to the threaded end of the knob in the photo below): You won't see that screw until you've removed the deflector/air valve by loosening that nut. As far as cutting holes/patching: you're replacing those old brittle deflectors, right? So if they break, no problem. You do have to be careful not to put pressure on the plenum, but if you go slow and careful, it can easily be done. I'd suggest reading my March 2020 post carefully and give it a shot before you cut any holes. Btw, once you've got the assembly sitting on your glareshield, you'll notice two small screws up in the plenum with the pointy ends down. Those are stops for the air valve. If you go with Plane Plastics or other deflectors, keep them. For a wemac you can ditch them. If you are going with Plane Plastics or other oem-looking solution, a little duct tape on the end of your wrench to hold the nut in place when you try to re-tighten works wonders! Good Luck!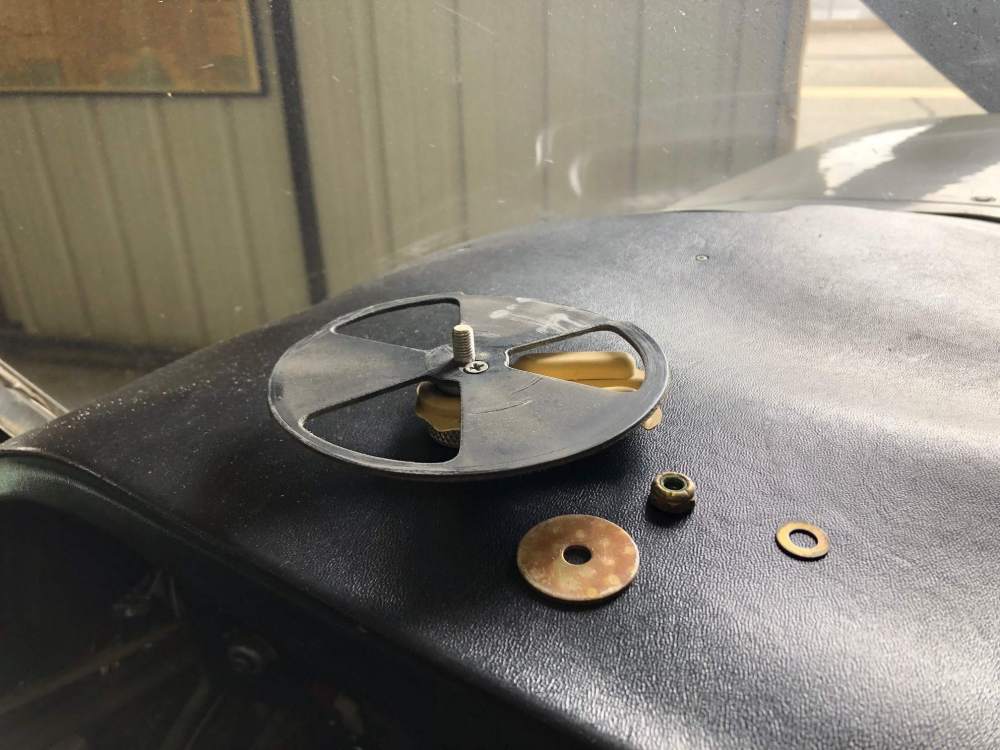
-
Overhead Ventilation System Air Deflector Removal -M20J
rrbeck11 replied to txmooney201's topic in Modern Mooney Discussion
Lwebb - see the stackup in the photo above. Knurled knob, deflector, ( washer? Can’t remember), plate. don’t forget the set screw that holds the plate to the knurled knob. I’d recommend a drop of Loctite (the non-permanent kind). You don’t ever want to do this again. Hold that assembly up to the hole in the plenum, then use a skinny needle nose to set first the big washer then the small one on the end of the threaded shaft. Use a piece of duct tape over the end of a box wrench to hold the nut in place. Slide the wrench between the deflector and the plenum then start turning the knurled knob until it threads. After several turns the plate will hit the stop (a tiny set screw pointed down from inside the plenum). At this point it’s 1/6 turn, then reposition the wrench, then 1/6 turn until you are happy with the friction. To loose and it will rattle. Too tight and you just broke something. Take your time - it’s real easy to break out the set screw or crack the 44-year-old plenum (Voice of experience). If you’re still stuck PM me with a phone number and I’ll talk to you down. good luck, Randy -
Nav Lights and Landing Light Switches
rrbeck11 replied to Toothdok50's topic in Vintage Mooneys (pre-J models)
New question: I have a short in my wiring to the right (green) wingtip nav light. I have disconnected the wire from the Nav Light switch and removed the green bulb, and it's fixture to confirm the short to ground. Does anyone know where the 9-pin amphenol connector (on the left in the schematic below) is located? From the schematic, it appear to be in or near the wing root, or perhaps near the copilot's right knee. Before I remove interior or exterior panels, I'd like to go to school on MS collective knowledge. Thanks! Randy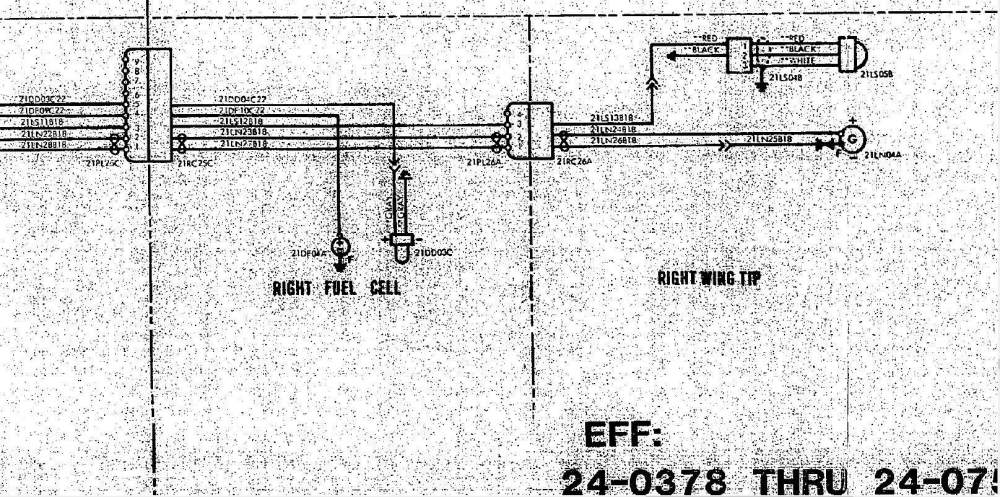
-
Overhead Ventilation System Air Deflector Removal -M20J
rrbeck11 replied to txmooney201's topic in Modern Mooney Discussion
Thanks Gents I got all four deflectors off today, with help from your responses, prior posts and from Byron (thanks again,). Here’s what worked: Remove headliner Insert 7/16” box or open end wrench between the air plenum and the metal plate with triangle cutouts that is attached to the knurled knob. There is no way to remove this knob without breaking the deflector as there is a screw accessible only from above that holds the plate to the knob. As mentioned above, there is no set screw (78 M20J). Your plane may be different. Grip knob with a Pair of padded vice grips (a nitrile glove works great). You’ll only get 1/8th turn at a time until it’s loose enough for the plate to clear the stop pin, or as Rich suggests above, you can pull the plate (disk) down a little to clear the stop pin. Caution is advised. The plenum is riveted through the top fuselage skin and will be brittle on your 40+ year old treasure. You don’t want to break that part!! Here’s a look after removal Note the countersunk screw that keeps the flow controller plate from spinning around the shaft. Thanks again for your help, Team Mooniac!!
-
Overhead Ventilation System Air Deflector Removal -M20J
rrbeck11 replied to txmooney201's topic in Modern Mooney Discussion
Hey folks! Hope you are all making it through the isolation in our new world I have the same problem as the OP. ‘78 M20J. No set screws on my knurled knobs. Anyone know how to get these off? Next assembly is riveted through the top of the fuselage. REALLY don’t want to go there... I’ve got four of the OEM replacement parts from Plane Plastics. I’d like to go with that solution if possible. any help appreciated Randy
-
Hello, did you end up doing the conversion on your engine swap? I’m at that point looking for feedback
-
Hello. Sorry, haven't got that far yet. Just had my annual yesterday and all cylinders are at 75 or 76. I'm probably several years from an engine swap, but I can tell you, from what I've read so far about the pain of going to an IO-390, I will likely go with a rebuilt IO-360. Good luck!
Randy
-
-
I have a ‘78 J with the same intermittent problem: sometimes on engine start he pressure gauge reads 0. We have replaced the ‘ducer, checked and cleaned the connectors and terminals, and replaced he wiring. When the pressure is reading normal it is solid as a rock. It looks like we’re going to the cluster next. Any advice on sources for the cluster? Can you replace a gauge within the cluster, or do you have to replace the whole thing? Randy
-
Phil - I had the same symptom on my 1978 M20J. Low Voltage indication on the annunciator panel flashes intermittently. The problem was in the annunciator itself. The guys at LASAR put me in touch with the original designer of our annunciator panel, who told me to spray contact cleaner on the potentiometer (center, rear of annunciator circuit board) that sets the low voltage threshold. My avionics guy opened the panel, sprayed contact cleaner, cycled the potentiometer several times, then reset the low voltage threshold (see Manual 24-33-00 par. 6). I have not seen the light blink (with the engine running) since. May not be the cause of your problem, as your analyzer plots brief dips below threshold voltage of 12.5, but I don't know where your monitor picks up the bus voltage. It seems clear from your plots the regulator helped a lot, but if it flashed once after the new regulator, my bet would be that you'll see it again. \Good Luck Randy


