Andy95W
-
Posts
5,714 -
Joined
-
Last visited
-
Days Won
24
Content Type
Profiles
Forums
Blogs
Gallery
Downloads
Media Demo
Events
Everything posted by Andy95W
-
You can buy a brand new standby vacuum system for $699, or about $200 used. Will take about 4-6 hours to install it. But in this day and age, the better question is why?
-

Touch and Go's not recommended? Why?
Andy95W replied to EarthboundMisfit's topic in Mooney Safety & Accident Discussion
Yes. I’m wondering what lessons you drew from the discussion of a landing gear collapse on a taxiway. -
Maxwell tank leak detection experience
Andy95W replied to RobertGary1's topic in General Mooney Talk
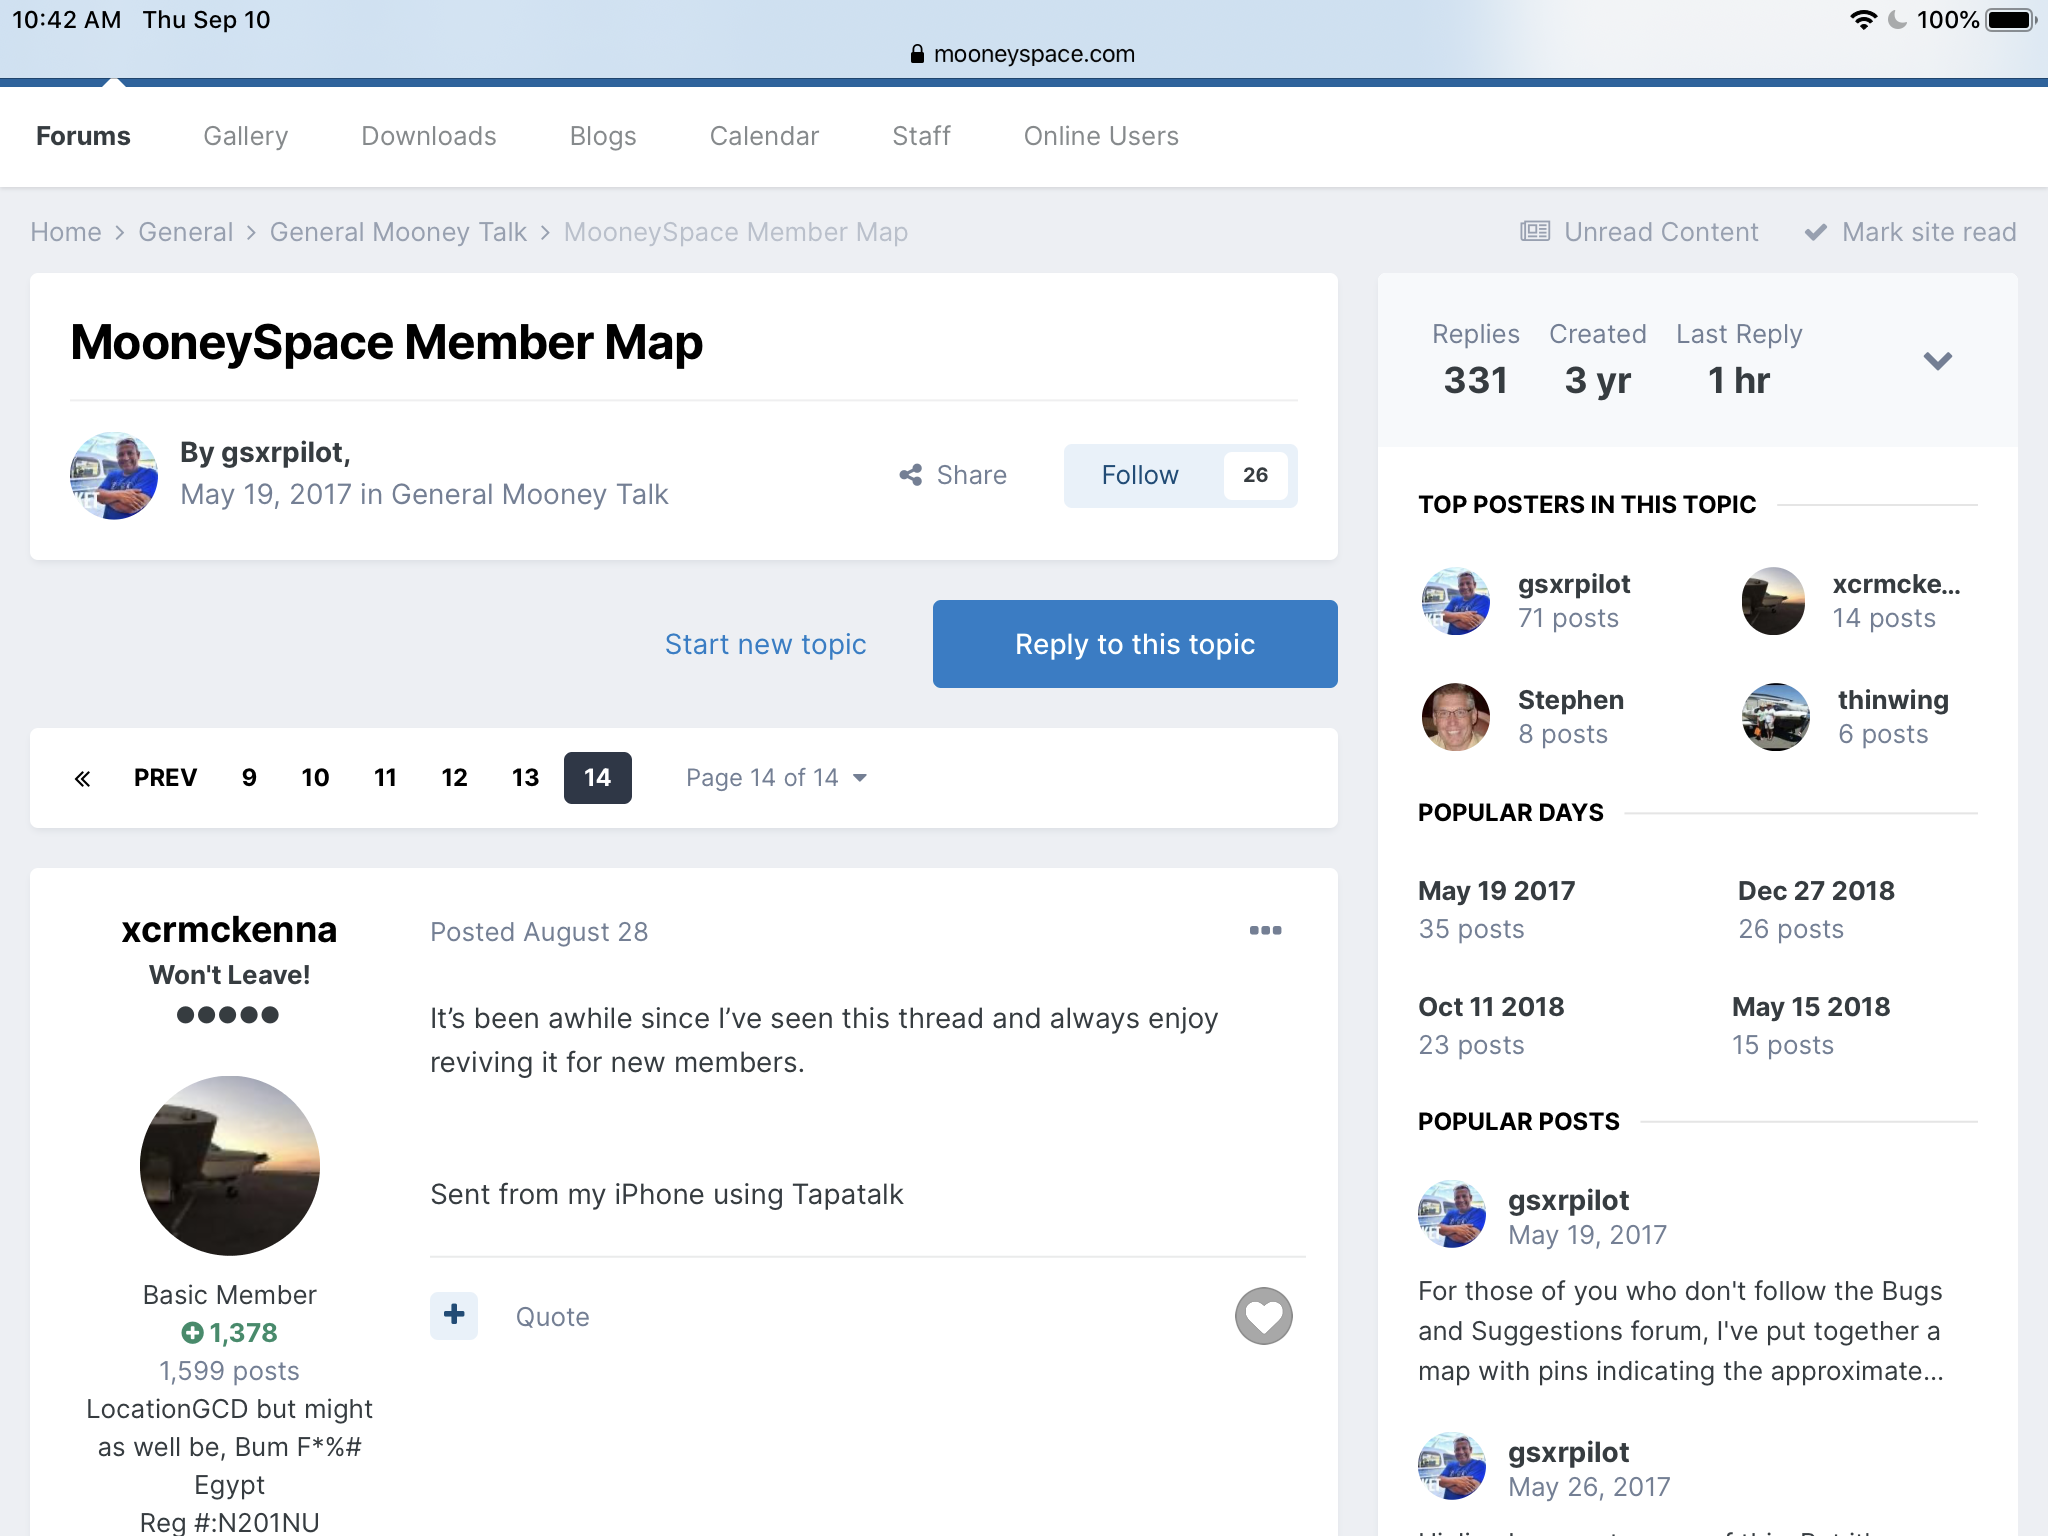
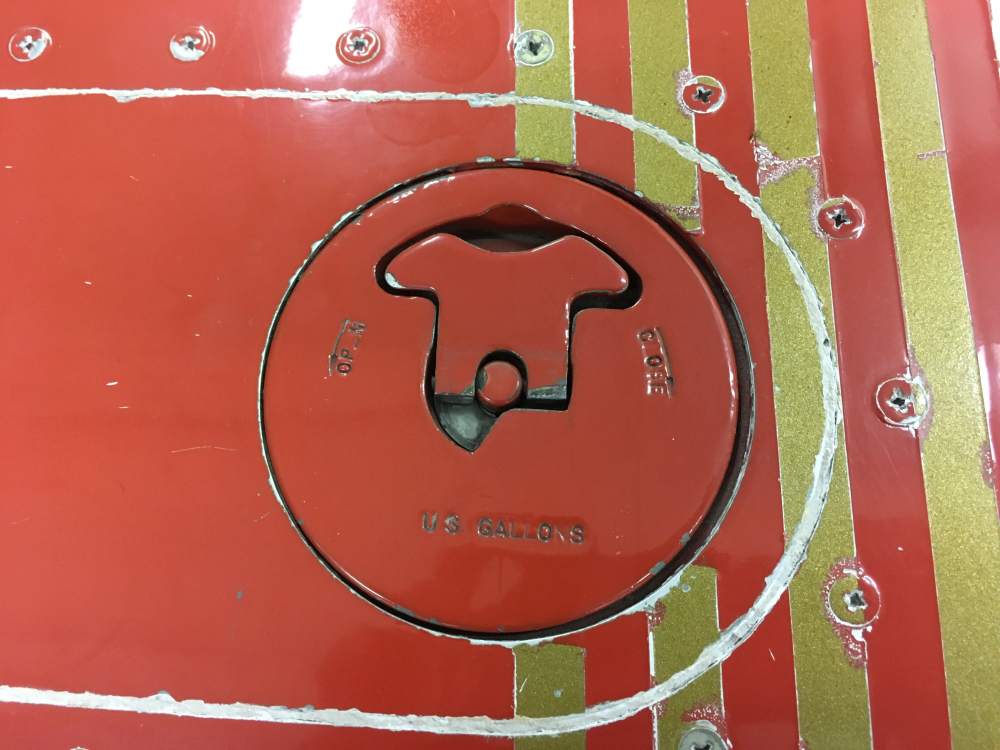
I copied it a while ago: ------------------------ Fuel Tank Repair - How We Fix Them Every week I receive several phone calls and e-mails regarding fuel tank leaks, with questions such as: “I smell fuel when I first get in the plane and then the smell goes away”; “I have a screw on the panel at the cabin door that leaks when the tank is full”; “I have fuel stains in the wheel well”; “ I have a panel under the wing that leaks”; and “ How much will it cost to have my tanks resealed?” In most cases, the leak can be repaired and a total “strip and reseal” is not needed. We repair at least one fuel tank per week. Fuel smells in the Cabin Your plane has been closed up for a period of time. You open the cabin door and smell fuel, and within a few minutes the smell is gone. The source of the fuel smell can be a fuel tank leak, a leaking fuel selector valve, or leaking fuel gauge sending unit. The leading edge of our Mooney wing is hollow. A fuel leak in the forward or outboard tanks will leak into the leading edge of the wing. The leading edge of the wing is open to the cabin at the forward edge of the seat track on each side of the cabin. Fuel fumes or smells enter the cabin at this point. Holes are drilled in the lower leading edge of the wing at each rib and at the fuselage. These holes are to prevent fuel from accumulating at the ribs and from entering the cabin. Fig. 1 is an example of the weep hole at the fuselage showing fuel leakage stains. Fuel Selector Fuel selector valve leaks are evident by stains around the fuel selector stem. In most cases these leaks are repaired by disassembling the selector and replacing the O-rings. Sending Units Mooney M20 B thru E models have fuel gauge sending units located inside the cabin, just in front of the rear seats on each side of the cabin. Models F thru S have sending units in the same location, as well as, having an outboard sending unit in each wing. These sending units have cork or neoprene gaskets. Leaks in these areas will be detected by blue stains on the tank walls below the sending units. In most cases, tightening the screws that attach the sending unit will stop these leaks. Panel Screws A leak found at a screw in an access panel is usually caused by a cracked nut plate. Fig. 2. The nut plate in the fuel tank has a plastic cap to keep the fuel from leaking around the screw threads. These caps, over time, become cracked due to age or possibly someone has replaced the screw with one that is too long. To repair the leak,remove the screw. You do not have to drain the tank. Apply a fuel resistant sealant, such as Permatex #3, to the screw threads and replace the screw in the panel. The times I've done it I've taken the old screw out, cleaned the threads, put Permatex Aviation Sealant #3 (http://www.aircraftspruce.com/catalog/eppages/permatexprod4.php?clickkey=288791) on the new screw and reinstalled and it has worked very well every time. But those aren't my instructions I just followed Don's. Fuel Tank Construction A Mooney fuel tank is a metal box constructed out of several individual pieces. Once assembled, each seam is sealed with layers of a fuel resistant sealant. If this sealant is damaged by a hard landing, or by age, fuel can leak between the sealant and the tank walls, migrating to a point where it can exit. This point of exit may be a rivet or seam between wing skins. I have come across logbook entries where the same rivet has been replaced several times trying to stop a leak. Using our method, we have located the source of these leaks in other parts of the tank. Finding Leaks I did not invent this procedure, nor do I remember who told me; however, this is how our service center finds leaks in Mooney fuel tanks. 1. The first rule to remember in chasing a fuel leak is: The source of the leak is never where the leak appears on the out side of the tank. 2. Remove the fuel from the tank. 3. Turn the fuel selector off. 4. Remove the top fuel tank access panels on the wing that has the leak. The panels are removed by first removing the screws. 5. Once the screws are removed, we use masking tape to tape around the access panel and the middle of the panel for protection of the paint. The panel is sealed with a sealant. Do not beat on the panels. An elephant could stand on the panel and it would not come loose. 6. Next, we use a thin putty knife, that has been sharpened on one side, to slide in between the seam of the access panel and the wing. Using a nonmetallic hammer, gently work the putty knife between the skin and panel. It may take several times around the panel with the blade and hammer, each round a little deeper under the skin, until the panel releases. 7. Once the panels are removed we place mirrors in the bottom of the tank so that we will be able to see the upper seams of the tank. Do not cover the stringers in the bottom of the tank. Many leaks are in this area. 8. Next we apply liquid hand soap, thicker the better, to all the seams in the tank. 9. We now cover all the removed access holes in the wing with Plexiglas. Fig. 3. The Plexiglas covers the entire hole including screw holes. The Plexiglas is held in place by masking or duct tape around the out side border forming a seal. The Plexiglas can be cut from an old windshield or purchased at most hardware stores. New glass is preferred as you will be looking thru the glass to find our leak source. 10. Next we take a standard shop vacuum cleaner. We attach the hose from the vacuum cleaner to the vent on the fuel tank. And no, this will not collapse your tank. Fig. 4 11. Turn on the vacuum and, using a flashlight, look thru the Plexiglas panel and look for bubbles in the soap. The mirrors should be positioned so that you can see the entire interior of the tank. 12. Bubbles indicate the source of the leak as air is drawn into the tank thru the leak. 13. Once the leak, or leaks, are found, Fig .5, the area will need to be thoroughly rinsed with water, dried, cleaned and repairs made using procedures in the Mooney Service Manual.. 14. Two types of sealant are recommended in the manual. PRC and Flame Master brands. We use Flame Master CS3204B-2 for repairs in the tank and topped with CS-3600 for a protective coating and CS3330B-2 for access panel sealant. Fig 6. We use sealants in Semkits that contain both sealant & activators. They are mixed together in a small caulking tube. Once mixed together, we transfer the sealant to a cup and apply with small acid brushes. The sealant will apply easily if thinned with a small amount of MEK. 15. Replace the access panels using CS3330B-2. I recommend at least 48 hours before fuel is added to allow for proper curing of the sealant. Temperature is key to a successful repair. Avoid cold weather & high humidity if possible. Most leaks are easily found and repaired using this method. I share this procedure with you so that you and your mechanic can locate and repair your Mooney’s fuel leak. We welcome you to visit our service center at any time. ----------------- -
I think I use most of my battery on MooneySpace too.
-
It looks like once you reach the MDA, you begin the visual segment which has obstacles- one of which is a 146' tower on short final. Interesting question!
-
Georgia to California flight update.
Andy95W replied to rbridges's topic in Miscellaneous Aviation Talk
Rich- I'm going to bet the difference is between being on an IFR flight plan and going VFR. Separation requirements and all that. -
Garmin A/P not for 1964 Cs and before?
Andy95W replied to GMBrown's topic in Vintage Mooneys (pre-J models)
What about the 1964 M20E models? If those are included with the rest of the E's, but the 1964 M20Cs are not, I think Garmin's reasoning might be a load of bunk. -
Not at either of the airlines I've flown for. Adherence to procedures keeps it from happening. Even the words we use are dictated, and we actually say the words as directed by the company. At my airline, the call out is "Flaps full, landing checklist." It's hard to forget to read the checklist when you simply follow the procedure. And yes, we actually take pride in doing it the way the company says to do it. They own the airplanes, after all. The least I can do is fly them the way they want. And we have procedures spelled out for everything. Visual approach? Procedure. Join an ILS glideslope from above? Procedure. Not landing with full flaps? Procedure. The list goes on. Sound boring? It is. Boring is good. If it starts getting exciting, it usually means something went wrong. And I can honestly say it's the 2d most fun job I've ever had. But for single pilot airplanes, I agree- technology is the answer.
-
No, it’s because there are 2 trained, professional pilots up front that follow their procedures and checklists. They also get a minimum of 3 checkrides a year between them as well as an annual ground school. Regular training and testing really works. In over 20 years flying airliners, I’ve never heard a gear warning. I’m not even sure what it says or what it sounds like.
-

-
Not the worst news ever, but close
Andy95W replied to DonMuncy's topic in Miscellaneous Aviation Talk
Just a thought, Don, but you could likely sell your 231 and buy a nice M20C/E with electric gear. Put the balance of the money in the bank which would allow you to basically self-insure. Get liability only. Either way, sorry you have to go through this. Good luck. -
Does that mean the “R” goes on the Right wing? That’s where mine is. I didn’t try to swap them. I’ll try that next.
-
Jim- I have one of each. They appear to be interchangeable. This is the -9: This is the -9R:
-
It costs $55 more and it looks like you'll be stuck with the 20° BTDC timing, instead of 25°. And the Surefly gives you the option of variable timing, the Lycoming doesn't.
-
https://www.faa.gov/about/office_org/headquarters_offices/avs/offices/aam/ame/guide/app_process/exam_tech/item48/amd/blood/ So the answer is it depends on severity, and must be approved by the FAA medical office on a case-by-case basis.
-
Opinions wanted: Buying a project airplane
Andy95W replied to coinneach's topic in General Mooney Talk
Make sure he has your phone number and email address. Nobody else is going to offer him more, and after he keeps spending tie-down rent he may come to his senses. -
six gear collapses & gear ups in one week
Andy95W replied to philiplane's topic in Mooney Safety & Accident Discussion
Don't jinx us, Paul!
-
Bruce- for your third question, don't worry about it. It's CAN bus architecture. Every component talks TO every other component THRU every other component. Seems weird, but it works.
-
Opinions wanted: Buying a project airplane
Andy95W replied to coinneach's topic in General Mooney Talk
Since you're going into this endeavor with your eyes wide open, I think what you're doing is quite commendable. Too many old Mooneys are getting wrecked and written off. You're actually bringing one back. Thank you. -
DMax said in his article to cut a slot the width of the mounting bolt from hole to edge. That way, you don't have to remove the lower mount bolts. The uppers are easy, compared to that. Probably worth doing, even for the uppers, actually.
-
It looks to me like your engine is higher than it ought to be. I wouldn't worry about the left/right very much, when you get the spinner pointed down a little, it'll look just fine. Don Maxwell had a good article about shims, but I can't get it up on the internet. I saved a copy, he says the 1/8" shim will move the spinner about 1/2". I'd use a shim on each of the upper mounts. In 100-200 hours or so, when your brand new engine mounts are broken in a bit, you'll probably need to remove them. About 500 hours later, you'll probably install them on the lowers. Perfect!
-
I have a Garmin Aera 500 paired with a GDL-39 (basic model). For under $1000, I get traffic and weather on a display larger than a 430 on my yoke right in front of my face. Plus- I wired it into my audio system so it yells "Traffic! Traffic!" or "Obstacle Ahead!" into my headphones. A new Garmin 660 and a new GDL-50 will run about $1450 and will do all of that plus give you a backup attitude indicator because the GDL50 has AHRS.
-
I was having the exact same issue with mine. I asked the JPI guys at OSH. One of them was a tech, and he said to gently "rap" the entire display unit onto a flat surface. Not too gently, you definitely want to jar it without breaking it. He gave a good reason behind the gas discharge displays and how they work. Sounded good to me. I bought a JPI 730 display and installed it, instead. It is head and shoulders better than the old gas discharge displays both in readability and presentation.
-
Mike Busch describes it all much better than me. The problem now might be that since your local fed knows about the installation, he might insist upon seeing the resolution. So right or wrong, you may be stuck. EAA_2015-06_alterations.pdf
-
I think this is the 4th “new look” I’ve seen. Overall, it’s not bad, just different. I don’t like how some threads show a kind of “split screen” look for some reason. This only happens in landscape mode on my iPad. Does anyone know how to turn that function off? @mooniac58?